配置多个Git账号(windows 10)
一、为什么要配置多个Git账号
一般情况下,我们都是一台电脑配置一个Git账号,使用如下命令:
git config --golbal user.name "XXX"
git config --golbal user.email "[email protected]"
本人电脑上已经配置GitHub的,在GitCoding上有另外一个git账号,将代码发布到GitCoding上报错403 (Forbidden),因此需要配置多个git账号。
二、配置多个git账号
步骤一、移除Git全局配置
1.右键【Git Bash Here】打开Git命令行
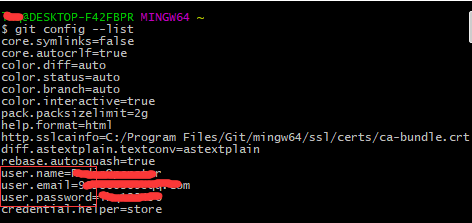
2.输入命令:git config --list查看全局配置,如下图:

3.使用如下命令移除name、email、password等配置
# 移除全局配置账户
git config --global --unset user.name
#查看全局用户名
git config --global user.name
# 移除全局配置邮箱
git config --global --unset user.email
# 查看全局邮箱
git config --global user.email
# 移除全局密码
git config --global --unset user.password
# 查看全局密码
git config --global user.password
步骤二、生成并在GitHub上部署SSH KEY
1.右键【Git Bash Here】进入【Git Bash】,输入以下命令生成user1的SSH KEY:
ssh-keygen -t rsa -C "[email protected]"
如下截图:

2.进入当前用户的.ssh目录查看,生成id_rsa私钥文件和id_rsa.pub公钥文件,如下截图:

3.用户user1登录GitHub,进入【Settings】-【SSH and GPG keys】,如下截图:

4.点击【New SSH key】按钮,进入新建SSH key页面,进入如下图设置:

4.添加完成后在【Git Bash】中输入以下命令测试该用户的SSH密钥是否生效:
ssh -T [email protected]

步骤三、生成并在GitCoding上部署SSH KEY
1.右键【Git Bash Here】进入【Git Bash】,输入以下命令生成user2的SSH KEY:
ssh-keygen -t rsa -f ~/.ssh/id_rsa2 -C "[email protected]"
如下截图:

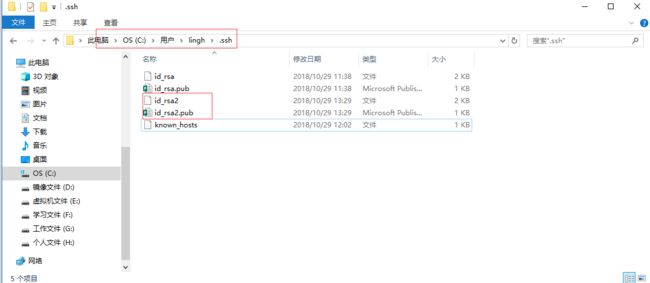
2.进入当前用户的.ssh目录查看,生成id_rsa私钥文件和id_rsa.pub公钥文件,如下截图:

3.用户user2登录GitCoding,进入【个人设置】-【SSH公钥】,如下截图:

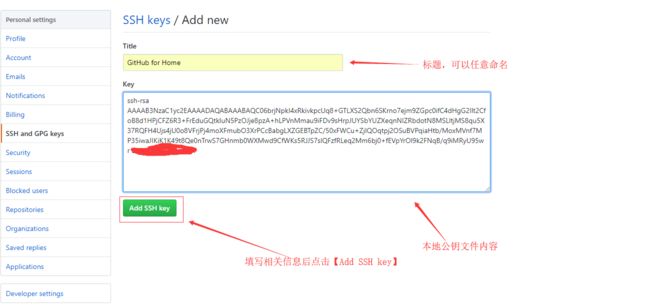
4.点击【新增公钥】按钮,进入新建SSH key页面,进入如下图设置:

5.添加完成后在【Git Bash】中输入以下命令测试该用户的SSH密钥是否生效:
ssh -T [email protected] -i ~/.ssh/id_rsa2
也可以使用ssh agent添加密钥后进行测试。因为系统默认只读取id_rsa,为了让ssh识别新的私钥,可以使用ssh-agent手动添加私钥:
ssh-agent bash
ssh-add ~/.ssh/id_rsa2
注:该方法仅限当前窗口有效,打开新的窗口则ssh连接失败。
步骤四、配置config文件
1.在.ssh目录下创建一个config文本文件,每个账号配置一个Host节点。主要配置项说明:
Host      主机别名
HostName  服务器真实地址
IdentityFile  私钥文件路径
PreferredAuthentications  认证方式
User  用户名
配置文件内容:
# 配置user1
Host user1.github.com
HostName github.com
IdentityFile C:\\Users\\lingh\\.ssh\\id_rsa
PreferredAuthentications publickey
User user1

# 配置user2
Host user2.github.com
HostName github.com
IdentityFile C:\\Users\\lingh\\.ssh\\id_rsa2
PreferredAuthentications publickey
User user2
2.终端测试SSH Key是否生效
ssh -T [email protected]
ssh -T [email protected]
三、配置用户名和邮箱
为各仓库单独配置用户名和邮箱
git config user.name "user1"
git config user.email "[email protected]"
如果原先使用HTTPS通信,则需要修改远程仓库地址
git remote rm origin
git remote add origin [email protected]:xxx/xxxxx.git
