OReilly.Hands-On.Machine.Learning.with.Scikit-Learn.and.TensorFlow.翻译以及读书心得--p41-53
Get Data
作者的资源都放到了这里的对应位置https://github.com/ageron/handson-ml.
这一章,房价的数据集在这里:
https://github.com/ageron/handson-ml/tree/master/datasets/housing
Create the Workspace:
操作系统最好用Ubuntu16.04
创建工作区:
$ export ML_PATH="$HOME/ml" # You can change the path if you prefer
$ mkdir -p $ML_PATH
接下来是创建你自己的Python环境,本书中作者推荐Python3 虽然Python2.7+也可以,但是作者认为它已经过时了。
你需要的工作Python Modules:
Jupyter, NumPy, Pandas, Matplotlib, and
Scikit-Learn
关于Python环境的安装,在作者github首页有介绍:
https://github.com/ageron/handson-ml/tree/master/datasets/housing
可以用apt-get 下载 或者官方的pip包
小秦推荐大家看看廖雪峰老师的博客:
https://www.liaoxuefeng.com/
如果pip 安装超时可以看这个教程:
https://blog.csdn.net/u010536377/article/details/50564185
也就是换源
以pandas 为例子
sudo pip3 install --index https://pypi.mirrors.ustc.edu.cn/simple/ pandas
也可以考虑使用Virtualenv 安装环境
$ pip3 install --user --upgrade virtualenv
Collecting virtualenv
[...]
Successfully installed virtualenv
$ cd $ML_PATH
$ virtualenv env
Using base prefix '[...]'
New python executable in [...]/ml/env/bin/python3.5
Also creating executable in [...]/ml/env/bin/python
Installing setuptools, pip, wheel...done.
以上的方法推荐在Ubuntu 和 MacOs 系统下完成 而在Windows环境还是推荐使用Anaconda
然后在你的工作区里
$ jupyter notebook
[I 15:24 NotebookApp] Serving notebooks from local directory: [...]/ml
[I 15:24 NotebookApp] 0 active kernels
[I 15:24 NotebookApp] The Jupyter Notebook is running at: http://localhost:8888/
[I 15:24 NotebookApp] Use Control-C to stop this server and shut down all
kernels (twice to skip confirmation).
然后会自动打开浏览器 在http://localhost:8888/
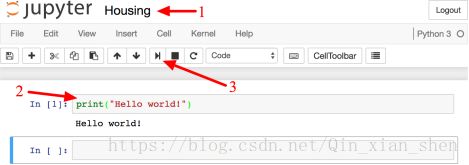
接下来用以下步骤做:

这做了三件事:第一,它在您的工作区中创建一个新的笔记本文件,称为untled.ipynb;第二,它启动一个jupyter python内核来运行这个笔记本;第三,它在一个新的表中打开这个笔记本。
尝试输入程序,你会相应的得出输出。其实这个笔记本是一个可以交互的笔记本
当你输入对应的值的时候,会对应编译这一句。(小秦推荐大家使用Atom这编辑器,也很不错)
接下来是获取数据
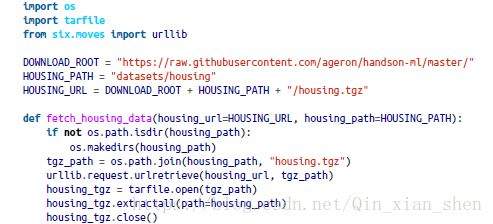
上段函数用来 获取数据并且解压

从csv文件中读取数据,得到Pandas DataFrame object格式数据
Take a Quick Look at the Data Structure

10个属性longitude, latitude, housing_median_age, total_rooms, total_bed
rooms, population, households, median_income, median_house_value, and
ocean_proximity
(还记得小秦之前的文章里说的吗?特征作为列,样本作为行)

info这个方法可以快速得到对应的数据
数据集中有20,640个实例,这意味着按照机器学习标准,它是相当小的,但是它是完美的开始。请注意,总床房属性只有20,433个非空值,这意味着207个区域缺少这个功能。我们需要稍后处理这个问题。
所有的属性都是数值的,除了ocean_proximity。它的类型是Object
可以使用value_counts()来看有多少个不同的文本,且文本的实例个数

Description()方法显示了数值属性

The count, mean, min, and max行是数量,均值,标准差(度量值的离散程度),最小值,最大值。空值会被忽略。25%、50%和75%的行表示相应的百分位数
另一种快速获取您正在处理的数据类型的方法是为每个数字属性绘制一个直方图。
纵轴是实例个数,横轴是属性的区间范围。
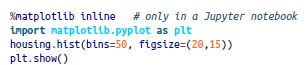

注意hist()方法要调用matplotlib库,而这个库需要用到绘图的后台程序。这个后台程序可以在jupyter notebook 中加入这句话:
%matplotlib inline # only in a Jupyter notebook
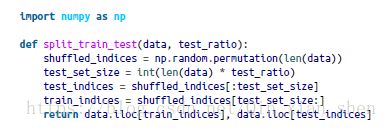
Create a Test Set
将数据集分成训练集和测试集

但是如果您再次运行该程序,它将生成一个不同的测试集。这不是我们希望看到的。有两个解决方法:
一种解决方案是在第一次运行时保存测试集,然后在后续运行中加载它。
另一种方法是使用种子生成器,在调用np.random.permutation(),前使用np.random.seed(42) 可以生成相同的随机索引。
至于为什么是42,这就是以后玄学问题了,有兴趣的小伙伴可以自己搜一下。
但是,这两种解决方案在下次获取更新数据集时都会中断
我们采用哈希值索引

![]()
但是由于我们使用的是Python就不用使用那么多复杂的东西,使用Scikit-Learn的函数就可以了。

当数据量比较大的时候,数据的选择不会简单的使用随机抽样,会分层抽样。
再看一下,收入中位数直方图
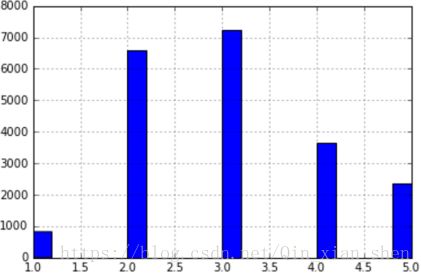
大部分数据在2-5之间,但是有些超过了6
下面的代码通过将收入中位数除以1.5(限制收入类别的数量),并使用ceil(有离散类别)将所有大于5的类别合并到第5类,创建一个收入类别属性
![]()


我们花了相当多的时间在测试集的生成上是有一个很好的理由的:这是机器学习项目中经常被忽视但却是关键的部分。而且,这些想法在以后讨论交叉验证时会很有用。现在是时候进入下一个阶段:探索数据了。
今天就到这里,数据的预处理阶段。