学习linux16
学习笔记
iptables规则备份和恢复
保存和备份iptables规则:前面设置的防火墙规则没有保存在文件中,重启后设定规则就没有了。
service iptables save //会把规则保存到/etc/sysconfig/iptables
把iptables 规则备份到my.ipt文件中
iptables-save > my.ipt
恢复刚才备份的规则
iptables-restore < my.ipt
备份防火墙规则到/tmp/ipt.txt下并查看
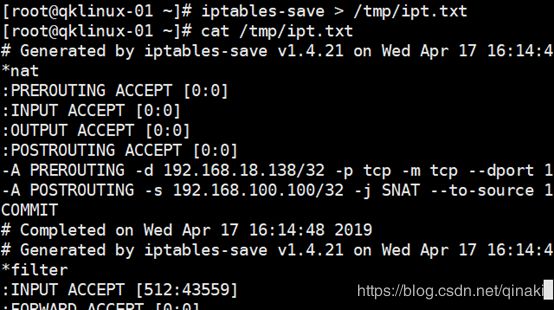
保存并清空规则
[root@qklinux-01 ~]# iptables-restore < /tmp/ipt.txt
[root@qklinux-01 ~]# iptables-save > /tmp/ipt.txt
[root@qklinux-01 ~]# iptables -t nat -F
[root@qklinux-01 ~]# iptables -t nat -nvL
Chain PREROUTING (policy ACCEPT 0 packets, 0 bytes)
 pkts bytes target     prot opt in     out     source               destination

Chain INPUT (policy ACCEPT 0 packets, 0 bytes)
 pkts bytes target     prot opt in     out     source               destination

Chain OUTPUT (policy ACCEPT 0 packets, 0 bytes)
 pkts bytes target     prot opt in     out     source               destination

Chain POSTROUTING (policy ACCEPT 0 packets, 0 bytes)
 pkts bytes target     prot opt in     out     source               destination
恢复备份的规则
 [root@qklinux-01 ~]# iptables-restore < /tmp/ipt.txt
[root@qklinux-01 ~]# iptables -t nat -nvL
Chain PREROUTING (policy ACCEPT 0 packets, 0 bytes)
 pkts bytes target     prot opt in     out     source               destination
    0     0 DNAT       tcp  --  *      *       0.0.0.0/0            192.168.18.138       tcp dpt:1122 to:192.168.100.100:22

Chain INPUT (policy ACCEPT 0 packets, 0 bytes)
 pkts bytes target     prot opt in     out     source               destination

Chain OUTPUT (policy ACCEPT 0 packets, 0 bytes)
 pkts bytes target     prot opt in     out     source               destination

Chain POSTROUTING (policy ACCEPT 0 packets, 0 bytes)
 pkts bytes target     prot opt in     out     source               destination
    0     0 SNAT       all  --  *      *       192.168.100.100      0.0.0.0/0            to:192.168.18.138
防火墙firewalld的9个zone
打开firewalld
systemctl disable iptables
systemctl stop iptables
systemctl enable firewalld
systemctl start firewalld
 [root@qklinux-01 ~]# systemctl disable iptables
    Removed symlink /etc/systemd/system/basic.target.wants/iptables.service.
    [root@qklinux-01 ~]# systemctl stop iptables
    [root@qklinux-01 ~]# systemctl enable firewalld
    Created symlink from /etc/systemd/system/dbus-org.fedoraproject.FirewallD1.service to /usr/lib/systemd/system/firewalld.service.
    Created symlink from /etc/systemd/system/multi-user.target.wants/firewalld.service to /usr/lib/systemd/system/firewalld.service.
    [root@qklinux-01 ~]# systemctl start firewalld
firewalld 默认有9个zone(zone是firewalld一个单位)默认zone为public,每个zone是一个规则集
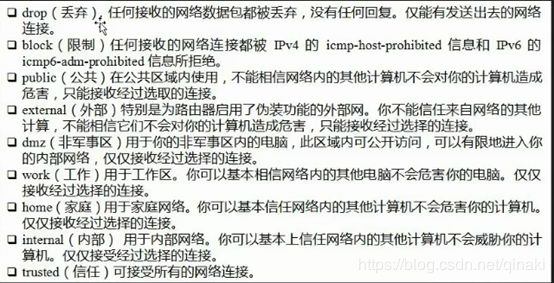
firewall-cmd –get-zones //查看所有zone
firewall-cmd –get-default-zone//查看默认zone
[root@qklinux-01 ~]# firewall-cmd --get-zones
block dmz drop external home internal public trusted work
[root@qklinux-01 ~]# firewall-cmd --get-default-zone
public
firewalld关于zone的操作
firewall-cmd –set-default-zone=work //设定默认zone
firewall-cmd –get-zone-of-interface=ens33 //指定网卡
firewall-cmd –zone=public –add-interface=lO//给指定网卡设置zone
firewall-cmd –zone=dmz –change-interface=lO//针对网卡更改zone
firewall-cmd –zone=dmz –remove-intaerface=lO针对网卡删除zone
firewall-cmd –get-active-zones //查看系统所有网卡所在的zone
指定修改zone为work
[root@qklinux-01 ~]# firewall-cmd --set-default-zone=work
success
[root@qklinux-01 ~]# firewall-cmd --get-default-zone
work
查看指定网卡
[root@qklinux-01 ~]# firewall-cmd --get-zone-of-interface=ens33
work
给指定网卡设置zone
[root@qklinux-01 ~]# firewall-cmd --zone=dmz --add-interface=ens37
The interface is under control of NetworkManager, setting zone to 'dmz'.
success
[root@qklinux-01 ~]# firewall-cmd --get-zone-of-interface=ens37
dmz
[root@qklinux-01 ~]# firewall-cmd --zone=public --add-interface=lo
success
[root@qklinux-01 ~]# firewall-cmd --get-zone-of-interface=
lo
public
针对网卡更改zone 删除zone
[root@qklinux-01 ~]# firewall-cmd --zone=block --change-interface=ens37
The interface is under control of NetworkManager, setting zone to 'block'.
success
[root@qklinux-01 ~]# firewall-cmd --zone=block --remove-interface=ens37
The interface is under control of NetworkManager, setting zone to default.
success
[root@qklinux-01 ~]# firewall-cmd --get-zone-of-interface=ens37
work
查看系统所有网卡的zone
[root@qklinux-01 ~]# firewall-cmd --get-active-zones
work
  interfaces: ens33 ens37
public
  interfaces: lo
firewalld关于servies的操作
firewall-cmd –get-services 查看所有的servies
firewall-cmd –list-services //查看当前zone下有哪些service
firewall-cmd –zone=public –add-service=http //把http增加到public zone下面
firewall-cmd –zone=public –remove-service=http
查看所有的servies
#firewall-cmd --get-services
查看当前zone下有哪些service
[root@qklinux-01 ~]# firewall-cmd --get-default-zone
work
[root@qklinux-01 ~]# firewall-cmd --list-services
ssh dhcpv6-client
查看指定的zone下有哪些service
# firewall-cmd --zone=public --list-services
指定给public增加http ftp
[root@qklinux-01 ~]# firewall-cmd --zone=public --add-service=http
success
[root@qklinux-01 ~]# firewall-cmd --zone=public --list-services
ssh dhcpv6-client http
[root@qklinux-01 ~]# firewall-cmd --zone=public --add-service=ftp
success
[root@qklinux-01 ~]# firewall-cmd --zone=public --list-services
ssh dhcpv6-client http ftp
这中操作只是把http ftp临时加入到内存中, 想要永久生效需要修改配置文件
firewall-cmd --zone=public --add-service=ftp --permanent

[root@qklinux-01 ~]# firewall-cmd --zone=public --add-service=ftp --permanent
success
[root@qklinux-01 ~]# ls /etc/firewalld/zones/
public.xml  public.xml.old
[root@qklinux-01 ~]# cat /etc/firewalld/zones/public.xml


  Public
  For use in public areas. You do not trust thselected incoming connections are accepted.
/usr/lib/firewalld/zones/ zone的配置模板
[root@qklinux-01 ~]# ls /usr/lib/firewalld/zones/
block.xml  external.xml  public.xml
dmz.xml    home.xml      trusted.xml
drop.xml   internal.xml  work.xml
**需求:ftp服务自定义端口1121,需要在work zone下面放行ftp
- 把ftp配置文件拷贝到etc下**
#cp /usr/lib/firewalld/services/ftp.xml /etc/firewalld/services/
2. 编辑修改配置文件 端口改为1121
   #vi /etc/firewalld/services/ftp.xml

  FTP is a protocol used for remote file transfer. If you plan to make your FTP server publicly available, enable this option. You need the vsftpd package installed for this option to be useful.
3. work.xml复制到etc目录下
#cp /usr/lib/firewalld/zones/work.xml /etc/firewalld/zones/
4. 修改配置文件
#vim /etc/firewalld/zones/work.xml
Work
For use in work areas. You mostly trust the other computers on networks to not harm your computer. Only selected incoming connections are accepted.
5. 重新加载
[root@qklinux-01 ~]# firewall-cmd --reload
success
[root@qklinux-01 ~]# firewall-cmd --zone=work --list-services
ssh dhcpv6-client ftp
linux任务计划
linux 系统则是由 cron (crond) 这个系统服务来控制的。crond 是linux下用来周期性的执行某种任务或等待处理某些事件的一个守护进程,与windows下的计划任务类似,当安装完成操作系统后,默认会安装此服务 工具,并且会自动启动crond进程,crond进程每分钟会定期检查是否有要执行的任务,如果有要执行的任务,则自动执行该任务。
查看cron配置文件
    [root@qklinux-01 ~]# cat /etc/crontab
    SHELL=/bin/bash
    PATH=/sbin:/bin:/usr/sbin:/usr/bin
    MAILTO=root

#For details see man 4 crontabs

#Example of job definition:
#.---------------- minute (0 - 59)     分钟
#|  .------------- hour (0 - 23)        小时
#|  |  .---------- day of month (1 - 31)   天
#|  |  |  .------- month (1 - 12) OR jan,feb,mar,apr ...   月
#|  |  |  |  .---- day of week (0 - 6) (Sunday=0 or 7) OR sun,mon,tue,wed,thu,fri,sat     周
#|  |  |  |  |
#*  *  *  *  * user-name  command to be executed   用户
编写任务计划# crontab –e
举例任务计划 每天凌晨三点执行的脚本日志追加重定向到文件
0 3 * * * /bin/bash /usr/local/sbin/123.sh >>/tmp/1123.log2>>/tmp/123.log
分范围0-59,时范围0-23,日范围0-31,月范围0-12,周1-6
可用格式1-5表示一个范围1到5
可用格式1,2,3表示1或者2或者3
可用格式/2表示被2整除的数字,比如小时,那就是每隔2小时*
要保证任务计划启动
#systmectl start crond
然后查看是否有这个进程
#ps aux |grep cron
还可以用命令查看启动状态
#systemctl status crond
crontab –l 查询计划
crontab –r 删除任务
crontab –u 指定用户
/var/spool/cron/root 这个文件有对应用户的cron
linux系统服务管理-chkconfig
chkconfig 是centos6 和之前的版本服务管理工具
查看当前系统有哪些服务
   [root@qklinux-01 ~]# chkconfig --list

注:该输出结果只显示 SysV 服务,并不包含
原生 systemd 服务。SysV 配置数据
可能被原生 systemd 配置覆盖。

      要列出 systemd 服务,请执行 'systemctl list-unit-files'。
      查看在具体 target 启用的服务请执行
      'systemctl list-dependencies [target]'。

netconsole     	0:关	1:关	2:关	3:关	4:关	5:关	6:关
network        	0:关	1:关	2:开	3:开	4:开	5:开	6:关
centos6用到的是sysv服务
查看服务所在目录
[root@qklinux-01 ~]# ls /etc/init.d/
functions  netconsole  network  README
关掉network服务
[root@qklinux-01 ~]# chkconfig network off
[root@qklinux-01 ~]# chkconfig --list

注:该输出结果只显示 SysV 服务,并不包含
原生 systemd 服务。SysV 配置数据
可能被原生 systemd 配置覆盖。

      要列出 systemd 服务,请执行 'systemctl list-unit-files'。
      查看在具体 target 启用的服务请执行
      'systemctl list-dependencies [target]'。

netconsole     	0:关	1:关	2:关	3:关	4:关	5:关	6:关
network        	0:关	1:关	2:关	3:关	4:关	5:关	6:关
打开network服务
   [root@qklinux-01 ~]# chkconfig network on
    [root@qklinux-01 ~]# chkconfig --list

注:该输出结果只显示 SysV 服务,并不包含
原生 systemd 服务。SysV 配置数据
可能被原生 systemd 配置覆盖。

      要列出 systemd 服务,请执行 'systemctl list-unit-files'。
      查看在具体 target 启用的服务请执行
      'systemctl list-dependencies [target]'。

netconsole     	0:关	1:关	2:关	3:关	4:关	5:关	6:关
network        	0:关	1:关	2:开	3:开	4:开	5:开	6:关
更改某服务指定级别的状态
[root@qklinux-01 ~]# chkconfig --level 3 network off
[root@qklinux-01 ~]# chkconfig --list

注:该输出结果只显示 SysV 服务,并不包含
原生 systemd 服务。SysV 配置数据
可能被原生 systemd 配置覆盖。

      要列出 systemd 服务,请执行 'systemctl list-unit-files'。
      查看在具体 target 启用的服务请执行
      'systemctl list-dependencies [target]'。

netconsole     	0:关	1:关	2:关	3:关	4:关	5:关	6:关
network        	0:关	1:关	2:开	3:关	4:开	5:开	6:关

也可以同时关闭多个级别
root@qklinux-01 ~]# chkconfig --level 345 network on
[root@qklinux-01 ~]# chkconfig --list

注:该输出结果只显示 SysV 服务,并不包含
原生 systemd 服务。SysV 配置数据
可能被原生 systemd 配置覆盖。

      要列出 systemd 服务,请执行 'systemctl list-unit-files'。
      查看在具体 target 启用的服务请执行
      'systemctl list-dependencies [target]'。

netconsole     	0:关	1:关	2:关	3:关	4:关	5:关	6:关
network        	0:关	1:关	2:开	3:开	4:开	5:开	6:关
增加一个服务启动脚本
[root@qklinux-01 ~]# cd /etc/init.d/
[root@qklinux-01 init.d]# ls
functions  netconsole  network  README
[root@qklinux-01 init.d]# cp network 123
[root@qklinux-01 init.d]# ls -l
总用量 48
-rwxr-xr-x  1 root root  7923 4月  18 17:49 123
-rw-r--r--. 1 root root 18281 8月  24 2018 functions
-rwxr-xr-x. 1 root root  4569 8月  24 2018 netconsole
-rwxr-xr-x. 1 root root  7923 8月  24 2018 network
-rw-r--r--. 1 root root  1160 10月 31 07:31 README
[root@qklinux-01 init.d]# chkconfig --list

注:该输出结果只显示 SysV 服务,并不包含
原生 systemd 服务。SysV 配置数据
可能被原生 systemd 配置覆盖。

      要列出 systemd 服务,请执行 'systemctl list-unit-files'。
      查看在具体 target 启用的服务请执行
      'systemctl list-dependencies [target]'。

netconsole     	0:关	1:关	2:关	3:关	4:关	5:关	6:关
network        	0:关	1:关	2:开	3:开	4:开	5:开	6:关
[root@qklinux-01 init.d]# chkconfig --add 123
[root@qklinux-01 init.d]# chkconfig --list

注:该输出结果只显示 SysV 服务,并不包含
原生 systemd 服务。SysV 配置数据
可能被原生 systemd 配置覆盖。

      要列出 systemd 服务,请执行 'systemctl list-unit-files'。
      查看在具体 target 启用的服务请执行
      'systemctl list-dependencies [target]'。

123            	0:关	1:关	2:开	3:开	4:开	5:开	6:关
netconsole     	0:关	1:关	2:关	3:关	4:关	5:关	6:关
network        	0:关	1:关	2:开	3:开	4:开	5:开	6:关
删除服务脚本
[root@qklinux-01 init.d]# chkconfig --del 123
[root@qklinux-01 init.d]# chkconfig --list

注:该输出结果只显示 SysV 服务,并不包含
原生 systemd 服务。SysV 配置数据
可能被原生 systemd 配置覆盖。

      要列出 systemd 服务,请执行 'systemctl list-unit-files'。
      查看在具体 target 启用的服务请执行
      'systemctl list-dependencies [target]'。

netconsole     	0:关	1:关	2:关	3:关	4:关	5:关	6:关
network        	0:关	1:关	2:开	3:开	4:开	5:开	6:关
linux系统服务管理-systemd
在centos7中列出系统所有服务
systemctl list-units --all --type =service
[root@qklinux-01 ~]# systemctl list-units --all --type=service
  UNIT                                            LOAD      ACTIVE   SUB     DESCRIPTION
  auditd.service                                  loaded    active   running Security Auditing Service
  chronyd.service                                 loaded    active   running NTP client/server
  cpupower.service                                loaded    inactive dead    Configure CPU power related settings
  crond.service                                   loaded    active   running Command Scheduler
  dbus.service                                    loaded    active   running D-Bus System Message Bus
● display-manager.service                         not-found inactive dead    display-manager.service
  dm-event.service                                loaded    inactive dead    Device-mapper event daemon
  dnsmasq.service                                 loaded    active   running DNS caching server.
  dracut-shutdown.service                         loaded    inactive dead    Restore /run/initramfs
  ebtables.service                                loaded    inactive dead    Ethernet Bridge Filtering tables
  emergency.service                               loaded    inactive dead    Emergency Shell
几个常用的服务相关的命令
systemctl enable crond 设置服务开机启动
systemctl disable crond 设置关闭开机启动
systemctl status crond 查看crond服务当前状态
systemctl stop crond 停止crond服务是
systemctl start crond 开启crond服务
systemctl restart crond 重启crond服务
systemctl is-enabled crond 检查crond服务是否开机启动
unit介绍
查看/usr/lib/systemd/system 目录下文件
[root@qklinux-01 ~]# ls /usr/lib/systemd/system
arp-ethers.service
auditd.service
[email protected]
basic.target
basic.target.wants
blk-availability.service
bluetooth.target
brandbot.path
brandbot.service
[email protected]
[email protected]
chronyd.service
chrony-wait.service
console-getty.service
console-shell.service
[email protected]
cpupower.service
crond.service
cryptsetup-pre.target
cryptsetup.target
# ls /usr/lib/systemd/system //系统所有的unit,分为以下类型
service 系统服务
target 多个unit组成的组
device 硬件设备
mount 文件系统挂载点
automount 自动挂载点
path 文件或路径
scope 不是由sysytemd启动的外部进程
slice 进程组
snapshot sysytemd 快照
socket 进程间通信套接字
swap swap文件
time 定时器
unit相关的命令
systemctl list-units //列出正在运行的unit
systemctl list-units – all //列出所有,包括失败的或者inactive的
systemctl list-units --all --state=inactive //列出inactive的unit
systemctl list-units --type=service //列出状态位active的service
systemct is-active crond.service //查看某个服务是否为active
target介绍
target是一个unit的组合,系统为了方便管理用target来管理unit
列出系统所有的target: systemctl list-unit-files --type=target
[
root@qklinux-01 ~]# systemctl list-unit-files --type=target
UNIT FILE                 STATE
basic.target              static
bluetooth.target          static
cryptsetup-pre.target     static
cryptsetup.target         static
ctrl-alt-del.target       disabled
default.target            enabled
emergency.target          static
final.target              static
getty-pre.target          static
getty.target              static
graphical.target          static
halt.target               disabled
hibernate.target          static
hybrid-sleep.target       static
initrd-fs.target          static
initrd-root-fs.target     static
initrd-switch-root.target static
initrd.target             static
iprutils.target           disabled
lines 1-20
查看指定target下面有哪些unit(systemctl list-dependencies multi-user.target)
[root@qklinux-01 ~]# systemctl list-dependencies multi-user.target
multi-user.target
● ├─auditd.service
● ├─chronyd.service
● ├─crond.service
● ├─dbus.service
● ├─dnsmasq.service
● ├─firewalld.service
● ├─irqbalance.service
● ├─kdump.service
● ├─network.service
● ├─NetworkManager.service
● ├─plymouth-quit-wait.service
● ├─plymouth-quit.service
● ├─postfix.service
● ├─rhel-configure.service
● ├─rsyslog.service
● ├─sshd.service
● ├─sysstat.service
● ├─systemd-ask-password-wall.path
● ├─systemd-logind.service
lines 1-20
查看系统默认的target (systemctl get-default)
[root@qklinux-01 ~]# systemctl get-default
multi-user.target
设置默认的target :systemctl set-default multi-user.target
[
root@qklinux-01 ~]# systemctl set-default multi-user.target
Removed symlink /etc/systemd/system/default.target.
Created symlink from /etc/systemd/system/default.target to /usr/lib/systemd/system/multi-user.target.
一个service属于一种类型的unit 多个unit组成了一个target 一个target里面包含了多个service
cat /usr/lib/systemd/system/sshd.service //看[install]部分
[root@qklinux-01 system]# cat /usr/lib/systemd/system/sshd.service
[Unit]
Description=OpenSSH server daemon
Documentation=man:sshd(8) man:sshd_config(5)
After=network.target sshd-keygen.service
Wants=sshd-keygen.service

[Service]
Type=notify
EnvironmentFile=/etc/sysconfig/sshd
ExecStart=/usr/sbin/sshd -D $OPTIONS
ExecReload=/bin/kill -HUP $MAINPID
KillMode=process
Restart=on-failure
RestartSec=42s

[Install]
WantedBy=multi-user.target
直播扩展
firewall添加80端口 但是重启后不生效
firewall-cmd --add-port=80/tcp
添加80端口永久保存加上–permanent 需要重新加载
firewall-cmd --permanent --add-port=80/tcp; firewall-cmd --reload
添加service
firewall-cmd --permanent --add-service=http; firewall-cmd --reload
firewall-cmd 如何添加自定义规则
Firewalld 自定义富规则
直接选项
–direct需要是直接选项的第一个参数。
将命令传递给防火墙。
参考示例:方式-:[reload 生效,修改后重启才可生效]
firewall-cmd --permanent --direct --add-rule ipv4 filter INPUT 1 -s 192.168.1.0/24 -p tcp --dport=22 -j ACCEPT

#firewall-cmd --permanent --direct --add-rule ipv4 filter INPUT 2 -p tcp --dport=22 -j DROP
方式二:[重载或重启后失效]
#iptables -t filter -I INPUT_direct -s 192.168.1.20 -p tcp --dport=22 -j ACCEPT

#iptables -A INPUT_direct -p tcp --dport=22 -j DROP
https://blog.51cto.com/jevic/1785162