Deep understand iOS view(一)
Experimenting with Views(view 的小实验)
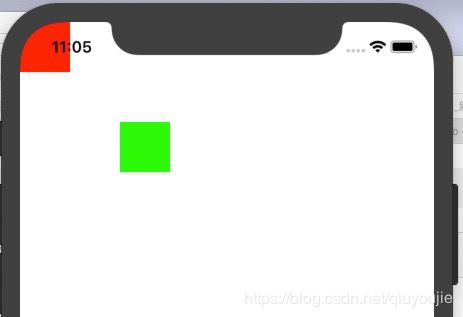
The viewDidLoad method can refer to the view controller’s main view by saying self.view
    override func viewDidLoad() {
        super.viewDidLoad()
        // Do any additional setup after loading the view.
        let v = UIView(frame:CGRect(x: 0, y: 0, width: 50, height: 50))
        v.backgroundColor = .red  //small red square
        self.view.addSubview(v)  //add it to main view

        let v2 = UIView(frame:CGRect(x: 100, y: 100, width: 50, height: 50))
        v2.backgroundColor = .green  //small green square
        self.view.addSubview(v2)  //add it to main view
    }
iphoneXR simulator effect:
Subview and Superview(父子view)
starting in OS X 10.5, Apple introduced an entirely new architecture for view drawing that lifted those restrictions completely. iOS view drawing is based on this revised architecture. In iOS, some or all of a subview can appear outside its superview, and a view can overlap another view and can be drawn partially or totally in front of it without being its subview.
1)a superview is drawn before its subviews, so if they overlap it, it will appear to be behind them
2)Sibling subviews of the same superview have a definite order: one is drawn before the other, so if they overlap, it will appear to be behind its sibling
Here are some other effects of the view hierarchy:
• If a view is removed from or moved within its superview, its subviews go with it.
• A view’s degree of transparency is inherited by its subviews.
• A view can optionally limit the drawing of its subviews so that any parts of them outside the view are not shown. This is called clipping and is set with the view’s clipsToBounds property.
• A superview owns its subviews, in the memory-management sense, much as an array owns its elements; it retains them and is responsible for releasing a subview when that subview ceases to be its subview (it is removed from the collection of
this view’s subviews) or when the superview itself goes out of existence.
• If a view’s size is changed, its subviews can be resized automatically (and I’ll have much more to say about that later in this chapter).
A UIView has a superview property (a UIView) and a subviews property (an array of UIView objects, in back-to-front order),
isDescendant(of:) letting you check whether one view is a subview of another at any depth.
view can have a numeric tag (its tag property) sending any view higher up the view hierarchy the viewWithTag(_:) message.
addSubview(_:) makes one view a subview of another;
removeFromSuperview takes a subview out of its superview’s view hierarchy
Events inform a view of these dynamic changes
• willRemoveSubview(_:), didAddSubview(_:)
• willMove(toSuperview:), didMoveToSuperview
• willMove(toWindow:), didMoveToWindow
• insertSubview(_:at:)
• insertSubview(_:belowSubview:), insertSubview(_:aboveSubview:)
• exchangeSubview(at:withSubviewAt:)
• bringSubviewToFront(_:), sendSubviewToBack(_:)
removing all of a view’s subviews
myView.subviews.forEach {$0.removeFromSuperview()}
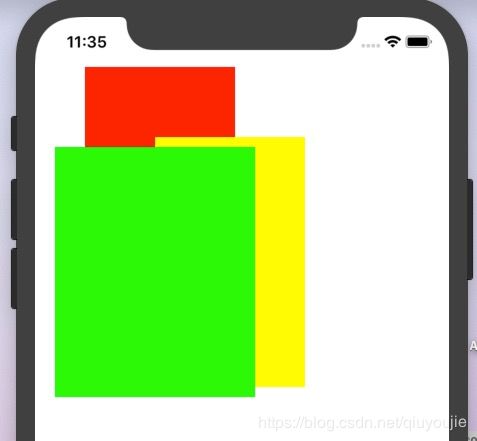
    override func viewDidLoad() {
        super.viewDidLoad()
        // Do any additional setup after loading the view.
        let v = UIView(frame:CGRect(x: 50, y: 50, width: 150, height: 250))
        v.backgroundColor = .red  //small red square
        self.view.addSubview(v)  //add it to main view

        let subV = UIView(frame:CGRect(x: 70, y: 70, width: 150, height: 250))
        subV.backgroundColor = .yellow  //small red square
        v.addSubview(subV)  //add it to main view

        let v2 = UIView(frame:CGRect(x: 20, y: 130, width: 200, height: 250))
        v2.backgroundColor = .green  //small green square
        self.view.addSubview(v2)  //add it to main view
    }
iphoneXR simulator effect:
Visibility and Opacity(可见性和不透明性)
1)invisible by setting its isHidden property to true/false, 不可见时只是看不见而已,其实还在,但无法接收触摸事件
2)view can be assigned a background color through its backgroundColor property. background color is nil (the default) has a transparent background
3)partially or completely transparent through its alpha property. 1.0 means opaque, 0.0 means transparent
    override func viewDidLoad() {
        super.viewDidLoad()
        // Do any additional setup after loading the view.
        let v = UIView(frame:CGRect(x: 50, y: 50, width: 150, height: 250))
        v.backgroundColor = .red  //small red square
        v.isHidden = true         //can not see
        self.view.addSubview(v)  //add it to main view

        let subV = UIView(frame:CGRect(x: 70, y: 70, width: 150, height: 250))
        subV.backgroundColor = .yellow  //small red square
        v.addSubview(subV)  //add it to main view

        let v2 = UIView(frame:CGRect(x: 20, y: 130, width: 200, height: 250))
        v2.backgroundColor = .green  //small green square
        v2.alpha = 0.5    //half of 1
        self.view.addSubview(v2)  //add it to main view
    }
iphoneXR simulator effect:

也验证了,父view可见性被子view 继承了
Frame, Bounds and Center
A view’s frame property, a CGRect, is the position of its rectangle within its super view, in the superview’s coordinate system.
-- 注意:是指在父view坐标系中的位置
-- When a UIView is instantiated from a nib, its init(frame:) is not called init(coder:) is called instead.
The CGRect that describes a view’s rectangle in its own coordinates is the view’s bounds property.
    override func viewDidLoad() {
        super.viewDidLoad()
        // Do any additional setup after loading the view.
        let v1 = UIView(frame:CGRect(x: 50, y: 50, width: 150, height: 250))
        v1.backgroundColor = .blue  //small red square
        self.view.addSubview(v1)  //add it to main view

        let v2 = UIView(frame:v1.bounds.insetBy(dx: 10, dy: 10))
        v2.backgroundColor = UIColor(red:1, green:1,blue:0, alpha: 1)
        v1.addSubview(v2)

    }
iphoneXR simulator effect:
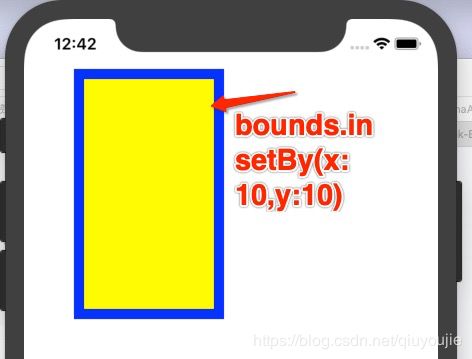
如果 let v2 = UIView(frame: v1.bounds) v2 will overlay v1
if v2 bounds 基础上扩展20,也是在自己坐标系的基础上,中心不变, 因此view的bounds 和中心是正交的,frame只是中心和边界的表示,通常只用frame 就够了,例如初始化的时候是init(frame:) ,可以改变frame, 中心和边界会随之改变, 然而最合适和可靠的放置和缩放一个view的方法是使用边界和中心而不是frame, 通过边界和中心总是有效的。
    override func viewDidLoad() {
        super.viewDidLoad()
        // Do any additional setup after loading the view.
        let v1 = UIView(frame:CGRect(x: 50, y: 50, width: 150, height: 250))
        v1.backgroundColor = .blue  //small red square
        self.view.addSubview(v1)  //add it to main view

        let v2 = UIView(frame:v1.bounds.insetBy(dx: 10, dy: 10))
        v2.backgroundColor = UIColor(red:1, green:1,blue:0, alpha: 1)
        v1.addSubview(v2)

        v2.bounds.size.height += 20
        v2.bounds.size.width += 20

    }
iphoneXR simulator effect:

调整父view的bounds 原点,改变的是子view的位置, 子view 以相反的方向移动
    override func viewDidLoad() {
        super.viewDidLoad()
        // Do any additional setup after loading the view.
        let v1 = UIView(frame:CGRect(x: 50, y: 50, width: 150, height: 250))
        v1.backgroundColor = .blue  //small red square

        print(v1.bounds)          //(0.0, 0.0, 150.0, 250.0)
        print(v1.frame)           //(50.0, 50.0, 150.0, 250.0)
        let v2 = UIView(frame:v1.bounds.insetBy(dx: 10, dy: 10))
        v2.backgroundColor = UIColor(red:1, green:1,blue:0, alpha: 1)

        v1.bounds.origin.x += 10
        v1.bounds.origin.y += 10

        v1.addSubview(v2)
        self.view.addSubview(v1)  //add it to main view

        print(v1.bounds)            //(10.0, 10.0, 150.0, 250.0)
        print(v1.frame)             //(50.0, 50.0, 150.0, 250.0)

    }
iphoneXR simulator effect:

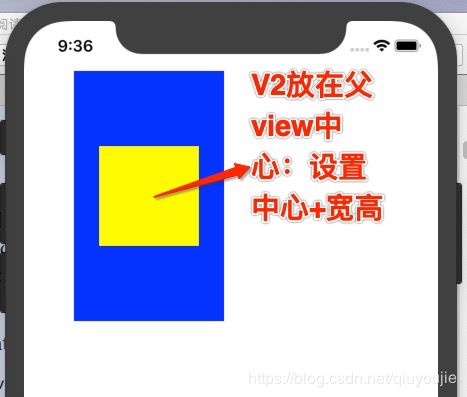
if v1 is the superview of v2, how to center v2 within v1 ? - 如何将View放到父view的中心?
v2.center = v1.convert(v1.center, from:v1.superview) or
v2.center = CGPoint(x: v1.bounds.midX, y: v1.bounds.midY)
    override func viewDidLoad() {
        super.viewDidLoad()
        // Do any additional setup after loading the view.
        let v1 = UIView(frame:CGRect(x: 50, y: 50, width: 150, height: 250))
        v1.backgroundColor = .blue  //small red square

        print(v1.bounds)          //(0.0, 0.0, 150.0, 250.0)
        print(v1.frame)           //(50.0, 50.0, 150.0, 250.0)
        let v2 = UIView(frame:CGRect(x: 20, y: 50, width: 100, height: 100))
        v2.backgroundColor = UIColor(red:1, green:1,blue:0, alpha: 1)
        v2.center = CGPoint(x: v1.bounds.midX, y: v1.bounds.midY)

        print(v2.bounds)          //(0.0, 0.0, 100, 100)
        print(v2.frame)           //(25.0, 75.0, 100, 100)

        v1.addSubview(v2)
        self.view.addSubview(v1)  //add it to main view
    }
iphoneXR simulator effect:
Transform ,变换
A transform value is a CGAffineTransform,三种变换:rotation, scaling, and translation
1) 旋转45° CGAffineTransform(rotationAngle: 45 * .pi/180)
    override func viewDidLoad() {
        super.viewDidLoad()
        // Do any additional setup after loading the view.
        let v1 = UIView(frame:CGRect(x: 50, y: 50, width: 150, height: 250))
        v1.backgroundColor = .blue  //small red square

        print(v1.bounds)          //(0.0, 0.0, 150.0, 250.0)
        print(v1.frame)           //(50.0, 50.0, 150.0, 250.0)
        let v2 = UIView(frame:CGRect(x: 20, y: 50, width: 100, height: 100))
        v2.backgroundColor = UIColor(red:1, green:1,blue:0, alpha: 1)
        v2.center = CGPoint(x: v1.bounds.midX, y: v1.bounds.midY)

        v1.addSubview(v2)
        self.view.addSubview(v1)  //add it to main view

        v1.transform = CGAffineTransform(rotationAngle: 45 * .pi/180)
        print(v1.frame)
    }
效果图

    override func viewDidLoad() {
        super.viewDidLoad()
        // Do any additional setup after loading the view.
        let v1 = UIView(frame:CGRect(x: 50, y: 50, width: 150, height: 250))
        v1.backgroundColor = .blue  //small red square

        print(v1.bounds)          //(0.0, 0.0, 150.0, 250.0)
        print(v1.frame)           //(50.0, 50.0, 150.0, 250.0)
        let v2 = UIView(frame:CGRect(x: 20, y: 50, width: 100, height: 100))
        v2.backgroundColor = UIColor(red:1, green:1,blue:0, alpha: 1)
        v2.center = CGPoint(x: v1.bounds.midX, y: v1.bounds.midY)

        v1.addSubview(v2)
        self.view.addSubview(v1)  //add it to main view

        //v1.transform = CGAffineTransform(rotationAngle: 45 * .pi/180)
        v1.transform = CGAffineTransform(scaleX: 1.2, y: 1)
        print(v1.frame)          //(35.0, 50.0, 180.0, 250.0)
    }
效果图
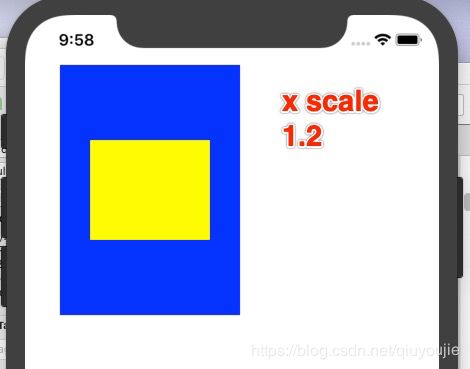
根据frame 打印可知 宽度150 -> 180 确实增加了20%,起点小了15,中心不变
平移和旋转混合
1)先平移后旋转
   override func viewDidLoad() {
        super.viewDidLoad()
        // Do any additional setup after loading the view.
        let v1 = UIView(frame:CGRect(x: 20, y: 100, width: 120, height: 200))
        v1.backgroundColor = UIColor(red: 1, green: 0.4, blue: 1, alpha: 1)
        let v2 = UIView(frame:v1.bounds)
        v2.backgroundColor = UIColor(red: 0.5, green: 1, blue: 0, alpha: 1)
        self.view.addSubview(v1)
        v1.addSubview(v2)

        //v1.transform = CGAffineTransform(rotationAngle: 45 * .pi/180)
        v2.transform =
            CGAffineTransform(translationX:100, y:0).rotated(by: 45 * .pi/180)
        print(v1.frame, v1.center)
        print(v2.frame, v2.center)
    }
效果图

2)先旋转后平移
    override func viewDidLoad() {
        super.viewDidLoad()
        // Do any additional setup after loading the view.
        let v1 = UIView(frame:CGRect(x: 20, y: 100, width: 120, height: 200))
        v1.backgroundColor = UIColor(red: 1, green: 0.4, blue: 1, alpha: 1)
        let v2 = UIView(frame:v1.bounds)
        v2.backgroundColor = UIColor(red: 0.5, green: 1, blue: 0, alpha: 1)
        self.view.addSubview(v1)
        v1.addSubview(v2)

        //v1.transform = CGAffineTransform(rotationAngle: 45 * .pi/180)
        //v2.transform = CGAffineTransform(translationX:100, y:0).rotated(by: 45 * .pi/180)
        v2.transform = CGAffineTransform(rotationAngle: 45 * .pi/180).translatedBy(x: 100, y: 0)
        print(v1.frame, v1.center)
        print(v2.frame, v2.center)
    }
效果图
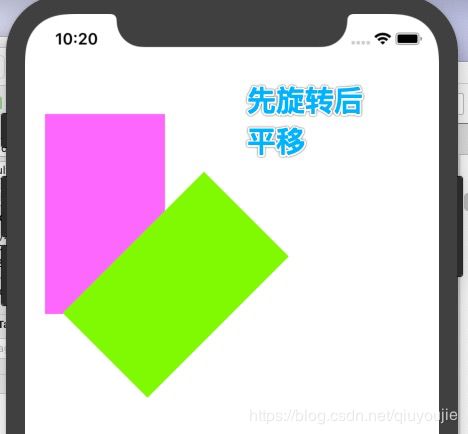
方法二: concatenating 连接函数实现先旋转后平移
let r = CGAffineTransform(rotationAngle: 45 * .pi/180)
let t = CGAffineTransform(translationX:100, y:0)
v2.transform = t.concatenating(r) // not r.concatenating(t)