SpringBoot 一些常用的配置
设置拦截的url路径
server:
	context-path: /services/


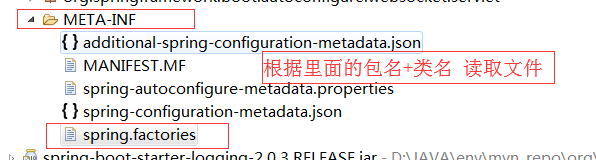
SpringBoot自动配置原理:
- SpringApplication.run(RunApp.class, args);
- SpringApplication(ResourceLoader resourceLoader, Class… primarySources)
- getSpringFactoriesInstances(ApplicationContextInitializer.class)
- getSpringFactoriesInstances(type, new Class[] {})
- SpringFactoriesLoader.loadFactoryNames(type, classLoader));
- loadSpringFactories(classLoader).getOrDefault(factoryClassName, Collections.emptyList())
- 加载文件FACTORIES_RESOURCE_LOCATION = “META-INF/spring.factories”;

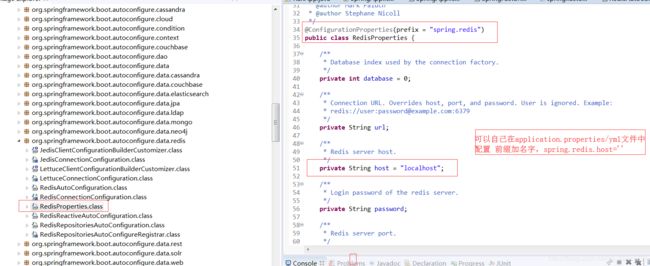
- 如自动配置redis

- 默认的配置
- WEB的一些自动配置

父级依赖统一管理
- 创建parent工程打包方式POM
<description>父工程统一jar管理</description>

	<!-- 配置父级依赖统一jar包管理
		spring-boot-starter-parent===>>>spring-boot-dependencies==>>pring-boot-dependencies
		 -->
	<dependencyManagement>
		<dependencies>
			<dependency>
				<groupId>org.springframework.boot</groupId>
				<artifactId>spring-boot-dependencies</artifactId>
				<version>2.0.3.RELEASE</version>
				<type>pom</type>
				<scope>import</scope>
			</dependency>
		</dependencies>
	</dependencyManagement>

	<!-- 父工程 实现对 JDK 版本控制 -->
	<build>
		<plugins>
			<plugin>
				<groupId>org.apache.maven.plugins</groupId>
				<artifactId>maven-compiler-plugin</artifactId>
				<configuration>
					<source>1.8</source>
					<target>1.8</target>
				</configuration>
			</plugin>
		</plugins>
	</build>
注解:
//@ComponentScan("com.feifan")//配置包扫描
//@EnableAutoConfiguration//启用自动配置
//代替上面两个注解@SpringBootApplication
@SpringBootApplication(scanBasePackages= {"com.feifan"})//默认扫描当前类所在的包及子包


logging:
  level:
    root: info
    org:
      springframework:
        web: debug
  file: g:\\applog\\info.log
  pattern:
    console: "%d{yyyy-MM-dd HH:mm:ss}[%thread] %-5level %logger- %msg%n"
    file:  "%d{yyyy-MM-dd HH:mm:ss}[%thread] %-5level %logger- %msg%n"


encoder 表示对日志进行编码:
%d{HH: mm:ss.SSS}——日志输出时间
%thread——输出日志的进程名字,这在Web应用以及异步任务处理中很有用
%-5level——日志级别,并且使用5个字符靠左对齐
%logger{36}——日志输出者的名字
%msg——日志消息
%n——平台的换行符
%c类的全名,
%i索引【从数字0开始递增】

<?xml version="1.0" encoding="UTF-8" ?>
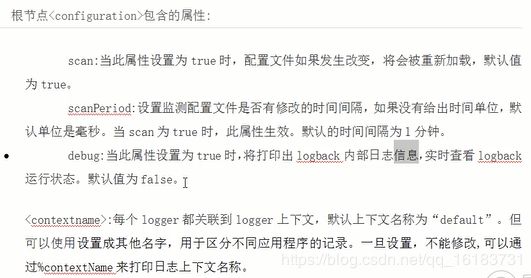
<configuration scan="true" scanPeriod="60 seconds" debug="false">
<!-- scan 设置为true 当配置文件发生变化时 会重新加载
60秒扫描一次 DEBUG 设置为true 将打印出logback 内部日志信息
实时查看logback 运行状态-->
<contextName>logback</contextName>
<!-- cotextname 每个logger 都关联到logger上下文,默认为default 可以修改
一但设置不能修改,可以通过%contextName 打印日志上下文名称 -->
<property name="log.path" value="\\applog\\info.log"></property>
<!-- 输出到控制台 -->
<appender name="console" class="ch.qos.logback.core.ConsoleAppender">
<!-- <filter class="ch.qos.logback.classic.filter.ThresholdFilter">
<level>ERROR</level>
</filter> -->
<!-- 过滤器 可以把指定级别以下的日志过滤 -->
<encoder><!-- 指定格式 -->
<pattern>%d{yyyy-MM-dd HH:mm:ss} %contextName [%thread] %-5level %logger{36}- %msg%n</pattern>
</encoder>
</appender>
<!-- 输出到文件 -->
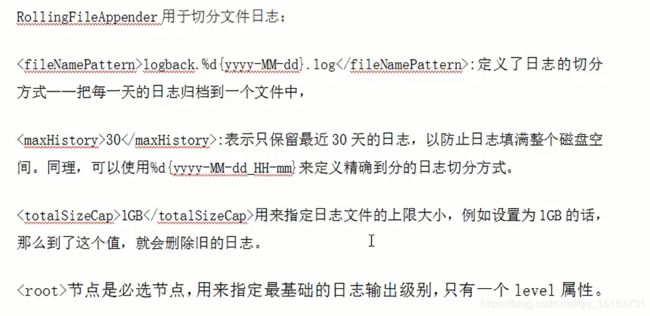
<appender name="file" class="ch.qos.logback.core.rolling.RollingFileAppender">
<file>${log.path}</file>
<rollingPolicy class="ch.qos.logback.core.rolling.TimeBasedRollingPolicy">
<fileNamePattern>logback.%d{yyyy-MM-dd}.log</fileNamePattern>
<maxHistory>30</maxHistory>
</rollingPolicy>
<!-- 日志文件的切割策略 -->
<encoder>
<pattern>%d{yyyy-MM-dd HH:mm:ss} %contextName [%thread] %-5level -- %logger{36}- %msg%n</pattern>
</encoder>
</appender>
<!-- root 节点为必选节点 指定日志的输出级别只有一个level级别,以及指定appender -->
<root level="info">
<appender-ref ref="console"/>
<appender-ref ref="file"/>
</root>
<!-- loger 的name 属性指定loger约束的某一个包,或者具体的某一个类
level 设置答应级别
addtivity 是否向上级Loger 传递打印信息,默认为true
-->
<!--包 -->
<logger name="com.feifan.controller"/>
<!--类 -->
<!-- additivity 是否向上级传递loger 传递打印信息 -->
<logger name="com.feifan.controller.RunApp" level="info" additivity="false">
<appender-ref ref="console"/>
<appender-ref ref="file"/>
</logger>
</configuration>
-
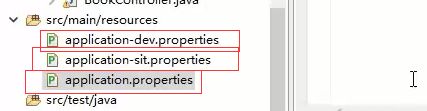
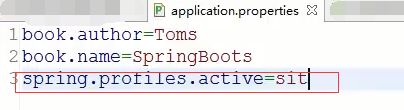
多环境日志输出
根据不同的环境(prod:生产环境,test:测试环境,dev:开发环境) 来定义不同的日志输出,在 logback-spring.xml 中使用springProfile 节点定义:
<!-- 根据不同的环境(prod:生产环境,test:测试环境,dev:开发环境) 来定义不同的日志输出 -->
	<!-- 在application.propertise 中指定用哪个 spring.profiles.active = dev,test -->
	<!-- 测试环境+开发环境,多个用逗号隔开 -->
	<springProfile name="dev,test">
		<logger name="com.feifan.controller" level="info"/>
	</springProfile>

	<!-- 生产环境 -->
	<springProfile name="prod">
		<logger name="com.feifan.controller" level="WARN"/>
	</springProfile>
-
使用log4j 日志管理
- springboot 默认使用的是logback 所以需要修改pom.xml 过滤掉spring-boot-starter-logging 然后添加spring-boot-starter-log4j 依赖包
<!-- log4j -->
		<dependency>
			<groupId>org.springframework.boot</groupId>
			<artifactId>spring-boot-starter</artifactId>
			<exclusions>
				<exclusion>
					<groupId>org.springframework.boot</groupId>
					<artifactId>spring-boot-starter-logging</artifactId>
				</exclusion>
			</exclusions>
		</dependency>
		<dependency>
			<groupId>org.springframework.boot</groupId>
			<artifactId>spring-boot-starter-log4j</artifactId>
			<version>1.3.8.RELEASE</version>
		</dependency>
- application.properties
mybatis.configuration.log-impl=org.apache.ibatis.logging.stdout.StdOutImpl
#org.apache.ibatis.logging.stdout.StdOutImpl:这个是可以sql、参数、查询结果的
#org.apache.ibatis.logging.log4j.Log4jImpl:这个不打印查询结果
- 在resources 下新建log4j.properties配置文件
#配置日志等级为info,输出到两个目的地
log4j.rootCategory = info ,consolelog,filelog
#配置上面的目的地Consolelog的输出端为控制台
log4j.appender.consolelog = org.apache.log4j.ConsoleAppender
#指定输出日志的样式
log4j.appender.consolelog.layout = org.apache.log4j.PatternLayout
#上面使用的是PatternLayout样式,所以要指定具体样式
log4j.appender.consolelog.layout.ConversionPattern = %p:%d{yyyy-MM-dd HH:mm:ss} %l %m%n

#配置目的地filelog 的输出端我文件,并且每天产生一个日志文件
log4j.appender.filelog = org.apache.log4j.DailyRollingFileAppender
#配置日志文件的路径
log4j.appender.filelog.File = \\log\\log4j.log
log4j.appender.filelog.layout = org.apache.log4j.PatternLayout
log4j.appender.filelog.layout.ConversionPattern = %p:%d{yyyy-MM-dd HH:mm:ss} %l %m%n

#打印sql 执行语句
#log4j.logger.com.mybatis3=DEBUG
#log4j.logger.com.feifan.dao=DEBUG
log4j.logger.java.sql.Connection = DEBUG
log4j.logger.java.sql.Statement = debug
log4j.logger.java.sql.PreparedStatement = debug
log4j.logger.java.sql.ResultSet =debug
配置为开发模式:
pom文件增加两个依赖
<!-- 配置为开发模式 代码修改,不用重新运行 -->
		<!-- https://mvnrepository.com/artifact/org.springframework/springloaded -->
		<dependency>
			<groupId>org.springframework</groupId>
			<artifactId>springloaded</artifactId>
			<version>1.2.8.RELEASE</version>
		</dependency>

		<!-- https://mvnrepository.com/artifact/org.springframework.boot/spring-boot-devtools -->
		<dependency>
			<groupId>org.springframework.boot</groupId>
			<artifactId>spring-boot-devtools</artifactId>
			<version>2.0.4.RELEASE</version>
		</dependency>
-
SpringBoot 的web开发
SpringBoot 提供了spring-boot-starter-web 为web 开发予以支持,spring-boot-starter-web 提供了嵌入式的Tomcat 以及 SpringMVC 的依赖。web 相关的自动配置存储在 spring-boot-autoconfigure.jar 的org.springframework.boot.autoconfigure.web 下
访问静态资源
在SpringBoot 中加载静态资源和在普通的web应用中不太一样,默认情况下,springBoot 从classpath的/static,/public 或/META-INF/resource 文件或从ServletContext 跟目录提供静态内容。
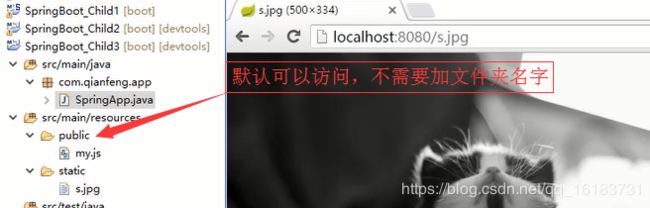
#设定 静态文件路径,js,css,image等
spring.resources.static-locations = classpath:/static/
自定义消息装换器
只需要在类中添加消息转换器的@Bean,就会被SpringBoot 自动加入到容器中
//定义消息转换器 http请求乱码问题
  @Bean
    public StringHttpMessageConverter stringHttpMessageConverter() {
    	StringHttpMessageConverter  converter = new StringHttpMessageConverter(Charset.forName("utf-8"));
    	return converter;
    }
默认配置了消息转换器
HttpMessageConvertersAutoConfiguration.class
		@Bean
		@ConditionalOnMissingBean
		public StringHttpMessageConverter stringHttpMessageConverter() {
			StringHttpMessageConverter converter = new StringHttpMessageConverter(
					this.encodingProperties.getCharset());
			converter.setWriteAcceptCharset(false);
			return converter;
		}
使用FastJson 解析Json 数据
SpringBoot 默认配置的是JackSon
使用FastJson 解析Jsons数据:
<!-- fastJSON 依赖 -->
		<dependency>
			<groupId>com.alibaba</groupId>
			<artifactId>fastjson</artifactId>
			<version>1.2.46</version>
		</dependency>
方式1:
SpringBoot http响应乱码问题
将设置utf-8 开启即可
Spring.http.encoding,force = true
启动类继承 WebMvcConfigurationSupport.class
重写方法
@Override
	protected void configureMessageConverters(List<HttpMessageConverter<?>> converters) {
		//1.构建MessageConverter对象
    	FastJsonHttpMessageConverter msConverter = new FastJsonHttpMessageConverter();
    	//2.配置MessageConverter对象
    	//2.1设置fastjson基本配置
    	FastJsonConfig config = new FastJsonConfig();
    	//对json 数据进行格式化
    	config.setSerializerFeatures(SerializerFeature.PrettyFormat);
    	msConverter.setFastJsonConfig(config);
    	converters.add(msConverter);
	}
第二中重写:
//整合fastjson库
    @Override
    public void configureMessageConverters(List<HttpMessageConverter<?>> converters) {
    	//1.构建MessageConverter对象
    	FastJsonHttpMessageConverter msConverter = new FastJsonHttpMessageConverter();
    	//2.配置MessageConverter对象
    	//2.1设置fastjson基本配置
    	FastJsonConfig config = new FastJsonConfig();
    	config.setSerializeConfig(SerializeConfig.globalInstance);
    	//禁用循环引用问题
    	config.setSerializerFeatures(
    			SerializerFeature.DisableCircularReferenceDetect);
    	msConverter.setFastJsonConfig(config);

    	//2.2 设置MessageConverter对象对媒体的支持
    	List<MediaType> list = new ArrayList<>();
    	list.add(new MediaType("text", "html", Charset.forName("utf-8")));
    	list.add(new MediaType("application", "json", Charset.forName("utf-8")));
    	msConverter.setSupportedMediaTypes(list);
    	//3.将MessageConverter对象添加到converters容器
		converters.add(msConverter);
    }
可以使用 @JSONField(format=“yyyy-MM-dd HH:mm:ss”)
private Date date; 验证fastjson 是否配置成功。
{ “date”:“2019-01-10 01:18:46” }
方式二
配置Bean 的方式
//配置fastjson 的Bean
    @Bean
    public HttpMessageConverters fastjsonHttpMessageConverters() {
    	//1.构建MessageConverter对象
    	FastJsonHttpMessageConverter msConverter = new FastJsonHttpMessageConverter();
    	//2.配置MessageConverter对象
    	//2.1设置fastjson基本配置
    	FastJsonConfig config = new FastJsonConfig();
    	//对json 数据进行格式化
    	config.setSerializerFeatures(SerializerFeature.PrettyFormat);
    	msConverter.setFastJsonConfig(config);

    	HttpMessageConverter<?> converter =msConverter;
    	return new HttpMessageConverters(converter);
    }
自定义拦截器
继承 WebMvcConfigurationSupport.class 重写父类的方法进行扩展
//拦截器配置 拦截器为配置类所以 要配置类上加@configuration
    @Override
    protected void addInterceptors(InterceptorRegistry registry) {

    	HandlerInterceptor interceptor = new HandlerInterceptor() {
			@Override
			public boolean preHandle(HttpServletRequest request, HttpServletResponse response, Object handler)
					throws Exception {
				LOGGER.info("自定义拦截器");
				return true;//true 放行
			}

			@Override
			public void postHandle(HttpServletRequest request, HttpServletResponse response, Object handler,
					ModelAndView modelAndView) throws Exception {
				// TODO Auto-generated method stub
				HandlerInterceptor.super.postHandle(request, response, handler, modelAndView);
			}

			@Override
			public void afterCompletion(HttpServletRequest request, HttpServletResponse response, Object handler,
					Exception ex) throws Exception {
				HandlerInterceptor.super.afterCompletion(request, response, handler, ex);
			}
		};

		registry.addInterceptor(interceptor)//注册拦截器
				.addPathPatterns("/**")//拦截资源的路径
				.excludePathPatterns("/kl")//排除的路径
		;
    }
定义全局异常处理器
@ControllerAdvice 注解
/**
 * 定义全局异常处理类
 * @author Donald 2019-01-10 01:49
 *
 */
@ControllerAdvice
public class GolableException {

	//捕获异常 Exception.class 及其子类
	@ExceptionHandler(Exception.class)
	@ResponseBody
	public Map<String, Object> handlerException(Exception exception){
		Map<String, Object> map = new HashMap<>();
		map.put("errcode", 201);
		map.put("message",exception.toString());
		return map;
	}
}
异常子类:
public class MyExec extends Exception {

	/**
	 *
	 */
	private static final long serialVersionUID = -1654509889116567545L;

	public MyExec() {
		super();
		// TODO Auto-generated constructor stub
	}

	public MyExec(String message, Throwable cause, boolean enableSuppression, boolean writableStackTrace) {
		super(message, cause, enableSuppression, writableStackTrace);
		// TODO Auto-generated constructor stub
	}

	public MyExec(String message, Throwable cause) {
		super(message, cause);
		// TODO Auto-generated constructor stub
	}

	public MyExec(String message) {
		super(message);
		// TODO Auto-generated constructor stub
	}

	public MyExec(Throwable cause) {
		super(cause);
		// TODO Auto-generated constructor stub
	}


}
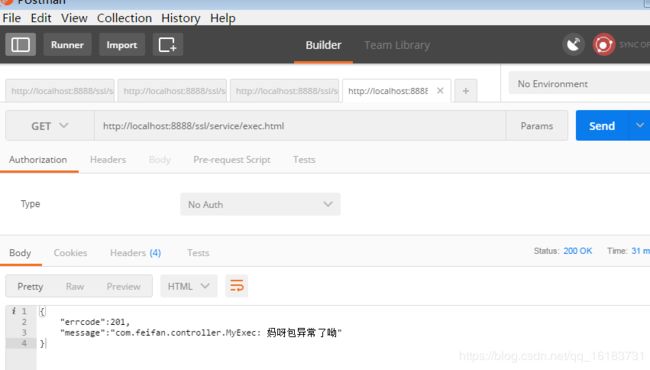
控制层实现:
//测试全局异常处理
    @RequestMapping("exec")
    @ResponseBody
    public String execptionTest() throws MyExec {
    	throw new MyExec("妈呀包异常了呦");
    	//return "报错了";
    }
异步调用
SpringBoot 提供异步处理方式@Async
需要在异步执行的方法上注解:@Async
在启动类上注解:@EnableAsync//开启异步
如果报这个错 because it is a JDK dynamic proxy that implements:
启动类注解修改为:
@EnableAsync(proxyTargetClass=true)//开启异步 proxyTargetClass=true
接口:
public interface AsyncService {

	Future<String> doTask1() throws Exception;
	Future<String> doTask2() throws Exception;
	Future<String> doTask3() throws Exception;

}
**实现类**:
@Service
public class FuterService implements AsyncService {

	private Random random =  new Random();
	private static Logger LOGGER =LoggerFactory.getLogger(FuterService.class);

	@Async
	@Override
	public Future<String> doTask1() throws Exception {
		LOGGER.info("线程任务1开始了"+new Date());
		long start = System.currentTimeMillis();
		Thread.sleep(random.nextInt(10000));
		LOGGER.info("线程1 结束耗时"+(System.currentTimeMillis()-start)+"MS");
		return new AsyncResult<String>("任务1结束");
	}

	@Async
	@Override
	public Future<String> doTask2() throws Exception {
		LOGGER.info("线程任务2开始了"+new Date());
		long start = System.currentTimeMillis();
		Thread.sleep(random.nextInt(10000));
		LOGGER.info("线程2 结束耗时"+(System.currentTimeMillis()-start)+"MS");
		return new AsyncResult<String>("任务2结束");
	}

	@Async
	@Override
	public Future<String> doTask3() throws Exception {
		LOGGER.info("线程任务3开始了"+new Date());
		long start = System.currentTimeMillis();
		Thread.sleep(random.nextInt(10000));
		LOGGER.info("线程3 结束耗时"+(System.currentTimeMillis()-start)+"MS");
		return new AsyncResult<String>("任务3结束");
	}

}
Controller:
@Autowired
    private FuterService futerService;

    @RequestMapping("asyn")
    @ResponseBody
    public String asyncTest() throws Exception {
    	LOGGER.info("线程实现开始了"+System.currentTimeMillis());
    	long start = System.currentTimeMillis();
    	Future<String> doTask1 = futerService.doTask1();
    	Future<String> doTask2 = futerService.doTask2();
    	Future<String> doTask3 = futerService.doTask3();
    	while(true) {
    		if(doTask1.isDone()&&doTask2.isDone()&&doTask3.isDone()) {
    			break;
    		}
    	}
    	LOGGER.info("线程执行完成耗时:"+(System.currentTimeMillis()-start));
    	 throw new MyExec("挂了呀");
    }
SpringBoot 整合JSP
官方推荐使用 thymeleaf ,不建议使用 JSP
<packaging>war</packaging>

	<dependencies>

	<!-- SpringBoot 整合jsp 需要是War 工程 还需要依赖下面两个包 -->
		<dependency>
			<groupId>org.springframework.boot</groupId>
			<artifactId>spring-boot-starter-tomcat</artifactId>
		</dependency>
		<dependency>
			<groupId>org.apache.tomcat.embed</groupId>
			<artifactId>tomcat-embed-jasper</artifactId>
			<version>8.5.20</version>
		</dependency>

		<dependency>
			<groupId>org.springframework.boot</groupId>
			<artifactId>spring-boot-starter-web</artifactId>
		</dependency>
	</dependencies>

	<!-- maven 项目为 war 类型时,必须加上这个插件  -->
	<build>
		<plugins>
			<plugin>
				<groupId>org.apache.maven.plugins</groupId>
				<artifactId>maven-war-plugin</artifactId>
				<version>3.2.0</version>
				<configuration><!-- 忽略XML 报错 -->
					<failOnMissingWebXml>false</failOnMissingWebXml>
				</configuration>
			</plugin>
		</plugins>
	</build>
在全局配置文件中声明:
#配置视图解析器的前缀和后缀
spring.mvc.view.prefix=/jsp/
spring.mvc.view.suffix=.jsp
页面:
<%@ page language="java" contentType="text/html; charset=UTF-8" pageEncoding="UTF-8"%>
<!DOCTYPE html PUBLIC "-//W3C//DTD HTML 4.01 Transitional//EN" "http://www.w3.org/TR/html4/loose.dtd">
<html>
<head>
<meta http-equiv="Content-Type" content="text/html; charset=UTF-8">
<title>Insert title here</title>
</head>
<body>

<h1>JSP</h1>
<h2>${JKJK}</h2>
</body>
</html>
启动类
@SpringBootApplication
@Controller
class MyControlller {

	public static void main(String[] args) {
		SpringApplication.run(MyControlller.class, args);
	}

	@RequestMapping("/index")
	public String jspModel(Model model) {
		model.addAttribute("JKJK", "怎么回事呀");
		return "index";
	}
}
SpringBoot 整合FreeMarker
建议使用模板引擎 themleaf,velocity,freemarker
			org.springframework.boot
			spring-boot-starter-freemarker
			1.5.13.RELEASE
- springBoot 默认在resources 下的templates 文件加里面去找模板

整合依赖:
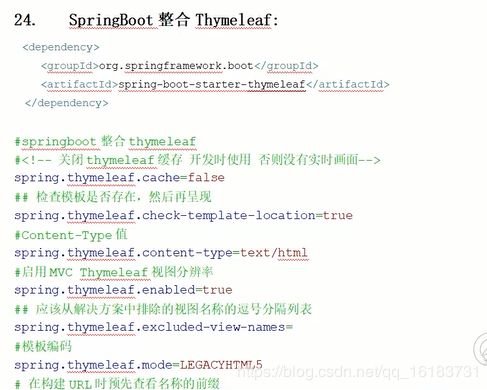
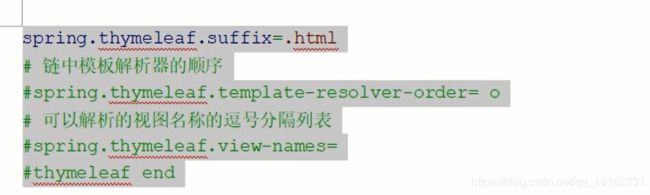
<!--  整合thymeleaf -->
		<dependency>
			<groupId>org.springframework.boot</groupId>
			<artifactId>spring-boot-starter-thymeleaf</artifactId>
		</dependency>
		<dependency>
			<groupId>net.sourceforge.nekohtml</groupId>
			<artifactId>nekohtml</artifactId>
		</dependency>
SpringBoot 整合QuartZ
在启动类上加注解:@EnableScheduling
@EnableScheduling//开启定时任务调度
public class RunApp extends WebMvcConfigurationSupport
定时任务类:
/**
 * 定时任务调度
 * @author Donald 2019-01-11 01:36
 *
 */
@Component
public class MyJob {

	/**
	 * 一秒钟一次
	 */
	@Scheduled(fixedRate=1000)
	public void print() {
		System.err.println(System.currentTimeMillis());
	}

}