一种简单的地图聚合算法
百度地图的聚合算法
这段百度算法的描述来自博客:https://blog.csdn.net/javine/article/details/51195014
总结如下:
百度地图把整个地球是按照一个平面来展开,把整个地球按照平面来展开之后,我们就能算出这个地球平面的宽度,也就是世界宽度。
计算公式是这样的:256*(zoom^2) == worldWidth
其中zoom就是地图的层级,我们缩放地图也是根据zoom的变化来判断是放大还是缩小的。这样可以把不利于计算的经纬度position转换成我们熟悉的二维坐标point。
而一个二维坐标中有若干个点,把它们按照一个给定的distance来进行分组。
迭代所有的QuadItem,以此QuadItem为中心画一个框框,框框里面的点就算是一个cluster簇,
也就是可以聚合成一个点的QuadItems。框框的大小就是我们定义的可以执行聚合的距离。
当然,这话其实并不准确,会有些点同时被好多个框框给框住,那就算距离最小的那个cluster里面的点。
/**
     *  cluster算法核心
     * @param zoom map的级别
     * @return
     */
    @Override
    public Set> getClusters(double zoom) {
        final int discreteZoom = (int) zoom;

        final double zoomSpecificSpan = MAX_DISTANCE_AT_ZOOM / Math.pow(2, discreteZoom) / 256;//定义的可进行聚合的距离

        final Set> visitedCandidates = new HashSet>();  //遍历QuadItem时保存被遍历过的Item
        final Set> results = new HashSet>();  //保存要返回的cluster簇,每个cluster中包含若干个MyItem对象
        final Map, Double> distanceToCluster = new HashMap, Double>();  //Item --> 此Item与所属的cluster中心点的距离
        final Map, mapapi.clusterutil.clustering.algo.StaticCluster> itemToCluster =
                new HashMap, mapapi.clusterutil.clustering.algo.StaticCluster>(); //Item对象 --> 此Item所属的cluster

        synchronized (mQuadTree) {
            for (QuadItem candidate : mItems) {	//遍历所有的QuadItem
                if (visitedCandidates.contains(candidate)) {	//如果此Item已经被别的cluster框住了,就不再处理它

                    continue;
                }

                Bounds searchBounds = createBoundsFromSpan(candidate.getPoint(), zoomSpecificSpan);//这个就是我们说的,根据给定距离生成一个框框
                Collection> clusterItems;
                // search 某边界范围内的clusterItems
                clusterItems = mQuadTree.search(searchBounds); //从quadTree中搜索出框框内的点
                if (clusterItems.size() == 1) {
                    // 如果只有一个点,那么这一个点就是一个cluster,QuadItem也实现了Cluster接口,也可以当作Cluster对象
                    results.add(candidate);
                    visitedCandidates.add(candidate);
                    distanceToCluster.put(candidate, 0d);
                    continue;	//并且结束此次循环
                }
                mapapi.clusterutil.clustering.algo.StaticCluster cluster =
                        new mapapi.clusterutil.clustering.algo
                                .StaticCluster(candidate.mClusterItem.getPosition());//如果搜索到多个点,那么就以此item为中心创建一个cluster
                results.add(cluster);

                for (QuadItem clusterItem : clusterItems) {	//遍历所有框住的点
                    Double existingDistance = distanceToCluster.get(clusterItem);//获取此item与原来的cluster中心的距离(如果之前已经被其他cluster给框住了)
                    double distance = distanceSquared(clusterItem.getPoint(), candidate.getPoint());	//获取此item与现在这个cluster中心的距离
                    if (existingDistance != null) {
                        // 判断那个距离跟小
                        if (existingDistance < distance) {
                            continue;
                        }
                        //如果跟现在的cluster距离更近,则将此item从原来的cluster中移除
                        itemToCluster.get(clusterItem).remove(clusterItem.mClusterItem);
                    }
                    distanceToCluster.put(clusterItem, distance); //保存此item到cluster中心的距离
                    cluster.add(clusterItem.mClusterItem);	//将此item添加到cluster中
                    itemToCluster.put(clusterItem, cluster);	//建立item -- cluster 的map
                }
                visitedCandidates.addAll(clusterItems);//将所有框住过的点添加到已访问的List中。
            }
        }
        return results;
    }
简化版的地图聚合算法
百度上面的聚合算法,基本上可以满足百分之九十九的需求。但是,经过测试,在一个很小的区域中密集聚合了1w个以上的点时,在android手机上就会出现内存溢出的情况。所以这时候就需要一个简单并且运算量较小的算法。
地图坐标化
虽然上面的算法不符合我们的要求,但是我们仍然可以获得一个思路,就是把地球展开成一个平面,将经纬度转换成我们熟识的xy二维坐标轴。
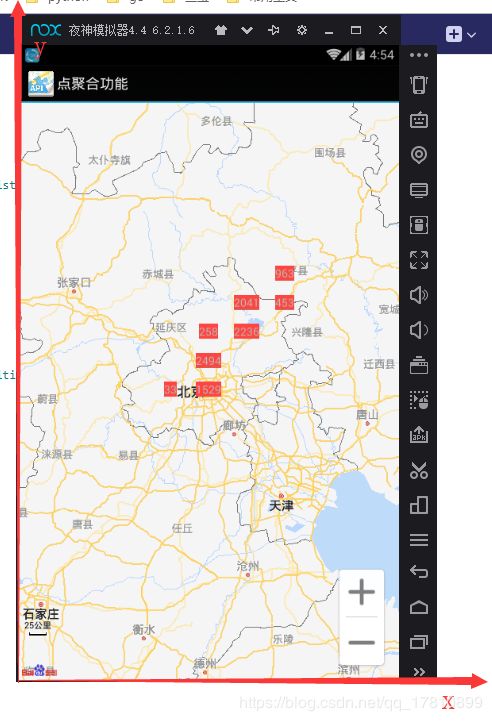
但是,为了节省移动端宝贵的内存和运算量,我们完全不需要建立整个世界的坐标系,而只需要建立我们手机屏幕所显示出来的地图的坐标系。如下图所示:

这样的建立坐标系以后,我们将屏幕的左下角看作0点,那么屏幕中任何一个点的相对坐标就是这个点的经纬度减去屏幕左下角那个点的经纬度。
点的聚合
在百度的算法中,可以看作会比较每两个点直接的距离。这样的话,画出来的聚合图虽然好看,但在数据量很大时,效率就比较低下。
所以我们如果对聚合的速度要求很高,但是聚合的效果要求不高的话。可以做这样一个处理。
我们将x轴分割为n份,y轴分割成m份。这样的话整个地图就会被分割成一个个的小方格,我们只需要计算每个方格中的包含的gps点数,即可。这样就完成了一个最基本的聚合。
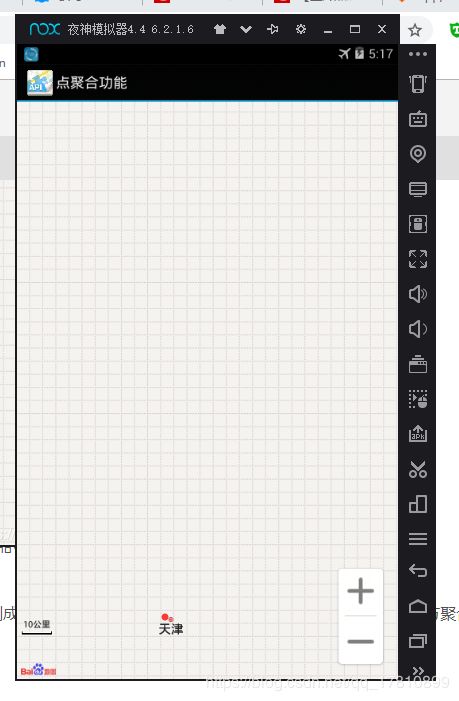
例如在上图中,我们将地图分割成了n*m份,天津所在的这个小方格内的聚合度就1,其他地方聚合度就是0。
如果这个时候我们在天津所在的这个方格内,再加一个点,这个方格的聚合度就变成了2。
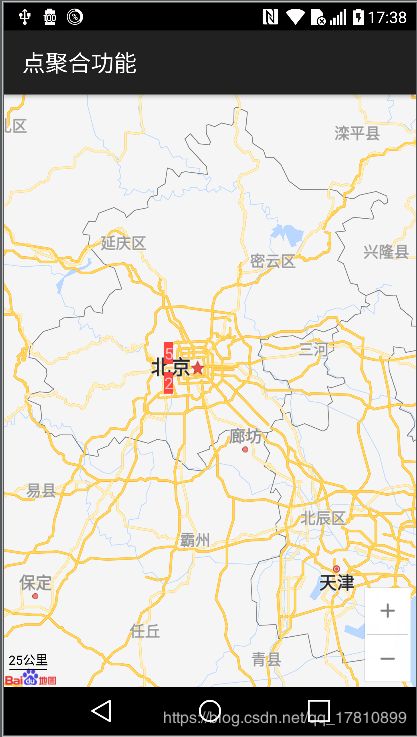
现在点的数目增加多一点
我们来分割一下,横向三格,纵向6格
具体代码
   mBaiduMap.setOnMapStatusChangeListener(new BaiduMap.OnMapStatusChangeListener() {
            @Override
            public void onMapStatusChangeStart(MapStatus mapStatus) {

            }

            @Override
            public void onMapStatusChangeStart(MapStatus mapStatus, int i) {

            }

            @Override
            public void onMapStatusChange(MapStatus mapStatus) {

            }

            @Override
            public void onMapStatusChangeFinish(MapStatus mapStatus) {
                try{
                    //清楚地图上的marker
                    mBaiduMap.clear();

                    //左上角经纬度
                    Point pt = new Point();
                    pt.x = 0;
                    pt.y = 0;
                    LatLng llLeftTop = mBaiduMap.getProjection().fromScreenLocation(pt);

                    //右下角经纬度
                    Point pty = new Point();
                    pty.x = mMapView.getWidth();
                    pty.y = mMapView.getHeight();
                    LatLng llRightBottom = mBaiduMap.getProjection().fromScreenLocation(pty);

                    //屏幕中显示的经度的长度和纬度的长度
                    double mapWidth = llRightBottom.longitude - llLeftTop.longitude;
                    double mapHeight = llLeftTop.latitude - llRightBottom.latitude;

                    //将屏幕中地图分割的横向 格子数和 纵向格子数
                    int widthSize = 10;
                    int heightSize = 20;

                    //计算每个格子的经纬度的长度
                    double unitWidth = mapWidth / widthSize;
                    double unitHeight = mapHeight / heightSize;

                    //用来保存每个格子里面的点的数量
                    int[] pointSize = new int[widthSize * heightSize];

                    //计算每个分隔点内gps点的数量
                    for (MyItem b : myItemList) {
                        LatLng latLng=b.getPosition();
                        //如果点在显示范围内
                        if (latLng.longitude > llLeftTop.longitude &&
                                latLng.longitude < llRightBottom.longitude &&
                                latLng.latitude > llRightBottom.latitude &&
                                latLng.latitude < llLeftTop.latitude) {

                            //计算每个点,相对于左下角的经纬度
                            double relativeX = latLng.longitude - llLeftTop.longitude;
                            double relativeY = latLng.latitude - llRightBottom.latitude;

                            //计算出这个点,处于哪个格子
                            int x = (int) Math.floor(relativeX / unitWidth);
                            int y = (int) Math.floor(relativeY / unitHeight);

                            if (x < 0 || y < 0) {
                                // LogUtil.e("relativeX:" + relativeX + "---------relativeY:" + relativeY);
                            }

                            pointSize[y * widthSize + x] = pointSize[y * widthSize + x] + 1;
                        }


                    }

                    List options = new ArrayList();
                    //设置坐标点
                    BitmapDescriptor bitmap;

                    //绘制每个格子和格子里点的数量
                    for (int y = 0; y < heightSize; y++) {
                        for (int x = 0; x < widthSize; x++) {
                            double lng = llLeftTop.longitude + x * unitWidth;
                            double lat = llRightBottom.latitude + y * unitHeight;

                            //如果格子里点的数量为0 ,则不绘制
                            if (pointSize[y * widthSize + x] == 0) {
                                continue;
                            }

                            TextView textView = new TextView(MarkerClusterDemo.this);
                            textView.setBackgroundColor(getResources().getColor(android.R.color.holo_red_light));
                            textView.setText(pointSize[y * widthSize + x] + "");
                            bitmap = BitmapDescriptorFactory.fromView(textView);

                            LatLng point = new LatLng(lat, lng);
                            OverlayOptions option1 = new MarkerOptions()
                                    .position(point)
                                    .icon(bitmap);
                            options.add(option1);
                        }
                    }

                    //在地图上批量添加
                    mBaiduMap.addOverlays(options);
                }catch (Exception e){
                    e.printStackTrace();
                }

            }


