分分钟搞定自定义控件之组合控件--自定义View入门篇
今天给大家详细讲解一下如何实现自定义组合控件,组合控件其实很简单。大家可以自由地组合任意控件。好了,下面开始我们的正文。
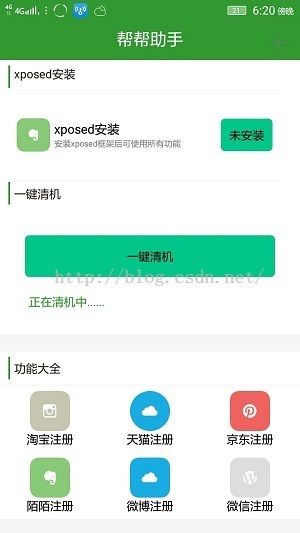
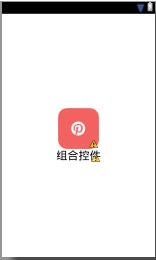
我们要实现的效果如右图底部所示,其实呢!大家只要把握规律,还是挺容易的。
- 新建一个attrs.xml属性集文件,即你要自定义控件的属性
- 新建一个xml布局文件,要显示的组合控件的布局
- 新建一个类,继承FrameLayout,LinearLayout或者RelativeLayout
- 得到属性集对象TypeArray
- 通过属性集得到各个属性及设置属性
- 向外暴露set设置属性的方法
- 向外暴露事件接口供调用
第一步:在res/values目录下创建自定义属性文件attrs.xml。
子标签是一个
我们看到如下代码,首先是一个命令为Mix的可自定义的外标签,记得给他取个名字。为的是到时候我们能和系统的控件区别开。每个
第二步:创建一个布局文件mix_text_image.xml,布局效果如下。
第三步:新建一个activiy继承LinearLayout布局,因为我采用的是LinearLayout包裹的其他控件。
那么我们新建一个类,我们知道控件的初始化,可以通过findViewById(R.id.xx);的方式查找并初始化控件,还有就是直接new的方式比如Button btn_a = new Button(this);这样我们就可以理解为什么新建类了,因为大多数控件都是继承自view或者view的子类。
package com.mero.wyt_register.widget;

import com.mero.wyt_register.R;

import android.content.Context;
import android.content.res.TypedArray;
import android.util.AttributeSet;
import android.view.LayoutInflater;
import android.view.View;
import android.widget.ImageView;
import android.widget.LinearLayout;
import android.widget.TextView;

/**
 *@项目名称: 帮帮助手
 *@文件名称: MixTextImage.java
 *@Date: 2016-7-16
 *@Copyright: 2016 Technology Mero Inc. All rights reserved.
 */
public class MixTextImage extends LinearLayout{
	private ImageView imageView = null;
	private TextView tx_fun_type = null;
	public MixTextImage(Context context){
		super(context);
	}
	public MixTextImage(Context context, AttributeSet attrs) {
		super(context, attrs);
		// TODO Auto-generated constructor stub
		//或LayoutInflater layoutInflater LayoutInflater.from(context);
		LayoutInflater layoutInflater = (LayoutInflater) context.getSystemService(Context.LAYOUT_INFLATER_SERVICE);
		layoutInflater.inflate(R.layout.mix_text_image, this);
		TypedArray typedArray = context.obtainStyledAttributes(attrs, R.styleable.Mix);
		initTyped(typedArray);
	}
	/**
	 * @param typedArray
	 */
	private void initTyped(TypedArray typedArray) {

		tx_fun_type = (TextView) findViewById(R.id.tx_fun_type);
		String text = typedArray.getString(R.styleable.Mix_text);
		int textColor = typedArray.getColor(R.styleable.Mix_text_color, 0xffffffff);
		float textSize =  typedArray.getDimension(R.styleable.Mix_text_size, 20);
		tx_fun_type.setText(text);
		tx_fun_type.setTextColor(textColor);
		tx_fun_type.setTextSize(textSize);


		imageView = (ImageView) findViewById(R.id.img_icon_left);

		int imageSrc = typedArray.getResourceId(R.styleable.Mix_image_src, 0);//从属性集得到图片
		int imageBg = typedArray.getResourceId(R.styleable.Mix_image_bg, 0);//从属性集得到背景图
		int imageWidth = (int) typedArray.getDimension(R.styleable.Mix_image_width, 25);
		int imageHeight = (int) typedArray.getDimension(R.styleable.Mix_image_height, 25);
		int imageAlpha = typedArray.getInt(R.styleable.Mix_image_alpha, 255);
		imageView.setImageResource(imageSrc);
		imageView.setBackgroundResource(imageBg);
		imageView.setAlpha(imageAlpha);
		LayoutParams layoutParams = new LayoutParams(imageWidth, imageHeight);
		imageView.setLayoutParams(layoutParams);//设置图片高度
		typedArray.recycle();
	}

	//设置图片资源
	@SuppressWarnings("unused")
	private void setImgResource(int resId){
		imageView.setImageResource(resId);
	}


	//设置控件背景图片
	@SuppressWarnings("unused")
	private void setBgImage(int resId){
		imageView.setImageResource(resId);
	}

	//设置图片的高度和宽度
	private void setImageSize(int width,int height){
		LayoutParams layoutParams = new LayoutParams(width,height);
		imageView.setLayoutParams(layoutParams);
	}

	//设置图片的不透明度
	private void setImageAlpha(int alpha){
		imageView.setAlpha(alpha);
	}

	//设置文字内容
	private void setText(String text){
		tx_fun_type.setText(text);
	}


	//设置文字颜色
	private void setTextColor(int colorValue){
		tx_fun_type.setTextColor(colorValue);
	}

	//设置文字大小
	private void setTextSize(int size){
		tx_fun_type.setTextSize(size);
	}
	//设置图片点击事件
	public void onMixTextImageClick(final MixTextImageListener mixTextImageListener){
		imageView.setOnClickListener(new OnClickListener() {

			@Override
			public void onClick(View v) {
				mixTextImageListener.mClick();
			}
		});
	}
	//回调接口
	public interface MixTextImageListener{
		public void mClick();
	}
}
第四步:得到属性集对象
LayoutInflater layoutInflater = (LayoutInflater) context.getSystemService(Context.LAYOUT_INFLATER_SERVICE);
		layoutInflater.inflate(R.layout.mix_text_image, this);//通过xml布局文件把View加载进来
		TypedArray typedArray = context.obtainStyledAttributes(attrs, R.styleable.Mix);//通过obtainStyledAttributes()方法获取到属性集
第五步:通过属性集得到各个属性及设置属性
tx_fun_type = (TextView) findViewById(R.id.tx_fun_type);
		String text = typedArray.getString(R.styleable.Mix_text);
		int textColor = typedArray.getColor(R.styleable.Mix_text_color, 0xffffffff);
		float textSize =  typedArray.getDimension(R.styleable.Mix_text_size, 20);
		tx_fun_type.setText(text);
		tx_fun_type.setTextColor(textColor);
		tx_fun_type.setTextSize(textSize);


		imageView = (ImageView) findViewById(R.id.img_icon_left);

		int imageSrc = typedArray.getResourceId(R.styleable.Mix_image_src, 0);//从属性集得到图片
		int imageBg = typedArray.getResourceId(R.styleable.Mix_image_bg, 0);//从属性集得到背景图
		int imageWidth = (int) typedArray.getDimension(R.styleable.Mix_image_width, 25);
		int imageHeight = (int) typedArray.getDimension(R.styleable.Mix_image_height, 25);
		int imageAlpha = typedArray.getInt(R.styleable.Mix_image_alpha, 255);
		imageView.setImageResource(imageSrc);
		imageView.setBackgroundResource(imageBg);
		imageView.setAlpha(imageAlpha);
LayoutParams layoutParams = new LayoutParams(imageWidth, imageHeight);第六步:向外暴露set方法
//设置图片资源
	@SuppressWarnings("unused")
	private void setImgResource(int resId){
		imageView.setImageResource(resId);
	}


	//设置控件背景图片
	@SuppressWarnings("unused")
	private void setBgImage(int resId){
		imageView.setImageResource(resId);
	}

	//设置图片的高度和宽度
	private void setImageSize(int width,int height){
		LayoutParams layoutParams = new LayoutParams(width,height);
		imageView.setLayoutParams(layoutParams);
	}

	//设置图片的不透明度
	private void setImageAlpha(int alpha){
		imageView.setAlpha(alpha);
	}

	//设置文字内容
	private void setText(String text){
		tx_fun_type.setText(text);
	}


	//设置文字颜色
	private void setTextColor(int colorValue){
		tx_fun_type.setTextColor(colorValue);
	}

	//设置文字大小
	private void setTextSize(int size){
		tx_fun_type.setTextSize(size);
	}
第七步:向外暴露事件接口供调用
public interface MixTextImageListener{
		public void mClick();
	}
好了,这样一个完整的组合控件就搞定了,接下来,我们看看如何使用。
我们只需要在自己的布局文件采用如下方式导入就可以了。记得在布局文件另外新添加上命令空间。 xmlns:mero="http://schemas.android.com/apk/res/com.mero.wyt_register" 这里要注意的是这个包名是你的application的包名,不会找的可以去你的AndroidManifest.xml下找到你的package名。而不是你的这个类的包名。
各位学习的,看着留言点赞可好。