Springboot2.1.0集成Redis
步骤:
- 引入pom依赖
- 配置文件
- 注解@EnableCaching
- 开始使用
下面开始实现
引入pom
使用的是IDEA,新建一个全新的工程:
直接在创建的时候引入:

在springboot2之后,redis默认集成的是lettuce,如果要使用jedis,需要使用第二个xml配置
第一种:
<dependency>
    <groupId>org.springframework.bootgroupId>
    <artifactId>spring-boot-starter-data-redisartifactId>
dependency>
<dependency>
    <groupId>org.projectlombokgroupId>
    <artifactId>lombokartifactId>
    <optional>trueoptional>
dependency>
<dependency>
    <groupId>org.springframework.bootgroupId>
    <artifactId>spring-boot-starter-webartifactId>
dependency>
<dependency>
    <groupId>org.springframework.bootgroupId>
    <artifactId>spring-boot-starter-testartifactId>
    <scope>testscope>
dependency>
第二种, 修改redis的引入方式,然后修改一些配置,稍后列出:
<dependency>
    <groupId>org.springframework.bootgroupId>
    <artifactId>spring-boot-starter-data-redisartifactId>

    <exclusions>
        <exclusion>
            <groupId>redis.clientsgroupId>
            <artifactId>jedisartifactId>
        exclusion>
        <exclusion>
            <groupId>io.lettucegroupId>
            <artifactId>lettuce-coreartifactId>
        exclusion>
    exclusions>
dependency>

<dependency>
    <groupId>redis.clientsgroupId>
    <artifactId>jedisartifactId>
    <version>2.9.0version>
dependency>


<dependency>
    <groupId>org.apache.commonsgroupId>
    <artifactId>commons-pool2artifactId>
    <version>RELEASEversion>
dependency>
配置文件【先使用默认的配置】
spring:
  redis:
    # Redis服务器地址
    host: 127.0.0.1
    # Redis数据库索引(默认为0)
    database: 0
    # Redis服务器连接端口
    port: 6379
    password: 这里是redis的密码
    #连接超时时间(毫秒)
    timeout: 3600
注解@EnableCaching
要使用redis,直接在启动类上加注解:
@EnableCaching
@SpringBootApplication
public class RedisApplication {
    public static void main(String[] args) {
        SpringApplication.run(RedisApplication.class, args);
    }
}
使用
先来一个controller,然后来一个service。注意用到了web,引入
<dependency>
    <groupId>org.springframework.bootgroupId>
    <artifactId>spring-boot-starter-webartifactId>
dependency>
启动类上加注解。
@EnableCaching
@SpringBootApplication
public class RedisApplication {
    public static void main(String[] args) {
        SpringApplication.run(RedisApplication.class, args);
    }
}
bean:注意一定要实现Serializable。
@Data
@Builder
@NoArgsConstructor
@AllArgsConstructor
public class User implements Serializable {
    private String name;
    private Integer age;
}
一个简单的controller:
@RestController
public class DemoController {
    @Autowired
    private IUserService userService;
    @RequestMapping("/user")
    public User find() {
        System.out.println("load1");
        return userService.find(1);
    }
}
service和impl:
public interface IUserService {
    User find(Integer id);
}
@Service
public class UserServiceImpl implements IUserService {
    @Cacheable(value = "users",key = "'id_' + #id")
    @Override
    public User find(Integer id) {
        System.out.println("load2");
        User u = User.builder()
                .name("名称" + RandomUtils.nextInt(1000, 2000))
                .age(RandomUtils.nextInt(0, 100))
                .build();
        return u;
    }
}
这里使用的是注解的方式,value指定了缓存的控件,key使用的是el方式写入,如果使用默认的缓存配置,这里key只能是string类型的。
测试
右击RedisApplication的main跑起来。
使用postman调用接口:
http://localhost:8080/user
得到返回值:

多点击几次接口调用,查看console的打印:
load1
load2
load1
load1
注意到只有第一次的时候有打印load2,后面的都直接返回,说明启用了缓存。
查看缓存【idea有iedis插件】:

使用stringRedisTemplate的方式,存储的都是string
修改一下UserServiceImpl中的实现
@Service
public class UserServiceImpl implements IUserService {

    @Autowired
    private StringRedisTemplate stringRedisTemplate;

    @Override
    public User find(Integer id) {
        System.out.println("load2");
        User u = User.builder()
                .name("名称" + RandomUtils.nextInt(1000, 2000))
                .age(RandomUtils.nextInt(0, 100))
                .build();

        stringRedisTemplate.opsForValue().set("users2", u.toString());
        return u;
    }
}
如果要存储对象,那么要修改一些redis的序列化配置
看userServiceImpl的修改,主要是增加了RedisTemplate
@Service
public class UserServiceImpl implements IUserService {

    @Autowired
    private StringRedisTemplate stringRedisTemplate;

    @Autowired
    private RedisTemplate<String, Object> redisTemplate;

    @Bean
    public RedisTemplate<String, Object> redisTemplate(LettuceConnectionFactory lettuceConnectionFactory) {
        //设置序列化
        Jackson2JsonRedisSerializer<Object> jackson2JsonRedisSerializer = new Jackson2JsonRedisSerializer<>(Object.class);
        ObjectMapper om = new ObjectMapper();
        om.setVisibility(PropertyAccessor.ALL, JsonAutoDetect.Visibility.ANY);
        om.enableDefaultTyping(ObjectMapper.DefaultTyping.NON_FINAL);
        jackson2JsonRedisSerializer.setObjectMapper(om);
        // 配置redisTemplate
        RedisTemplate<String, Object> redisTemplate = new RedisTemplate<>();
        redisTemplate.setConnectionFactory(lettuceConnectionFactory);

        RedisSerializer<String> stringSerializer = new StringRedisSerializer();
        // key序列化
        redisTemplate.setKeySerializer(stringSerializer);
        // value序列化
        redisTemplate.setValueSerializer(jackson2JsonRedisSerializer);
        // Hash key序列化
        redisTemplate.setHashKeySerializer(stringSerializer);
        // Hash value序列化
        redisTemplate.setHashValueSerializer(jackson2JsonRedisSerializer);
        redisTemplate.afterPropertiesSet();
        return redisTemplate;
    }


    @Override
    public User find(Integer id) {
        System.out.println("load2");
        User u = User.builder()
                .name("名称" + RandomUtils.nextInt(1000, 2000))
                .age(RandomUtils.nextInt(0, 100))
                .build();
        stringRedisTemplate.opsForValue().set("users3", u.toString());
        redisTemplate.opsForValue().set("users4", u);
        return u;
    }
}
跑起来之后,调用接口,查看redis中的user4的值,已经进行格式化存储。
使用jedis的方式
配置文件加入:
spring:
  redis:
    # Redis服务器地址
    host: 127.0.0.1
    # Redis数据库索引(默认为0)
    database: 0
    # Redis服务器连接端口
    port: 6379
    password: JDJHSY73MHGNWCBXB6QH9G6JHAN2HQ5YJ278DENCRABEW9EAJYFG4Z4BEMMNTZ5N8HUVXKFHHUJ8U76M4ZS5W9ZG79ZB99VPXCUG
    #连接超时时间(毫秒)
    timeout: 3600
    ## springboot 中redis默认使用lettuce, 本系统使用jedis, 如果要用默认的,配置上只需要将jedis换成lettuce即可
    jedis:
      pool:
        # 连接池最大连接数(使用负值表示没有限制)
        max-active: 8
        #连接池最大阻塞等待时间(使用负值表示没有限制)
        max-wait: -1
        # 连接池中的最大空闲连接
        max-idle: 8
        # 连接池中的最小空闲连接
        min-idle: 0
pom的修改,参考第二种中的配置,注意jedis版本不能太高。
然后加入一个配置类:
@Slf4j
@Configuration
public class RedisConfiguration extends CachingConfigurerSupport {

    /**
     * Logger
     */
    private static final Logger lg = LoggerFactory.getLogger(RedisConfiguration.class);

    /**
     * 自定义缓存的可以生成策略, 没有指定key的缓存都使用这个生成.
     *
     * @return
     */
    @Bean
    @Override
    public KeyGenerator keyGenerator() {
        //  设置自动key的生成规则,配置spring boot的注解,进行方法级别的缓存
        // 使用:进行分割,可以很多显示出层级关系
        // 这里其实就是new了一个KeyGenerator对象,只是这是lambda表达式的写法,我感觉很好用,大家感兴趣可以去了解下
        return (target, method, params) -> {
            StringBuilder sb = new StringBuilder();
            sb.append(target.getClass().getName());
            sb.append(".");
            sb.append(method.getName());
            sb.append("[");
            for (Object obj : params) {
                sb.append(String.valueOf(obj));
            }
            sb.append("]");
            return sb.toString();
        };
    }

    @Bean
    public CacheManager cacheManager(RedisConnectionFactory factory) {
        // 生成一个默认配置,通过config对象即可对缓存进行自定义配置
        RedisCacheConfiguration config = RedisCacheConfiguration.defaultCacheConfig();
        // 设置缓存的默认过期时间,也是使用Duration设置, 设置为30分钟
        config = config.entryTtl(Duration.ofMinutes(30))
                // 不缓存空值
                .disableCachingNullValues();

        // 设置一个初始化的缓存空间set集合, 就是注解@Cacheable(value = "my-redis-cache2")中的value值,
        Set<String> cacheNames = new HashSet<>();
        cacheNames.add("demo-redis-cache0");
        cacheNames.add("demo-redis-cache1");

        // 对每个缓存空间应用不同的配置
        Map<String, RedisCacheConfiguration> configMap = new HashMap<>(16);
        configMap.put("demo-redis-cache0", config);
        // 设置过期时间为 30s
        configMap.put("demo-redis-cache1", config.entryTtl(Duration.ofSeconds(30)));

        // 使用自定义的缓存配置初始化一个cacheManager
        return RedisCacheManager.builder(factory)
                // 注意这两句的调用顺序,一定要先调用该方法设置初始化的缓存名,再初始化相关的配置
                .initialCacheNames(cacheNames)
                .withInitialCacheConfigurations(configMap)
                .transactionAware()
                .build();
    }

    @Bean
    public RedisTemplate<String, Object> redisTemplate(JedisConnectionFactory jedisConnectionFactory) {
        //设置序列化
        Jackson2JsonRedisSerializer<Object> jackson2JsonRedisSerializer = new Jackson2JsonRedisSerializer<>(Object.class);
        ObjectMapper om = new ObjectMapper();
        om.setVisibility(PropertyAccessor.ALL, JsonAutoDetect.Visibility.ANY);
        om.enableDefaultTyping(ObjectMapper.DefaultTyping.NON_FINAL);
        jackson2JsonRedisSerializer.setObjectMapper(om);
        // 配置redisTemplate
        RedisTemplate<String, Object> redisTemplate = new RedisTemplate<>();
        redisTemplate.setConnectionFactory(jedisConnectionFactory);
        RedisSerializer<String> stringSerializer = new StringRedisSerializer();
        // key序列化
        redisTemplate.setKeySerializer(stringSerializer);
        // value序列化
        redisTemplate.setValueSerializer(jackson2JsonRedisSerializer);
        // Hash key序列化
        redisTemplate.setHashKeySerializer(stringSerializer);
        // Hash value序列化
        redisTemplate.setHashValueSerializer(jackson2JsonRedisSerializer);
        redisTemplate.afterPropertiesSet();
        return redisTemplate;
    }

    @Override
    @Bean
    public CacheErrorHandler errorHandler() {
        // 异常处理,当Redis发生异常时,打印日志,但是程序正常走
        lg.info("初始化 -> [{}]", "Redis CacheErrorHandler");
        return new CacheErrorHandler() {
            @Override
            public void handleCacheGetError(RuntimeException e, Cache cache, Object key) {
                lg.error("Redis occur handleCacheGetError:key -> [{}]", key, e);
            }

            @Override
            public void handleCachePutError(RuntimeException e, Cache cache, Object key, Object value) {
                lg.error("Redis occur handleCachePutError:key -> [{}];value -> [{}]", key, value, e);
            }

            @Override
            public void handleCacheEvictError(RuntimeException e, Cache cache, Object key) {
                lg.error("Redis occur handleCacheEvictError:key -> [{}]", key, e);
            }

            @Override
            public void handleCacheClearError(RuntimeException e, Cache cache) {
                lg.error("Redis occur handleCacheClearError:", e);
            }
        };
    }

    /**
     * 此内部类就是把yml的配置数据,进行读取,创建JedisConnectionFactory和JedisPool,以供外部类初始化缓存管理器使用
     * 不了解的同学可以去看@ConfigurationProperties和@Value的作用
     */
    @ConfigurationProperties
    class DataJedisProperties {
        @Value("${spring.redis.host}")
        private String host;
        @Value("${spring.redis.password}")
        private String password;
        @Value("${spring.redis.port}")
        private int port;
        @Value("${spring.redis.timeout}")
        private int timeout;
        @Value("${spring.redis.jedis.pool.max-idle}")
        private int maxIdle;
        @Value("${spring.redis.jedis.pool.max-wait}")
        private long maxWaitMillis;

        @Bean
        JedisConnectionFactory jedisConnectionFactory() {
            lg.info("Create JedisConnectionFactory successful");
            RedisStandaloneConfiguration redisStandaloneConfiguration = new RedisStandaloneConfiguration();
            redisStandaloneConfiguration.setHostName(host);
            redisStandaloneConfiguration.setPort(port);
            redisStandaloneConfiguration.setDatabase(0);
            redisStandaloneConfiguration.setPassword(RedisPassword.of(password));

            JedisClientConfiguration.JedisClientConfigurationBuilder jedisClientConfiguration = JedisClientConfiguration.builder();
            jedisClientConfiguration.connectTimeout(Duration.ofMillis(timeout));
            return new JedisConnectionFactory(redisStandaloneConfiguration,
                    jedisClientConfiguration.build());
        }

        @Bean
        public JedisPool redisPoolFactory() {
            lg.info("JedisPool init successful,host -> [{}];port -> [{}]", host, port);
            JedisPoolConfig jedisPoolConfig = new JedisPoolConfig();
            jedisPoolConfig.setMaxIdle(maxIdle);
            jedisPoolConfig.setMaxWaitMillis(maxWaitMillis);

            return new JedisPool(jedisPoolConfig, host, port, timeout, password);
        }
    }
}
配置类中定义了2个缓存空间。
修改一下userserviceimpl:
@Service
public class UserServiceImpl implements IUserService {
    @Cacheable(value = "demo-redis-cache0")
    @Override
    public User find(Integer id) {
        System.out.println("load2");
        User u = User.builder()
                .name("名称" + RandomUtils.nextInt(1000, 2000))
                .age(RandomUtils.nextInt(0, 100))
                .build();
        return u;
    }
}
跑起来查看结果:

而且多次调用没有打印load2,说明缓存生效。
玩点其他的不一样的
这里我注入的都是在service的实现层,为什么不在controller第一层就缓存呢?
改造一下controller:
@RestController
public class DemoController {
    @Autowired
    private IUserService userService;
    @RequestMapping("/user")
    public User find() {
        System.out.println("load1");
        return userService.find(1);
    }

    @Autowired
    private StringRedisTemplate stringRedisTemplate;

    // 第二个测试,
    @RequestMapping("/user1")
    public User find2(){
        System.out.println("load3");
        return getUser();
    }

    @Cacheable(value = "demo-redis-cache1")
    public User getUser() {
        System.out.println("load4");
        return new User("名称", 12);
    }

    //
    @RequestMapping("/user2")
    public User find3(){
        System.out.println("load5");
        User u = new User("名称1", 20);
        stringRedisTemplate.opsForValue().set("testuser", u.toString());
        return u;
    }
}
看到了,加了2个方法,一个是将@cacheable加入到了controller层,另外一个是在这一层直接使用stringRedisTemplate。
调用接口,结果【一次调用user,2次调用user1,一次调用user2】:
load1
load3
load4
load3
load4
load5
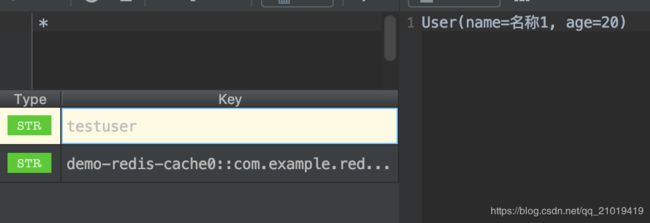
结果是user1中打印了2次,可见缓存没有生效。查看iedis:

结果中并没有demo-redis-cache1,也即是说使用注解的方式,这里是实效的。那么为什么呢?
这里参看一下这个解释:
https://stackoverflow.com/questions/41534493/spring-boot-enablecaching-and-cacheable-annotation-not-working
总结
以上就是集成redis的方式了,使用的时候,为了避免不能缓存,还是主动使用redisTemplate的好,自己包装一层工具类就可以了。还可以自定义失效时间:
stringRedisTemplate.opsForValue().set("testUser2", u.toString(), 10, TimeUnit.SECONDS);
以上。

