spring boot + druid +jpa(hibernate) +mysql 项目搭建步骤和注意事项
注:使用maven项目结构搭建的项目;
一.使用eclipse或者其他IDE工具搭建一个maven项目,这里步骤省略;
二.配置pom.xml文件:
1.引入spring-boot依赖, druid依赖,mysql依赖等;
a. spring-boot-starter-parent 版本必须是1.4.0版本以上,因为1.4.0版本还需要写相应的Druid类去开启引用Druid数据源,不支持直接在application.properties配置;说白了就是1.4.0版本不支持spring.datasource.type这个属性;
b.spring-boot-starter-data-jpa 已经包含了hibernate所需的所有包;
  4.0.0

  com.zwp
  spring-boot
  0.0.1-SNAPSHOT
  jar
  spring-boot
  http://maven.apache.org


    org.springframework.boot
    spring-boot-starter-parent
    1.4.2.RELEASE


    UTF-8
    UTF-8
    1.7


      org.springframework.boot
      spring-boot-starter-web


       org.springframework.boot
       spring-boot-starter-data-jpa


		com.alibaba
		druid
		1.0.15


      mysql
      mysql-connector-java


      junit
      junit
      test


		javax.servlet
		jstl


		javax.servlet
		servlet-api
		3.0-alpha-1
		provided


	        spring-snapshots
	        http://repo.spring.io/libs-snapshot


	        spring-snapshots
	        http://repo.spring.io/libs-snapshot


			org.apache.maven.plugins
			maven-compiler-plugin

				1.7
				1.7
三.application.properties 配置:
#tomcat配置
##修改tomcat端口
server.port=8011

# dataSource_config
spring.datasource.type=com.alibaba.druid.pool.DruidDataSource
spring.datasource.driver-class-name=com.mysql.jdbc.Driver
spring.datasource.url=jdbc:mysql://127.0.0.1:3306/test?characterEncoding=utf8&useSSL=false
spring.datasource.username=root
spring.datasource.password=root
spring.jpa.database =MYSQL
spring.jpa.hibernate.ddl-auto=update
spring.jpa.show-sql =true
spring.jpa.hibernate.dialect=org.hibernate.dialect.MySQLDialect
spring.jpa.properties.hibernate.dialect =org.hibernate.dialect.MySQLDialect

# 下面为连接池的补充设置,应用到上面所有数据源中
# 初始化大小,最小,最大
spring.datasource.initialSize=5
spring.datasource.minIdle=5
spring.datasource.maxActive=20
# 配置获取连接等待超时的时间
spring.datasource.maxWait=60000
# 配置间隔多久才进行一次检测,检测需要关闭的空闲连接,单位是毫秒
spring.datasource.timeBetweenEvictionRunsMillis=60000
# 配置一个连接在池中最小生存的时间,单位是毫秒
spring.datasource.minEvictableIdleTimeMillis=300000
spring.datasource.validationQuery=SELECT 1 FROM DUAL
spring.datasource.testWhileIdle=true
spring.datasource.testOnBorrow=false
spring.datasource.testOnReturn=false
# 打开PSCache,并且指定每个连接上PSCache的大小
spring.datasource.poolPreparedStatements=true
spring.datasource.maxPoolPreparedStatementPerConnectionSize=20
# 配置监控统计拦截的filters,去掉后监控界面sql无法统计,'wall'用于防火墙
spring.datasource.filters=stat,wall,log4j
# 通过connectProperties属性来打开mergeSql功能;慢SQL记录
spring.datasource.connectionProperties=druid.stat.mergeSql=true;druid.stat.slowSqlMillis=5000
# 合并多个DruidDataSource的监控数据
spring.datasource.useGlobalDataSourceStat=true
四.Application 类配置: 这个类是spring boot启动入口;
a. @Configuration
这里的@Configuration对我们来说不陌生,它就是JavaConfig形式的Spring Ioc容器的配置类使用的那个@Configuration,SpringBoot社区推荐使用基于JavaConfig的配置形式,所以,这里的启动类标注了@Configuration之后,本身其实也是一个IoC容器的配置类。任何一个标注了@Configuration的Java类定义都是一个JavaConfig配置类。
b.@ComponentScan
@ComponentScan这个注解在Spring中很重要,它对应XML配置中的元素,@ComponentScan的功能其实就是自动扫描并加载符合条件的组件(比如@Component和@Repository等)或者bean定义,最终将这些bean定义加载到IoC容器中。
我们可以通过basePackages等属性来细粒度的定制@ComponentScan自动扫描的范围,如果不指定,则默认Spring框架实现会从声明@ComponentScan所在类的package进行扫描。
c. @EnableAutoConfiguration个人感觉@EnableAutoConfiguration这个Annotation最为重要,所以放在最后来解读,大家是否还记得Spring框架提供的各种名字为@Enable开头的Annotation定义?比如@EnableScheduling、@EnableCaching、@EnableMBeanExport等,@EnableAutoConfiguration的理念和做事方式其实一脉相承,简单概括一下就是,借助@Import的支持,收集和注册特定场景相关的bean定义。
@EnableScheduling是通过@Import将Spring调度框架相关的bean定义都加载到IoC容器。
@EnableMBeanExport是通过@Import将JMX相关的bean定义加载到IoC容器。
而@EnableAutoConfiguration也是借助@Import的帮助,将所有符合自动配置条件的bean定义加载到IoC容器,仅此而已!
d.@EnableJpaRepositories
注解用于Srping JPA的代码配置,用于取代xml形式的配置文件,@EnableJpaRepositories支持的配置形式丰富多用
package com.zwp.base;

import org.springframework.boot.SpringApplication;
import org.springframework.boot.autoconfigure.EnableAutoConfiguration;
import org.springframework.boot.autoconfigure.domain.EntityScan;
import org.springframework.context.annotation.ComponentScan;
import org.springframework.context.annotation.Configuration;
import org.springframework.data.jpa.repository.config.EnableJpaRepositories;


@Configuration
@ComponentScan(basePackages = {"com.zwp.controller"})
@EnableAutoConfiguration
@EntityScan(basePackages="com.zwp.entity")
@EnableJpaRepositories(basePackages="com.zwp.repository")
public class Application {

	//程序启动入口
    public static void main(String[] args) {
        SpringApplication.run(Application.class, args);
    }
}
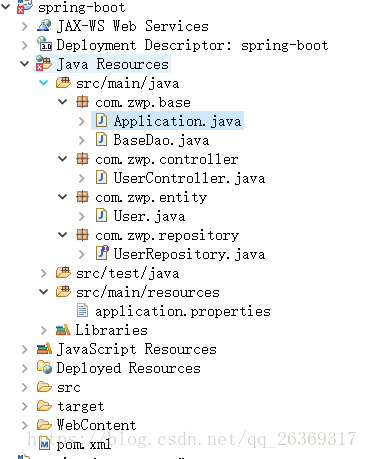
六. 项目结构:entity,service,dao代码省略,可下载demo查看;
七.案例下载;
