docker实现Mongodb复制集
mongodb4.0及其以上不支持主从复制,但是(replica Set)依然可以实现mongodb数据库的备份。
搭建环境:
centos7三台
三台机器互相ping通,三台机器安装docker环境
192.168.3.10(主复制集)宿主机开放端口37017
192.168.3.11(从复制集)宿主机开放端口47017
192.168.3.12(从复制集)宿主机开放端口57017
首先在主复制集上操作
[[email protected] ~]# docker pull mongo启动名为m0的mongodb容器并开启复制集功能
[[email protected] ~]# docker run --name m0 -p 37017:27017 -v /data/yapi/:/data/yapi/ -d mongo --replSet "rs"进入起来的主m0容器中
[[email protected] ~]# docker exec -it m0 bash 进入mongodb数据库
root@095d2b0e1858:/# mongo
MongoDB shell version v4.0.6
connecting to: mongodb://127.0.0.1:27017/?gssapiServiceName=mongodb
Implicit session: session { "id" : UUID("65e72c7a-acee-4aa0-b009-606ff75988f3") }
MongoDB server version: 4.0.6
Server has startup warnings:
2019-03-27T11:04:08.270+0000 I STORAGE  [initandlisten]
2019-03-27T11:04:08.270+0000 I STORAGE  [initandlisten] ** WARNING: Using the XFS filesystem is strongly recommended with the WiredTiger storage engine
2019-03-27T11:04:08.270+0000 I STORAGE  [initandlisten] **          See http://dochub.mongodb.org/core/prodnotes-filesystem
2019-03-27T11:04:09.199+0000 I CONTROL  [initandlisten]
2019-03-27T11:04:09.199+0000 I CONTROL  [initandlisten] ** WARNING: Access control is not enabled for the database.
2019-03-27T11:04:09.199+0000 I CONTROL  [initandlisten] **          Read and write access to data and configuration is unrestricted.
2019-03-27T11:04:09.199+0000 I CONTROL  [initandlisten]
2019-03-27T11:04:09.199+0000 I CONTROL  [initandlisten]
2019-03-27T11:04:09.199+0000 I CONTROL  [initandlisten] ** WARNING: /sys/kernel/mm/transparent_hugepage/enabled is 'always'.
2019-03-27T11:04:09.199+0000 I CONTROL  [initandlisten] **        We suggest setting it to 'never'
2019-03-27T11:04:09.199+0000 I CONTROL  [initandlisten]
2019-03-27T11:04:09.199+0000 I CONTROL  [initandlisten] ** WARNING: /sys/kernel/mm/transparent_hugepage/defrag is 'always'.
2019-03-27T11:04:09.199+0000 I CONTROL  [initandlisten] **        We suggest setting it to 'never'
2019-03-27T11:04:09.199+0000 I CONTROL  [initandlisten]
---
Enable MongoDB's free cloud-based monitoring service, which will then receive and display
metrics about your deployment (disk utilization, CPU, operation statistics, etc).

The monitoring data will be available on a MongoDB website with a unique URL accessible to you
and anyone you share the URL with. MongoDB may use this information to make product
improvements and to suggest MongoDB products and deployment options to you.

To enable free monitoring, run the following command: db.enableFreeMonitoring()
To permanently disable this reminder, run the following command: db.disableFreeMonitoring()
---

:>
设置主复制集和从复制集
var config={_id:"rs",members:[{_id:0,host:"192.168.3.10:37017"},{_id:1,host:"192.168.3.11:47017"},{_id:2,host:"192.168.3.12:57017"}]};这个时候主的复制集已经搭建完成开始搭建两个从复制集
开始在从复制集机器上做 192.168.3.11(从复制集)宿主机开放端口47017
[[email protected] ~]# docker pull mongo[[email protected]~]# docker run --name m1 -p 47017:27017 -v /data/yapi/:/data/yapi/ -d mongo --replSet "rs"开始在从复制集机器上做 192.168.3.12(从复制集)宿主机开放端口57017
[[email protected] ~]# docker pull mongo
[[email protected] ~]# docker run --name m2 -p 57017:27017 -v /data/yapi/:/data/yapi/ -d mongo --replSet "rs"主从复制集已经搭建完成
在主的mongodb数据库中输入下面可参考命令(最好前几个,后面几个还没用)查看复制集状态
rs.help()
    rs.status()                                { replSetGetStatus : 1 } checks repl set status
    rs.initiate()                              { replSetInitiate : null } initiates set with default settings
    rs.initiate(cfg)                           { replSetInitiate : cfg } initiates set with configuration cfg
    rs.conf()                                  get the current configuration object from local.system.replset
    rs.reconfig(cfg)                           updates the configuration of a running replica set with cfg (disconnects)
    rs.add(hostportstr)                        add a new member to the set with default attributes (disconnects)
    rs.add(membercfgobj)                       add a new member to the set with extra attributes (disconnects)
    rs.addArb(hostportstr)                     add a new member which is arbiterOnly:true (disconnects)
    rs.stepDown([stepdownSecs, catchUpSecs])   step down as primary (disconnects)
    rs.syncFrom(hostportstr)                   make a secondary sync from the given member
    rs.freeze(secs)                            make a node ineligible to become primary for the time specified
    rs.remove(hostportstr)                     remove a host from the replica set (disconnects)
    rs.slaveOk()                               allow queries on secondary nodes

    rs.printReplicationInfo()                  check oplog size and time range
    rs.printSlaveReplicationInfo()             check replica set members and replication lag
    db.isMaster()                              check who is primary
发现主复制集已经从普通的命令行输入变成了以下PRIMARY
To enable free monitoring, run the following command: db.enableFreeMonitoring()
To permanently disable this reminder, run the following command: db.disableFreeMonitoring()
---

rs:PRIMARY>
同理进入两个从的复制集发现是SECONDARY
To enable free monitoring, run the following command: db.enableFreeMonitoring()
To permanently disable this reminder, run the following command: db.disableFreeMonitoring()
---

rs:SECONDARY> show dbs
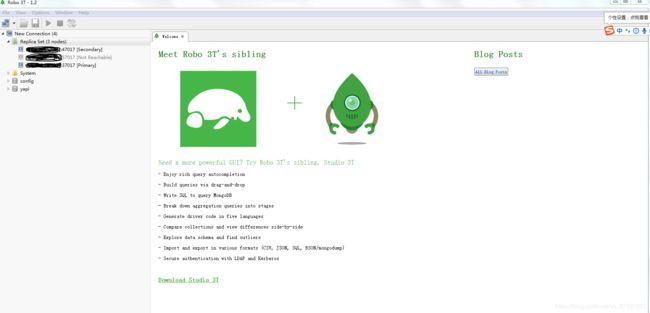
下载Robo 3T查看mongodb 复制集状态,我停止了一个从,所以从是灰色的
另外还可以下载Studio 3T 更详细的展示出数据库信息以及方便数据库的导入导出
mongodb主从复制集数据验证无误至此搭建完成

