SpringBoot入门,整合Mybatis并使用Mybatis-Generator自动生成所需代码
1.引言
在上一篇博客中,我们已经搭建好的第一个springboot web应用程序,下面整合mybatis与数据库进行交互,废话不多说,搞起!
2.引入依赖
在pom.xml文件中引入链接数据库的依赖,mybatis的依赖和mybatis-generator的依赖。
    org.springframework.boot
    spring-boot-starter-jdbc


    mysql
    mysql-connector-java
    runtime


    org.mybatis.spring.boot
    mybatis-spring-boot-starter
    1.3.2


    org.mybatis.generator
    mybatis-generator-core
    1.3.5
3.配置文件
打开application.properties配置文件,配置数据源并整合mybtis。
#数据源
spring.datasource.url=jdbc:mysql://127.0.0.1:3306/first?useUnicode=true&characterEncoding=utf-8
spring.datasource.username=root
spring.datasource.password=123456
spring.datasource.driver-class-name=com.mysql.jdbc.Driver
#整合mybatis
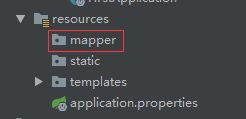
mybatis.mapper-locations=classpath:/mapper/**.xml这里我们将 mybatis的xml文件放在了classpath:/mapper/下,所以我们需要在resources创建一个mapper文件夹:
怎么样,是不是很简单,这样就完事了,下面开始测试。
4.测试
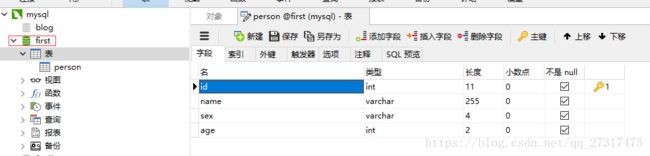
(1)创建数据库和表
这里使用mysql数据库,用的是navicat进行管理的,新建一个名为first的数据库,并新建一张person表,表结构如下:
创建完后,我们可以手动添加一些信息方便测试。
(2)创建项目所需包

(3)Mybatis-generator逆向工程
在resources目录下新建generator的配置文件,mybatis-generator.xml
在utils包下新建Generator.java
package com.example.utils;

import org.mybatis.generator.api.MyBatisGenerator;
import org.mybatis.generator.config.Configuration;
import org.mybatis.generator.config.xml.ConfigurationParser;
import org.mybatis.generator.internal.DefaultShellCallback;

import java.io.File;
import java.util.ArrayList;
import java.util.List;

public class Generator {
    public static void main(String[] args) throws Exception{
        List warnings = new ArrayList();
        boolean overwrite = true;
        File configFile = new File("D:/JavaProjects/First/src/main/resources/mybatis-generator.xml");
        ConfigurationParser cp = new ConfigurationParser(warnings);
        Configuration config = cp.parseConfiguration(configFile);
        DefaultShellCallback callback = new DefaultShellCallback(overwrite);
        MyBatisGenerator myBatisGenerator = new MyBatisGenerator(config, callback, warnings);
        myBatisGenerator.generate(null);
    }
}
然后执行这个程序,如果执行成功,将为我们自动生成所需的文件,也证明了我们与数据库链接成功。我们可以在相应的包内查看自动生成的文件

(4)开始测试
在controller包下新建PersonController类,在service包下常见PersonService接口,在serviceImpl包下创建PersonServiceImpl类实现PersonService接口。

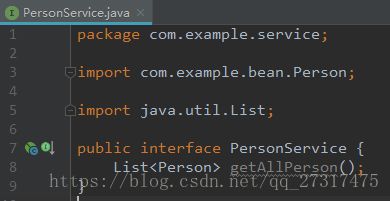
我们想要从数据库中取出全部数据并在前台页面显示出来。首先在PersonService中定义一个获取全部信息的方法:
然后在PersonServiceImpl中实现这个方法:
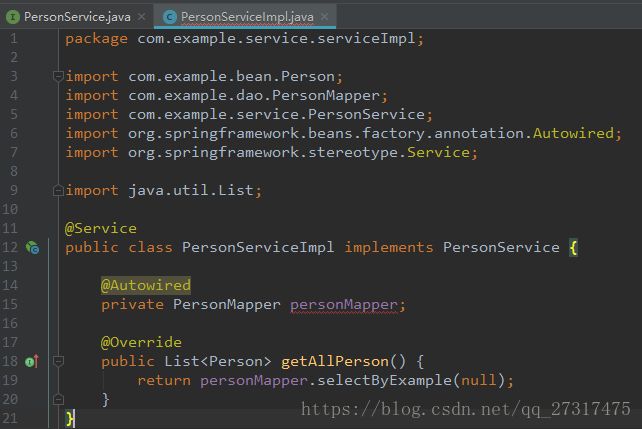
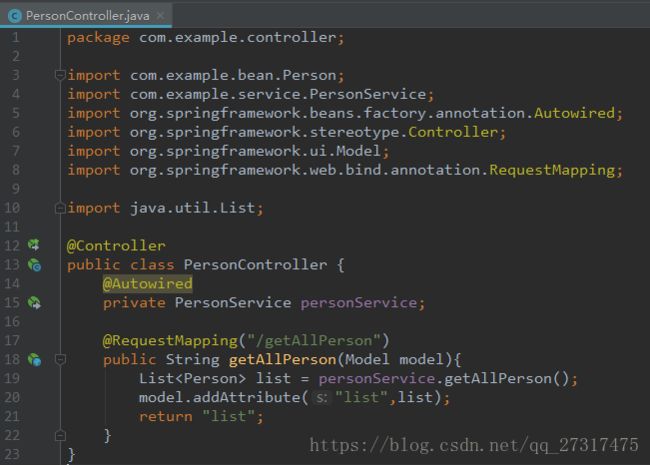
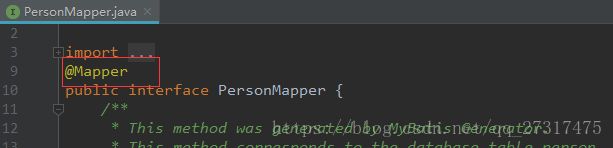
personMapper下的红线可以忽略,是idea的问题。在PersonController中调用PersonService中的方法获取所有人的信息并返回到list界面:
list界面没有,所以我们在templates文件夹下新建list.html,在上一篇博客博客中,我们引入的thymeleaf模版将会使用,处理数据并显示。

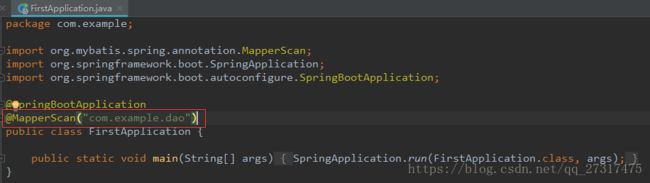
最后一步,为dao包中的自动生成的接口文件添加@Mapper或者直接在入口程序添加@MapperScan注解自动扫描dao包下的所有文件(二者选其一即可)
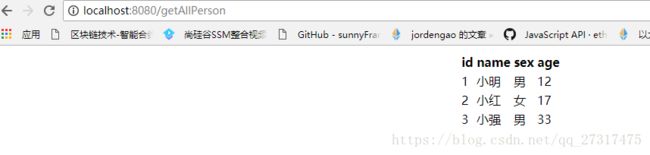
至此,准备工作已经完成,启动入口程序,输入http://localhost:8080/getAllPerson查看效果吧。
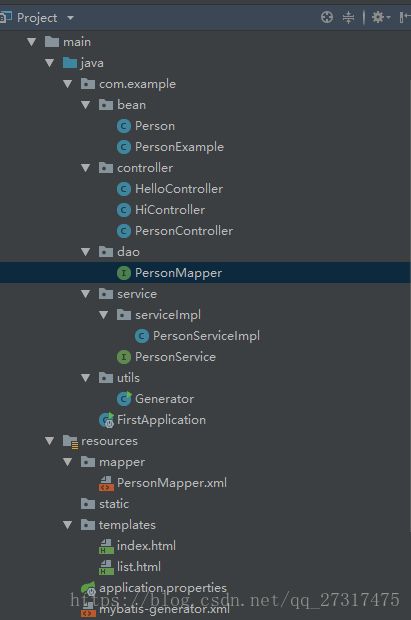
最终的目录结构如下图所示:
5.扩展(使用Druid链接池)
在pom.xml文件中,添加依赖项,
    com.alibaba
    druid
    1.1.10
更改配置文件,将我们之间的数据源配置注释掉,添加druid的数据配置。
#数据库访问配置
spring.datasource.name=mysql_test
spring.datasource.type=com.alibaba.druid.pool.DruidDataSource
spring.datasource.driver-class-name=com.mysql.jdbc.Driver
spring.datasource.url=jdbc:mysql://127.0.0.1:3306/first?useUnicode=true&characterEncoding=utf-8
spring.datasource.username=root
spring.datasource.password=123456
#数据源配置,初始化大小、最小、最大
spring.datasource.initialSize=5
spring.datasource.minIdle=5
spring.datasource.maxActive=20
#连接等待超时时间
spring.datasource.maxWait=60000
#配置隔多久进行一次检测(检测可以关闭的空闲连接)
spring.datasource.timeBetweenEvictionRunsMillis=60000
#配置连接在池中的最小生存时间
spring.datasource.minEvictableIdleTimeMillis=300000
spring.datasource.validationQuery=SELECT 1 FROM DUAL
spring.datasource.testWhileIdle=true
spring.datasource.testOnBorrow=false
spring.datasource.testOnReturn=false
# 打开PSCache,并且指定每个连接上PSCache的大小
spring.datasource.poolPreparedStatements=true
spring.datasource.maxPoolPreparedStatementPerConnectionSize=20
# 配置监控统计拦截的filters,去掉后监控界面sql无法统计,'wall'用于防火墙
spring.datasource.filters=stat,wall,log4j
# 通过connectProperties属性来打开mergeSql功能;慢SQL记录
spring.datasource.connectionProperties=druid.stat.mergeSql=true;druid.stat.slowSqlMillis=5000
# 合并多个DruidDataSource的监控数据
#spring.datasource.useGlobalDataSourceStat=true
重新启动入口程序,查看是否能够获得数据信息。
总体的pomw文件如下:
    4.0.0

    com.example
    first
    0.0.1-SNAPSHOT
    jar

    First
    Demo project for Spring Boot


        org.springframework.boot
        spring-boot-starter-parent
        2.0.3.RELEASE


        UTF-8
        UTF-8
        1.8


            org.springframework.boot
            spring-boot-starter-web


            org.springframework.boot
            spring-boot-starter-test
            test


            org.springframework.boot
            spring-boot-starter-thymeleaf


            org.springframework.boot
            spring-boot-starter-jdbc


            mysql
            mysql-connector-java
            runtime


            org.mybatis.spring.boot
            mybatis-spring-boot-starter
            1.3.2


            org.mybatis.generator
            mybatis-generator-core
            1.3.5


                org.springframework.boot
                spring-boot-maven-plugin
欢迎转载和评论,如有错误,我会及时改正!