https协议说明和自签证书使用
1、https交互说明
HTTPS 协议是“HTTP 协议”和“SSL/TLS 协议”的组合,又叫HTTP over SSL”或“HTTP over TLS”。会对http协议的文本数据进行加密处理,以二进制形式传输。
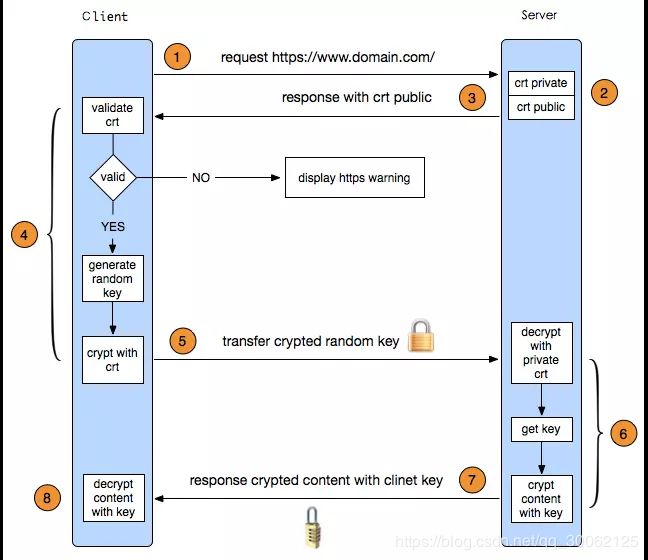
这里的https是基于TSL1.2协议(TLS1.2交互说明见 https://blog.csdn.net/qq_30062125/article/details/84560749 ),与TLS1.2交互过程类似:
-
1、客户端请求https地址,这里隐藏了一个TCP三次握手逻辑。
-
2、3、服务端下发CA证书(公钥)
-
4、客户端通过CA认证机构的公钥对服务器传过来的证书进行验签。具体流程如下:
- 4.1、CA机构对证书进行签名,根据证书里的签名算法字段决定算法。如sha256RSA,CA机构使用sha256对证书进行摘要,然后使用RSA算法对摘要进行私钥签名。
- 4.2、对于购买的证书,颁发这个证书的CA机构的公钥一般已经预置在操作系统中,浏览器使用该公钥进行验签。验签之后得到CA机构使用sha256得到的证书摘要,然后客户端再使用sha256对证书内容进行一次摘要,如果得到的值和验签之后得到的摘要值相同,则表示证书没有被修改过。
- 4.3、如果验证通过,则显示安全图标;如果不通过,则显示警告和不安全图标。
-
5、客户端验签成功之后,生成随机的对称秘钥,使用服务器公钥加密对称秘钥发送给服务端。
-
6、7、服务器通过自己的私钥解密密文,得到对称秘钥,加密相关信息传递给客户端。
-
8、客户端拿到服务器传递的信息,解析验证MAC(Message Authentication Code) 等信息,最终建立加密连接。
新建一次https连接总共有4个RTT,其中TCP三次握手一个RTT,TLS1.2握手2个RTT,建立http连接1个RTT。
2、openssl生成自签证书
包含三个组件:
openssl: 多用途的命令行工具,
包openssl libcrypto: 加密算法库,
包openssl-libs libssl:加密模块应用库,实现了ssl及tls,包nss
常用命令说明:
生成密钥对:man genrsa
生成私钥:
openssl genrsa -out /PATH/TO/PRIVATEKEY.FILE NUM_BITS
(umask 077; openssl genrsa –out test.key –des 2048)
–des/des3 2048为生成的私钥进行对称加密,临时指定umask值,设置生成私钥权限为600
openssl rsa -in test.key –out test2.key 将加密key解密
从私钥中提取出公钥
openssl rsa -in test3.key –pubout –out test3.key.pub
常用证书说明:
| 证书类型 | 说明 | 结构特征 |
|---|---|---|
| cer,crt | 不支持私钥,一般是CA签署后颁发的证书,实质是CA用私钥在申请者的公钥上签名。 | -----BEGIN CERTIFICATE----- 开头 |
| csr:(Certificate Signing Request) | 应用向CA申请签名的证书请求 | -----BEGIN CERTIFICATE REQUEST----- 开头 |
| pfx,p12:(Personal Information Exchange) | 存储证书和私钥 | |
| crl:(Certificate Revocation List) | 证书销毁清单 | |
| key,pem:(Privacy-enhanced Electronic Mail) | linux/unix下存储密钥的,window下不能用keytool导出密钥;pem同时也能存储公钥 | -----BEGIN RSA PRIVATE KEY----- 或者 —–BEGIN PUBLIC KEY—– 开头 |
2.1、环境描述
- 私有CA服务器
- 应用服务器
2.2、配置文件说明
参考配置文件/etc/pki/tls/openssl.cnf文件来创建CA
三种策略:匹配、支持和可选;匹配指要求申请填写的信息跟CA设置信息必须一致,支持指必须填写这项申请信息,可选指可有可无。
部分配置说明:
#CA配置相关说明:
[ ca ]
default_ca      = CA_default            # The default ca section  默认CA
####################################################################
[ CA_default ] 默认CA包含的信息

dir             = /etc/pki/CA           # Where everything is kept
                CA的公共目录
certs           = $dir/certs            # Where the issued certs are kept
                被发布的证书&旧的证书存放目录
crl_dir         = $dir/crl              # Where the issued crl are kept
                被吊销的证书存放目录
database        = $dir/index.txt        # database index file.
                存放颁发证书的数据库文件.默认不存在需要手动先创建
#unique_subject = no                    # Set to 'no' to allow creation of
                                        # several ctificates with same subject.
new_certs_dir   = $dir/newcerts         # default place for new certs.
                新颁发的证书存放目录
certificate     = $dir/cacert.pem       # The CA certificate
                自签名证书,局域网内的根CA自证证书
serial          = $dir/serial           # The current serial number
下一个证书颁发的编号 16进制数,默认不存在,手动创建,并且指定第一个证书的开始编号
crlnumber       = $dir/crlnumber        # the current crl number
                下一个吊销证书的编号
                                        # must be commented out to leave a
crl             = $dir/crl.pem          # The current CRL

private_key     = $dir/private/cakey.pem# The private key
                CA的私钥文件,必须叫cakey.pem
RANDFILE        = $dir/private/.rand    # private random number file

x509_extensions = usr_cert              # The extentions to add to the cert

default_days    = 365                   # how long to certify for
                默认ca有效期
default_crl_days= 30                    # how long before next CRL
            定义多少天公布新的吊销证书名单
default_md      = sha256                # use SHA-256 by default
            默认加密算法
preserve        = no                    # keep passed DN ordering

serial为16进制数00开始
#创建CA和申请证书选项说明:
policy          = policy_match
# For the CA policy
[ policy_match ]
countryName             = match         三项match是必须一样的
stateOrProvinceName     = match
organizationName        = match         组织必填项,即用户向哪个组织申请证书
organizationalUnitName  = optional      optional 不关心是否一样
commonName              = supplied      supplied是必须提供的,即网站域名
emailAddress            = optional
目录结构说明
CA服务器上的/etc/pki/CA的tree结构

[root@node190 CA]# tree
.
├── app.csr             传过来的申请证书文件
├── cacert.pem          CA自签名证书
├── certs               被发布的证书存放目录
│   ├── app.crt         已签署的证书
│   └── multiApp.crt
├── crl                 吊销证书存放目录
├── crlnumber           下一个被吊销的证书编号
├── crlnumber.old
├── crl.pem             新的吊销证书列表
├── index.txt           记录颁发V/R吊销证书的编号和证书填写的主题信息
├── index.txt.attr      unique_subject=yes,多个证书请求填写信息必须不同
├── index.txt.attr.old
├── index.txt.old       数据库备份
├── multiApp.csr        传过来的申请证书文件
├── newcerts            颁发证书的存放目录
│   ├── 00.pem          所有历史证书
│   ├── 01.pem
│   ├── 02.pem
│   ├── 03.pem
│   ├── 04.pem
│   ├── 05.pem
│   └── 06.pem
├── private
│   └── cakey.pem       CA的私钥
├── serial              下一个证书的编号
└── serial.old
2.3、步骤说明
2.3.1、创建CA自签根证书
- 在私有CA认证服务器/etc/pki/CA/目录下,创建必须要用的文件:index.txt和serial。
[root@node190 CA]# touch index.txt
[root@node190 CA]# echo 00 > serial

###### 进制转换 ######
# 10进制转16进制
[root@node190 CA]# printf "%x" 16
10
# 16进制转10进制
[root@node190 CA]# echo $((0x10))
16
# 8进制转10进制
[root@node190 CA]# echo $((010))
8
- 生成CA根证书私钥
[root@node190 CA]# ( umask 066;openssl genrsa -out /etc/pki/CA/private/cakey.pem 2048)
Generating RSA private key, 2048 bit long modulus
.......+++
..................................................................................................................+++
e is 65537 (0x10001)
- 根据CA私钥生成自签名证书
openssl req -new -x509 -key /etc/pki/CA/private/cakey.pem -out /etc/pki/CA/cacert.pem -days 3650 -config /etc/pki/tls/openssl.cnf
-new: 生成新证书签署请求
-x509: 专用于CA生成自签证书
-key: 生成请求时用到的私钥文件
-days n:证书的有效期限
-out /PATH/TO/SOMECERTFILE: 证书的保存路径
[root@node190 CA]# openssl req -new -x509 -key /etc/pki/CA/private/cakey.pem -out /etc/pki/CA/cacert.pem -days 3650 -config /etc/pki/tls/openssl.cnf
You are about to be asked to enter information that will be incorporated
into your certificate request.
What you are about to enter is what is called a Distinguished Name or a DN.
There are quite a few fields but you can leave some blank
For some fields there will be a default value,
If you enter '.', the field will be left blank.
-----
Country Name (2 letter code) [XX]:CN   必填项
State or Province Name (full name) []:AnHui  必填项
Locality Name (eg, city) [Default City]:HeFei
Organization Name (eg, company) [Default Company Ltd]:Wondertek 必填项
Organizational Unit Name (eg, section) []:center
Common Name (eg, your name or your server's hostname) []:csp.private.ca
Email Address []:52*****[email protected]
2.3.2、创建网站应用证书
- 生成应用私钥
[root@node191 CA]#  (umask 066;openssl genrsa -out app.key 2048)
Generating RSA private key, 2048 bit long modulus
......+++
.....................+++
e is 65537 (0x10001)
- 根据生成的私钥生成证书申请文件
单域名
[root@node191 CA]# openssl req -new -key app.key -out app.csr
You are about to be asked to enter information that will be incorporated
into your certificate request.
What you are about to enter is what is called a Distinguished Name or a DN.
There are quite a few fields but you can leave some blank
For some fields there will be a default value,
If you enter '.', the field will be left blank.
-----
Country Name (2 letter code) [XX]:CN
State or Province Name (full name) []:AnHui
Locality Name (eg, city) [Default City]:HeFei
Organization Name (eg, company) [Default Company Ltd]:Wondertek
Organizational Unit Name (eg, section) []:dev
Common Name (eg, your name or your server's hostname) []:qwcsp.tk
Email Address []:

Please enter the following 'extra' attributes
to be sent with your certificate request
A challenge password []:
An optional company name []:
# 查看申请文件信息
[root@node191 CA]# openssl req -text -noout -in app.csr
Certificate Request:
    Data:
        Version: 0 (0x0)
        Subject: C=CN, ST=AnHui, L=HeFei, O=Wondertek, OU=dev, CN=qwcsp.tk
        Subject Public Key Info:
            Public Key Algorithm: rsaEncryption
                Public-Key: (2048 bit)
                ...
多域名证书
- 生成申请
# C  => Country
# ST => State
# L  => City
# O  => Organization
# OU => Organization Unit
# CN => Common Name (证书所请求的域名)
# emailAddress => main administrative point of contact for the certificate

openssl req -new -sha256 \
    -key app.key -out multiApp.csr \
    -subj "/C=CN/ST=AnHui/L=HeFei/O=Wondertek/OU=dev/CN=www.qwcsp.tk" \
    -reqexts SAN \
    -config <(cat /etc/pki/tls/openssl.cnf \
        <(printf "[SAN]\nsubjectAltName=DNS:www.qwcsp.tk,DNS:www.qcforever.cf"))
- 查看申请文件信息
[root@node191 CA]# openssl req -text -noout -in multiApp.csr
Certificate Request:
    Data:
        Version: 0 (0x0)
        Subject: C=CN, ST=AnHui, L=HeFei, O=Wondertek, OU=dev, CN=www.qwcsp.tk
        Subject Public Key Info:
            Public Key Algorithm: rsaEncryption
                Public-Key: (2048 bit)
                Modulus:
                    ...
                Exponent: 65537 (0x10001)
        Attributes:
        Requested Extensions:
            X509v3 Subject Alternative Name:
                DNS:www.qwcsp.tk, DNS:www.qcforever.cf
    Signature Algorithm: sha256WithRSAEncryption
    ...
- 将请求证书文件拷贝到CA服务器/etc/pki/CA/目录
scp [email protected]:/etc/pki/CA/*csr /etc/pki/CA/
4.在CA服务器上,检查并签署证书
如果证书想要重新生成,可以先吊销再生成。
- 单域名
[root@node190 CA]# openssl ca -in app.csr -out certs/app.crt -keyfile private/cakey.pem -cert cacert.pem -days 3650 -config /etc/pki/tls/openssl.cnf
Using configuration from /etc/pki/tls/openssl.cnf
Check that the request matches the signature
Signature ok
Certificate Details:
        Serial Number: 0 (0x0)
        Validity
            Not Before: Nov 28 07:38:27 2018 GMT
            Not After : Nov 25 07:38:27 2028 GMT
        Subject:
            countryName               = CN
            stateOrProvinceName       = AnHui
            organizationName          = Wondertek
            organizationalUnitName    = dev
            commonName                = qwcsp.tk
        X509v3 extensions:
            X509v3 Basic Constraints:
                CA:FALSE
            Netscape Comment:
                OpenSSL Generated Certificate
            X509v3 Subject Key Identifier:
               ......
            X509v3 Authority Key Identifier:
                ......
查看签署信息
openssl x509 -in app.crt -noout -text|issuer|subject|serial|dates
[root@node190 CA]# openssl x509 -serial -noout -in certs/app.crt
serial=00

[root@node190 CA]# openssl x509 -dates -noout -in certs/app.crt
notBefore=Nov 28 07:38:27 2018 GMT
notAfter=Nov 25 07:38:27 2028 GMT

[root@node190 CA]# openssl x509 -text -noout -in certs/app.crt
Certificate:
    Data:
        Version: 3 (0x2)
        Serial Number: 0 (0x0)
    Signature Algorithm: sha256WithRSAEncryption
        Issuer: C=CN, ST=AnHui, L=HeFei, O=Wondertek, OU=dev, CN=www.qwcsp.tk/emailAddress=52*****[email protected]
        Validity
            Not Before: Nov 28 07:38:27 2018 GMT
            Not After : Nov 25 07:38:27 2028 GMT
        Subject: C=CN, ST=AnHui, O=Wondertek, OU=dev, CN=qwcsp.tk
        Subject Public Key Info:
            Public Key Algorithm: rsaEncryption
                Public-Key: (2048 bit)
                Modulus:
                ......
        X509v3 extensions:
            X509v3 Basic Constraints:
                CA:FALSE
            Netscape Comment:
                OpenSSL Generated Certificate
            ......

    Signature Algorithm: sha256WithRSAEncryption
        ......
- 多域名
[root@node190 CA]# openssl ca -in multiApp.csr  -extensions SAN -config <(cat /etc/pki/tls/openssl.cnf  <(printf "[SAN]\nsubjectAltName=DNS:www.qwcsp.tk,DNS:www.qcforever.cf"))      -out certs/multiApp.crt -days 3650
Using configuration from /dev/fd/63
Check that the request matches the signature
Signature ok
Certificate Details:
        Serial Number: 2 (0x2)
        Validity
            Not Before: Nov 28 08:13:16 2018 GMT
            Not After : Nov 25 08:13:16 2028 GMT
        Subject:
            countryName               = CN
            stateOrProvinceName       = AnHui
            organizationName          = Wondertek
            organizationalUnitName    = dev
            commonName                = www.qwcsp.tk
        X509v3 extensions:
            X509v3 Subject Alternative Name:
                DNS:www.qwcsp.tk, DNS:www.qcforever.cf
Certificate is to be certified until Nov 25 08:13:16 2028 GMT (3650 days)
Sign the certificate? [y/n]:y


1 out of 1 certificate requests certified, commit? [y/n]y
Write out database with 1 new entries
Data Base Updated
查看签署信息
[root@node190 CA]# openssl x509 -serial -noout -in certs/multiApp.crt
serial=02
[root@node190 CA]# openssl x509 -dates -noout -in certs/multiApp.crt
notBefore=Nov 28 08:13:16 2018 GMT
notAfter=Nov 25 08:13:16 2028 GMT
[root@node190 CA]# openssl x509 -text -noout -in certs/multiApp.crt
Certificate:
    Data:
        Version: 3 (0x2)
        Serial Number: 2 (0x2)
    Signature Algorithm: sha256WithRSAEncryption
        Issuer: C=CN, ST=AnHui, L=HeFei, O=Wondertek, OU=center, CN=csp.private.ca/emailAddress=52*****[email protected]
        Validity
            Not Before: Nov 28 08:13:16 2018 GMT
            Not After : Nov 25 08:13:16 2028 GMT
        Subject: C=CN, ST=AnHui, O=Wondertek, OU=dev, CN=www.qwcsp.tk
        Subject Public Key Info:
            Public Key Algorithm: rsaEncryption
                Public-Key: (2048 bit)
                Modulus:
                    ......
                Exponent: 65537 (0x10001)
        X509v3 extensions:
            X509v3 Subject Alternative Name:
                DNS:www.qwcsp.tk, DNS:www.qcforever.cf
    Signature Algorithm: sha256WithRSAEncryption
         ......
应用有 私钥:app.key 申请证书:app.csr、multiApp.csr 签署证书:app.crt、multiApp.crt
2.3.3 吊销证书
# 1、CA服务器创建吊销证书列表文件编号
[root@node190 CA] echo 02 > /etc/pki/CA/crlnumber

# 2、在应用服务器查找要吊销的证书以确保吊销正确
[root@node191 CA]# openssl x509 -in /etc/pki/CA/certs/multiApp.crt -noout -serial -subject
serial=02
subject= /C=CN/ST=AnHui/O=Wondertek/OU=dev/CN=www.qwcsp.tk

# 3、与CA服务器 index.txt 比对,发现是02证书
[root@node190 CA]# cat index.txt
V       281125081316Z   181128081549Z   02      unknown /C=CN/ST=AnHui/O=Wondertek/OU=dev/CN=www.qwcsp.tk
V       281125081529Z           04      unknown /C=CN/ST=AnHui/O=Wondertek/OU=dev/CN=qwcsp.tk

# 4、在CA服务器吊销指定的证书  此时 newcerts/02.pem 或者 certs/multiApp.crt 为一个证书
[root@node190 CA]# openssl ca -revoke certs/multiApp.crt
Using configuration from /etc/pki/tls/openssl.cnf
Revoking Certificate 02.
Data Base Updated

# 5、更新证书吊销列表
[root@node190 CA]# openssl ca -gencrl -out /etc/pki/CA/crl.pem
Using configuration from /etc/pki/tls/openssl.cnf

# 6、查看吊销列表信息
[root@node190 CA]# openssl crl -in /etc/pki/CA/crl.pem -noout -text
Certificate Revocation List (CRL):
        Version 2 (0x1)
    Signature Algorithm: sha256WithRSAEncryption
        Issuer: /C=CN/ST=AnHui/L=HeFei/O=Wondertek/OU=center/CN=csp.private.ca/emailAddress=52*****[email protected]
        Last Update: Nov 28 08:16:23 2018 GMT
        Next Update: Dec 28 08:16:23 2018 GMT
        CRL extensions:
            X509v3 CRL Number:
                2
Revoked Certificates:
    Serial Number: 02  02为被吊销证书的编号
        Revocation Date: Nov 28 08:15:49 2018 GMT
    Signature Algorithm: sha256WithRSAEncryption
        ......

# 7、针对已经吊销的证书,如果需要,重新生成即可,会看到记录中02是R,05是新生成的。
[root@node190 CA]# cat index.txt
R       281125081316Z   181128081549Z   02      unknown /C=CN/ST=AnHui/O=Wondertek/OU=dev/CN=www.qwcsp.tk
V       281125081529Z           04      unknown /C=CN/ST=AnHui/O=Wondertek/OU=dev/CN=qwcsp.tk
V       281125083553Z           05      unknown /C=CN/ST=AnHui/O=Wondertek/OU=dev/CN=www.qwcsp.tk
2.3.4 常用格式转换
- 得到 pfx 格式的私钥
PKCS12格式文件,可以包含多个证书/私钥对
root@node191 CA]# openssl pkcs12 -export -out multiApp.pfx -inkey app.key -in multiApp.crt
Enter Export Password:
Verifying - Enter Export Password:
- 从pfx文件中提取信息
# 首先导入pem,包含私钥和公钥
[root@node191 CA]# openssl pkcs12 -in multiApp.pfx -nodes -out new/multiApp.pem
Enter Import Password:
MAC verified OK

# 提取私钥
[root@node191 CA]# openssl rsa -in new/multiApp.pem -out new/multiApp.key
writing RSA key

# 提取公钥,与CA证书区别在缺少CA签名信息
[root@node191 CA]# openssl x509 -in new/multiApp.pem -out new/multiApp.crt
[root@node191 CA]# ll new
总用量 12
-rw-r--r--. 1 root root 1289 11月 28 17:32 multiApp.crt
-rw-r--r--. 1 root root 1675 11月 28 17:32 multiApp.key
-rw-r--r--. 1 root root 3367 11月 28 17:32 multiApp.pem
- 生成tomcat的证书
导出.p12格式的证书
[root@node191 CA]# openssl pkcs12 -export -in multiApp.crt -inkey  app.key -out  multiApp.p12 -name tomcat_letsencrypt
Enter Export Password:
Verifying - Enter Export Password:
再将证书由.p12格式转换成.jks格式
multiApp.jks就是tomcat使用的证书
keytool -importkeystore -deststorepass '123456' -destkeypass '123456' -destkeystore multiApp.jks -srckeystore multiApp.p12 -srcstoretype PKCS12 -srcstorepass '123456' -alias tomcat_letsencrypt
3、https使用证书
这里使用nginx演示下。
- nginx.conf 中配置
server
 {
   listen       443;
   server_name www.qwcsp.tk www.qcforever.cf;
    ssl_certificate /etc/pki/CA/multiApp.crt; #指定证书文件
    ssl_certificate_key /etc/pki/CA/app.key; #指定证书私钥文件
    ssl on; #启用SSL功能
    ......
}
- nginx刷新配置
nginx -s reload
系统中添加根证书信任。
mac系统将上面的根证书cacert.pem拖到钥匙串中,修改信任为始终信任。
重启浏览器,访问页面地址。