OKHttp3-- HTTP缓存机制解析 缓存处理类Cache和缓存策略类CacheStrategy源码分析 【九】
Cache CacheStrategy
- 系列
- 前言
- HTTP缓存机制
- 服务端缓存
- 客户端缓存
- Etag与Last-Modified
- 用户行为
- Cache
- 全局缓存配置
- 单个请求缓存配置
- 构造方法
- Cache.put
- HttpMethod.invalidatesCache
- Cache.Entry
- Cache.key
- Cache.Entry.writeTo
- 总结
- Cache.get
- Cache.Entry.response
- Cache.CacheResponseBody
- Cache.Entry.matches
- 总结
- CacheStrategy
- CacheStrategy.Factory
- CacheStrategy.Factory.get
- CacheStrategy.Factory.getCandidate
- CacheStrategy.Factory.cacheResponseAge
- CacheStrategy.Factory.computeFreshnessLifetime
- 试探性过期时间
- 总结
系列
OKHttp3–详细使用及源码分析系列之初步介绍【一】
OKHttp3–流程分析 核心类介绍 同步异步请求源码分析【二】
OKHttp3–Dispatcher分发器源码解析【三】
OKHttp3–调用对象RealCall源码解析【四】
OKHttp3–拦截器链RealInterceptorChain源码解析【五】
OKHttp3–重试及重定向拦截器RetryAndFollowUpInterceptor源码解析【六】
OKHttp3–桥接拦截器BridgeInterceptor源码解析及相关http请求头字段解析【七】
OKHttp3–缓存拦截器CacheInterceptor源码解析【八】
OKHttp3-- HTTP缓存机制解析 缓存处理类Cache和缓存策略类CacheStrategy源码分析 【九】
通过ConnectInterceptor源码掌握OKHttp3网络连接原理 呕心沥血第十弹【十】
前言
继续上篇关于缓存拦截器的文章来讲述OKHttp内部缓存的实现逻辑,CacheInterceptor内部所涉及的缓存操作和策略主要由以下两个类完成
-
Cache:OKHttp中缓存具体的操作类
-
CacheStrategy:缓存策略类,由它决定是使用缓存还是使用网络请求
HTTP缓存机制
HTTP协议详细解释可参考Hypertext Transfer Protocol – HTTP/1.1
HTTP头部字段定义可参考Header Field Definitions
OKHttp的缓存机制遵循了HTTP协议的缓存机制,所以在了解它之前,我们先来看下HTTP协议的缓存机制
HTTP的缓存机制通常有两种:客户端缓存和服务端缓存,我们今天主要介绍下客户端缓存
服务端缓存
服务端缓存通常分为代理服务器缓存和反向代理服务器缓存(比如 Nginx反向代理、Squid等)
客户端缓存
客户端缓存一般指的是浏览器缓存,而它的实现一般有HTTP协议定义的缓存机制(由头部信息决定),非HTTP协议的缓存机制(HTML Meta标签实现)
非HTTP协议的缓存机制实现就是在< head>节点中加入< meta>标签,如下
加这句代码就是告诉浏览器当前页面不需要缓存,每次访问都去服务器拉取最新数据;但是它的作用很有限,仅有IE能识别这段meta标签含义,其它主流浏览器仅识别“Cache-Control: no-store”的meta标签
我们这里主要讲HTTP协议定义的缓存机制:
这里通常从两个维度来规定浏览器是直接使用缓存中的数据,还是去服务器获取新的数据:
-
新鲜度:这对应着缓存中的过期机制,也就是表明缓存的有效期;一个缓存资源需要满足下面的条件之一,浏览器会认为该资源是可以使用的,无需向服务器重新拉取
- 含有完整的过期时间控制头信息(HTTP协议报头),并且仍在有效期内;
- 浏览器已经使用过这个缓存资源,并且在一个会话中已经检查过新鲜度
-
校验值:这对应着验证机制;服务器返回资源的时候有时会在头信息带上这个资源的实体标签Etag(Entity Tag),它可以用来作为浏览器再次请求该资源的校验标识。如发现校验标识不匹配,说明资源在服务器已经被修改或过期,浏览器需重新获取资源
接下来我们从实际场景来看看:
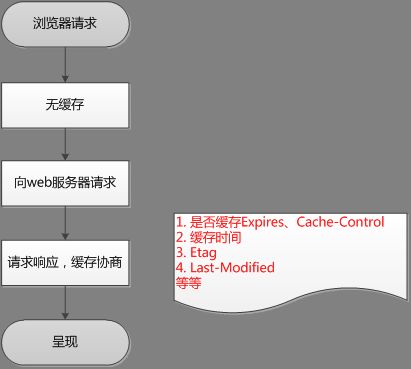
当我们第一次通过浏览器访问服务器时,肯定是没有缓存的,直接向服务器请求数据;当获取到响应后根据头部信息决定是否将其保存在浏览器中,如图

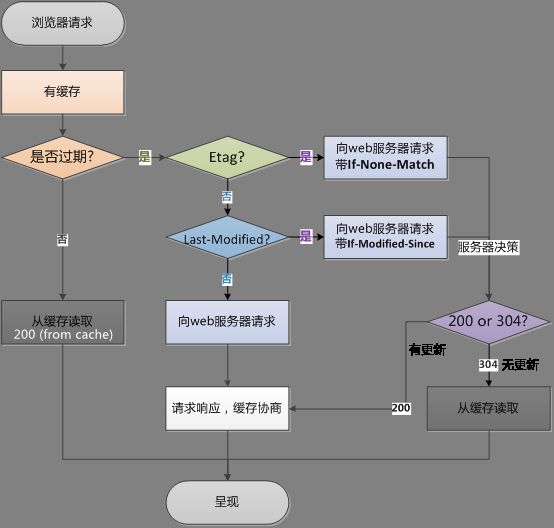
当再次请求服务器时,再根据头部信息中的字段,比如Expires,Cache-control,Last-Modified , If-Modified-Since ,Etag,If-None-Match等字段来决定是使用缓存还是重新获取资源;流程如图

当我们取出缓存时,先要判断缓存是否过期,那怎么判断呢?有两个头部信息可以知道:
-
第一个就是Expires:该字段是存在于服务器返回的响应头中,目的是告诉浏览器该资源的过期时间;也就是说当浏览器再次请求的时候如果当前时间早于这个过期时间,那么就不需要请求了,直接使用缓存;如果晚于这个时间,那么再向浏览器请求数据;该字段存在于HTTP/1.0中,格式如下
Expires: Thu, 12 Mar 2019 12:08:54 GMT这种机制有一个非常大的问题,因为该字段是存在于响应头中,也就是说它的时间是服务器上的时间,但是客户端的时间是很有可能与服务器上的时间存在误差的,比如不在一个时区,用户修改了自己电脑时间等因素,这样这个字段就没有意义了;在HTTP 1.1开始,使用Cache-Control: max-age=秒 替代;而且现在浏览器均默认使用HTTP 1.1,所以它的作用基本忽略
-
第二个就是Cache-control:它是当前浏览器缓存中非常重要的一个字段,作用与Expires差不多,存在于响应头,都是标注当前资源的有效期;但是它有很多的值,可以指定较为复杂的缓存规则,如果与Expires同时存在,Cache-control的优先级高,它的一般格式如下
Cache-Control: private, max-age=0, no-cache可以组合的值有:
- public:表明该资源或者说响应可以被任何用户缓存,比如客户端,代理服务器等都可以缓存资源,写法:Cache-Control:public
- private:表明该资源只能被单个用户缓存,默认是private,即只能被客户端缓存,不能被代理服务器缓存,写法:Cache-Control:private
- max-age:表明该资源的有效时间,单位是s,写法: Cache-Control:max-age=3600,即在获取该资源后3600s内不需要再向服务器获取
- no-cache:表明客户端需要忽略已存在的缓存,强制每次请求直接发送给服务器,拉取资源,写法:Cache-Control:no-cache
- no-store:表明该资源不能被缓存,如果缓存了需要删除,写法:Cache-Control:no-store
- s-maxage:和max-age含义类似,只不过用于public 修饰的缓存,写法:Cache-Control:s-maxage=3600
- must-revalidate:表明在使用缓存前必须要验证旧资源状态,并且不可使用过期资源, 写法:Cache-Control:must-revalidate
- max-stale:表明缓存的资源在过期了但未超过max-stale指定的时间,那么就可以继续使用该缓存,超过后就必须去服务器获取;写法:Cache-Control:max-stale(代表着资源永不过期); Cache-Control:max-stale=3600(表明在缓存过期后的3600秒内还可以继续用)
- min-fresh:字面意思是最小新鲜度,跟max-age相对应(最大新鲜度),比如max-age=3600,min-fresh=600,那么 他两的差值就是3000,也就是说缓存真正有效时间只有3000s,超过这个时间就要去服务器拉取了
- only-if-cached:不管缓存是否过期,或者服务端有更新,只要存在缓存就是用它,写法:Cache-Control:only-if-cached
- no-transform:不得对资源进行转换,即代理服务器不能修改Content-Encoding, Content-Range, Content-Type等HTTP头;因为有时候代理服务器为了节省缓存空间或者提高传输效率,会对图片等进行压缩;写法: Cache-Control:no-transform、
- immutable:表示资源在有效期内服务器不会对其更改,这样客户端就不需要再发送验证请求头,比如If-None-Match或If-Modified-Since来检测更新,即使用户主动刷新页面,写法:Cache-Control:immutable
上面所列举的Expires和Cache-control是从新鲜度的角度来强制决定客户端缓存,下面所说的是从校验值的角度来与服务器协商验证是使用缓存还是重新获取数据,也就是上图在判断缓存过期后的流程
这里有几个字段来标识缓存规则:Last-Modified / If-Modified-Since ,Etag / If-None-Match(优先级大于Last-Modified / If-Modified-Since))
- Etag:服务器在响应客户端请求时,会在响应头带上该字段;它表示该资源在服务器中的唯一标识,生成规则由服务器决定,在Apache中,ETag的值默认是对文件的索引节(INode),大小(Size)和最后修改时间(MTime)进行Hash后得到的
- If-None-Match:这是在请求头中的字段,值就是Etag的值
它们两的使用逻辑就是:当客户端判断资源过期时(通常使用Cache-Control标识的max-age),如果发现缓存的响应有Etag头部声明,那再次向服务器请求时带上If-None-Match头部,值就是Etag的值,web服务器收到请求后发现有If-None-Match头,就将其与存在服务端的Etag值进行比较;如果匹配,说明该资源没有修改,那就返回304,告诉客户端可以继续使用缓存;如果不匹配,说明资源修改过,那就返回200,重新响应该资源给客户端
接下来就是客户端发现缓存的响应没有Etag声明,那就从Last-Modified / If-Modified-Since进行判断
- Last-Modified:标识资源在服务器上的最后修改时间,随着响应头带给客户端
- If-Modified-Since:这是在请求头中的字段,值就是Last-Modified的值
它们两的使用逻辑是:当客户端判断资源过期时,同时缓存的响应头没有Etag声明,如果发现头部有Last-Modified声明,则再次向服务器请求资源时,在请求头带上 If-Modified-Since头部,值就是Last-Modified的值;服务器收到请求后发现有头If-Modified-Since 则与被请求资源的最后修改时间进行比对。若最后修改时间较新,说明资源被改动过,则响应整片资源给客户端,响应码是 200;若最后修改时间较旧,说明资源无修改,则响应304 ,告知浏览器继续使用缓存
一般情况下,使用Cache-Control/Expires会配合Last-Modified/ETag一起使用,因为即使服务器设置缓存时间,当用户点击“刷新”按钮时,浏览器会忽略缓存继续向服务器发送请求,这时Last-Modified/ETag就能够起作用,服务器如果资源没有修改就返回304,从而减少响应开销
Etag与Last-Modified
不知道你有没有疑惑,Etag也是判断资源有没有修改,Last-Modified也是判断资源有没有修改,那两个重复功能的存在是不是多余呢?
要知道Last-Modified是出现在HTTP1.0中的,但是它有几个问题:
- Last-Modified表示的最后修改时间只能精确到秒级,如果某些文件在1秒钟以内,被修改多次的话,它就不能准确标注文件的新鲜度
- 一些文件也许会周期性的更改,但是他的内容并不改变(仅仅改变的修改时间),这个时候我们并不希望客户端认为这个文件被修改了,而重新GET
- 服务器可能没有获取准确的修改时间,或者与代理服务器时间不一致
在HTTP1.1出现的Etag就主要就是为了解决它的几个问题,Etag是服务器自动生成或者由开发者生成的对应资源在服务器端的唯一标识符,能够更加准确的控制缓存。Last-Modified与ETag是可以一起使用的,服务器会优先验证ETag,一致的情况下,才会继续比对Last-Modified,最后才决定是否返回304,关于Etag更详细的可以参考Etag互动百科
用户行为
浏览器的缓存不光与HTTP协议有关,还与用户的行为有关,比如用户手动点击浏览器的刷新按钮,或者按Ctrl+F5进行强制刷新,这些操作都会对从缓存中获取到的响应的头部字段Expires/Cache-Control,Last-Modified/Etag产生影响
| 用户操作 | Expires/Cache-Control | Last-Modified/Etag |
|---|---|---|
| 地址栏回车 | 有效 | 有效 |
| 页面链接跳转 | 有效 | 有效 |
| 新开窗口 | 有效 | 有效 |
| 前进、后退 | 有效 | 有效 |
| F5/按钮刷新 | 无效(浏览器重置max-age=0) | 有效 |
| Ctrl+F5强制刷新 | 无效(重置为no-cache) | 无效(请求头丢弃该选项) |
Cache
OKHttp提供了缓存机制以将我们的的HTTP和HTTPS请求的响应缓存到文件系统中,但是它默认是不使用缓存的,所以如果我们需要使用缓存(强烈推荐使用),就得在实例化OKHttpClient的时候进行相关的配置,如下:
全局缓存配置
OkHttpClient client = new OkHttpClient
                .Builder()
                .cache(new Cache(new File("cache"),1024*1024*10))//接收两个参数,1:私有缓存目录,2:缓存空间大小
                .build();
这里的Cache类是OKHttp内部提供的一个用于缓存实际操作的类,它内部维护了一个匿名内部类实现了InternalCache接口,该接口定义的功能由Cache实现
当然了你也可以自己实现InternalCache接口,采用自己的缓存逻辑,那就通过Build的如下方法进行设置
    void setInternalCache(InternalCache internalCache) {
      this.internalCache = internalCache;
      this.cache = null;
    }
单个请求缓存配置
上面的缓存配置是全局的,也可以对单个请求配置不同的缓存策略
new Request
         .Builder()
         .cacheControl(new CacheControl())
         .build();
这个CacheControl的构造方法有很多参数,参考上面的HTTP缓存机制那一节;同时CacheControl内部也提供了两个策略供开发者使用
//强制使用网络,不使用缓存
public static final CacheControl FORCE_NETWORK = new Builder().noCache().build();
//强制使用缓存,不使用网络
public static final CacheControl FORCE_CACHE = new Builder()
      .onlyIfCached()
      .maxStale(Integer.MAX_VALUE, TimeUnit.SECONDS)
      .build();
-
某些情况下,比如用户点击刷新按钮,那么就需要跳过缓存,重新去服务器获取最小数据,那就需要强制使用网络,不使用缓存
Request request = new Request.Builder() .cacheControl(new CacheControl.Builder().noCache().build()) //.cacheControl(CacheControl.FORCE_NETWORK ) 两种写法一样 .url("http://publicobject.com/helloworld.txt") .build(); -
如果必须要服务器验证下缓存的响应,可以使用max-age = 0 指令
Request request = new Request.Builder() .cacheControl(new CacheControl.Builder().maxAge(0, TimeUnit.SECONDS).build()) .url("http://publicobject.com/helloworld.txt") .build(); -
如果某些资源不需要重复向服务器请求,可以设置强制使用缓存
Request request = new Request.Builder()
          .cacheControl(new CacheControl.Builder().onlyIfCached().maxStale(Integer.MAX_VALUE, TimeUnit.SECONDS).build())
          .url("http://publicobject.com/helloworld.txt")
          .build();
给单个请求进行配置最终会添加相应的请求头
   /**
   * 该请求头将会替换掉任何缓存控制标头
   */
   public Builder cacheControl(CacheControl cacheControl) {
      String value = cacheControl.toString();
      if (value.isEmpty()) return removeHeader("Cache-Control");
      return header("Cache-Control", value);
    }
构造方法
接下来看下Cache内部源码
  public Cache(File directory, long maxSize) {
    this(directory, maxSize, FileSystem.SYSTEM);
  }

  Cache(File directory, long maxSize, FileSystem fileSystem) {
    this.cache = DiskLruCache.create(fileSystem, directory, VERSION, ENTRY_COUNT, maxSize);
  }
公开构造方法接收两个参数,然后调用内部重载的构造方法;在下面的这个构造方法可以看到实例化了一个DiskLruCache对象
DiskLruCache这个东西大家应该很熟悉了吧,我们通常做三级缓存的时候,其中的文件缓存或者说磁盘缓存就是通过它来实现的,使用的是著名的 最近最少使用算法(Least recently used),所以可以明白OKHttp的缓存其实是通过DiskLruCache实现的,至于这个类的实现原理,大家可以在网上查一查,资料很多
Cache.put
先看下这个Cache类是如何缓存我们获取到的响应
  CacheRequest put(Response response) {
    // 获取网络请求方法
    String requestMethod = response.request().method();
    // 验证请求方法的合法性,具体什么方法不能缓存见下方
    if (HttpMethod.invalidatesCache(response.request().method())) {
      try {
        // 如果是这些请求方法就移除缓存
        remove(response.request());
      } catch (IOException ignored) {
        // The cache cannot be written.
      }
      return null;
    }
    // 如果请求方法不是get请求,那就直接返回null
    if (!requestMethod.equals("GET")) {
      // 不做非get请求的缓存,虽然其它方法的响应可以缓存,但是做起来成本太大且效率低下,所以放弃
      return null;
    }
    // 如果响应头含有 * 字符,那也不缓存,直接返回null
    if (HttpHeaders.hasVaryAll(response)) {
      return null;
    }

    // 创建Entry对象,这个对象封装了响应的一些信息,见下方
    Entry entry = new Entry(response);
    // 创建编辑对象 这个操作类似于SharedPerference
    DiskLruCache.Editor editor = null;
    try {
      // 通过DiskLruCache创建editor对象(需要将url转换成key,方法见下方)
      editor = cache.edit(key(response.request().url()));
      if (editor == null) {
        return null;
      }
      // 将entry封装的部分信息写入缓存,不包括响应体,该方法见下方
      entry.writeTo(editor);
      // 返回CacheRequestImpl对象给拦截器,用来缓存响应体
      return new CacheRequestImpl(editor);
    } catch (IOException e) {
      abortQuietly(editor);
      return null;
    }
  }
HttpMethod.invalidatesCache
  public static boolean invalidatesCache(String method) {
    return method.equals("POST")
        || method.equals("PATCH")
        || method.equals("PUT")
        || method.equals("DELETE")
        || method.equals("MOVE");     // WebDAV
  }
如果是以上这些请求方法,那么获取到的响应将不会进行缓存
HTTP请求方法一览:
- OPTIONS:获取服务器支持的HTTP请求方法和用来检查服务器的性能
- GET:请求获取Request-URI所标识的资源
- POST:在Request-URI所标识的资源后附加新的数据,通常我们用来提交表单
- PUT:请求服务器存储一个资源,并用Request-URI作为其标识
- PATCH:是对PUT方法的补充,用来对已知资源进行局部更新
- DELETE:请求服务器删除Request-URI所标识的资源
- HEAD:请求获取由Request-URI所标识的资源的响应消息报头
- MOVE:请求服务器将指定的页面移至另一个网络地址
Cache.Entry
  private static final class Entry {
    /** Synthetic response header: the local time when the request was sent. */
    private static final String SENT_MILLIS = Platform.get().getPrefix() + "-Sent-Millis";

    /** Synthetic response header: the local time when the response was received. */
    private static final String RECEIVED_MILLIS = Platform.get().getPrefix() + "-Received-Millis";

    private final String url;
    private final Headers varyHeaders;
    private final String requestMethod;
    private final Protocol protocol;
    private final int code;
    private final String message;
    private final Headers responseHeaders;
    private final Handshake handshake;
    private final long sentRequestMillis;
    private final long receivedResponseMillis;

    ......

}
Entry是Cache的一个静态内部类,封装了请求的一些信息,比如请求url,请求头,请求方法,请求协议类型;响应码,响应信息,响应头,TLS握手信息,请求发送时间,响应获取时间
Cache.key
 public static String key(HttpUrl url) {
    return ByteString.encodeUtf8(url.toString()).md5().hex();
  }
将url生成key
- 获取url的utf-8格式不可变字节序列
- 进行md5加密
- 获取16进制形式字符串
Cache.Entry.writeTo
    public void writeTo(DiskLruCache.Editor editor) throws IOException {
      BufferedSink sink = Okio.buffer(editor.newSink(ENTRY_METADATA));

      sink.writeUtf8(url)
          .writeByte('\n');
      sink.writeUtf8(requestMethod)
          .writeByte('\n');
      sink.writeDecimalLong(varyHeaders.size())
          .writeByte('\n');
      for (int i = 0, size = varyHeaders.size(); i < size; i++) {
        sink.writeUtf8(varyHeaders.name(i))
            .writeUtf8(": ")
            .writeUtf8(varyHeaders.value(i))
            .writeByte('\n');
      }

      sink.writeUtf8(new StatusLine(protocol, code, message).toString())
          .writeByte('\n');
      sink.writeDecimalLong(responseHeaders.size() + 2)
          .writeByte('\n');
      for (int i = 0, size = responseHeaders.size(); i < size; i++) {
        sink.writeUtf8(responseHeaders.name(i))
            .writeUtf8(": ")
            .writeUtf8(responseHeaders.value(i))
            .writeByte('\n');
      }
      sink.writeUtf8(SENT_MILLIS)
          .writeUtf8(": ")
          .writeDecimalLong(sentRequestMillis)
          .writeByte('\n');
      sink.writeUtf8(RECEIVED_MILLIS)
          .writeUtf8(": ")
          .writeDecimalLong(receivedResponseMillis)
          .writeByte('\n');

      if (isHttps()) {
        sink.writeByte('\n');
        sink.writeUtf8(handshake.cipherSuite().javaName())
            .writeByte('\n');
        writeCertList(sink, handshake.peerCertificates());
        writeCertList(sink, handshake.localCertificates());
        // 在旧的缓存响应和HttpsURLConnection上tls握手版本是null
        if (handshake.tlsVersion() != null) {
          sink.writeUtf8(handshake.tlsVersion().javaName())
              .writeByte('\n');
        }
      }
      sink.close();
    }
将Entry封装的url,请求方法,请求头;响应行(这里面包括请求协议类型,响应码,响应信息),响应头,发送请求的时间,获取响应的时间,TLS握手信息写入到缓存
总结
通过对put方法的分析我们可以知道:
- OkHttp只支持缓存GET方法的响应
- 如果响应头含有*字符也不缓存
- Cache类中并不会直接将响应体写入缓存,而是交给构建一个CacheRequestImpl对象交给拦截器去操作
Cache.get
继续看从缓存中获取响应的方法
CacheInterceptor的intercept方法中第一句代码就是调用Cache类的get方法获取缓存的响应,那我们来看下它的具体实现
  Response get(Request request) {
    // 将请求url转化成可以使用的key
    String key = key(request.url());
    // 定义缓存快照对象
    DiskLruCache.Snapshot snapshot;
    Entry entry;
    try {
      // 通过DiskLruCache对象获取一个该key对象的缓存快照
      snapshot = cache.get(key);
      // 如果快照是null,说明没有缓存响应,直接返回null
      if (snapshot == null) {
        return null;
      }
    } catch (IOException e) {
      // 出现异常 不能读取缓存
      return null;
    }

    try {
      // 创建Entry对象,将快照中的缓存信息封装到Entry对象
      entry = new Entry(snapshot.getSource(ENTRY_METADATA));
    } catch (IOException e) {
      Util.closeQuietly(snapshot);
      return null;
    }
	// 将缓存中的数据构建成一个响应 见下方
    Response response = entry.response(snapshot);
    // 通过比对请求和响应的相关字段,来判断是否是改请求对应的响应 见下方
    if (!entry.matches(request, response)) {
      Util.closeQuietly(response.body());
      return null;
    }

    return response;
  }
Cache.Entry.response
    public Response response(DiskLruCache.Snapshot snapshot) {
      String contentType = responseHeaders.get("Content-Type");
      String contentLength = responseHeaders.get("Content-Length");
      Request cacheRequest = new Request.Builder()
          .url(url)
          .method(requestMethod, null)
          .headers(varyHeaders)
          .build();
      return new Response.Builder()
          .request(cacheRequest)
          .protocol(protocol)
          .code(code)
          .message(message)
          .headers(responseHeaders)
          .body(new CacheResponseBody(snapshot, contentType, contentLength))
          .handshake(handshake)
          .sentRequestAtMillis(sentRequestMillis)
          .receivedResponseAtMillis(receivedResponseMillis)
          .build();
    }
通过Entry中的信息构建响应中非响应体的数据,而响应报文body是通过CacheResponseBody构建,CacheResponseBody又是通过缓存快照和内容类型,内容长度构成(见下方),最终就构成了一个完整的响应
Cache.CacheResponseBody
CacheResponseBody也是Cache中的一个静态内部类
  private static class CacheResponseBody extends ResponseBody {
    final DiskLruCache.Snapshot snapshot;
    private final BufferedSource bodySource;
    private final String contentType;
    private final String contentLength;

    public CacheResponseBody(final DiskLruCache.Snapshot snapshot,
        String contentType, String contentLength) {
      this.snapshot = snapshot;
      this.contentType = contentType;
      this.contentLength = contentLength;

      Source source = snapshot.getSource(ENTRY_BODY);
      bodySource = Okio.buffer(new ForwardingSource(source) {
        @Override
        public void close() throws IOException {
          snapshot.close();
          super.close();
        }
      });
    }
  }
这里将快照中的关于响应体的数据Source 读到BufferedSource中
还记得我们平常通过Response.body().byteStream() 拿到响应体的数据流,这个流就是BufferedSource的inputStream方法提供的流
Cache.Entry.matches
    public boolean matches(Request request, Response response) {
      return url.equals(request.url().toString())
          && requestMethod.equals(request.method())
          && HttpHeaders.varyMatches(response, varyHeaders, request);
    }
将Entry封装的从缓存读取的响应的数据和传递过来的Request中的数据进行对比,判断是否匹配
总结
获取缓存的方法比较简单,通过url获取缓存快照,如果没有就返回null;反之通过快照构建Entry对象,然后通过Entry和Snapshot 构建完整的响应,最后比对Request和Response,如果匹配就返回
CacheStrategy
缓存拦截器CacheInterceptor决定使用缓存还是网络请求是由这个策略类决定的,它里面维护两个变量:
  /** 如果最终这个变量为null,那就不能使用网络;反之就通过网络发送请求. */
  public final Request networkRequest;

  /** 如果最终这个变量为null,那就不能使用缓存;反之就返回缓存的响应. */
  public final Response cacheResponse;
在上篇文章我们分析拦截器的拦截方法开头有这么一段代码,并且分析完后可以看到CacheStrategy 在拦截方法里起到了非常重要的作用
  @Override
  public Response intercept(Chain chain) throws IOException {

    CacheStrategy strategy = new CacheStrategy.Factory(now, chain.request(), cacheCandidate).get();
    Request networkRequest = strategy.networkRequest;
    Response cacheResponse = strategy.cacheResponse;
  }
接下来看看是怎么获取这个实例的
CacheStrategy.Factory
    public Factory(long nowMillis, Request request, Response cacheResponse) {
      this.nowMillis = nowMillis;
      this.request = request;
      this.cacheResponse = cacheResponse;
      // 若有缓存
      if (cacheResponse != null) {
        // 当时发出请求获取该响应的时间
        this.sentRequestMillis = cacheResponse.sentRequestAtMillis();
        // 收到该响应的时间
        this.receivedResponseMillis = cacheResponse.receivedResponseAtMillis();
        // 取出缓存的响应头
        Headers headers = cacheResponse.headers();
        // 遍历header,保存Date、Expires、Last-Modified、ETag、Age等缓存机制相关字段的值
        for (int i = 0, size = headers.size(); i < size; i++) {
          String fieldName = headers.name(i);
          String value = headers.value(i);
          if ("Date".equalsIgnoreCase(fieldName)) {
            servedDate = HttpDate.parse(value);
            servedDateString = value;
          } else if ("Expires".equalsIgnoreCase(fieldName)) {
            expires = HttpDate.parse(value);
          } else if ("Last-Modified".equalsIgnoreCase(fieldName)) {
            lastModified = HttpDate.parse(value);
            lastModifiedString = value;
          } else if ("ETag".equalsIgnoreCase(fieldName)) {
            etag = value;
          } else if ("Age".equalsIgnoreCase(fieldName)) {
            ageSeconds = HttpHeaders.parseSeconds(value, -1);
          }
        }
      }
    }
Factory是CacheStrategy的一个静态内部类,用来获取缓存的响应信息,然后根据这些信息生成缓存策略
最后通过get方法获取CacheStrategy实例
CacheStrategy.Factory.get
    public CacheStrategy get() {
      // 获取CacheStrategy 对象
      CacheStrategy candidate = getCandidate();

      if (candidate.networkRequest != null && request.cacheControl().onlyIfCached()) {
        // We're forbidden from using the network and the cache is insufficient.
        return new CacheStrategy(null, null);
      }

      return candidate;
    }
通过getCandidate方法获取CacheStrategy 对象,但是下面有个判断,意思就是通过对缓存的解析,得到的结果是我们需要通过网络请求获取响应;但是我们的请求头设置了only-if-cached,那这里的意思就不是说只是用缓存,而是不要使用网络;那这两个就出现了矛盾,OKHttp的解决方法是直接new一个新的CacheStrategy返回,参数是null,这样在缓存拦截器中将会构建一个504错误返回给用户
CacheStrategy.Factory.getCandidate
    private CacheStrategy getCandidate() {
      // 如果没有缓存 那就将response置null,直接进行网络请求
      if (cacheResponse == null) {
        return new CacheStrategy(request, null);
      }

      // 如果是https连接,但没有握手信息,那就进行网络请求
      if (request.isHttps() && cacheResponse.handshake() == null) {
        return new CacheStrategy(request, null);
      }

      //该方法在解析缓存拦截器的文章里分析过了,主要是通过响应码以及头部缓存控制字段判断响应能不能缓存
      // 如果不能缓存那就进行网络请求
      if (!isCacheable(cacheResponse, request)) {
        return new CacheStrategy(request, null);
      }

       // 取出请求头缓存控制对象
      CacheControl requestCaching = request.cacheControl();
      // noCache表明要忽略本地缓存
      // If-Modified-Since/If-None-Match说明缓存过期,需要服务端验证
      // 这两种情况就需要进行网络请求
      if (requestCaching.noCache() || hasConditions(request)) {
        return new CacheStrategy(request, null);
      }

      // 该响应已缓存的时长
      long ageMillis = cacheResponseAge();//见下方
      // 该响应可以缓存的时长
      long freshMillis = computeFreshnessLifetime();//见下方

      if (requestCaching.maxAgeSeconds() != -1) {
        // 取出两者最小值
        //走到这里 ,从computeFreshnessLifetime方法可以知道就是拿Request和Response的CacheControl头中
        // max-age值作比较
        freshMillis = Math.min(freshMillis, SECONDS.toMillis(requestCaching.maxAgeSeconds()));
      }

      long minFreshMillis = 0;
      if (requestCaching.minFreshSeconds() != -1) {
        // 这里是取出min_fresh值,即缓存过期后还能继续使用的时长
        minFreshMillis = SECONDS.toMillis(requestCaching.minFreshSeconds());
      }

      long maxStaleMillis = 0;
      //取出响应头缓存控制字段
      CacheControl responseCaching = cacheResponse.cacheControl();
      // 第一个判断:是否要求必须去服务器验证资源状态
      // 第二个判断:获取max-stale值,如果不等于-1,说明缓存过期后还能使用指定的时长
      if (!responseCaching.mustRevalidate() && requestCaching.maxStaleSeconds() != -1) {
        // 如果不用去服务器验证状态且max-stale值不等于-1,那就取出来
        maxStaleMillis = SECONDS.toMillis(requestCaching.maxStaleSeconds());
      }

      // 如果响应头没有要求忽略本地缓存
      // 已缓存时长+最小新鲜度时长 < 最大新鲜度时长 + 过期后继续使用时长
      // 通过不等式转换:最大新鲜度时长减去最小新鲜度时长就是缓存的有效期,再加上过期后继续使用时长,那就是缓存极限有效时长
      //如果已缓存的时长小于极限时长,说明还没到极限,对吧,那就继续使用
      if (!responseCaching.noCache() && ageMillis + minFreshMillis < freshMillis + maxStaleMillis) {
        Response.Builder builder = cacheResponse.newBuilder();
        // 如果已过期,但未超过 过期后继续使用时长,那还可以继续使用,只用添加相应的头部字段
        if (ageMillis + minFreshMillis >= freshMillis) {
          builder.addHeader("Warning", "110 HttpURLConnection \"Response is stale\"");
        }
        long oneDayMillis = 24 * 60 * 60 * 1000L;
        //如果缓存已超过一天并且响应中没有设置过期时间也需要添加警告
        if (ageMillis > oneDayMillis && isFreshnessLifetimeHeuristic()) {
          builder.addHeader("Warning", "113 HttpURLConnection \"Heuristic expiration\"");
        }
        //缓存继续使用,不进行网络请求
        return new CacheStrategy(null, builder.build());
      }

      // 走到这里说明缓存真的过期了
      String conditionName;
      String conditionValue;
      if (etag != null) {//判断缓存的响应头是否设置了Etag
        conditionName = "If-None-Match";
        conditionValue = etag;
      } else if (lastModified != null) {//判断缓存的响应头是否设置了lastModified
        conditionName = "If-Modified-Since";
        conditionValue = lastModifiedString;
      } else if (servedDate != null) {//判断缓存的响应头是否设置了Date
        conditionName = "If-Modified-Since";
        conditionValue = servedDateString;
      } else {
        //如果都没有设置就使用网络请求
        return new CacheStrategy(request, null);
      }

      //复制一份和当前请求一样的头部
      Headers.Builder conditionalRequestHeaders = request.headers().newBuilder();
      //将上面判断的字段添加到头部
      Internal.instance.addLenient(conditionalRequestHeaders, conditionName, conditionValue);
      //使用新的头部
      Request conditionalRequest = request.newBuilder()
          .headers(conditionalRequestHeaders.build())
          .build();
      //返回策略类
      return new CacheStrategy(conditionalRequest, cacheResponse);
    }
在上面说到HTTP缓存机制的时候提到过新鲜度的概念,做一个通俗的比喻,一根香蕉从树上摘下来,这是新鲜的,并且它有一个维持新鲜的时间跨度,比如三天后就会烂掉,那它的新鲜度就是从树上摘下来放到家里保存的这三天
这个类比中树就是服务器,香蕉就是响应的资源,摘到家里就是客户端请求资源保存在本地,缓存有效期就是三天
HTTP头部跟新鲜度有关的字段有:Age,Expires,Date,Last-Modified,max-age
同时这里再注明这个类里的几个变量
- Date servedDate:对应着响应头的“Date”字段,服务器认定的报文创建时间和日期
- long receivedResponseMillis:收到该响应的时间戳
- int ageSeconds:对应着响应头的“Age”字段,当代理服务器用自己缓存的实体去响应请求时,用该头部表明该实体从产生到现在经过多长时间了
- long sentRequestMillis:发起请求的时间戳
CacheStrategy.Factory.cacheResponseAge
    private long cacheResponseAge() {
      long apparentReceivedAge = servedDate != null
          ? Math.max(0, receivedResponseMillis - servedDate.getTime())
          : 0;
      long receivedAge = ageSeconds != -1
          ? Math.max(apparentReceivedAge, SECONDS.toMillis(ageSeconds))
          : apparentReceivedAge;
      long responseDuration = receivedResponseMillis - sentRequestMillis;
      long residentDuration = nowMillis - receivedResponseMillis;
      return receivedAge + responseDuration + residentDuration;
    }
该方法是返回响应的已缓存时间:
- 计算收到响应的时间与服务器创建该响应时间的差值apparentReceivedAge
- 取出apparentReceivedAge 与ageSeconds最大值并赋予receivedAge
- 计算从发起请求到收到响应的时间差responseDuration
- 计算现在与收到响应的时间差residentDuration
- 三者加起来就是响应已存在的总时长
CacheStrategy.Factory.computeFreshnessLifetime
    // 获取缓存的新鲜度,或者说可以缓存的时长
    private long computeFreshnessLifetime() {
      // 取出响应头部
      CacheControl responseCaching = cacheResponse.cacheControl();
      //如果设置了max-age,那就返回它的值
      if (responseCaching.maxAgeSeconds() != -1) {
        return SECONDS.toMillis(responseCaching.maxAgeSeconds());
      } else if (expires != null) {//如果设置了过期时间
        long servedMillis = servedDate != null
            ? servedDate.getTime()
            : receivedResponseMillis;
        // 计算过期时间与产生时间的差就是可以缓存的时长
        long delta = expires.getTime() - servedMillis;
        return delta > 0 ? delta : 0;
      } else if (lastModified != null && cacheResponse.request().url().query() == null) {//当上述2个字段都不存在时 进行试探性过期计算

        // As recommended by the HTTP RFC and implemented in Firefox, the
        // max age of a document should be defaulted to 10% of the
        // document's age at the time it was served. Default expiration
        // dates aren't used for URIs containing a query.
        long servedMillis = servedDate != null
            ? servedDate.getTime()
            : sentRequestMillis;
        long delta = servedMillis - lastModified.getTime();
        return delta > 0 ? (delta / 10) : 0;
      }
      //走到这里,说明缓存不能继续使用了,需要进行网络请求
      return 0;
    }
试探性过期时间
采用LM_Factor算法计算,方法如下
time_since_modify = max(0,date - last-modified);
freshness_time = (int)(time_since_modify*lm_factor)
详细解释下:
time_since_modify = max(0,date - last-modified);就是将服务器响应时间(date) 减去 服务器最后一次修改资源的时间(last-modified) 得到一个时间差,用这个时间差和0比较取最大值得到time_since_modify,
freshness_time = (int)(time_since_modify*lm_factor);前面我们已经得到time_since_modify 这里我们取其中一小段时间作为过期时间,lm_factor就是这一小段的比例,在okhttp中比例是10%
总结
总结一波使用缓存还是使用网络的策略
- 如果从Cache获取的Response是null,那就需要使用网络请求获取响应
- 如果是Https请求,但是又丢失了握手信息,那也不能使用缓存,需要进行网络请求
- 如果从响应码判断响应不能缓存且响应头有no-store标识,那就需要进行网络请求
- 如果请求头有no-cache标识或者有If-Modified-Since/If-None-Match,那么需要进行网络请求
- 如果响应头没有no-cache标识,且缓存时间没有超过极限时间,那么可以使用缓存,不需要进行网络请求
- 如果缓存过期了,但是响应头没有设置Etag,Last-Modified,Date,那就直接使用网络请求
- 将上一步的头部信息添加到请求头,构建策略类并返回,这一步的效果其实也是需要使用网络请求
一路分析下来发现Request和Resonse都为null的情况只有一种,就是在get方法里面
      if (candidate.networkRequest != null && request.cacheControl().onlyIfCached()) {
        // We're forbidden from using the network and the cache is insufficient.
        return new CacheStrategy(null, null);
      }
也就是说getCandidate方法告诉客户端需要进行网络请求,但是我们设置的请求头有only-if-cached标识(只要有缓存就使用缓存),那就发送矛盾,所以就两者都为null,返回一个504给用户
抛开这种特殊情况,只有Request为null的情况只有一种,也就是响应头没有no-cache标识,且缓存时间没有超过极限时间,这时候需要使用缓存;只有Response为null的情况就有5种,这都需要进行网络请求;两者都不为nul只有一种情况,这也需要进行网络请求(可能并不是重新获取资源,而只是根据头部信息向服务器验证资源的有效性)