Linux下安装mysql完整教程(解决安装中的任何问题)
-
最近自己写了一个小项目,需要部署在远程服务器上,在LIUNX虚拟机上搭建mysql服务器,发现网上的教程都是坑,要么就是找不到下载地址,总结如下:
- 下载安装包(如果404 就把后面的文件名去掉,在游览器打开找到自己下载的版本)
wget http://repo.mysql.com/mysql57-community-release-el7-8.noarch.rpm未安装wget的同学执行以下命令安装
sudo yum install wget -
安装MYSQL (这个过程打开要执行几分钟)
sudo rpm -ivh mysql57-community-release-el7-8.noarch.rpmsudo yum install mysql-server - 设置密码 当第一次启动MySQL服务器时,为MySQL根用户生成一个临时密码。 您可以通过运行以下命令找到密码:
sudo grep 'temporary password' /var/log/mysqld.log输出内容如下:
 如果没有输出,说明是之前安装的mysql导致此路径下已经存在此文件了,PS:/var/log/mysqld.log 中找不到临时密码
 1.删除原来安装过的mysql残留的数据(这一步非常重要,问题就出在这) rm -rf /var/lib/mysql 2.重启mysqld服务 systemctl restart mysqld 3.再去找临时密码 grep 'temporary password' /var/log/mysqld.log
-
尝试用 mysql -uroot -p 发现登陆不成功:解决办法如下:
-
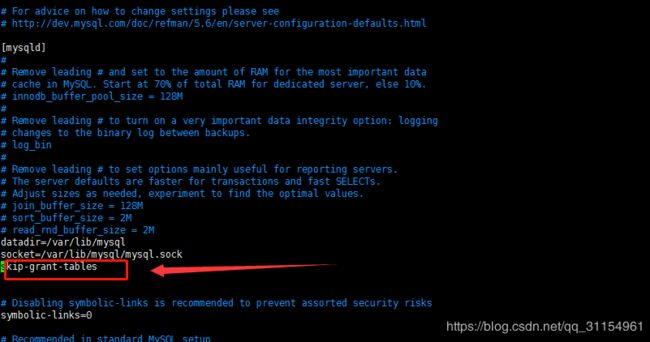
[root@izwz91h49n3mj8r232gqwez ~]# vim /etc/my.cnf 加入在 [mysqld]一栏下面加入一行 skip-grant-tables -
重启一下Mysql服务
-
[root@izwz91h49n3mj8r232gqwez etc]# service mysqld restart Redirecting to /bin/systemctl restart mysqld.service -
修改密码
[root@izwz91h49n3mj8r232gqwez etc]# mysql Welcome to the MySQL monitor. Commands end with ; or \g. Your MySQL connection id is 2 Server version: 5.6.41 MySQL Community Server (GPL) Copyright (c) 2000, 2018, Oracle and/or its affiliates. All rights reserved. Oracle is a registered trademark of Oracle Corporation and/or its affiliates. Other names may be trademarks of their respective owners. Type 'help;' or '\h' for help. Type '\c' to clear the current input statement. mysql> use mysql Reading table information for completion of table and column names You can turn off this feature to get a quicker startup with -A Database changed mysql> update user set password=password("root") where user="root"; Query OK, 0 rows affected (0.00 sec) Rows matched: 5 Changed: 0 Warnings: 0 mysql> flush privileges; Query OK, 0 rows affected (0.00 sec) mysql> quit -
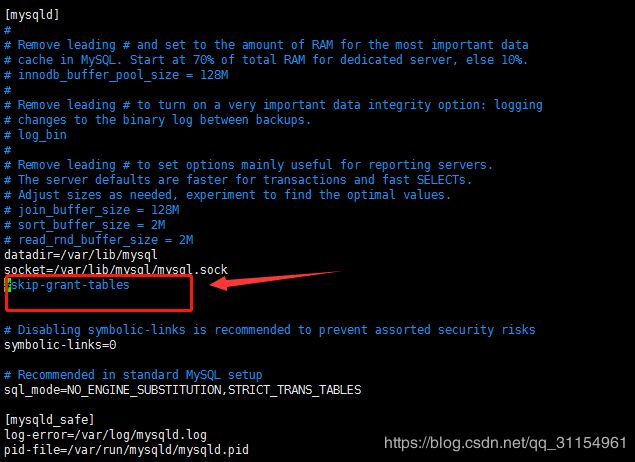
编辑my.cnf,去掉刚才添加的内容,然后重启MySQL
[root@izwz91h49n3mj8r232gqwez etc]# vim my.cnf
如下图 注释掉一行
skip-grant-tables
重启服务—使得密码登录生效
[root@izwz91h49n3mj8r232gqwez etc]# service mysqld restart
Redirecting to /bin/systemctl restart mysqld.service登陆成功后发现操作任何动是都提示:ERROR 1820 (HY000): You must reset your password using ALTER USER statement before
如果你想要设置一个简单的测试密码的话,比如设置为123456,会提示这个错误,报错的意思就是你的密码不符合要求
mysql> alter user 'root'@'localhost' identified by '123456';
ERROR 1819 (HY000): Your password does not satisfy the current policy requirements
解决办法:
首先,修改validate_password_policy参数的值
mysql> set global validate_password_policy=0;
Query OK, 0 rows affected (0.00 sec)
validate_password_length(密码长度)参数默认为8,我们修改为1
mysql> set global validate_password_length=1;
Query OK, 0 rows affected (0.00 sec)
4,完成之后再次执行修改密码语句即可成功
mysql> alter user 'root'@'localhost' identified by '123456';
Query OK, 0 rows affected (0.00 sec)
用SQLyog 进行连接发现报错:1130-host ... is not allowed to connect to this MySql server,MySQL不允许从远程访问的方法
解决办法:
1。 改表法。
可能是你的帐号不允许从远程登陆,只能在localhost。这个时候只要在localhost的那台电脑,登入mysql后,更改 "mysql" 数据库里的 "user" 表里的 "host" 项,从"localhost"改称"%"
mysql -u root -pvmwaremysql>use mysql;
mysql>update user set host = '%' where user = 'root';
mysql>select host, user from user;
2. 授权法。
例如,你想myuser使用mypassword从任何主机连接到mysql服务器的话。
GRANT ALL PRIVILEGES ON *.* TO 'myuser'@'%' IDENTIFIED BY 'mypassword' WITH GRANT OPTION;
FLUSH PRIVILEGES;
如果你想允许用户myuser从ip为192.168.1.6的主机连接到mysql服务器,并使用mypassword作为密码
GRANT ALL PRIVILEGES ON *.* TO 'myuser'@'192.168.1.3' IDENTIFIED BY 'mypassword' WITH GRANT OPTION;
FLUSH PRIVILEGES;
如果你想允许用户myuser从ip为192.168.1.6的主机连接到mysql服务器的dk数据库,并使用mypassword作为密码
GRANT ALL PRIVILEGES ON dk.* TO 'myuser'@'192.168.1.3' IDENTIFIED BY 'mypassword' WITH GRANT OPTION;
FLUSH PRIVILEGES;
我用的第一个方法,刚开始发现不行,在网上查了一下,少执行一个语句 mysql>FLUSH RIVILEGES 使修改生效.就可以了
另外一种方法,不过我没有亲自试过的,在csdn.net上找的,可以看一下.
在安装mysql的机器上运行:
1、d:/mysql/bin/>mysql -h localhost -u root //这样应该可以进入MySQL服务器
2、mysql>GRANT ALL PRIVILEGES ON *.* TO 'root'@'%' WITH GRANT OPTION //赋予任何主机访问数据的权限
3、mysql>FLUSH PRIVILEGES //修改生效
4、mysql>EXIT //退出MySQL服务器
这样就可以在其它任何的主机上以root身份登录啦!
如有问题+Q : 790228724

