Swagger框架:使用swagger自动生成API
项目情况:
最近开的项目是巴斯夫公司的BCG项目,项目的后台框架阶段我选择了Swagger框架来实现API的生成。
该项目的后台技术框架有:SpringBoot+Spring Security+JWT+MyBatis+Swagger+POI
Swagger介绍:
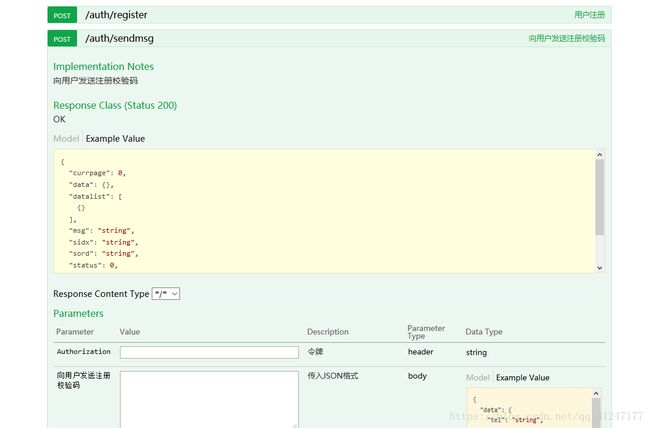
个人感觉Swagger相当的方便,通过注解的方式将Controller层的方法自动生成到swagger-ui.html中,在该页面可以看到输入参数的格式、访问路径、返回的响应参数等。与postman类似,但比postman方便一点。而且前后端分离的情况下,后台代码发布到服务器上就可以让前端开发查看到swagger-ui.html。这样每次后台修改过代码之后,代码一发布,前端就可以看到最新的接口信息,省去了写wiki之类的时间。
项目整合Swagger框架步骤:
第一步:添加相关依赖:
   io.springfox
   springfox-swagger2
   2.6.0


   io.springfox
   springfox-swagger-ui
   2.6.0
第二步:建立配置类,添加配置信息(这里我添加的请求头Authorization是由于我使用了jwt框架首先登陆校验,需要swagger能够发送token信息)
package com.handlecar.basf_bcg_service.conf;

import org.springframework.context.annotation.Bean;
import org.springframework.context.annotation.Configuration;
import springfox.documentation.builders.ApiInfoBuilder;
import springfox.documentation.builders.ParameterBuilder;
import springfox.documentation.builders.PathSelectors;
import springfox.documentation.builders.RequestHandlerSelectors;
import springfox.documentation.schema.ModelRef;
import springfox.documentation.service.ApiInfo;
import springfox.documentation.service.Parameter;
import springfox.documentation.spi.DocumentationType;
import springfox.documentation.spring.web.plugins.Docket;
import springfox.documentation.swagger2.annotations.EnableSwagger2;

import java.util.ArrayList;
import java.util.List;

@Configuration
@EnableSwagger2
public class Swagger2Configuration {

    @Bean
    public Docket createRestApi() {
        //添加head参数start
        ParameterBuilder tokenPar = new ParameterBuilder();
        List pars = new ArrayList();
        tokenPar.name("Authorization")
                .description("令牌")
                .modelRef(new ModelRef("string"))
                .parameterType("header")
                .required(false)
                .build();
        pars.add(tokenPar.build());
        //添加head参数end


        return new Docket(DocumentationType.SWAGGER_2)
                .apiInfo(apiInfo())
                .select()
                .apis(RequestHandlerSelectors.basePackage("com.handlecar.basf_bcg_service"))  // 选择那些路径和api会生成document
                .paths(PathSelectors.any())  // 对所有路径进行监控
                .build()
                .globalOperationParameters(pars);
    }
    private ApiInfo apiInfo() {
        return new ApiInfoBuilder()
                .title("巴斯夫BCG的API")
                .description("巴斯夫BCG的API")
                .termsOfServiceUrl("http://localhost:9001")
                .version("1.0")
                .build();
    }
}
注意:@EnableSwagger2注解不可少
第三步:运行项目,在浏览器地址栏输入:http://localhost:8080/swagger-ui.html (这里的swagger-ui.html是swagger框架运行后自动生成的,不需要自己编写,也不会再项目中出现)
在这个时候你可能会发现swagger-ui.html不能正常显示,这可能是你的过滤器拦截器拦截了请求。我这里是由于Security安全校验框架导致的。这时候你需要对相应的配置进行修改:
package com.handlecar.basf_bcg_service.conf;

import com.handlecar.basf_bcg_service.filter.JwtAuthenticationTokenFilter;
import com.handlecar.basf_bcg_service.security.JwtTokenUtil;
import org.springframework.beans.factory.annotation.Autowired;
import org.springframework.context.annotation.Bean;
import org.springframework.context.annotation.Configuration;
import org.springframework.http.HttpMethod;
import org.springframework.security.config.annotation.authentication.builders.AuthenticationManagerBuilder;
import org.springframework.security.config.annotation.method.configuration.EnableGlobalMethodSecurity;
import org.springframework.security.config.annotation.web.builders.HttpSecurity;
import org.springframework.security.config.annotation.web.configuration.EnableWebSecurity;
import org.springframework.security.config.annotation.web.configuration.WebSecurityConfigurerAdapter;
import org.springframework.security.config.http.SessionCreationPolicy;
import org.springframework.security.core.userdetails.UserDetailsService;
import org.springframework.security.crypto.bcrypt.BCryptPasswordEncoder;
import org.springframework.security.crypto.password.PasswordEncoder;
import org.springframework.security.web.authentication.UsernamePasswordAuthenticationFilter;

@Configuration
//@EnableWebSecurity is used to enable Spring Security’s web security support and provide the Spring MVC integration
@EnableWebSecurity
@EnableGlobalMethodSecurity(prePostEnabled = true)
public class WebSecurityConfig extends WebSecurityConfigurerAdapter {


    // Spring会自动寻找同样类型的具体类注入,这里就是JwtUserDetailsServiceImpl了
    @Autowired
    private UserDetailsService userDetailsService;

    @Autowired
    public WebSecurityConfig(UserDetailsService userDetailsService) {
        this.userDetailsService = userDetailsService;
    }


    //父类WebSecurityConfigurerAdapter有AuthenticationManagerBuilder类成员变量 (private AuthenticationManagerBuilder authenticationBuilder;)
    //以下相当于重载了父类的该成员变量(先自动装配一个实例authenticationManagerBuilder,再进行相关设置,然后被引入作为本类实例的一个成员变量),
    //之后该重载后的成员变量会被框架代码使用到。
    @Autowired
    public void configureAuthentication(AuthenticationManagerBuilder authenticationManagerBuilder) throws Exception {
        authenticationManagerBuilder
                // 设置UserDetailsService
                .userDetailsService(this.userDetailsService)
                // 使用BCrypt进行密码的hash
                .passwordEncoder(passwordEncoder());
    }

    // 装载BCrypt密码编码器
    @Bean
    public PasswordEncoder passwordEncoder() {
        return new BCryptPasswordEncoder();
    }

    @Bean
    public JwtTokenUtil jwtTokenUtil(){
        return new JwtTokenUtil();
    }

    @Bean
    public JwtAuthenticationTokenFilter authenticationTokenFilterBean() throws Exception {
        return new JwtAuthenticationTokenFilter();
    }

    @Override
    protected void configure(HttpSecurity httpSecurity) throws Exception {
        httpSecurity
                // 由于使用的是JWT,我们这里不需要csrf,不用担心csrf攻击
                .csrf().disable()
                // 基于token,所以不需要session
                .sessionManagement().sessionCreationPolicy(SessionCreationPolicy.STATELESS).and()

                .authorizeRequests()
                    //.antMatchers(HttpMethod.OPTIONS, "/**").permitAll()

                    // 允许对于网站静态资源的无授权访问
                    .antMatchers(
                        HttpMethod.GET,
                        "/",
                        "/*.html",
                        "/favicon.ico",
                        "/**/*.html",
                        "/**/*.css",
                        "/**/*.js",
                        "/webjars/springfox-swagger-ui/images/**","/swagger-resources/configuration/*","/swagger-resources",//swagger请求
                        "/v2/api-docs"
                    ).permitAll()
                    // 对于获取token的rest api要允许匿名访问
                    .antMatchers("/auth/**").permitAll()
                    // 除上面外的所有请求全部需要鉴权认证。 .and() 相当于标示一个标签的结束,之前相当于都是一个标签项下的内容
                .anyRequest().authenticated().and()

                .addFilterBefore(authenticationTokenFilterBean(), UsernamePasswordAuthenticationFilter.class);

        // 禁用缓存
        httpSecurity.headers().cacheControl();
    }

}
注意:这里找到被拦截的请求的方法就是使用谷歌浏览器的开发者工具栏查看有哪些请求被拦截,将这些被拦截的请求放行就可以了。
第四步:在Controller层的方法上添加注解@ApiOperation和@ApiParam
@RequestMapping(value = "/register", method = RequestMethod.POST)
@ApiOperation(value ="用户注册",notes = "用户注册",tags = {"auth"})
public AbstractOutputDto register(@ApiParam(name = "用户注册",value = "传入JSON格式")@RequestBody AbstractInputDto abstractInputDto) throws AuthenticationException {
    UserRegisterReqDto userRegisterReqDto=abstractInputDto.getData();
    if(userRegisterReqDto.getCheckcode()!=null && userRegisterReqDto.getUltel()!=null){  //如果验证码和手机号都不为null
        AbstractOutputDto abstractOutputDto=authService.register(userRegisterReqDto);
        return abstractOutputDto;
        }
       return AbstractOutputDto.error("验证码或手机号不能为空!");
}
最终运行效果: