Spring核心必备
依赖注入会将所依赖的关系自动交给目标对象,而不是让对象自己去获取锁。
依赖注入的方式之一:
构造器注入。

传入的探险类型是Quest,也就是所有探险类型必须实现的一个接口。这里的BraveKnight 没有与任何特定的Quest实现发生耦合。这就是松耦合。
如果一个对象只通过接口(而不是具体实现或初始化过程)来表明依赖关系,那么这种依赖就能够在对象本身毫不知情的情况下,用不同的具体实现进行替换。
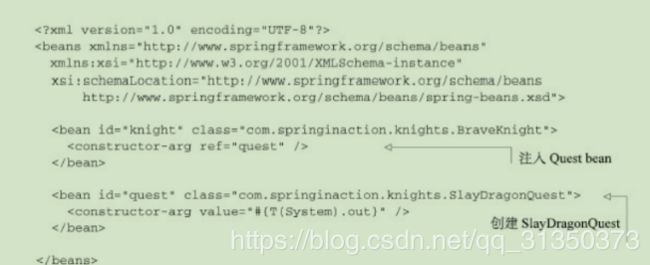
创建应用组件之间协作的行为通常称为装配,采用xml的装配方式。
用ClassPathXmlApplicationContext 加载xml,并获取Knight 的引用
//加载Spring上下文
ClassPathXmlApplicationContext context = new ClassPathXmlApplicationContext(“.xml”);
Knight knight =context.getBean(knight);
knight.embarkOnQuest();
context.close();
在Spring应用中,应用对象生存于Spring容器中,Spring容器负责创建对象,装配他们,配置他们,并管理他们的整个生命周期。
容器是Spring框架的核心,
Spring使用上下文
AnnotationConfigAppliactionContext:从一个或多个基于Java的配置类中加载Spring应用上下文。
AnnotationConfigWebAppliactionContext:从一个或多个基于Java的配置类中加载SpringWeb应用上下文。
ClassPathXmlAppliactionContext:从类路径下的一个或多个XML配置文件中加载上下文定义,把应用上下文的定义文件作为类资源。
FIleSystemXmlapplicationcontext:从文件系统下的一个或多个XML配置文件中加载上下文定义。
XmlWebApplicationContext:从Web应用下的一个或多个XML配置文件中加载上下文定义。
FIleSystemXmlapplicationcontext加载应用上下文:
ClassPathXmlAppliactionContext从应用的类路径下加载应用上下文:
FIleSystemXmlapplicationcontext在指定的文件系统路径下查找knight.xml文件。
ClassPathXmlAppliactionContext是在所有的类路径下查找knight.xml文件。
从Java配置中加载用于上下文:
Spring框架关注于通过DI,AOP和消除样板式代码来简化企业级Java开发。
Spring的Instrumentation 模块提供了为JVM添加代理的功能,能够为Tomcat传递类文件,就像这些文件是被类加载器加载的一样。
装配Bean
创建应用对象之间协作关系的行为通常被称为装配。
Spring配置的可选方案
Spring容器负责创建应用程序中的bean并通过依赖注入来协调这些对象之间的关系。
Spring的三种装配机制:
在xml中进行显示配置
在java中进行显示配置
隐式的bean发现机制和自动装配
自动化装配Bean
Spring从两个角度来实现自动化配置:
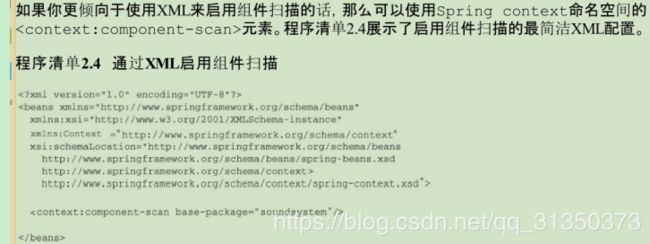
组件扫描(component scannning):Spring会自动发现上下文中所创建的bean.
自动装配(autowiring):Spring自动满足bean之间的依赖。
@Component 表明该类会作为组件类,并告知Spring要为这个类创建bean.
@ComponentScan能够在Spring中启用组件扫描。 如果没有其他配置的话,@ComponentScan 默认会扫描与配置类相同的包。
为组件扫描的bean命名
Spring应用上下文中所有的bean都会给定一个ID,Spring会根据类名为其制定一个ID,SgtPeppersbean所给的ID为sgtPeppers,将类名的第一个字母变为小写。
@Component(“lonelyHearts”)将制定的ID传递给@Component
@ComponentScan(basePackage={“soundsystem”,”video”}
通过Java代码装配bean
当你想要将第三方库中的组件装配到你的应用中,这种情况下是没有办法在它的类上添加@Component 和@Autowired注解的。
使用JavaConfig
public class CustomerBo {
public void printMsg(String msg) {
System.out.println("CustomerBo : " + msg);
}
}
public class SchedulerBo {
public void printMsg(String msg) {
System.out.println("SchedulerBo : " + msg);
}
}
@Configuration
public class CustomerConfig {
@Bean(name="customer")
public CustomerBo customerBo(){
return new CustomerBo();
}
}
@Configuration
public class SchedulerConfig {
@Bean(name="scheduler")
public SchedulerBo suchedulerBo(){
return new SchedulerBo();
}
}
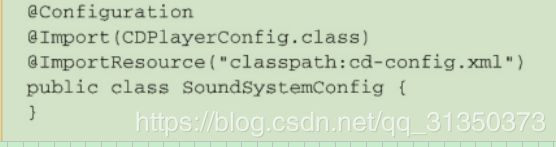
使用@Import加载多个配置文件。
@Configuration
@Import({ CustomerConfig.class, SchedulerConfig.class })
public class AppConfig {
}
public static void main(String[] args) {
ApplicationContext context = new AnnotationConfigApplicationContext(
AppConfig.class);
CustomerBo customer = (CustomerBo) context.getBean("customer");
customer.printMsg("Hello 11");
SchedulerBo scheduler = (SchedulerBo) context.getBean("scheduler");
scheduler.printMsg("Hello 22");
}
}
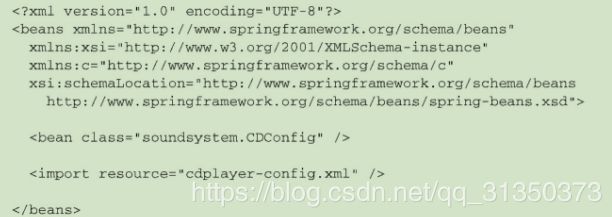
JavaConfig中引用XML配置
@import引入java类 @ImportResource(“classpath:cd-config.xml”)
classpath是指 WEB-INF文件夹下的classes目录
解释classes含义:
存放各种资源配置文件 eg.init.properties log4j.properties struts.xml
存放模板文件 eg.actionerror.ftl
存放class文件 对应的是项目开发时的src目录编译文件
将两个或更多的配置组合起来。
@Profile注解应用在了类级别上,它会告诉Spring这个配置类中的bean只有在dev profile激活时才能创建,如果dev profile没有激活的话,那么带有@Bean 注解的方法都会被忽略掉

方法级别上的profile注解

在XML中配置profile
通过
可以在根

选择该怎样激活其中的某个profile呢?
Spring在确定哪个profile处于激活状态时,需要依赖于两个独立的属性:spring.profiles.active和spring.profiles.default。如果设置了spring.profiles.active,那么它的值就可以用来确定哪个profile是激活的,如果未设置spring.profiles.active的值,spring 将会查找spring.profiles.default的值。
在web.xml文件中设置默认的profile
为上下文设置默认的profile
为Servlet设置默认的profile
param-name>spring.profiles.default
Spring提供了@ActiveProfiles注解,我们可以使用它来激活哪个profile
@ActiveProfiles(“dev”)
条件化地配置bean
@Conditional注解,可以根据给定的条件来创建bean
@Conditional 会通过Condition接口进行条件对比,

如果matches返回true将会创建bean
@Conditional(MagicExistsCondition.classs)
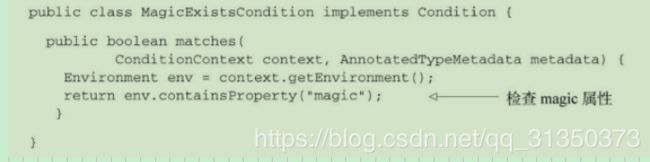
实现Condition接口,返回true,则sCondiit@Conditional注解上引用MagicExistsCondtion的bean都会被创建。
Bean的作用域
在默认情况下,Spring应用上下文中所有bean都是以单例的形式创建的。
单例Singleton 原型Prototype 会话Session 请求Request
使用ConfigurableBeanFactory类的SCOPE_PROTOTYPE也可以使用@Scope(“prototype”)

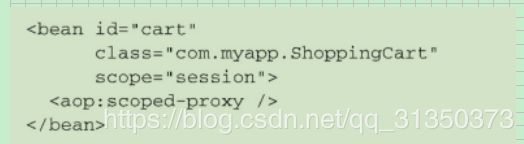
可以使用XML的bean配置作用域

WebApplicationContext 中的SCOPE_SESSION 会告诉Spring为Web应用中每个会话创建一个ShoopingCart。ScopedProxyMode.INTERFACES解决了将会话作用域的bean注入到单例的问题

如果ShoppingCart是类的话,proxyMode将设置为ScopedProxyMode.TARGET.CLASS
在XML中声明作用域代理

Spring注入外部的值:
在Spring中,处理外部值的最简单的方式就是声明属性源并通过Spring的Enviromrnt来检索属性。
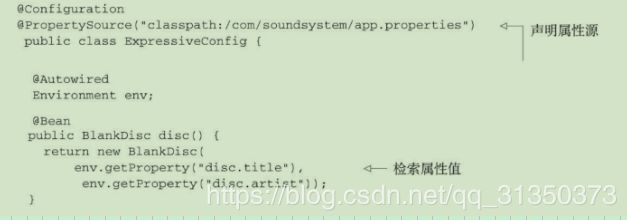
@PropertySource(“classpath:/com/soundsystem/app.properties”)
@Autowired
Enviroment env;
env.getProperty(“disc.title”);
Spring属性占位符
@Value
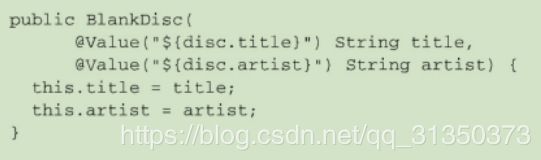
使用占位符,需要配置一个PropertyPlaceholderConfigurer

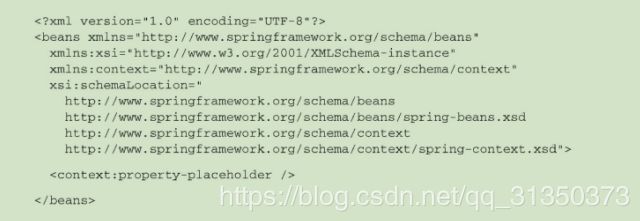
SPEL表达式要放到#{}中
Spring面向切面
DI依赖注入有助于对象之间的解耦,而AOP可以实现横切关注点与他们所影响的对象之间的解耦。
AOP,描述切面的常用术语有通知,切点,和连接点。
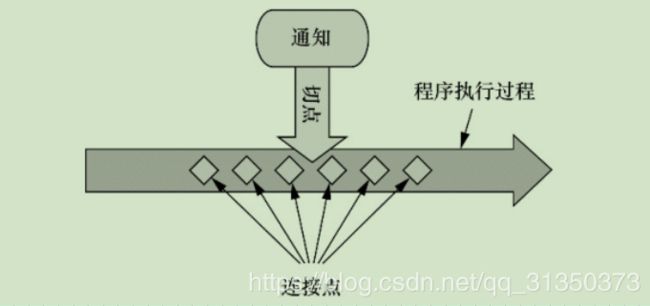
切面(切面的工作是通知) 连接点(通知的时机) 切点 有助于缩小切面所通知的连接点的范围。
我们通常使用明确的类和方法名称或是利用正则表达式定义所匹配的类和方法名称来知道这些切点。
Aspect切面:切面是通知和切点的结合,在何时和何处完成其功能。
编写切点
定义一个Performance接口

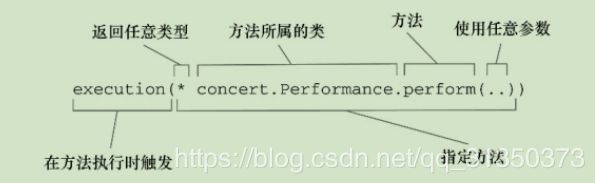
切点表达式:
execution(* concert.Performance.perform(..))
假设我们需要配置的切点仅匹配concert包。可以使用within()指示器来限制匹配。
execution(* concert.Performance.perform(..)&& within(concert.*))
限制切面的通知被编织到不为woodstock的bean中
execution(* concert.Performance.perform()) and !bean(‘woodstock’)
定义切面
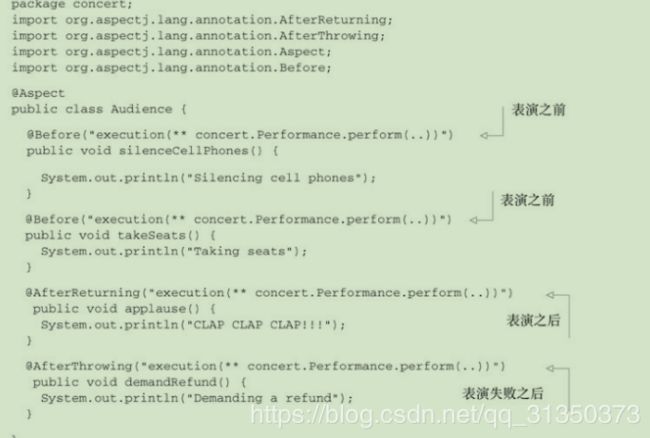
@pointcut 注解能够在一个@Aspect切面内定义可重用的切点。
@Pointcout(“execution (** concert.Performance.perform(..))”)
public void performance(){}
@Before(“performance()”)

如果你就此止步的话,Audience只会是Spring容器中的一个Bean,使用JavaConfig,在配置类的类级别上通过使用EnableAspectJAutoProxy注解启用自动代理功能。EnableAspectJAutoProxy
Spring中使用XML来装配bean的话,需要使用Spring aop命名空间中的
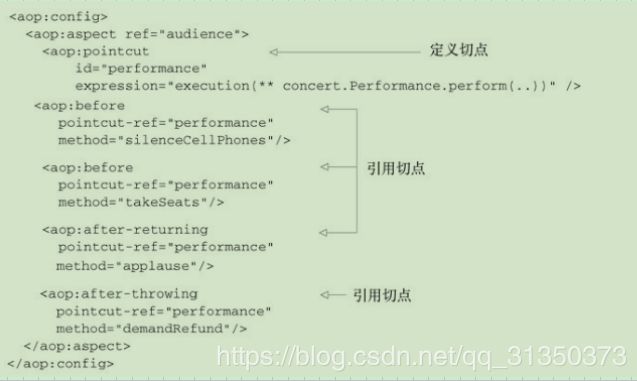
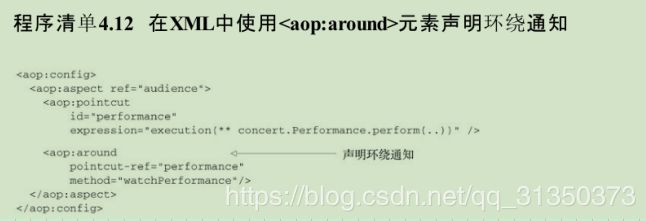
在XML中声明切面
xml中将无注解的Audience声明为切面:
使用
Spring AOP
它会在方法执行之前执行。创建一个实现 MethodBeforeAdvice 接口的类。
package com.yiibai.aop;
import java.lang.reflect.Method;
import org.springframework.aop.MethodBeforeAdvice;
public class HijackBeforeMethod implements MethodBeforeAdvice
{
@Override
public void before(Method method, Object[] args, Object target)
throws Throwable {
System.out.println("HijackBeforeMethod : Before method hijacked!");
}
}
在 bean 配置文件(applicationContext.xml),创建一个 bean 的 HijackBeforeMethod 类,并命名为“customerServiceProxy” 作为一个新的代理对象。
‘target’ – 定义你想拦截的bean。
‘interceptorNames’ – 定义要应用这个代理/目标对象的类(通知)。
xmlns:xsi="http://www.w3.org/2001/XMLSchema-instance" xsi:schemaLocation="http://www.springframework.org/schema/beans http://www.springframework.org/schema/beans/spring-beans-2.5.xsd"> class="org.springframework.aop.framework.ProxyFactoryBean">
https://www.yiibai.com/spring/spring-aop-examples-advice.html
AspectJ
https://www.yiibai.com/spring/spring-aop-aspectj-annotation-example.html
启用AspectJ
在 Spring 配置文件,把“
File : applicationContext.xml
xmlns:xsi="http://www.w3.org/2001/XMLSchema-instance" xmlns:aop="http://www.springframework.org/schema/aop" xsi:schemaLocation="http://www.springframework.org/schema/beans http://www.springframework.org/schema/beans/spring-beans-3.0.xsd http://www.springframework.org/schema/aop http://www.springframework.org/schema/aop/spring-aop-3.0.xsd ">
AspectJ @Before
在下面例子中,logBefore()方法将在 customerBo接口的 addCustomer()方法的执行之前被执行。
AspectJ的“切入点”是用来声明哪种方法将被拦截,应该参考Spring AOP切入点指南,支持切入点表达式的完整列表。
File : LoggingAspect.java
package com.yiibai.aspect;
import org.aspectj.lang.JoinYiibai;
import org.aspectj.lang.annotation.Aspect;
import org.aspectj.lang.annotation.Before;
@Aspect
public class LoggingAspect {
@Before("execution(* com.yiibai.customer.bo.CustomerBo.addCustomer(..))")
public void logBefore(JoinYiibai joinYiibai) {
System.out.println("logBefore() is running!");
System.out.println("hijacked : " + joinYiibai.getSignature().getName());
System.out.println("******");
}
}
SpringMVC的过程
- 请求传给Spring 的DispatcherServlet前端控制器
- 会查询一个或多个处理器映射来确定请求的下一站
- DispatcherServlet再将请求发送给指定的SpringMVC控制器
- 控制器将模型数据打包,并且标识出用于渲染输出的视图名,会将请求连同数据模型和视图名一起送回DispatcherServlet.
- DispatcherServlet将会使用视图解析器来将逻辑视图名称匹配为一个特定的视图实现。
- DispatcherServlet处理视图的实现(可能是jSP),交付数据模型
- 视图再使用数据模型渲染输出(通过响应对象传给客户端)
DispatcherServlet和Servlet监听器(ContextLoaderListener)的关系