【手把手AI项目】七、MobileNetSSD通过Ncnn前向推理框架在PC端的使用(目标检测 objection detection)

前言

  • 安装win10+linux-Ubuntu16.04的双系统(超细致)
  • ubuntu16.04+caffe+CUDA10.0+cudnn7.4+opencv2.4.9.1+python2.7 (超超细致)
  • Caffe_ssd安装以及利用VOC2012,VOC2007数据集测试VGG_SSD网络
  • Caffe实现MobileNetSSD以及各个文件的具体解释,利用自己的数据集dataset训练MobileNetSSD建立模型

下载编译ncnn

git clone https://github.com/Tencent/ncnn.git
cd ncnn
mkdir -p build
cd build
cmake ..
make -j4

一波搞定下载和编译 查看/home/XXX/ncnn/build/tools和/home/XXX/ncnn/build/tools/caffe分别有ncnn2mem和caffe2ncnn两个可执行文件,如下图所示
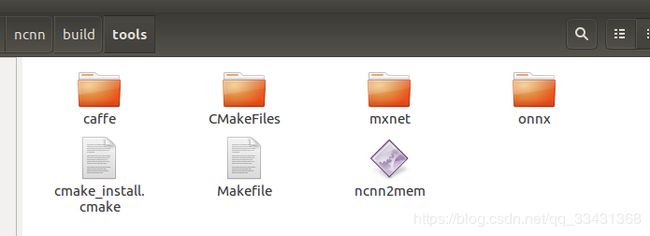
【手把手AI项目】七、MobileNetSSD通过Ncnn前向推理框架在PC端的使用(目标检测 objection detection)_第1张图片【手把手AI项目】七、MobileNetSSD通过Ncnn前向推理框架在PC端的使用(目标检测 objection detection)_第2张图片

  • caffe2ncnn 将caffemodel转换为ncnnmodel
  • ncnn2mem 对模型进行加密操作

转换模型并加密

准备模型和网络文件

有自己数据集训练的直接用自己数据集的即可,没有的话就跟着我的来吧
这里使用上次所讲的MobileNetSSD的demo的.prototxt文件和caffemodel来使用
下载训练好的model,需要外网才可以
如何在Ubuntu16.04访问国外网站——lantern2018-07-16
deploy_model网址如下:
https://drive.google.com/file/d/0B3gersZ2cHIxRm5PMWRoTkdHdHc/view
MobileNetSSD_deploy.prototxt下载如下
https://download.csdn.net/download/qq_33431368/10850770
在/home/XXX/ncnn/build/tools/下新建一个ncnnmodel的文件夹便于管理

旧版caffe模型和网络文件转换成新版caffe模型和网络文件(ncnn只支持新版)

这个tools在caffe/build/tools中直接就有,具体操作如下

$ ~/caffe/build/tools/upgrade_net_proto_text MobileNetSSD_deploy.prototxt MobileNetSSD_deploy_new.prototxt
$ ~/caffe/build/tools/upgrade_net_proto_binary MobileNetSSD_deploy.caffemodel MobileNetSSD_deploy_new.caffemodel
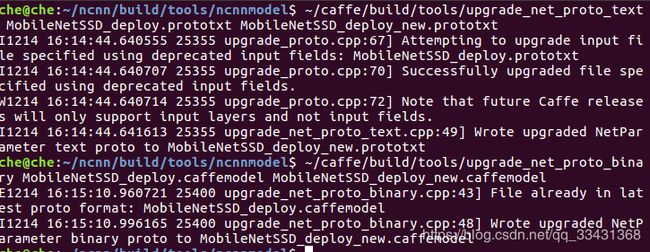
【手把手AI项目】七、MobileNetSSD通过Ncnn前向推理框架在PC端的使用(目标检测 objection detection)_第3张图片生成两个new文件
【手把手AI项目】七、MobileNetSSD通过Ncnn前向推理框架在PC端的使用(目标检测 objection detection)_第4张图片
new.prototxt文件输入层改用 Input,因为每次只需要做一个图片,所以第一个 dim 设为 1

name: "MobileNet-SSD"
layer {
  name: "input"
  type: "Input"
  top: "data"
  input_param {
    shape {
      dim: 1
      dim: 3
      dim: 300
      dim: 300
    }
  }
}
layer {
  name: "conv0"
  type: "Convolution"
  ...........

利用ncnn的两个可执行文件进行转换model和加密

利用/home/XXX/ncnn/build/tools和/home/XXX/ncnn/build/tools/caffe分别有ncnn2mem和caffe2ncnn两个可执行文件
转换model

$./caffe2ncnn' MobileNetSSD_deploy_new.prototxt MobileNetSSD_deploy_new.caffemodel MobileNetSSD_deploy.param MobileNetSSD_deploy.bin

.param相当于prototxt网络文件,.bin相当于caffemodel模型文件

加密(去掉可见字符串, 一种常见加密方式,不加密的话自己的网络可能被别人套用)

$./ncnn2mem mobilenet.param mobilenet.bin mobilenet.id.h mobilenet.mem.h

在这里插入图片描述
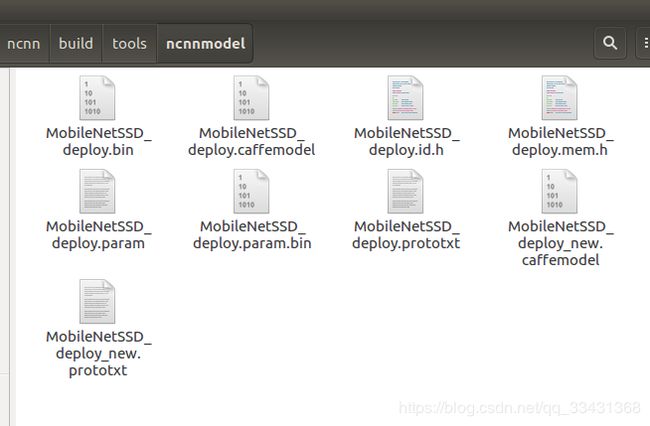
最后文件所示
【手把手AI项目】七、MobileNetSSD通过Ncnn前向推理框架在PC端的使用(目标检测 objection detection)_第5张图片
加密与不加密使用上稍微有点不同,主要体现在load_model上

//j加载非加密的ncnn模型
ncnn::Net net;
net.load_param("MobileNetSSD_deploy.param");
net.load_model("MobileNetSSD_deploy.bin");

//加载加密的ncnn模型
ncnn::Net net;
net.load_param_bin("MobileNetSSD_deploy.param.bin");
net.load_model("MobileNetSSD_deploy.bin");

在PC上run(未加密的,下面叙述的android端使用加密)

在 ncnn/examples中有 mobilenetssd.cpp 我们利用这个文件进行操作
为了不丢失这个demo,我们另外复制一个文件依然在这个文件夹中重命名为MobileNetSSD.cpp
MobileNetSSD.cpp文件修改并做出说明

#include 
#include 
#include 
#include 
#include 

#include "net.h"

struct Object
{
    cv::Rect_<float> rect;  //画图的框
    int label;   //标签
    float prob;     //概率
};
//检测操作
static int detect_mobilenet(const cv::Mat& bgr, std::vector<Object>& objects)
{
    ncnn::Net mobilenet;
  // 更改 更改成自己的ncnnmodel 和网络文件
    mobilenet.load_param("MobileNetSSD_deploy.param");
    mobilenet.load_model("MobileNetSSD_deploy.bin");
   
   //图片预处理
    const int target_size = 300;  ##对应你训练的时候网络输入dataset的大小,这边为300*300

    int img_w = bgr.cols;
    int img_h = bgr.rows;

    ncnn::Mat in = ncnn::Mat::from_pixels_resize(bgr.data, ncnn::Mat::PIXEL_BGR, bgr.cols, bgr.rows, target_size, target_size);
    
 //归一化,这里的值就是我上一篇关于MobileNetSSD网络文件中定义的值
    const float mean_vals[3] = {127.5f, 127.5f, 127.5f};
    const float norm_vals[3] = {1.0/127.5,1.0/127.5,1.0/127.5};
    in.substract_mean_normalize(mean_vals, norm_vals);

    ncnn::Extractor ex = mobilenet.create_extractor(); //前向传播
//     ex.set_num_threads(4); // 线程,可以用四个线程 试试看

    ex.input("data", in);

    ncnn::Mat out;
    ex.extract("detection_out",out); //输出结果

//     printf("%d %d %d\n", out.w, out.h, out.c);
    objects.clear();
    //以下代码为输出的结果的整理可以看出第一个object的value0为标签,以此列推,代码不难
    for (int i=0; i<out.h; i++)
    {
        const float* values = out.row(i);

        Object object;
        object.label = values[0];
        object.prob = values[1];
        object.rect.x = values[2] * img_w;
        object.rect.y = values[3] * img_h;
        object.rect.width = values[4] * img_w - object.rect.x;
        object.rect.height = values[5] * img_h - object.rect.y;

        objects.push_back(object);
    }

    return 0;
}
// 画方框和文本
static void draw_objects(const cv::Mat& bgr, const std::vector<Object>& objects)
{
 //class的个数和对应具体类别,这边依然利用voc2007和2012所以这边不需要更改,原理上需要更改为自己dataset的数据集的 
 	//可能更改(如果我这个教程不需要更改,自己的dataset需要更改)
    static const char* class_names[] = {"background",
        "aeroplane", "bicycle", "bird", "boat",
        "bottle", "bus", "car", "cat", "chair",
        "cow", "diningtable", "dog", "horse",
        "motorbike", "person", "pottedplant",
        "sheep", "sofa", "train", "tvmonitor"};

    cv::Mat image = bgr.clone();

    for (size_t i = 0; i < objects.size(); i++)
    {
        const Object& obj = objects[i];

        fprintf(stderr, "%d = %.5f at %.2f %.2f %.2f x %.2f\n", obj.label, obj.prob,
                obj.rect.x, obj.rect.y, obj.rect.width, obj.rect.height);

        cv::rectangle(image, obj.rect, cv::Scalar(255, 0, 0));

        char text[256];
        sprintf(text, "%s %.1f%%", class_names[obj.label], obj.prob * 100);

        int baseLine = 0;
        cv::Size label_size = cv::getTextSize(text, cv::FONT_HERSHEY_SIMPLEX, 0.5, 1, &baseLine);

        int x = obj.rect.x;
        int y = obj.rect.y - label_size.height - baseLine;
        if (y < 0)
            y = 0;
        if (x + label_size.width > image.cols)
            x = image.cols - label_size.width;

        cv::rectangle(image, cv::Rect(cv::Point(x, y),
                                      cv::Size(label_size.width, label_size.height + baseLine)),
                      cv::Scalar(255, 255, 255), CV_FILLED);

        cv::putText(image, text, cv::Point(x, y + label_size.height),
                    cv::FONT_HERSHEY_SIMPLEX, 0.5, cv::Scalar(0, 0, 0));
    }

    cv::imshow("image", image);
    cv::waitKey(0);
}

int main(int argc, char** argv)
{
    if (argc != 2)
    {
        fprintf(stderr, "Usage: %s [imagepath]\n", argv[0]);
        return -1;
    }

    const char* imagepath = argv[1];

    cv::Mat m = cv::imread(imagepath, CV_LOAD_IMAGE_COLOR);
    if (m.empty())
    {
        fprintf(stderr, "cv::imread %s failed\n", imagepath);
        return -1;
    }

    std::vector<Object> objects;
    detect_mobilenet(m, objects);

    draw_objects(m, objects);

    return 0;
}

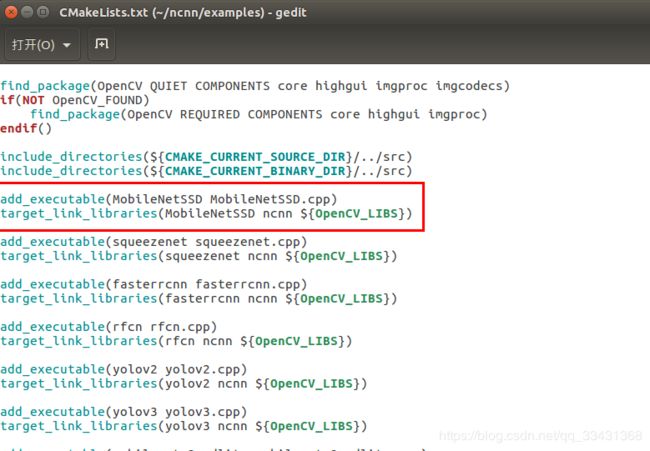
将这两个文件MobileNetSSD_deploy.param、MobileNetSSD_deploy.bin也复制到这个文件夹中,然后打开ncnn/examples目录下的CMakeLists.txt文件,增加这两行:

add_executable(MobileNetSSD MobileNetSSD.cpp)
target_link_libraries(MobileNetSSD ncnn ${OpenCV_LIBS})
【手把手AI项目】七、MobileNetSSD通过Ncnn前向推理框架在PC端的使用(目标检测 objection detection)_第6张图片
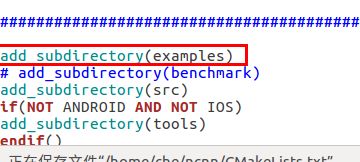
打开ncnn根目录下的CMakeLists.txt文件,将编译examples语句的注释打开(默认是被注释掉的)
【手把手AI项目】七、MobileNetSSD通过Ncnn前向推理框架在PC端的使用(目标检测 objection detection)_第7张图片

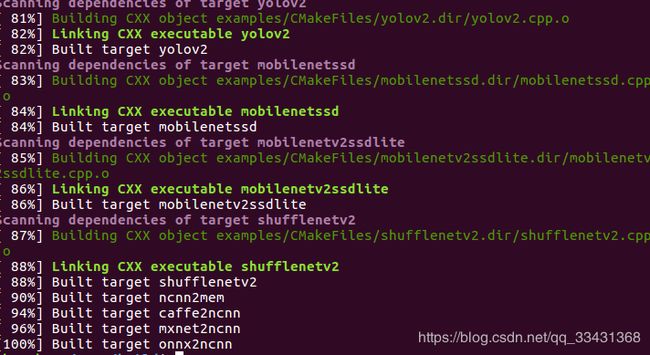
最后进入ncnn/build路径点开terminal终端

make

就发现编译的可执行文件有了,相当于走了一波.cpp文件的编译过程
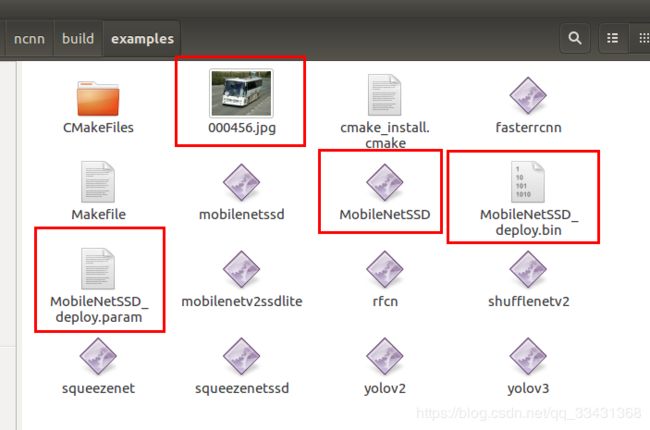
【手把手AI项目】七、MobileNetSSD通过Ncnn前向推理框架在PC端的使用(目标检测 objection detection)_第8张图片查看 ncnn/build/examples文件中
【手把手AI项目】七、MobileNetSSD通过Ncnn前向推理框架在PC端的使用(目标检测 objection detection)_第9张图片用VOC测试图片试一下即可有效果
测试之前需要把测试图片和ncnnmodel和网络文件都拷贝到这个文件夹中
【手把手AI项目】七、MobileNetSSD通过Ncnn前向推理框架在PC端的使用(目标检测 objection detection)_第10张图片

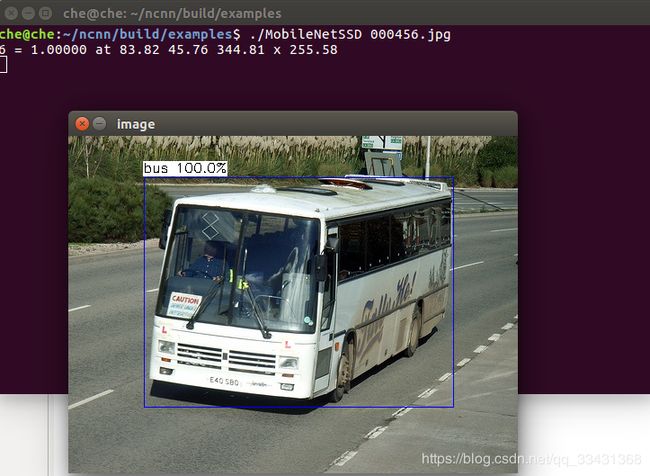
./MobileNetSSD 000456.jpg

【手把手AI项目】七、MobileNetSSD通过Ncnn前向推理框架在PC端的使用(目标检测 objection detection)_第11张图片 
PS: 如果觉得本篇本章对您有所帮助,欢迎关注、评论、点赞!Github给个Star就更完美了_!

联系本人,手机观看,欢迎关注本人公众号

【手把手AI项目】七、MobileNetSSD通过Ncnn前向推理框架在PC端的使用(目标检测 objection detection)_第12张图片

Reference

https://blog.csdn.net/computerme/article/details/77876633

https://blog.csdn.net/qq_36982160/article/details/79929869

https://github.com/Tencent/ncnn/wiki/ncnn-%E7%BB%84%E4%BB%B6%E4%BD%BF%E7%94%A8%E6%8C%87%E5%8C%97-alexnet

你可能感兴趣的:(Deep,Learning,caffe,ncnn)