Spring Boot+Mybatis+MySql 完整整合教程
最近开始学习Spring Boot 找了些教程,描述不清楚走了很多弯路 所以把我的流程记录一下
开发工具:myeclipse2014
框架:Spring Boot 、Mybatis 、Maven
数据库:Mysql5.1
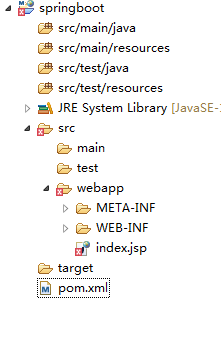
1.首先创建一个Maven项目


这是创建完成后的目录结构

2.需要把项目改为web项目 右键项目然后Properties 找到 Project Facets 点击 Convert to faceted form...

3.除了本身已经勾上的Java 再勾上 Dynamic Web Module 如果报下面的错误 是因为Java 版本的问题,解决办法是右键选择Java 选择 Change Version... 选择1.6或以上版本 然后点击OK 这时候项目已经是Web 项目了

4.改下项目结构 在src下新建文件夹 webapp 然后把WebRoot 目录下的文件全都复制到webapp 再把WebRoot目录删掉 如下图

5.下面开始配置pom.xml 完整配置
  4.0.0
  cn.gendan
  Copy
  0.0.1-SNAPSHOT


	war


	            org.springframework.boot
	            spring-boot-maven-plugin


        org.springframework.boot
        spring-boot-starter-parent
        1.4.1.RELEASE


            org.springframework.boot
            spring-boot-starter-web


            org.springframework.boot
            spring-boot-starter-test
            test


            org.springframework.boot
            spring-boot-starter-tomcat
            provided


            org.apache.tomcat.embed
            tomcat-embed-jasper


            javax.servlet
            jstl


		  com.alibaba
		  fastjson
		  1.2.3


            org.mybatis.spring.boot
            mybatis-spring-boot-starter
            1.1.1


            mysql
            mysql-connector-java
6.完整目录结构如下

下面开始贴代码了
User.java
package cn.copy.model;

public class User {

	private String id;
	private String name;
	public String getId() {
		return id;
	}
	public void setId(String id) {
		this.id = id;
	}
	public String getName() {
		return name;
	}
	public void setName(String name) {
		this.name = name;
	}


}
UserDao.java
package cn.copy.dao;


import org.apache.ibatis.annotations.Mapper;

import cn.copy.model.User;


@Mapper
public interface UserDao {

	public User getNameById(User user);


}
UserService.java
package cn.copy.service;

import cn.copy.model.User;

public interface UserService {

	public User getNameById(User user);

}
UserServiceImpl.java
package cn.copy.service.Impl;

import org.springframework.beans.factory.annotation.Autowired;
import org.springframework.stereotype.Service;

import cn.copy.dao.UserDao;
import cn.copy.model.User;
import cn.copy.service.UserService;

@Service
public class UserServiceImpl implements UserService{

	@Autowired
	private UserDao userDao;

	@Override
	public User getNameById(User user) {
		return userDao.getNameById(user);
	}


}
UserController.java
package cn.copy.controller;
import org.springframework.beans.factory.annotation.Autowired;
import org.springframework.web.bind.annotation.RequestMapping;
import org.springframework.web.bind.annotation.ResponseBody;
import org.springframework.web.bind.annotation.RestController;

import com.alibaba.fastjson.JSONObject;

import cn.copy.model.User;
import cn.copy.service.UserService;

@RestController
public class UserController {

	@Autowired
	private UserService userService;


	 @RequestMapping("/hello")
     public String index() {
          return"Hello World";
     }


	 @RequestMapping("/get")
	 @ResponseBody
     public String get(User user) {
		 User u=userService.getNameById(user);

         return JSONObject.toJSONString(u);
     }


}
以上是spring MVC结构
下面是Spring Boot 启动类 Application.java
package cn.copy;
import org.springframework.boot.SpringApplication;
import org.springframework.boot.autoconfigure.SpringBootApplication;
import org.springframework.transaction.annotation.EnableTransactionManagement;

@EnableTransactionManagement
@SpringBootApplication
public class Application{


    public static void main(String[] args) {
        SpringApplication.run(Application.class, args);
    }


}package cn.copy;
import org.springframework.boot.builder.SpringApplicationBuilder;
import org.springframework.boot.web.support.SpringBootServletInitializer;
public class ServletInitializer extends SpringBootServletInitializer{
@Override
protected SpringApplicationBuilder configure(SpringApplicationBuilder application) {
return application.sources(Application.class);
}
}7.配置解析路径和数据库
创建文件application.properties
#设置Tomcat端口,默认8080
server.port=8080
#设置项目ContextPath
server.context-path=/
#设置Tomcat编码
server.tomcat.uri-encoding=UTF-8
#设置视图解析器路径
spring.mvc.view.prefix=/WEB-INF/views/
#设置视图解析器后缀
spring.mvc.view.suffix=.jsp

#数据库配置
spring.datasource.url=jdbc:mysql://localhost:3306/tuzisong?useUnicode=true&characterEncoding=utf-8&zeroDateTimeBehavior=convertToNull&allowMultiQueries=true
spring.datasource.username=root
spring.datasource.password=F6m3G3j6
spring.datasource.driver-class-name=com.mysql.jdbc.Driver

#配置.xml文件路径
mybatis.mapper-locations=classpath:mapper/*.xml
#配置模型路径
mybatis.type-aliases-package=cn.copy.model
8.在resources目录下新建 mapper文件夹 并创建文件UserMapper.xml
大功告成,别忘了在数据库里创建user 表 或者自行修改sql语句以及数据库名字与账号密码。
下面是运行后的结果 注意:不需要项目名称

附:打包方法
打开cmd cd到项目主目录 输入 mvn package 打包成war包 如果想要打包成jar需要在pom.xml里改一下

等待打包完成运行如下命令可以运行项目 但是cmd关掉项目也就关闭了 可以在最后加上 & 就可以持续运行了 关闭直接 kill掉
![]()
完整源码下载地址 https://download.csdn.net/download/qq_33768099/10322400