xwiki管理指南-配置
在XWiki安装之后,你可以按照以下2种方式来配置:
- 通过停止XWiki实例,修改xwiki/WEB-INF/xwiki.cfg文件或者xwiki/WEB-INF/xwiki.properties文件,然后重新启动XWiki。请注意,xwiki.cfg是包含配置选项的历史文件,但是我们会在适当的时候把这些内容全部迁移到xwiki.properties。
- 通过登录具有管理员权限的用户,并在顶层菜单导航到管理页面。或者你可以直接通过http://localhost:8080/xwiki/bin/admin/XWiki/XWikiPreferences跳转到。这种方式可以保持服务器运行的同时进行更改。
- 有些配置只能在xwiki.cfg和xwiki.properties文件才能访问,在管理页面上是没有办法修改的。
- 如果你是一名开发人员,需要了解XWiki配置是如何工作的,那么请查看配置模块文档。
有各种各样的东西,你可以配置:
启用超级管理员帐户
编辑xwiki.cfg文件并启用xwiki.superadminpassword属性。例如:
# Enable to allow superadmin. It is disabled by default as this could be a security breach if
# it were set and you forgot about it.
xwiki.superadminpassword=system
登录时,用户名为“superadmin”,密码为xwiki.superadminpassword属性设置的值。
语言设定
要为你的wiki定义默认语言,需要进入管理页面,点击“Localization”,找到“Default Language”这一栏,输入你希望使用语言的语言代码。例如:“en”表示英语,“FR”代表法语,“德”为德国等。
另外你可以配置你的wiki为多语言。
最后,你还可以通过修改WEB-INF/xwiki.cfg文件强制在设置中只能指定一种语言。搜索“Internationalization”部分,你会看到以下注释,取消注释,并设置为1:
#-# By default, XWiki chooses the language specified by the client (browser) in the Accept-Language HTTP header. This
#-# allows to use the default language of the wiki when the user didn't manually choose a language.
# xwiki.language.preferDefault=0
#-# Force only one of the supported languages to be accepted.
# xwiki.language.forceSupported=0
日期格式
要定义接口使用的日期格式,到Wiki -> Administer Wiki -> Localization下,找到“Date format”这一栏,然后输入你希望使用的日期格式。例子:
| Format | Result |
|---|---|
| MMMM dd, HH:mm | January 27, 12:27 |
| yyyy/MM/dd, HH:mm | 2009/01/27, 12:27 |
| dd/MM/yyyy, HH:mm | 27/01/2009, 12:27 |
有关日期格式的详细信息.
启用/禁用统计
要禁用统计功能,可以通过编辑xwiki.cfg文件,如下所示(启用功能,更改0到1):
xwiki.stats=0
xwiki.stats.default=0
- xwiki.stats 控制统计是否打开或关闭
- xwiki.stats.default 控制默认情况下当前的Wiki统计是否打开或关闭。这对多租户模式很有用的。一个wiki可以通过在XWiki.XWikiPreferences设置"statistics"字段来决定是否打开或关闭。如果没有设置"statistics",是由xwiki.stats.default值决定。
目前一个subwiki下还没有任何UI界面来设置开启或关闭的统计数据。因此,你需要做两件事情
- 通过在http://localhost:8080/xwiki/bin/edit/XWiki/XWikiPreferences?editor=class编辑XWiki.XWikiPreferences类添加一个新的boolean属性。
- 到http://localhost:8080/xwiki/bin/edit/XWiki/XWikiPreferences?editor=object,设置statistics属性为true
可选的存储功能
文档版本
wiki引擎其中一个的主要功能是保存文档所有的历史,可以让用户看到文档的历史变化,同时也提供恢复其中一个版本的能力。然而,有历史版本xwiki的数据通常比只有当前版本的大得多。在XWiki可以禁用版本控制功能,这意味着将减少存储空间的使用,虽然它也不再提供恢复历史文档的功能。
要禁用版本需要编辑xwiki.cfg并添加xwiki.store.versioning=0。
附件的版本也是一样的,默认情况下是开启的。
文件回收站
默认删除的文档不会被永久删除,而是放置在回收站,在回收站里可以直接删除或恢复。如果要禁用它,通过编辑xwiki.cfg并添加xwiki.recyclebin=0。
禁用回收站将无法恢复已删除的文档,除非数据库备份是可用的。
默认情况下,管理员可以马上永久删除文档,而普通用户要7天后删除。要改变这些限制,通过编辑xwiki.cfg并添加:
# Admins must wait 3 days before being allowed to permanently delete
xwiki.store.recyclebin.adminWaitDays=3
# Normal users must also wait 3 days
xwiki.store.recyclebin.waitDays=3
附件回收也类似这样。
自定义皮肤
请参阅皮肤指南。
安全配置
请参阅安全指南.
如果用户使用SSL(HTTPS)访问XWiki,那么你将不得不改变链接的创建方式,使外部链接不会重定向用户回HTTP页面。这可以通过在xwiki.cfg设置xwiki.url.protocol属性来实现的。
自定义菜单
要了解的第一件事是,菜单取决于你正在使用的皮肤。如果你使用的是1.0的皮肤那么很可能由Panels应用程序为你提供关于你的wiki的左边或右边看到的不同的菜单面板。查看Panels应用程序,以了解更多有关如何配置和修改。
编码
请参阅编码指南。
用户认证
请参阅认证指南。
自定义验证注册页面(从2.2M2开始)
验证注册页面是管理后台应用程序的一部分,它可以要求用户填写验证码,客户端和服务器端验证用户输入以及在客户端使用JavaScript。该配置允许你添加字段和验证约束。
从2.3M1版本开始,想要启动验证码,只要到管理员后台,点击"Registration",然后你会发现一个复选框来开启验证码。
有关配置登录页面的详细信息,你查看管理后台应用程序了解更多信息。
初始化组
可以通过在xwiki.cfg文件修改xwiki.users.initialGroups参数来设置新用户自动添加到默认组。为了让所有新用户被添加到XWiki.CoolPeople和XWiki.CommunityMembers组,设置#initialGroups参数为:
xwiki.users.initialGroups=XWiki.CoolPeople, XWiki.CommunityMembers
- 当前成员将不会自动被添加到这些组中,只有新成员才会。
- 这些组应当在被指定为初始组之前创建好。
日志
请参阅日志指南。
配置跨维基(Interiki)链接
跨维基(Interiki)链接是指用户可以不用输入完整的URL而使用相似的简写就能在同一Wiki网站内相互链接。例如,你可以通过[[InterWiki@WikiPedia]]来链接到http:en.wikipedia.org/wiki/InterWiki。
注意,不同的列表都必须维护,以支持XWiki语法1.0和2.x。
跨维基链接的链接符号在XWiki语法2.1已经改变。XWiki语法2.1链接为: [[interwiki:WikiPedia:InterWiki]].
跨维基链接(XWiki语法1.0)
XWiki渲染wiki语法使用的是Radeox引擎, 是支持跨维基链接。
在你的wiki配置跨维基链接:
- 创建一个文件名为[容器起始位置]/conf/intermap.txt
- 在intermap.txt填写以下内容:
IMDB http://us.imdb.com/Title?
当然你也可以添加自己的条目。
OpenWiki http://openwiki.com/?
SourceForge http://sourceforge.net/
TWiki http://twiki.org/cgi-bin/view/
Why http://clublet.com/c/c/why?
Wiki http://c2.com/cgi/wiki?
WikiPedia http://www.wikipedia.com/wiki/
Radeox解析intermap.txt是非常脆弱的。在文件底部加个空行就足以让它倒下。
重新启动XWiki(每次修改intermap.txt都要重启XWiki)。如果它不工作,请检查你的xwiki.log文件。你会看到,conf/intermap.txt找不到,或者有一个错误解析。
跨维基链接(XWiki语法2.x)
为了在XWiki语法2.x使用跨维基链接,需要在xwiki.properties文件配置相关内容。寻找如下部分:
#-# [Since 2.5M2]
#-# InterWiki definitions in the format alias=URL
#-# See http://en.wikipedia.org/wiki/Interwiki_links for a definition of an InterWiki link
# Some examples:
# rendering.interWikiDefinitions = wikipedia = http://en.wikipedia.org/wiki/
# rendering.interWikiDefinitions = definition = http://www.yourdictionary.com/
设置默认的编辑器(Wiki或者WYSIWYG)
从XWiki Enterprise 3.0开始,可以在管理员页面选择默认的编辑器,"Configuration > Edit Mode Settings" (见下图):
配置WYSIWYG编辑器
查看WYSIWYG编辑器配置页面了解如何启用或禁用编辑功能。
URL链接
反向代理服务器设置
XWiki能运行在反向代理如Apache mod_proxy之后。通常所需要做的一件事就是在http头的x-forwarded-host设置外部URL以及书写正确链接。
一些反向代理软件不设置这个http头,在XWiki Enterprise 3.0M3之后,可以在一个wiki(非多租户)使用xwiki.home参数以达到同样的效果。
- xwiki.home - 参数位于xwiki.cfg用于所有链接指向服务器上main wiki。如果你的main wiki为"xwiki"但是你希望你的用户访问它通过www.yoursite.tld而不是xwiki.yoursite.tld,你需要设置xwiki.home参数为http://www.yoursite.tld/
- xwiki.url.protocol - xwiki.cfg的xwiki.url.protocol参数可以明确指定该协议为https。当xwiki运行于反向代理之后,转化https为http,这将很有用。
短网址
参阅配置XWiki短网址了解更多信息。
配置数据库schema名字
从1.6M1开始,我们需要控制数据库scheme名字,而不是用默认的。
- xwiki.db: 对于主main wiki数据库模式的名称(包括在非多租户环境下wiki的名字,否则数据库的名字来自于Hibernate配置文件)。
- xwiki.db.prefix: 主要用于虚拟wiki,为每个虚拟wiki设置一个单独的数据库schema。此前缀将被添加到wiki名和schema之间映射后的数据库schema名称。注意,这也适用于mian wiki数据库名称。
关闭评论或附件
你需要更改XWiki.XWikiPreferences类,如下:
- 到
/xwiki/bin/edit/XWiki/XWikiPreferences?editor=class - 添加一个新的名为showcomments(关闭附件时为showattachments)String类型的属性
- 到
/xwiki/bin/edit/XWiki/XWikiPreferences?editor=object&classname=XWiki.XWikiPreferences,在showcomments (或showattachments)域里写no
如果你想重新启用,把"no"值改为"yes"。
如果你只想在单个页面关闭评论/附件/历史/信息选项卡,只需要在页面写脚本来定义一些属性。
最后,如果你想基于一些程序规则(如只有管理员能看到它们)将它们关闭,你可以在你的XWiki下找到layoutExtraVars.vm模板文件定义一些属性。 例如:
#if (!$hasAdmin)
#set($docextras = [])
#end
配置"Version Summary"
当你编辑一个页面,你可以在默认情况下"Version Summary"字段中添加你更改的简短说明。你可以通过在xwiki.cfg设置xwiki.editcomment=0禁用此功能。
当启用了"Version Summary"功能,你还可以通过在xwiki.cfg设置xwiki.editcomment.mandatory=1,来强制要求填写Version Summary"。如果没有填写,会弹出一个窗口来填写,不允许填写空内容。如果你希望弹出一个窗口,但希望内容允许为空,可以在xwiki.cfg设置xwiki.editcomment.suggested=1 。
如果将"Version Summary"设置为强制性或建议,也可以去掉"Version Summary"这一栏,使用一个弹出窗口来填写。在xwiki.cfg设置xwiki.editcomment.hidden=0。
你也可以在XWikiPreferences对象使用特殊字段来设置这些内容,而不用编辑xwiki.cfg。这些字段是:editcomment,editcomment_mandatory, editcomment_suggested 和editcomment_hidden。
配置目录
XWiki从数据库加载图片之后,使用临时目录缓存图片。它还使用了一个永久性的目录用于存储数据,如文件系统附件,这些附件不能被删除,搜索索引可以被替换但创建很费力。
如果没有配置永久目录,XWiki将使用临时目录以及在启动时日志输出一个警告。
从XWiki企业4.1M2开始,临时文件将被放置在临时目录中的一个特殊子目录称为xwiki-temp。此目录被定期清洗和删除它的所有内容。
要设置永久性的目录,你有两种方法:
- 当启动JVM设置系统属性xwiki.data.dir(即Servlet容器的JVM,具体为: -Dxwiki.data.dir=...)
- 在xwiki.properties文件设置environment.permanentDirectory属性
如果XWiki没有权限访问设置的文件或目录,那么会在日志中将打印一条警告,并还是使用默认的临时目录。
临时目录是由Servlet容器的Servlet上下文属性javax.servlet.context.tempdir决定,因此必须在该级别进行配置。如果设置的文件或目录XWiki没有权限写,那么会在日志中将打印一条警告,并尝试使用java.io.tmpdir找到临时目录。如果这临时目录是一个不可写目录,将会抛出一个异常。
配置WebDAV (1.7开始)
从XWiki企业1.7开始,XWiki添加对WebDAV支持。要注意的是WebDAV默认是启用。
保护WebDAV服务
XWiki的WebDAV实现对于验证WebDAV客户端仅支持基本访问身份验证。因为这个原因,强烈建议你使用传输层安全机制,如SSL来保护客户端。你可以查看你的Web应用程序容器的文档,看看如何可以做到这一点。
禁用WebDAV
在XWiki禁用WebDAV的支持,只要编辑你的web.xml文件并删除WebDAV相关的url-mapping元素。WebDAV的URL映射元素看起来像这样:
重定向
XWiki支持定义请求重定向。激活此功能首先需要修改xwiki.cfg文件并设置以下属性:
xwiki.preferences.redirect=1.
然后,你要添加的每个重定向,在main wiki的XWiki.XWikiPreferences下添加一个XWiki.GlobalRedirect对象。XWiki.GlobalRedirect对象有2个域:pattern和destination。URL匹配pattern,如果匹配到则把它替换为destination。然后XWiki重定向到新的URL。
自定义PDF导出外观
在未来,我们将要重写PDF / RTF导出,用新的渲染模块渲染。当发生这种情况,本节也将升级。
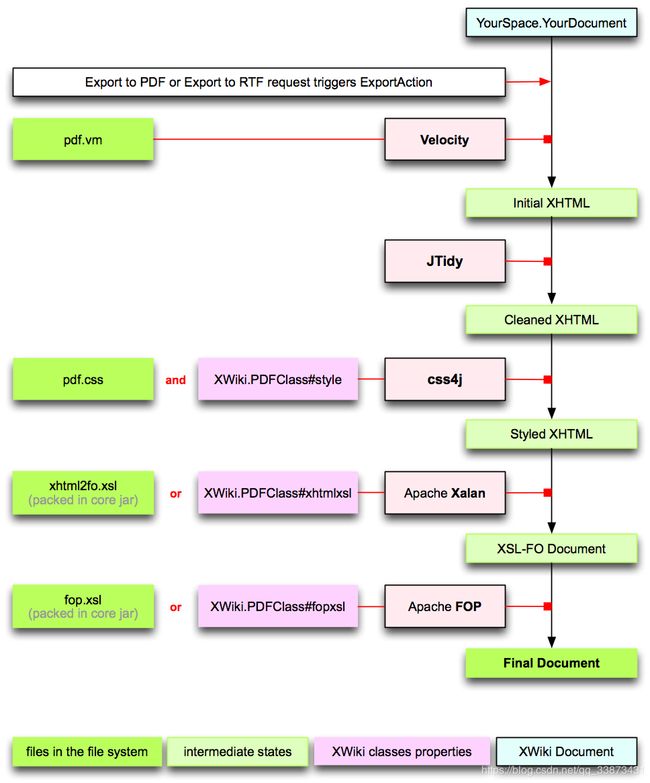
正如图中所示,你可以自定义4个部分:
- 模板,pdf.vm和引用的子部分,pdfhtmlheader.vm,pdfheader.vm,pdffooter.vm,pdftoc.vm,pdfcover.vm,可以通过自定义皮肤来覆盖
- CSS用于呈现内容。默认情况下没有pdf.css。它可以在/templates或在皮肤中创建
- XHTML2FO XSL转换。默认是xhtml2fo.xsl,在core jar里。
- FOP XSL转换。默认是fop.xsl,也在core jar里。
在导出请求触发ExportAction之后,文档内容通过Velocity解析来获取初始XHTML内容。JTidy,一个HTML/XHTML语法检查器和优雅的打印编排工具,用于清理XHTML,使之符合XHTML。如果没有定制,可能就到这一步。
为了提供定制,你需要通过调整默认模板(它们也可以被复制到一个新的皮肤),或者创建一个新的XWiki Class。要做到这一点只需创建一个名为XWiki.PDFClass的页面和在class模式下编辑(例如http://yourserver.com/xwiki/bin/edit/XWiki/PDFClass?editor=class)。根据需要添加下面的"Text Area"属性(它们都是可选的,所以你只需要定义你需要使用的):
- style: 包含CSS信息覆盖默认pdf.css的值,如果存在的话。css4j,是一个 Java 类库,实现了DOM CSS API
- xhtmlxsl: 包含XHTML转化为FO。由Apache Xalan处理,是一个XSLT处理器将XML文档转换成HTML,文本或其它XML文档类型。从3.0M2版本开始 (查看此问题XWIKI-5918)此字段需要定制xhtml2fo.xsl的实际内容。请注意,你还可以在此字段中使用velocity(当你需要填写一个大内容的文件时,通过velocity取附加的.xsl文件的内容,因为textarea属性的限制是60000字符)
- fopxsl: 包含FOP转化为PDF/RTF。由Apache FOP处理。
class的名字必须是XWiki.PDFClass.
有关fop/xsl-fo的好处是,xsl-fo文件独立与最终的结果。因此,我们可以以多种格式导出wiki文档。
然后创建一个新的页面(比如XWiki.PDFTemplate) 并且添加XWiki.PDFClass对象。
最后当调用PDF/RTF导出使用pdftemplate参数:http://yourserver/xwiki/bin/export/Space/Page?format=pdf&language=en&pdftemplate=XWiki.PDFTemplate.
默认情况下没有模板。
正如前面提到的样式属性存储CSS代码。该字段由Velocity引擎解析,这样你就可以使用当前的颜色主题美化你的PDF。例如:
#template('colorThemeInit.vm')
h2 {
color: $theme.titleColor;
}
td {
border-color: $theme.borderColor;
}
覆盖PDF模板
自定义PDF页脚
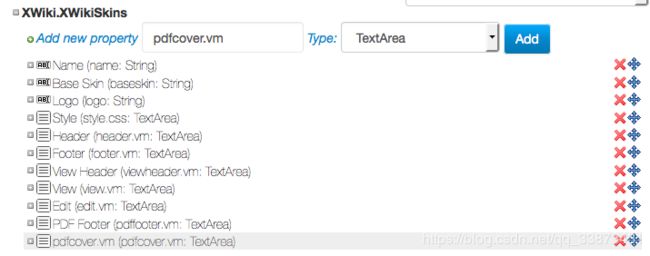
默认情况下,在PDF页脚显示页面号码,作者和最后修改的日期。为了显示自定义消息,pdffooter.vm模板必须重写。编辑skin类(如:http://yourserver/xwiki/bin/edit/XWiki/XWikiSkins?editor=class)并且添加一个名为pdffooter.vm的"TextArea"对象:
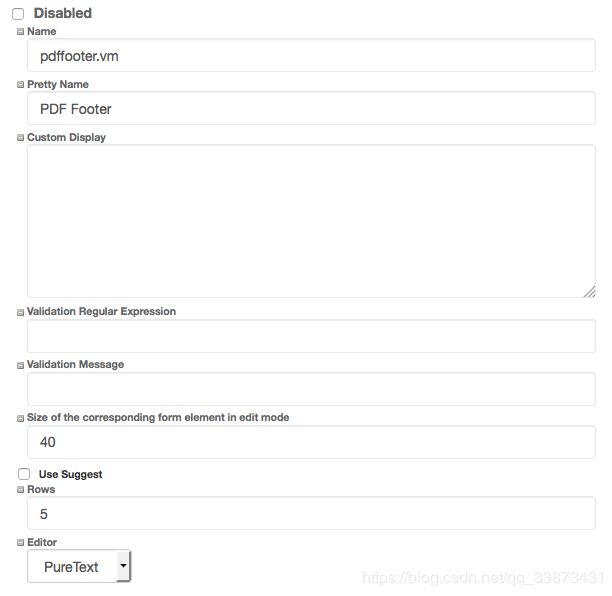
添加pdffooter.vm之后,对其编辑(点击它会打开一个详细的编辑器) 和设置"Pretty name"。在此编辑器中,需要设置"Editor"属性为"pure text",否则会使用WYSIWYG-Editor编辑器:
下一步,编辑皮肤页面(如 http://yourserver/xwiki/bin/edit/XWiki/DefaultSkin?editor=object),在pdffooter.vm属性添加以下代码:
$msg.Page
$xwiki.getUserName($tdoc.author, false)
$msg.get('lastmodifiedon')
$!xwiki.formatDate($tdoc.date)
CustomName SAS. All rights reserved. Confidential and proprietary document. Printed Copies are not controlled.
想看到更改后的变化,随便导出一个页面:
自定义PDF封面
当你需要为你的PDF封面添加一个公司的logo时,这将很有用。想要实现这一点,需要覆盖pdfcover.vm模板。如同和PDF页脚一样,需要在XWiki.XWikiSkins类添加一个名为pdfcover.vm的"TextArea"属性 (如 http://yourserver/xwiki/bin/view/XWiki/XWikiSkins?editor=class).
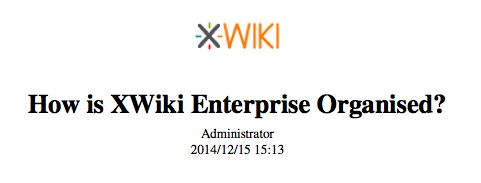
下一步,编辑皮肤页面(如http://yourserver/xwiki/bin/edit/XWiki/DefaultSkin?editor=object)并且在pdfcover.vm属性添加以下代码:
#set($title = "$!pdfdoc.display('title', 'rendered')")
#if($title == '')
$escapetool.xml($!doc.displayTitle)
#else
$escapetool.xml($title)
#end
$!xwiki.getUserName($tdoc.author, false)
$!xwiki.formatDate($tdoc.date)
最后一步,为皮肤上传一个“Logo.png”图片:
覆盖CSS规则
为了使用自己的模板以PDF导出页面,你需要在XWiki空间创建一个名为PDFClass的类。下一步,在"Class"模式编辑页面(如http://yourserver/xwiki/bin/edit/XWiki/PDFClass?editor=class)并添加以下TextArea属性:
- style 包含的CSS规则,这将覆盖默认pdf.css的值;默认情况下,pdf.css不会出现在你的文件系统中,但是你可以在\webapps\xwiki\templates\下创建,或者在你的皮肤页面指定它
- xhtmlxsl 包含XHTML2FO XSL转换,这将替代默认的
- fopxsl 包含FOP XSL转换,这将替代默认的
然后,创建需要自定义PDF导出的wiki页面(例如XWiki.PDFTemplate),并添加一个"XWiki.PDFClass"的对象。
假设你的wiki页面包含一个表格,你必须在“wiki”的模式进行编辑并添加样式,如下图所示:
(% class="mytable" %)
|=Column 1|=Column 2
| data|data
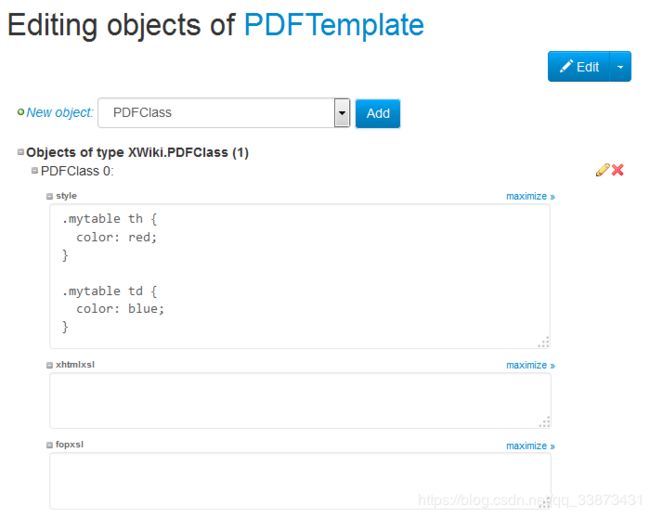
下一步,在"Objects"模式编辑页面,并在"style"属性中写入自己的CSS规则:
由于默认情况下没有使用模板,为了指定自己的模板,需要在URL中添加pdftemplate参数:http://yourserver/xwiki/bin/export/XWiki/PDFTemplate?format=pdf&pdftemplate=XWiki.PDFTemplate。
尽管希望RTF导出也以相同的方式工作,但仍有一些问题需要解决。
重写xhtml2fo.xsl规则
如上所述,定制xhtmlxsl需要把xhtml2fo.xsl的整个代码复制到xhtmlxsl文本域。
例如,可以修改以下部分来在PDF禁用生成可点击的URL:
为
配置Wiki语法和默认语法
从XWiki企业1.6开始可以配置wiki语法。可以通过编辑WEB-INF/xwiki.cfg文件并配置xwiki.rendering.syntaxes属性来设置。这是一个逗号分隔的语法ID列表。例如:
xwiki.rendering.syntaxes = xwiki/1.0, xwiki/2.0, confluence/1.0, jspwiki/1.0, creole/1.0, mediawiki/1.0, xhtml/1.0, twiki/1.0
从XWiki Enterprise 1.8开始,当创建一个文档时可以设置一个默认的语法。通过编辑WEB-INF/xwiki.properties文件并配置core.defaultDocumentSyntax属性。例如,默认使用XWiki Syntax 2.0语法:
#-# Specifies the default syntax to use when creating new documents.
#-# Default value is xwiki/1.0.
core.defaultDocumentSyntax = xwiki/2.0
提示:如果它不起作用,请检查你的配置文件是否正确。
标题
下列配置参数(在xwiki.cfg文件中)可以控制标题:
#-# Defines whether title handling should be using the compatibility mode or not. When the compatibility
#-# mode is active, if the document's content first header (level 1 or level 2) matches the document's title
#-# the first header is stripped.
xwiki.title.compatibility=1
#-# Defines the maximum header depth to look for when computing a document's title from its content. If no header
#-# equal or lower to the specified depth is found then the computed title falls back to the document name.
#-# The default value is 2.
# xwiki.title.headerdepth=2
#-# Defines if setting the title field must be mandatory in the WYSIWYG and Wiki editors. It is mandatory when this
#-# property is set to 1. The default value is 0 (not mandatory).
# xwiki.title.mandatory=0
生成Link Label
从XWiki语法2.0开始,当用户没有指定label时,可以通过配置由系统生成label。
具体配置位于xwiki.properties:
#-# [Since 1.8RC2]
#-# Specifies how links labels are displayed when the user doesn't specify the label explicitly.
#-# Valid values:
#-# %w: wiki name
#-# %s: full space name (e.g. space1.space2)
#-# Note: Prior to 7.4.2/8.0M2 this was only displaying the last space name
#-# %ls: last space name. New in 7.4.2/8.0M2
#-# %p: page name
#-# %np: nested page name (i.e. will display the space name for Nested Pages). New in 7.4.2/8.0M2
#-# %P: page name with spaces between camel case words, i.e. "My Page" if the page name is "MyPage"
#-# %NP: nested page name with spaces between camel case words, i.e. "My Page" if the page name is "MyPage".
#-# New in 7.4.2/8.0M2
#-# %t: page title
#-#
#-# Note that if the page title is empty or not defined then it defaults to %np. This is also the case
#-# if the title cannot be retrieved for the document.
#-#
#-# The default is "%np". Some examples: "%s.%p", "%w:%s.%p".
# rendering.linkLabelFormat = %np
渲染缓存
请参阅性能页面。
允许非活动用户查看一些页面
xwiki.cfg配置文件包含一个名为xwiki.inactiveuser.allowedpages的属性。这个属性可以被用来建立一个白名单页面,可以由被标记为非活动用户阅读。格式用一个逗号分隔。
例如在管理页面使电子邮件验证用户时,可以把一些用户标记为非活动用户。非活动用户是有帐户的,但是账户需要验证。访问权限并不适用于非活动用户 (他们不属于XWikiGuest也不属于XWikiAllGroup组成员)。
非活动的用户总是会看到XWiki.AccountValidation页面,以验证他们的帐户。
渲染转换
你可以通过编辑xwiki.properties控制激活转换 (默认情况下,Macro和Icon 是激活的):
#-# [Since 2.6RC1]
#-# Controls what transformations will be executed when rendering content.
#-# A transformation modifies the parsed content. For example the Icon transformation replaces some characters with
#-# icons, a WikiWord transformation will automatically create links when it finds wiki words, etc.
#-# Note that the Macro transformation is a special transformation that replaces macro markers by the result of the
#-# macro execution. If you don't list it, macros won't get executed.
#-# The default value is: rendering.transformations = macro, icon
例如,如果你想关闭图标转换不使用表情符号,你必须定义以下属性:rendering.transformations = macro.
保护Groovy脚本
查看:
- Commons Groovy Module
- Platform Groovy Module
xwiki.cfg样本
查看xwiki.cfg.vm
请注意,我们在编译的时候生成默认的xwiki.cfg文件,所以你会在编译的时候看到所有$
xwiki.properties样本
查看xwiki.cfg.vm

