一个列子让你弄懂SpringBoot实现后台框架的搭建
- 首先项目搭建
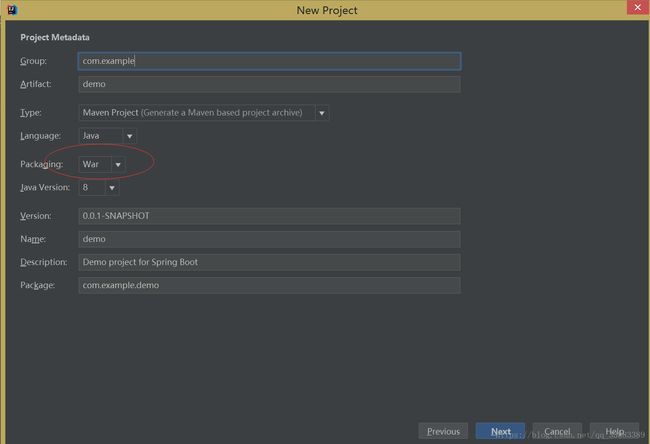
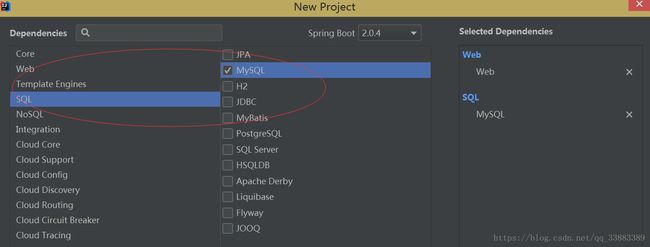
首先项目基于idea来写的,下面演示项目搭建d
记住Application文件一定要在根目录底下不然程序会运行不起来的
-
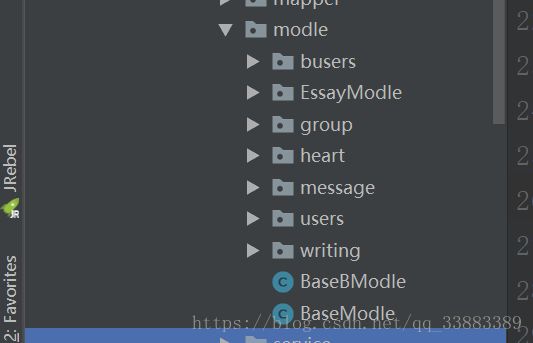
然后开始新建包。
- constant :常量包,存放一些常量数据,如定义服务器响应状态码。
- controller: 控制器,存放各种控制器,来提供数据或者返回界面
- entity:实体类包,存放各种与数据库对应的实体类
- mapper:存放各种与数据库映射的类
- modle:封装返回数据json的格式样式
- service:返回数据给控制调用
Application:程序的入口:
package com.wust.job;

import org.mybatis.spring.annotation.MapperScan;
import org.springframework.boot.SpringApplication;
import org.springframework.boot.autoconfigure.SpringBootApplication;

@MapperScan("com.wust.job.mapper")
@SpringBootApplication
public class JobApplication {

    public static void main(String[] args) {
        SpringApplication.run(JobApplication.class, args);
    }
}
解释:@MapperScan("com.wust.job.mapper") 这个用来扫描当前项目的实体类的映射。
- pom文件
    4.0.0

    com.wust
    job
    0.0.1-SNAPSHOT
    war

    job
    Demo project for Spring Boot


        org.springframework.boot
        spring-boot-starter-parent
        2.0.3.RELEASE


        UTF-8
        UTF-8
        1.8


            org.springframework.boot
            spring-boot-starter-jdbc


            org.springframework.boot
            spring-boot-starter-web


            org.mybatis.spring.boot
            mybatis-spring-boot-starter
            1.3.2


            org.apache.tomcat.embed
            tomcat-embed-jasper


            javax.servlet
            javax.servlet-api


            javax.servlet
            jstl


            mysql
            mysql-connector-java
            runtime


            org.springframework.boot
            spring-boot-starter-tomcat


            org.springframework.boot
            spring-boot-starter-test
            test


            org.apache.commons
            commons-lang3
            3.4


            com.fasterxml.jackson.core
            jackson-core


            com.fasterxml.jackson.core
            jackson-databind


            com.fasterxml.jackson.datatype
            jackson-datatype-joda


            com.fasterxml.jackson.module
            jackson-module-parameter-names


            com.github.pagehelper
            pagehelper-spring-boot-starter
            1.2.5


            com.alibaba
            druid-spring-boot-starter
            1.1.9


                org.springframework.boot
                spring-boot-maven-plugin
- 配置我们的yml文件
spring:
 mvc:
    view:
      prefix: /WEB-INF/view/
      suffix: .jsp

 datasource:
  driver-class-name: com.mysql.jdbc.Driver
  url: jdbc:mysql://127.0.0.1:3306/test?useUnicode=true&characterEncoding=UTF-8
  username: root
  password: zhengmeng001
解释: 这里用yml来写,格式要严谨点,但是看的清楚点。
下面介绍怎样封装一个(通用)json数据格式。
{
    "code":0,
    "msg":"essays success",
    "count":100,
    "data":[
        Object{...},
        {
            "id":54,
            "title":"测试文章",
            "username":"admin",
            "viewCount":148321,
            "remarkCount":897897,
            "collectCount":574804,
            "titleid":243557,
            "date":"2018-07-22T16:00:00.000+0000"
        },
        {
            "id":55,
            "title":"fsdfds",
            "username":"admin",
            "viewCount":194468,
            "remarkCount":576879,
            "collectCount":328477,
            "titleid":737659,
            "date":"2018-07-23T16:00:00.000+0000"
        }
    ]
}
解释 :
- code 为响应码,这里0 表示成功,1表示失败
- msg 返回信息,成功者返回成功的信息,错误者返回为什么错了
- count 返回数据的长度
- data 里存放我们的真实数据的集合 ,所以我们只需动态的改变他就可以了,当是文章这里填的是文章的集合,当时个人信息是则填个人信息的集合。
- 上面code,msg count为公用字段,我们可以提取出来作为公共字段,其他的json模板继承他就可以了。
package com.wust.job.modle;

/**
 * 〈json封装的基类
 *
 *   其他json的实体类必须继承该类
 * 〉

 * 〈〉
 *
 * @author meng
 * @create 2018/7/17
 * @since 1.0.0
 */
public class BaseModle {

    public int code;
    public String msg;
    public int count;

    public BaseModle() {
    }

    public BaseModle(int code, String msg) {
        this.code = code;
        this.msg = msg;
    }

    public BaseModle(int code, String msg, int count) {
        this.code = code;
        this.msg = msg;
        this.count = count;
    }
}
譬如:
package com.wust.job.modle.users;

import com.wust.job.entity.Users;
import com.wust.job.entity.UsersInformation;
import com.wust.job.modle.BaseModle;

import java.util.List;

//返回个人信息的json
public class UsersModle extends BaseModle {
    public List data;
}
于是我们可以写出如下的东西:
封装好了我们的(在此之前应该封装好了我们实体类层)json数据层之后,开始写我们的Mapper层(操作数据库层)
- Mapper层(基于注解形式完成)
package com.wust.job.mapper;

import com.wust.job.entity.Essay;

import org.apache.ibatis.annotations.Delete;
import org.apache.ibatis.annotations.Insert;
import org.apache.ibatis.annotations.Param;
import org.apache.ibatis.annotations.Select;
import org.springframework.stereotype.Component;

import java.util.List;

@Component
public interface IEssayMapper {


    @Select("select *from essay")
    public List getAllEssay();

    @Select("Select *from essay where username=#{username}")
    public List getUsersEssay(@Param("username") String username);

    @Select("select *from essay where title=#{title}")
    public List getUsersEssayByTitle(@Param("title") String title);

    @Delete("delete from essay where username=#{username}")
    public int deleteMyEssay(String username);

    @Delete("delete from essay where titleid=#{titleid}")
    public int deleteMyEssayByTitleId(int titleid);


    @Insert("insert into essay value (null,#{title},#{username},#{viewCount},#{remarkCount},#{collectCount},#{titleid},#{date})")
    int addEssay(Essay essay);

}
- 再写我们的Service层(调用Mapper层来完成相应操作)
-
/** * Copyright (C), 2015-2018, XXX有限公司 * FileName: EssayService * Author: meng * Date: 2018/7/17 15:36 * Description: * History: *
- 再写Controller层
package com.wust.job.controller;

import com.wust.job.constant.Constant;
import com.wust.job.entity.Essay;
import com.wust.job.modle.BaseModle;
import com.wust.job.modle.EssayModle.EssayModle;
import com.wust.job.service.EssayService;
import org.springframework.beans.factory.annotation.Autowired;
import org.springframework.stereotype.Controller;
import org.springframework.web.bind.annotation.CrossOrigin;
import org.springframework.web.bind.annotation.RequestMapping;
import org.springframework.web.bind.annotation.ResponseBody;

import javax.servlet.http.HttpServletRequest;
import javax.servlet.http.HttpSession;

import java.util.Date;
import java.util.List;
import java.util.Random;

/**
 * 〈一句话功能简述〉

 * 〈〉
 *
 * @author meng
 * @create 2018/7/19
 * @since 1.0.0
 */
@CrossOrigin
@Controller
@RequestMapping("/essay")
public class EssayController {

    @Autowired
    private EssayService essayService;

    @Autowired
    HttpServletRequest request;

    @Autowired
    HttpSession httpSession;


    /**
     * 返回文章的列表信息
     *
     * @return
     */
    @RequestMapping("/getAllEssay")
    @ResponseBody
    public EssayModle getAllEssay() {

        String username = request.getParameter("username");
        String title = request.getParameter("title");

        if(username == null){
            return  returnEssays(essayService.getAllEssay());
        }else{//如果输入框为空
            System.out.println("username = "+username);
            System.out.println("title = "+title);
            if(username.length() == 0){
                return returnEssays(essayService.getAllEssay());
            }else{//输入框不为空,可能是按照用户名,或者是文章标题来搜索
                List essays = essayService.getUsersEssayByTitle(title);//按照用户名搜索
                if(essays == null ||essays.size() ==0){//为空的时候说明不是用户名搜索,或者是不存在
                    essays = essayService.getUserEssay(username);
                    if(essays !=null){
                        return returnEssays(essays);
                    }else{
                        return null;
                    }
                }else {//不为空说明是为标题
                    return returnEssays(essays);
                }
            }//end else
        }//end if

    }


    /**
     * 返回该用户的文章
     *
     * @return
     */
    @RequestMapping("/getUserEssay")
    @ResponseBody
    public EssayModle getUserEssay( ) {

        String username = request.getParameter("username");
        System.out.println("getUserEssay"+username);
        return returnEssays(essayService.getUserEssay(username));
    }

    public EssayModle returnEssays(List essays) {


        if (essays != null) {
            return new EssayModle(0, "essays success",100, essays);
        }
        return new EssayModle(1, "essays error",0, null);
    }

    /**
     * 添加图书界面
     * @return
     */
    @RequestMapping("/addEssayPage")
    public String essayPage(){
        return "account/addEssay";
    }


    //只能超级用户添加即 admin
    @RequestMapping("/addEssay")
    @ResponseBody
    public BaseModle addEssay(){

        String title = request.getParameter("title");

        System.out.println("title = "+title);

        Random random = new Random();

        int viewCount = random.nextInt(1000000);
        int remarkCount = random.nextInt(1000000);
        int collectCount = random.nextInt(1000000);
        int titleId =  random.nextInt(1000000);

        if(essayService.addEssay(new Essay(
                0,
                title,
                "admin",
                viewCount,
                remarkCount,
                collectCount,
                titleId,
                new Date()
                ))){

            return new BaseModle(Constant.SUCESS,"添加文章成功",10);

        }

        return new BaseModle(Constant.ERROR,"添加文章失败",0);
    }

}
解释:
- @Autowired 实际上等于new
- @ResponseBody 标志这个方法返回我们的数据的 这里我们只需返回我们上层封装好的Modle 及json模板 将其返回springboot会自动的将其转化为json格式的数据
- @CrossOrigin 开启跨域访问
这样我就一层层的搭建好了。
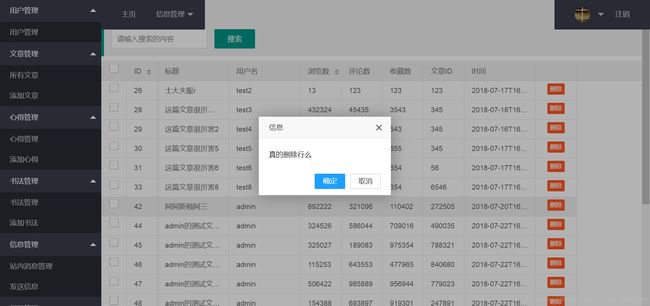
这样我们可以实现如下功能了


