shiro 整合oauth2.0 服务端 和 客户端实现(入门教程)(十三)
原文地址,转载请注明出处: https://blog.csdn.net/qq_34021712/article/details/80510774 ©王赛超
随着项目上线,有几家公司来找我们合作,打算在各自的app中集成其他公司的功能,公司准备使用一种网页的安全认证来实现多个应用认证,类似于支付宝授权一样,根据不同的scope返回不同的用户信息。经过研究采用了现阶段比较流行的OAuth2.0 。下面是对OAuth2.0一些整理和总结以便以后的学习交流。
什么是OAuth2.0?
OAuth2.0 是一个开放标准,允许用户让第三方应用访问该用户在某一网站上存储的私密的资源(如照片,视频,联系人列表),而不需要将用户名和密码提供给第三方应用。OAuth允许用户提供一个令牌,而不是用户名和密码来访问他们存放在特定服务提供者的数据。每一个令牌授权一个特定的网站在特定的时段内访问特定的资源。这样,OAuth让用户可以授权第三方网站访问他们存储在另外服务提供者的某些特定信息,而非所有内容。
OAuth2.0四个角色
资源拥有者(resource owner):比如你的信息是属于你的。你就是资源的拥有者。
资源服务器(resource server):存储受保护资源,客户端通过access token请求资源,资源服务器响应受保护资源给客户端。
授权服务器(authorization server):成功验证资源拥有者并获取授权之后,授权服务器颁发授权令牌(Access Token)给客户端。
客户端(client):第三方应用,其本身不存储资源,而是资源拥有者授权通过后,使用它的授权(授权令牌)访问受保护资源,然后客户端把相应的数据展示出来/提交到服务器。“客户端”术语不代表任何特定实现(如应用运行在一台服务器、桌面、手机或其他设备)。
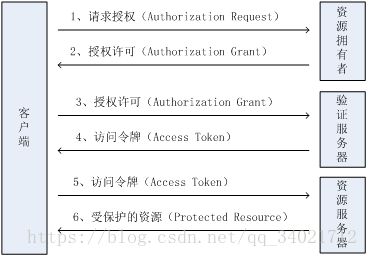
流程图

文字解释:
1. 用户打开客户端以后,客户端要求用户给予授权。
2. 用户同意给予客户端授权。
3. 客户端使用上一步获得的授权,向认证服务器申请令牌。
4. 认证服务器对客户端进行认证后,确认无误后,同意发放令牌。
5. 客户端使用令牌,向资源服务器申请获取资源。
6. 资源服务器确认令牌无误后,同意向客户端开放资源。
入门级代码
服务端使用了shiro,如果用户在授权过程中,密码连续错误5次将冻结账号,登录时有验证码,但是并没有使用,可以忽略。
客户端就是纯粹的http请求。
项目源码:点击下载 (包含sql文件)
服务端
添加用户表
DROP TABLE IF EXISTS `user_info`;
CREATE TABLE `user_info` (
  `uid` int(11) NOT NULL AUTO_INCREMENT,
  `username` varchar(50) DEFAULT '' COMMENT '用户名',
  `password` varchar(256) DEFAULT NULL COMMENT '登录密码',
  `name` varchar(256) DEFAULT NULL COMMENT '用户真实姓名',
  `id_card_num` varchar(256) DEFAULT NULL COMMENT '用户身份证号',
  `state` char(1) DEFAULT '0' COMMENT '用户状态:0:正常状态,1:用户被锁定',
  PRIMARY KEY (`uid`),
  UNIQUE KEY `username` (`username`) USING BTREE,
  UNIQUE KEY `id_card_num` (`id_card_num`) USING BTREE
) ENGINE=InnoDB DEFAULT CHARSET=utf8;
添加client表
DROP TABLE IF EXISTS `oauth2_client`;
CREATE TABLE `oauth2_client` (
  `id` bigint(20) NOT NULL AUTO_INCREMENT,
  `client_name` varchar(100) DEFAULT NULL COMMENT '客戶端名稱',
  `client_id` varchar(100) DEFAULT NULL COMMENT '客戶端ID',
  `client_secret` varchar(100) DEFAULT NULL COMMENT '客户端安全key',
  PRIMARY KEY (`id`),
  KEY `idx_oauth2_client_client_id` (`client_id`)
) ENGINE=InnoDB AUTO_INCREMENT=2 DEFAULT CHARSET=utf8;
表内添加数据
#插入用户信息表
INSERT INTO user_info(uid,username,`password`,`name`,id_card_num) VALUES (null,'admin','123456','超哥','133333333333333333');

#插入client表
insert into oauth2_client values(1,'oauth-client','c1ebe466-1cdc-4bd3-ab69-77c3561b9dee','d8346ea2-6017-43ed-ad68-19c0f971738b');
pom添加依赖
<dependency>
    <groupId>org.apache.oltu.oauth2groupId>
    <artifactId>org.apache.oltu.oauth2.authzserverartifactId>
    <version>1.0.2version>
dependency>
<dependency>
    <groupId>org.apache.oltu.oauth2groupId>
    <artifactId>org.apache.oltu.oauth2.resourceserverartifactId>
    <version>1.0.2version>
dependency>
相关实体类
package com.springboot.test.shiro.oauthserver.entity;

import java.io.Serializable;
import java.util.HashSet;
import java.util.Set;

/**
 * @author: wangsaichao
 * @date: 2018/5/11
 * @description: 用户信息
 */
public class User implements Serializable{

    /**
     * 用户id(主键 自增)
     */
    private Integer uid;

    /**
     * 用户名
     */
    private String username;

    /**
     * 登录密码
     */
    private String password;

    /**
     * 用户真实姓名
     */
    private String name;

    /**
     * 身份证号
     */
    private String id_card_num;

    /**
     * 用户状态:0:正常状态,1:用户被锁定
     */
    private String state;
}
package com.springboot.test.shiro.oauthserver.entity;
/**
* @author: wangsaichao
* @date: 2018/5/11
* @description: 客户端信息
*/
public class Client {
private String id;
private String clientName;
private String clientId;
private String clientSecret;
}相关service层
public interface AuthorizeService {
    /** 根据客户端id 查询客户端是否存在 */
    public boolean checkClientId(String clientId);
    /** 添加 auth code */
    public void addAuthCode(String authCode, String username);
    /** 检查客户端安全Key是否正确 */
    public boolean checkClientSecret(String clientSecret);
    /** 检查authCode是否可用 */
    public boolean checkAuthCode(String authCode);
    /** 根据 authCode 获取用户名 */
    public String getUsernameByAuthCode(String authCode);
    /** 添加accessToken */
    public void addAccessToken(String accessToken, String username);
    /** access token 过期时间 */
    public long getExpireIn();
    /** 检查 accessToken 是否可用 */
    public boolean checkAccessToken(String accessToken);
    /** 根据 accessToken 获取用户名 */
    public String getUsernameByAccessToken(String accessToken);
}
public interface ClientService {
/** 根据clientId查询Client信息 */
public Client findByClientId(String clientId);
/** 根据clientSecret查询client信息 */
public Client findByClientSecret(String clientSecret);
}public interface UserService {
/** 根据用户名 查询用户 */
public User findByUserName(String username);
/** 修改用户信息 */
public int updateUser(User user);
}相关dao和数据库操作请参考代码代码中并没有有关资源的维护,只是授权服务。资源服务相关操作没有写。只拿插入数据库的那一条基础数据测试。
以下代码参考开涛博客:http://jinnianshilongnian.iteye.com/blog/2038646
授权控制器AuthorizeController
package com.springboot.test.shiro.oauthserver.controller;

import com.springboot.test.shiro.oauthserver.service.AuthorizeService;
import com.springboot.test.shiro.oauthserver.service.ClientService;
import org.apache.oltu.oauth2.as.issuer.MD5Generator;
import org.apache.oltu.oauth2.as.issuer.OAuthIssuerImpl;
import org.apache.oltu.oauth2.as.request.OAuthAuthzRequest;
import org.apache.oltu.oauth2.as.response.OAuthASResponse;
import org.apache.oltu.oauth2.common.OAuth;
import org.apache.oltu.oauth2.common.error.OAuthError;
import org.apache.oltu.oauth2.common.exception.OAuthProblemException;
import org.apache.oltu.oauth2.common.exception.OAuthSystemException;
import org.apache.oltu.oauth2.common.message.OAuthResponse;
import org.apache.oltu.oauth2.common.message.types.ResponseType;
import org.apache.oltu.oauth2.common.utils.OAuthUtils;
import org.apache.shiro.SecurityUtils;
import org.apache.shiro.authc.IncorrectCredentialsException;
import org.apache.shiro.authc.LockedAccountException;
import org.apache.shiro.authc.UnknownAccountException;
import org.apache.shiro.authc.UsernamePasswordToken;
import org.apache.shiro.subject.Subject;
import org.springframework.beans.factory.annotation.Autowired;
import org.springframework.http.HttpHeaders;
import org.springframework.http.HttpStatus;
import org.springframework.http.ResponseEntity;
import org.springframework.stereotype.Controller;
import org.springframework.ui.Model;
import org.springframework.util.StringUtils;
import org.springframework.web.bind.annotation.RequestMapping;

import javax.servlet.http.HttpServletRequest;
import javax.servlet.http.HttpServletResponse;
import java.net.URI;
import java.net.URISyntaxException;

/**
 * @author: wangsaichao
 * @date: 2018/5/27
 * @description: 授权控制器
 *
 * 代码的作用:
 * 1、首先通过如 http://localhost:9090/oauth-server/authorize?response_type=code&redirect_uri=http%3A%2F%2Flocalhost%3A9080%2Foauth-client%2FcallbackCode&client_id=c1ebe466-1cdc-4bd3-ab69-77c3561b9dee
 * 2、该控制器首先检查clientId是否正确;如果错误将返回相应的错误信息
 * 3、然后判断用户是否登录了,如果没有登录首先到登录页面登录
 * 4、登录成功后生成相应的auth code即授权码,然后重定向到客户端地址,如http://localhost:9080/oauth-client/oauth2-login?code=52b1832f5dff68122f4f00ae995da0ed;在重定向到的地址中会带上code参数(授权码),接着客户端可以根据授权码去换取access token。
 */
@Controller
@RequestMapping("/oauth-server")
public class AuthorizeController {

    @Autowired
    private AuthorizeService authorizeService;

    @Autowired
    private ClientService clientService;

    @RequestMapping("/authorize")
    public Object authorize(Model model, HttpServletRequest request) throws OAuthSystemException, URISyntaxException {


        try {
            //构建OAuth 授权请求
            OAuthAuthzRequest oauthRequest = new OAuthAuthzRequest(request);

            //根据传入的clientId 判断 客户端是否存在
            if (!authorizeService.checkClientId(oauthRequest.getClientId())) {
                //生成错误信息,告知客户端不存在
                OAuthResponse response = OAuthASResponse
                        .errorResponse(HttpServletResponse.SC_BAD_REQUEST)
                        .setError(OAuthError.TokenResponse.INVALID_CLIENT)
                        .setErrorDescription("客户端验证失败,如错误的client_id/client_secret")
                        .buildJSONMessage();
                return new ResponseEntity(
                        response.getBody(), HttpStatus.valueOf(response.getResponseStatus()));
            }

            // 判断用户是否登录
            Subject subject = SecurityUtils.getSubject();
            //如果用户没有登录,跳转到登录页面
            if(!subject.isAuthenticated()) {
                if(!login(subject, request)) {
                    //登录失败时跳转到登陆页面
                    model.addAttribute("client", clientService.findByClientId(oauthRequest.getClientId()));
                    return "oauth2login";
                }
            }
            String username = (String) subject.getPrincipal();

            //生成授权码
            String authorizationCode = null;

            String responseType = oauthRequest.getParam(OAuth.OAUTH_RESPONSE_TYPE);
            if(responseType.equals(ResponseType.CODE.toString())) {
                OAuthIssuerImpl oAuthIssuer = new OAuthIssuerImpl(new MD5Generator());
                authorizationCode = oAuthIssuer.authorizationCode();
                //把授权码放到缓存中
                authorizeService.addAuthCode(authorizationCode, username);
            }

            // 进行OAuth响应构建
            OAuthASResponse.OAuthAuthorizationResponseBuilder builder = OAuthASResponse.authorizationResponse(request, HttpServletResponse.SC_FOUND);
            // 设置授权码
            builder.setCode(authorizationCode);
            // 根据客户端重定向地址
            String redirectURI = oauthRequest.getParam(OAuth.OAUTH_REDIRECT_URI);
            // 构建响应
            final OAuthResponse response = builder.location(redirectURI).buildQueryMessage();

            // 根据OAuthResponse 返回 ResponseEntity响应
            HttpHeaders headers = new HttpHeaders();
            headers.setLocation(new URI(response.getLocationUri()));
            return new ResponseEntity(headers, HttpStatus.valueOf(response.getResponseStatus()));
        } catch (OAuthProblemException e) {
            // 出错处理
            String redirectUri = e.getRedirectUri();
            if(OAuthUtils.isEmpty(redirectUri)) {
                // 告诉客户端没有传入redirectUri直接报错
                return new ResponseEntity("告诉客户端没有传入redirectUri直接报错!", HttpStatus.NOT_FOUND);
            }
            // 返回错误消息
            final OAuthResponse response = OAuthASResponse.errorResponse(HttpServletResponse.SC_FOUND).error(e).location(redirectUri).buildQueryMessage();
            HttpHeaders headers = new HttpHeaders();
            headers.setLocation(new URI(response.getLocationUri()));
            return new ResponseEntity(headers, HttpStatus.valueOf(response.getResponseStatus()));
        }

    }

    private boolean login(Subject subject, HttpServletRequest request) {
        if("get".equalsIgnoreCase(request.getMethod())) {
            return false;
        }

        String username = request.getParameter("username");
        String password = request.getParameter("password");

        if(StringUtils.isEmpty(username) || StringUtils.isEmpty(password)) {
            return false;
        }

        UsernamePasswordToken token = new UsernamePasswordToken(username, password);

        try {
            subject.login(token);
            return true;
        }catch(Exception e){

            if(e instanceof UnknownAccountException){
                request.setAttribute("msg","用户名或密码错误!");
            }

            if(e instanceof IncorrectCredentialsException){
                request.setAttribute("msg","用户名或密码错误!");
            }

            if(e instanceof LockedAccountException){
                request.setAttribute("msg","账号已被锁定,请联系管理员!");
            }
            return false;
        }
    }


}
1、首先通过如
http://localhost:9090/oauth-server/authorize?response_type=code&redirect_uri=http://localhost:9080/oauth-client/callbackCode&client_id=c1ebe466-1cdc-4bd3-ab69-77c3561b9dee进入方法
2、该控制器首先检查clientId是否正确;如果错误将返回相应的错误信息
3、然后判断用户是否登录了,如果没有登录首先到登录页面登录
4、登录成功后生成相应的auth code即授权码,然后重定向到客户端地址,如http://localhost:9080/oauth-client/oauth2-login?code=52b1832f5dff68122f4f00ae995da0ed;在重定向到的地址中会带上code参数(授权码),接着客户端可以根据授权码去换取access token。
访问令牌控制器AccessTokenController
package com.springboot.test.shiro.oauthserver.controller;

import com.springboot.test.shiro.oauthserver.service.AuthorizeService;
import org.apache.oltu.oauth2.as.issuer.MD5Generator;
import org.apache.oltu.oauth2.as.issuer.OAuthIssuer;
import org.apache.oltu.oauth2.as.issuer.OAuthIssuerImpl;
import org.apache.oltu.oauth2.as.request.OAuthTokenRequest;
import org.apache.oltu.oauth2.as.response.OAuthASResponse;
import org.apache.oltu.oauth2.common.OAuth;
import org.apache.oltu.oauth2.common.error.OAuthError;
import org.apache.oltu.oauth2.common.exception.OAuthProblemException;
import org.apache.oltu.oauth2.common.exception.OAuthSystemException;
import org.apache.oltu.oauth2.common.message.OAuthResponse;
import org.apache.oltu.oauth2.common.message.types.GrantType;
import org.springframework.beans.factory.annotation.Autowired;
import org.springframework.http.HttpEntity;
import org.springframework.http.HttpStatus;
import org.springframework.http.ResponseEntity;
import org.springframework.web.bind.annotation.RequestMapping;
import org.springframework.web.bind.annotation.RestController;

import javax.servlet.http.HttpServletRequest;
import javax.servlet.http.HttpServletResponse;

/**
 * @author: wangsaichao
 * @date: 2018/5/27
 * @description: 访问令牌控制器
 *
 * 代码描述:
 * 1、首先通过如http://localhost:9090/accessToken,POST提交如下数据:client_id= c1ebe466-1cdc-4bd3-ab69-77c3561b9dee& client_secret= d8346ea2-6017-43ed-ad68-19c0f971738b&grant_type=authorization_code&code=828beda907066d058584f37bcfd597b6&redirect_uri=http://localhost:9080/oauth-client/oauth2-login访问。
 * 2、该控制器会验证client_id、client_secret、auth code的正确性,如果错误会返回相应的错误;
 * 3、如果验证通过会生成并返回相应的访问令牌access token。
 */
@RestController
@RequestMapping("/oauth-server")
public class AccessTokenController {

    @Autowired
    private AuthorizeService authorizeService;

    @RequestMapping("/accessToken")
    public HttpEntity token(HttpServletRequest request) throws OAuthSystemException {
        try {
            // 构建Oauth请求
            OAuthTokenRequest oAuthTokenRequest = new OAuthTokenRequest(request);

            //检查提交的客户端id是否正确
            if(!authorizeService.checkClientId(oAuthTokenRequest.getClientId())) {
                OAuthResponse response = OAuthASResponse.errorResponse(HttpServletResponse.SC_BAD_REQUEST)
                        .setError(OAuthError.TokenResponse.INVALID_CLIENT)
                        .setErrorDescription("客户端验证失败,client_id错误!")
                        .buildJSONMessage();
                return new ResponseEntity(response.getBody(), HttpStatus.valueOf(response.getResponseStatus()));
            }

            // 检查客户端安全Key是否正确
            if(!authorizeService.checkClientSecret(oAuthTokenRequest.getClientSecret())){
                OAuthResponse response = OAuthASResponse.errorResponse(HttpServletResponse.SC_UNAUTHORIZED)
                        .setError(OAuthError.TokenResponse.UNAUTHORIZED_CLIENT)
                        .setErrorDescription("客户端验证失败,client_secret错误!")
                        .buildJSONMessage();
                return new ResponseEntity(response.getBody(), HttpStatus.valueOf(response.getResponseStatus()));
            }

            String authCode = oAuthTokenRequest.getParam(OAuth.OAUTH_CODE);

            // 检查验证类型,此处只检查AUTHORIZATION类型,其他的还有PASSWORD或者REFRESH_TOKEN
            if(oAuthTokenRequest.getParam(OAuth.OAUTH_GRANT_TYPE).equals(GrantType.AUTHORIZATION_CODE.toString())){
                if(!authorizeService.checkAuthCode(authCode)){
                    OAuthResponse response = OAuthASResponse.errorResponse(HttpServletResponse.SC_BAD_REQUEST)
                            .setError(OAuthError.TokenResponse.INVALID_GRANT)
                            .setErrorDescription("auth_code错误!")
                            .buildJSONMessage();
                    return new ResponseEntity(response.getBody(),HttpStatus.valueOf(response.getResponseStatus()));
                }
            }

            //生成Access Token
            OAuthIssuer issuer = new OAuthIssuerImpl(new MD5Generator());
            final String accessToken  = issuer.accessToken();
            authorizeService.addAccessToken(accessToken, authorizeService.getUsernameByAuthCode(authCode));

            // 生成OAuth响应
            OAuthResponse response = OAuthASResponse.tokenResponse(HttpServletResponse.SC_OK)
                    .setAccessToken(accessToken).setExpiresIn(String.valueOf(authorizeService.getExpireIn()))
                    .buildJSONMessage();

            return new ResponseEntity(response.getBody(),HttpStatus.valueOf(response.getResponseStatus()));
        } catch(OAuthProblemException e) {
            OAuthResponse res = OAuthASResponse.errorResponse(HttpServletResponse.SC_BAD_REQUEST).error(e).buildBodyMessage();
            return new ResponseEntity(res.getBody(),HttpStatus.valueOf(res.getResponseStatus()));
        }
    }

}
1、首先通过如http://localhost:9090/accessToken,POST提交如下数据:client_id= c1ebe466-1cdc-4bd3-ab69-77c3561b9dee&client_secret=d8346ea2-6017-43ed-ad68-19c0f971738b&grant_type=authorization_code&code=828beda907066d058584f37bcfd597b6&redirect_uri=http://localhost:9080/oauth-client/oauth2-login访问。
2、该控制器会验证client_id、client_secret、auth code的正确性,如果错误会返回相应的错误;
3、如果验证通过会生成并返回相应的访问令牌access token。
资源控制器UserInfoController
package com.springboot.test.shiro.oauthserver.controller;

import com.springboot.test.shiro.oauthserver.service.AuthorizeService;
import org.apache.oltu.oauth2.common.OAuth;
import org.apache.oltu.oauth2.common.error.OAuthError;
import org.apache.oltu.oauth2.common.exception.OAuthProblemException;
import org.apache.oltu.oauth2.common.exception.OAuthSystemException;
import org.apache.oltu.oauth2.common.message.OAuthResponse;
import org.apache.oltu.oauth2.common.message.types.ParameterStyle;
import org.apache.oltu.oauth2.common.utils.OAuthUtils;
import org.apache.oltu.oauth2.rs.request.OAuthAccessResourceRequest;
import org.apache.oltu.oauth2.rs.response.OAuthRSResponse;
import org.springframework.beans.factory.annotation.Autowired;
import org.springframework.http.HttpEntity;
import org.springframework.http.HttpHeaders;
import org.springframework.http.HttpStatus;
import org.springframework.http.ResponseEntity;
import org.springframework.stereotype.Controller;
import org.springframework.web.bind.annotation.RequestMapping;

import javax.servlet.http.HttpServletRequest;
import javax.servlet.http.HttpServletResponse;

/**
 * @author: wangsaichao
 * @date: 2018/5/27
 * @description:
 * 1、首先通过如http://localhost:9090/oauth-server/userInfo?access_token=828beda907066d058584f37bcfd597b6进行访问;
 * 2、该控制器会验证access token的有效性;如果无效了将返回相应的错误,客户端再重新进行授权;
 * 3、如果有效,则返回当前登录用户的用户名。
 */
@Controller
@RequestMapping("/oauth-server")
public class UserInfoController {

    @Autowired
    private AuthorizeService authorizeService;

    @RequestMapping("/userInfo")
    public HttpEntity userInfo(HttpServletRequest request) throws OAuthSystemException {
        try {

            //构建OAuth资源请求
            OAuthAccessResourceRequest oauthRequest = new OAuthAccessResourceRequest(request, ParameterStyle.QUERY);
            //获取Access Token
            String accessToken = oauthRequest.getAccessToken();

            //验证Access Token
            if (!authorizeService.checkAccessToken(accessToken)) {
                // 如果不存在/过期了,返回未验证错误,需重新验证
                OAuthResponse oauthResponse = OAuthRSResponse
                        .errorResponse(HttpServletResponse.SC_UNAUTHORIZED)
                        .setRealm("oauth-server")
                        .setError(OAuthError.ResourceResponse.INVALID_TOKEN)
                        .buildHeaderMessage();

                HttpHeaders headers = new HttpHeaders();
                headers.add(OAuth.HeaderType.WWW_AUTHENTICATE, oauthResponse.getHeader(OAuth.HeaderType.WWW_AUTHENTICATE));
                return new ResponseEntity(headers, HttpStatus.UNAUTHORIZED);
            }
            //返回用户名
            String username = authorizeService.getUsernameByAccessToken(accessToken);
            return new ResponseEntity(username, HttpStatus.OK);
        } catch (OAuthProblemException e) {
            //检查是否设置了错误码
            String errorCode = e.getError();
            if (OAuthUtils.isEmpty(errorCode)) {
                OAuthResponse oauthResponse = OAuthRSResponse
                        .errorResponse(HttpServletResponse.SC_UNAUTHORIZED)
                        .setRealm("fxb")
                        .buildHeaderMessage();

                HttpHeaders headers = new HttpHeaders();
                headers.add(OAuth.HeaderType.WWW_AUTHENTICATE, oauthResponse.getHeader(OAuth.HeaderType.WWW_AUTHENTICATE));
                return new ResponseEntity(headers, HttpStatus.UNAUTHORIZED);
            }

            OAuthResponse oauthResponse = OAuthRSResponse
                    .errorResponse(HttpServletResponse.SC_UNAUTHORIZED)
                    .setRealm("oauth-server")
                    .setError(e.getError())
                    .setErrorDescription(e.getDescription())
                    .setErrorUri(e.getUri())
                    .buildHeaderMessage();

            HttpHeaders headers = new HttpHeaders();
            headers.add(OAuth.HeaderType.WWW_AUTHENTICATE, oauthResponse.getHeader(OAuth.HeaderType.WWW_AUTHENTICATE));
            return new ResponseEntity(HttpStatus.BAD_REQUEST);
        }
    }
}
1、首先通过如
http://localhost:9090/oauth-server/userInfo?access_token=828beda907066d058584f37bcfd597b6进行访问;
2、该控制器会验证access token的有效性;如果无效了将返回相应的错误,客户端再重新进行授权;
3、如果有效,则返回当前登录用户的用户名。
对于授权服务和资源服务的实现可以参考新浪微博开发平台的实现:
http://open.weibo.com/wiki/授权机制说明
http://open.weibo.com/wiki/微博API
客户端
我是将客户端一系列流程直接跑完的,就是内部redirect没有使用shiro控制权限,只是为了理解这个流程
pom添加依赖
<dependency>
    <groupId>org.apache.oltu.oauth2groupId>
    <artifactId>org.apache.oltu.oauth2.clientartifactId>
    <version>1.0.2version>
dependency>
AuthCodeController获取code
package com.springboot.test.shiro.oauthclient.controller;

import org.apache.oltu.oauth2.client.request.OAuthClientRequest;
import org.apache.oltu.oauth2.common.exception.OAuthProblemException;
import org.apache.oltu.oauth2.common.exception.OAuthSystemException;
import org.springframework.beans.factory.annotation.Value;
import org.springframework.stereotype.Controller;
import org.springframework.web.bind.annotation.RequestMapping;

/**
 * @author: wangsaichao
 * @date: 2018/5/29
 * @description:
 * 1、拼接url然后访问,获取code
 * 2、服务端检查成功,然后会回调到 另一个接口 /oauth-client/callbackCode
 */
@Controller
@RequestMapping("/oauth-client")
public class AuthCodeController {

    @Value("${clientId}")
    private String clientId;

    @Value("${authorizeUrl}")
    private String authorizeUrl;

    @Value("${redirectUrl}")
    private String redirectUrl;

    @Value("${response_type}")
    private String response_type;

    @RequestMapping("/getCode")
    public String getCode() throws OAuthProblemException {
        String requestUrl = null;
        try {

            //配置请求参数,构建oauthd的请求。设置请求服务地址(authorizeUrl)、clientId、response_type、redirectUrl
            OAuthClientRequest accessTokenRequest = OAuthClientRequest.authorizationLocation(authorizeUrl)
                    .setResponseType(response_type)
                    .setClientId(clientId)
                    .setRedirectURI(redirectUrl)
                    .buildQueryMessage();

            requestUrl = accessTokenRequest.getLocationUri();
        } catch (OAuthSystemException e) {
            e.printStackTrace();
        }

        System.out.println("==> 客户端重定向到服务端获取auth_code: "+requestUrl);
        return "redirect:"+requestUrl ;
    }

}
1、拼接url然后重定向到服务端,获取code
2、服务端检查成功,然后会回调到 另一个接口 /oauth-client/callbackCode
AccessTokenController服务端回调
package com.springboot.test.shiro.oauthclient.controller;

import org.apache.oltu.oauth2.client.OAuthClient;
import org.apache.oltu.oauth2.client.URLConnectionClient;
import org.apache.oltu.oauth2.client.request.OAuthClientRequest;
import org.apache.oltu.oauth2.client.response.OAuthAccessTokenResponse;
import org.apache.oltu.oauth2.common.OAuth;
import org.apache.oltu.oauth2.common.exception.OAuthProblemException;
import org.apache.oltu.oauth2.common.exception.OAuthSystemException;
import org.apache.oltu.oauth2.common.message.types.GrantType;
import org.springframework.beans.factory.annotation.Value;
import org.springframework.stereotype.Controller;
import org.springframework.web.bind.annotation.RequestMapping;

import javax.servlet.http.HttpServletRequest;

/**
 * @author: wangsaichao
 * @date: 2018/5/29
 * @description: 服务端回调方法
 * 1.服务端回调,传回code值
 * 2.根据code值,调用服务端服务,根据code获取access_token
 * 3.拿到access_token重定向到客户端的服务  /oauth-client/getUserInfo 在该服务中 再调用服务端获取用户信息
 */
@Controller
@RequestMapping("/oauth-client")
public class AccessTokenController {

    @Value("${clientId}")
    private String clientId;

    @Value("${clientSecret}")
    private String clientSecret;

    @Value("${accessTokenUrl}")
    private String accessTokenUrl;

    @Value("${redirectUrl}")
    private String redirectUrl;

    @Value("${response_type}")
    private String response_type;


    //接受客户端返回的code,提交申请access token的请求
    @RequestMapping("/callbackCode")
    public Object toLogin(HttpServletRequest request)throws OAuthProblemException {

        String  code = request.getParameter("code");

        System.out.println("==> 服务端回调,获取的code:"+code);

        OAuthClient oAuthClient =new OAuthClient(new URLConnectionClient());

        try {

            OAuthClientRequest accessTokenRequest = OAuthClientRequest
                    .tokenLocation(accessTokenUrl)
                    .setGrantType(GrantType.AUTHORIZATION_CODE)
                    .setClientId(clientId)
                    .setClientSecret(clientSecret)
                    .setCode(code)
                    .setRedirectURI(redirectUrl)
                    .buildQueryMessage();

            //去服务端请求access token,并返回响应
            OAuthAccessTokenResponse oAuthResponse =oAuthClient.accessToken(accessTokenRequest, OAuth.HttpMethod.POST);
            //获取服务端返回过来的access token
            String accessToken = oAuthResponse.getAccessToken();
            //查看access token是否过期
            Long expiresIn =oAuthResponse.getExpiresIn();
            System.out.println("==> 客户端根据 code值 "+code +" 到服务端获取的access_token为:"+accessToken+" 过期时间为:"+expiresIn);

            System.out.println("==> 拿到access_token然后重定向到 客户端 /oauth-client/getUserInfo服务,传过去accessToken");

            return"redirect:/oauth-client/getUserInfo?accessToken="+accessToken;

        } catch (OAuthSystemException e) {
            e.printStackTrace();
        }
        return null;
    }

}
1、服务端回调,传回code值
2、根据code值,调用服务端服务,根据code获取access_token
3、拿到access_token重定向到客户端的服务 /oauth-client/getUserInfo 在该服务中 再调用服务端获取用户信息
GetUserInfoController客户端根据access_token获取用户信息
package com.springboot.test.shiro.oauthclient.controller;

import org.apache.oltu.oauth2.client.OAuthClient;
import org.apache.oltu.oauth2.client.URLConnectionClient;
import org.apache.oltu.oauth2.client.request.OAuthBearerClientRequest;
import org.apache.oltu.oauth2.client.request.OAuthClientRequest;
import org.apache.oltu.oauth2.client.response.OAuthResourceResponse;
import org.apache.oltu.oauth2.common.OAuth;
import org.springframework.beans.factory.annotation.Value;
import org.springframework.stereotype.Controller;
import org.springframework.web.bind.annotation.RequestMapping;
import org.springframework.web.bind.annotation.ResponseBody;

/**
 * @author: wangsaichao
 * @date: 2018/5/29
 * @description: 通过access_token获取用户信息
 */
@Controller
@RequestMapping("/oauth-client")
public class GetUserInfoController {

    @Value("${userInfoUrl}")
    private String userInfoUrl;


    //接受服务端传回来的access token,由此token去请求服务端的资源(用户信息等)
    @RequestMapping("/getUserInfo")
    @ResponseBody
    public String accessToken(String accessToken) {

        OAuthClient oAuthClient =new OAuthClient(new URLConnectionClient());
        try {
            OAuthClientRequest userInfoRequest =new OAuthBearerClientRequest(userInfoUrl)
                    .setAccessToken(accessToken).buildQueryMessage();

            OAuthResourceResponse resourceResponse =oAuthClient.resource(userInfoRequest, OAuth.HttpMethod.GET, OAuthResourceResponse.class);
            String body = resourceResponse.getBody();
            System.out.println("==> 客户端通过accessToken:"+accessToken +"  从服务端获取用户信息为:"+body);
            return body;
        } catch (Exception e) {
            e.printStackTrace();
        }
        return null;

    }
}
测试
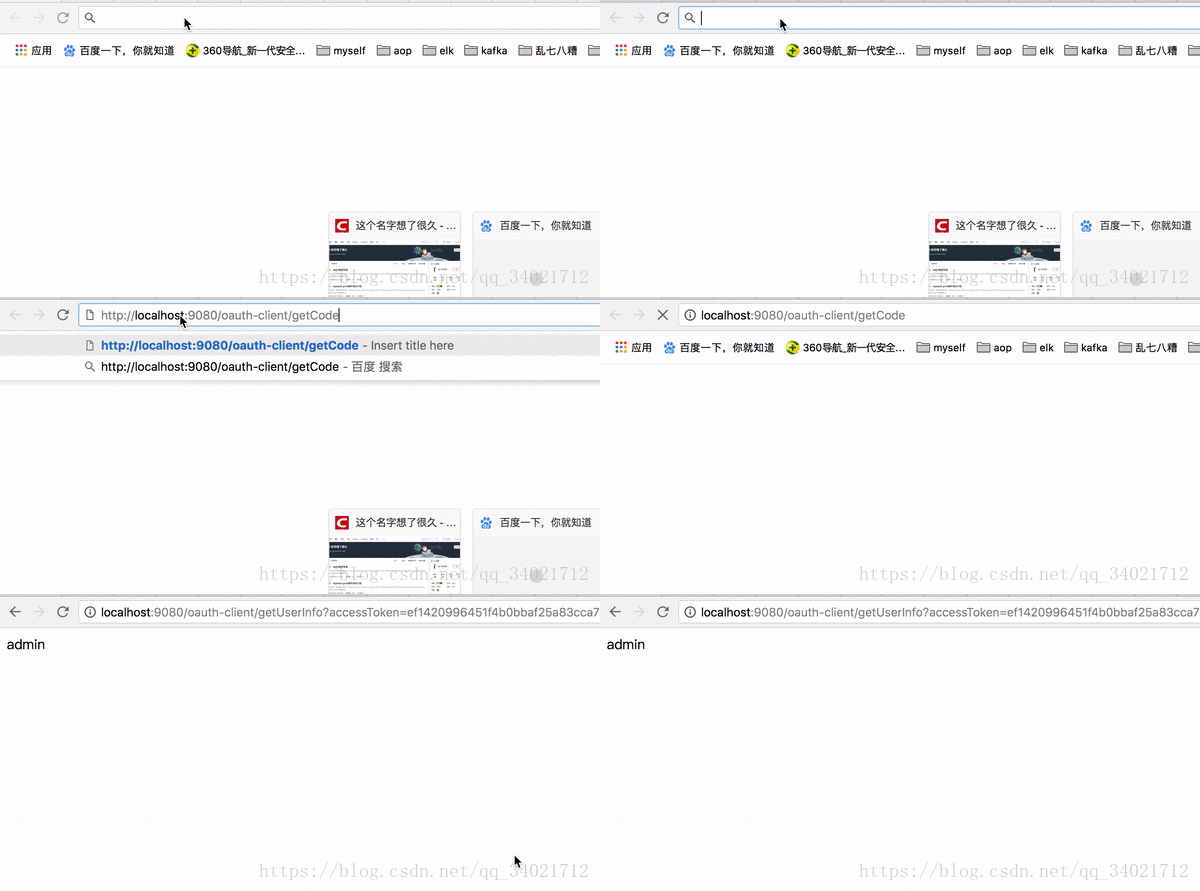
1、首先访问客户端http://localhost:9080/oauth-client/getCode 会重定向到服务端让你输入账号密码授权
2、输入用户名进行登录并授权;
3、如果登录成功,服务端会重定向到客户端,即之前客户端提供的地址http://localhost:9080/oauth-client/callbackCode?code=98872aeb79889bc27be46da76a204aa3,并带着auth code过去;
4、方法内部拿到code之后 会调用服务端获取access_token 然后重定向到客户端的获取用户信息方法
5、获取用户信息方法内调用服务端 并传过去 access_token 获取用户名,然后展示到页面

控制台打印日志

到此流程结束,此处的客户端 服务端 比较简单,还有很多没有做 比如根据scope 获取不同的级别的用户信息,请求的验签等等。