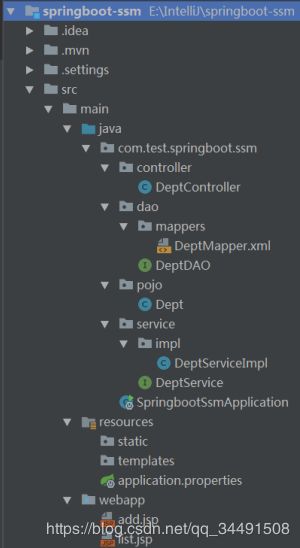
springboot整合ssm详细讲解
SSM是企业中广泛应用的框架。大家再熟练地使用SSM进行业务逻辑开发的时候,也被它大量的xml配置困扰。今
天快速优雅的使用SpringBoot实现简易的SSM工程。废话不多说,come on
开发工具idea
1.创建一个web工程,pom.xml中加入如下配置:
    org.springframework.boot
    spring-boot-starter-parent
    1.5.10.RELEASE


    UTF-8
    UTF-8
    1.8


        org.springframework.boot
        spring-boot-starter-jdbc


        org.springframework.boot
        spring-boot-starter-web


        org.springframework.boot
        spring-boot-starter-aop


        org.mybatis.spring.boot
        mybatis-spring-boot-starter
        1.3.1


        org.springframework.boot
        spring-boot-starter-tomcat
        provided


        mysql
        mysql-connector-java
        runtime


        org.springframework.boot
        spring-boot-starter-test
        test


        org.apache.tomcat.embed
        tomcat-embed-jasper


        jstl
        jstl
        1.2


            org.springframework.boot
            spring-boot-maven-plugin


            src/main/java

                **/*.xml


            src/main/resources

                **/*.xml
                **/*.properties
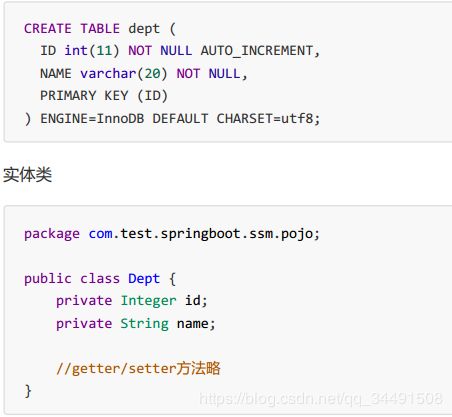
3.数据库和实体类
数据库使用mysql,创建部门表dept,表结构很简单,id主键和name部门名称。
4.dao层
dao的代码我们演示两种方式,一种使用传统的Mapper映射文件,一种使用注解编写sql:
package com.test.springboot.ssm.dao;
import com.test.springboot.ssm.pojo.Dept;
import org.apache.ibatis.annotations.Insert;
import org.apache.ibatis.annotations.Options;
import java.util.List;
public interface DeptDAO {
//查询列表,演示使用传统的mapper映射文件
List
//插入,演示使用注解编写sql,省略xml配置
@Insert("insert into DEPT(NAME) values(#{name})")
@Options(useGeneratedKeys = true, keyProperty = "id", keyColumn = "ID")
void addDept(String name);
}
mapper映射文件如下
mapper.dtd" >
注意mapper的namespace是DAO接口的全路径,mapper中语句的id与DAO接口中的方法名是一致的
5.service层
接口:
package com.test.springboot.ssm.service;
import com.test.springboot.ssm.pojo.Dept;
import java.util.List;
public interface DeptService {
List
void addDept(String name);
}
实现类;
package com.test.springboot.ssm.service.impl;
import com.test.springboot.ssm.dao.DeptDAO;
import com.test.springboot.ssm.pojo.Dept;
import com.test.springboot.ssm.service.DeptService;
import org.springframework.beans.factory.annotation.Autowired;
import org.springframework.stereotype.Service;
import java.util.List;
@Service
public class DeptServiceImpl implements DeptService {
@Autowired
private DeptDAO deptDAO;
@Override
public List
return deptDAO.getDeltList();
}
@Override
public void addDept(String name) {
deptDAO.addDept(name);
}
}
6.controller层
package com.test.springboot.ssm.controller;
import com.test.springboot.ssm.pojo.Dept;
import com.test.springboot.ssm.service.DeptService;
import org.springframework.beans.factory.annotation.Autowired;
import org.springframework.stereotype.Controller;
import org.springframework.web.bind.annotation.RequestMapping;
import org.springframework.web.servlet.ModelAndView;
import java.util.List;
@Controller
public class DeptController {
@Autowired
private DeptService deptService;
@RequestMapping("list.html")
public ModelAndView list() {
List
return new ModelAndView("list", "deptList", deptList);
}
@RequestMapping("add.html")
public String add(String name) {
deptService.addDept(name);
//添加成功后重定向到列表页
return "redirect:list.html";
}
}
jsp页面
add.jsp
<%@ page contentType="text/html;charset=UTF-8" language="java" %>
list.jsp
<%@ taglib prefix="c" uri="http://java.sun.com/jsp/jstl/core" %>
<%@ page contentType="text/html;charset=UTF-8" language="java" %>
${dept.id}-${dept.name}
貌似到目前为止,编码的形式和我们开发普通的SSM没什么区别,不要着急,重点来了。传统的ssm中我们需需要
在spring.xml中配置数据源、声明式事务、mybatis配置信息、注解扫描等。使用SpringBoot,我们可以省略掉所
有的xml。没错,就是一个配置文件都没有,废话少说,上代码:
SpringBoot有个全局的属性配置文件application.properties
#数据源的基本信息
spring.datasource.url = jdbc:mysql://localhost:3306/test?characterEncoding=utf-8
spring.datasource.username = root
spring.datasource.password =
spring.datasource.driverClassName = com.mysql.jdbc.Driver
#mybatis中mapper文件的路径
mybatis.mapper-locations=classpath*:com/test/springboot/ssm/dao/mappers/*.xml
#起别名。可省略写mybatis的xml中的resultType的全路径
mybatis.type-aliases-package=com.test.springboot.ssm.pojo
#springMVC中的视图信息,响应前缀
spring.mvc.view.prefix=/
# 响应页面默认后缀
spring.mvc.view.suffix=.jsp
#DispatcherServlet中响应的url-pattern
server.sevlet-path=*.html
7.入口类
package com.test.springboot.ssm;
import org.mybatis.spring.annotation.MapperScan;
import org.springframework.boot.SpringApplication;
import org.springframework.boot.autoconfigure.SpringBootApplication;
import org.springframework.context.annotation.ComponentScan;
import org.springframework.transaction.annotation.EnableTransactionManagement;
@SpringBootApplication
@EnableTransactionManagement//开启事务管理
@ComponentScan("com.test.springboot.ssm")//扫描注解元素
@MapperScan("com.test.springboot.ssm.dao")//Mybatis的DAO所在包
public class SpringbootSsmApplication {
public static void main(String[] args) {
SpringApplication.run(SpringbootSsmApplication.class, args);
}
}
对比发现,SpringBoot可以省略大量的xml配置文件,几个注解轻松代替繁琐的配置。为了方便大家接受
SpringBoot,本文中的示例使用的页面模板引擎还是jsp。Spring官网推荐使用Thymeleaf 作为页面模板引擎,后
续的学习中

