Spring IoC 实现方式
在Spring 基本概念里我们已经了解了IoC的思想,本篇讨论Spring IoC的两种实现方式和相关配置。
一、通过XML文件配置实现
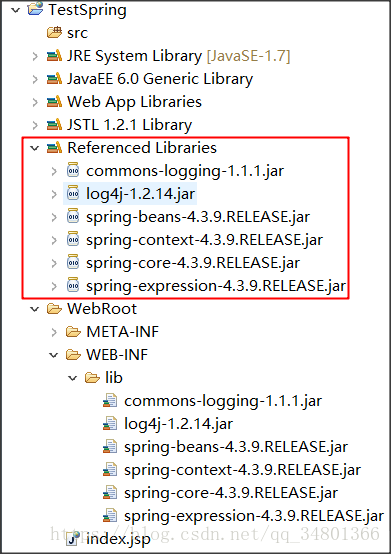
1、 首先要通过XML文件配置实现我们要引入最基本的Spring相关jar包并生成环境
- spring-beans-4.3.9.RELEASE.jar
- spring-context-4.3.9.RELEASE.jar
- spring-core-4.3.9.RELEASE.jar
- spring-expression-4.3.9.RELEASE.jar
- commons-logging-1.1.1.jar
- log4j-1.2.14.jar

2、创建Spring配置文件,并引入schema约束
3、创建测试类,利用Spring配置来创建对象并测试
- 客户类,要利用Spring实例化的类
package com.sitech.test1;

public class Custom {

    public void print() {
        System.out.println("Custom.print()");
    }
}
- 在applicationContext位置文件里配置Custom
<beans xmlns="http://www.springframework.org/schema/beans"
    xmlns:xsi="http://www.w3.org/2001/XMLSchema-instance"
    xsi:schemaLocation="
        http://www.springframework.org/schema/beans http://www.springframework.org/schema/beans/spring-beans.xsd">

    <bean id="custom" class="com.sitech.test1.Custom">bean>
beans>- 测试类
package com.sitech.test1;

import org.springframework.context.ApplicationContext;
import org.springframework.context.support.ClassPathXmlApplicationContext;

public class Test1 {

    public static void main(String[] args) {
        ApplicationContext applicationContext = new ClassPathXmlApplicationContext("applicationContext.xml");
        Custom custom = (Custom) applicationContext.getBean("custom");
        custom.print();
    }
}
- 输出结果
log4j:WARN No appenders could be found for logger (org.springframework.core.env.StandardEnvironment).
log4j:WARN Please initialize the log4j system properly.
Custom.print()
4、bean实例化的三种方式
- 使用类的构造方法创建对象
<bean id="custom" class="com.sitech.test1.Custom">bean>- 使用静态工厂创建对象
package com.sitech.test2;

public class CustomStaticFactory {

    public static Custom getCustom() {
        return new Custom();
    }
}
<bean id="custom" class="com.sitech.test2.CustomStaticFactory" factory-method="getCustom">bean>- 使用实例工厂创建对象
package com.sitech.test3;

public class CustomFactory {

    public Custom getCustom() {
        return new Custom();
    }
}
<bean id="customFactory" class="com.sitech.test3.CustomFactory">bean>
<bean id="custom" factory-bean="customFactory" factory-method="getCustom">bean>
5、bean标签属性介绍
- id:标识,实例名,建议使用
- name:标识,不建议使用
- class:所要创建的对象的类名全路径
- scope
- singleton:单例,默认值
- prototype:原型(多例),如struts2中Action
- request:创建对象把对象放到request域里
- session:创建对象把对象放到session域里
- globalSession:创建对象把对象放到globalSession域里
6、属性注入介绍
- set方法注入,要提供相应的set方法
package com.sitech.test5;

public class Custom {

    private String name;

    public void setName(String name) {
        this.name = name;
    }

    public void print() {
        System.out.println(name);
    }
}
id="custom" class="com.sitech.test4.Custom">
    <property name="name" value="Jack">property>
- 想一想,若这个name属性换成一个对象呢?这就是我们在实际开发中广泛应用的了,注入对象类型
package com.sitech.test6;

public class Restaurant {

    public void eat() {
        System.out.println("Restaurant.eat()");
    }
}
package com.sitech.test6;

public class Custom {

    private Restaurant restaurant;

    public void setRestaurant(Restaurant restaurant) {
        this.restaurant = restaurant;
    }

    public void hungry() {
        restaurant.eat();
    }
}
<bean id="restaurant" class="com.sitech.test6.Restaurant">bean>

<bean id="custom" class="com.sitech.test6.Custom">

    <property name="restaurant" ref="restaurant">property>
bean>- 有参构造方法注入,要提供相应的有参构造方法
package com.sitech.test4;

public class Custom {

    private String name;

    Custom(String name) {
        this.name = name;
    }

    public void print() {
        System.out.println(name);
    }
}
<bean id="custom" class="com.sitech.test4.Custom">
    <constructor-arg name="name" value="Jack">constructor-arg>
bean>
7、其它类型注入配置方式介绍(都需要提供set方法)
package com.sitech.test7;

import java.util.*;

public class Custom {

    private String name;
    private String[] array;
    private List list;
    private Map map;
    private Properties properties;

    public void setName(String name) {
        this.name = name;
    }

    public void setArray(String[] array) {
        this.array = array;
    }

    public void setList(List list) {
        this.list = list;
    }

    public void setMap(Map map) {
        this.map = map;
    }

    public void setProperties(Properties properties) {
        this.properties = properties;
    }

    public void print() {
        System.out.println(name);
        for (int i = 0; i < array.length; i++) {
            System.out.println(array[i]);
        }
        System.out.println(list);
        System.out.println(map);
        System.out.println(properties);
    }
}
- P命名空间注入,需引入P命名空间的约束
xmlns:p="http://www.springframework.org/schema/p"id="custom" class="com.sitech.test7.Custom" p:name="Lucy"> - 数组类型注入
<bean id="custom" class="com.sitech.test7.Custom">
    <property name="array">
        <list>
            <value>小明value>
            <value>小强value>
            <value>小红value>
        list>
    property>
bean>- List注入
<bean id="custom" class="com.sitech.test7.Custom">
    <property name="list">
        <list>
            <value>红楼梦value>
            <value>西游记value>
            <value>水浒传value>
        list>
    property>
bean>- Map注入
<bean id="custom" class="com.sitech.test7.Custom">
    <property name="map">
        <map>
            <entry key="1" value="足球">entry>
            <entry key="2" value="篮球">entry>
            <entry key="3" value="排球">entry>
        map>
    property>
bean>- Properties注入
<bean id="custom" class="com.sitech.test7.Custom">
    <property name="properties">
        <props>
            <prop key="1">LOLprop>
            <prop key="2">DNFprop>
            <prop key="3">CSGOprop>
        props>
    property>
bean>
二、通过注解方式实现
1、准备基本jar包
- spring-beans-4.3.9.RELEASE.jar
- spring-context-4.3.9.RELEASE.jar
- spring-core-4.3.9.RELEASE.jar
- spring-expression-4.3.9.RELEASE.jar
- spring-aop-4.3.9.RELEASE.jar
- commons-logging-1.1.1.jar
- log4j-1.2.14.jar
2、创建类、方法、属性
package com.sitech.test8;

public class Custom {

    private String name;

    public void print() {
        System.out.println(name);
    }
}
3、创建spring的配置文件,引入相关约束
<beans xmlns="http://www.springframework.org/schema/beans"
    xmlns:xsi="http://www.w3.org/2001/XMLSchema-instance"
    xmlns:context="http://www.springframework.org/schema/context" xsi:schemaLocation="
        http://www.springframework.org/schema/beans http://www.springframework.org/schema/beans/spring-beans.xsd
        http://www.springframework.org/schema/context http://www.springframework.org/schema/context/spring-context.xsd">

beans>
4、开启注解扫描
<context:component-scan base-package="com.sitech">context:component-scan>


<context:annotation-config>context:annotation-config>
5、注入对象
- @Component(value=”classObject”) 也可写成@Component(“classObject”),以下一致
- @Controller(value=”classObject”) 控制层
- @Service(value=”classObject”) 业务层
- @Repository(value=”classObject”) 持久层
- @Scope(value=”prototype”) 多例、单例等,和XML中配置Scope属性一致
6、注入属性
- @Autowired
- 自动装配
- @Repository(value=”customDao”) 中的customDao与CustomService中的customDao没有直接的对应关系,autowired是根据类名找到对应的类的对象完成注入
- 这种注入方式导致类与对象之间的关系不明确,不推荐这种注入
package com.sitech.test9;

import org.springframework.stereotype.Repository;

@Repository(value="customDao")
public class CustomDao {

    public void print() {
        System.out.println("CustomDao.print()");
    }
}
package com.sitech.test9;

import org.springframework.beans.factory.annotation.Autowired;
import org.springframework.stereotype.Service;

@Service(value="customService")
public class CustomService {

    @Autowired
    CustomDao customDao;

    public void print() {
        customDao.print();
    }
}
package com.sitech.test9;

import org.springframework.context.ApplicationContext;
import org.springframework.context.support.ClassPathXmlApplicationContext;

public class Test {

    public static void main(String[] args) {
        ApplicationContext applicationContext = new ClassPathXmlApplicationContext("applicationContextAOP.xml");
        CustomService customService = (CustomService) applicationContext.getBean("customService");
        customService.print();
    }
}
- @Resource(name=”customDao”)
- 这种注入方式Resource(name=”customDao”)中name所指定的值 customDao 要与@Repository(value=”customDao”)中value所指定的值对应
- 这种注入方式类与对象之间的关系更明确,推荐这种注入
package com.sitech.test9;

import org.springframework.stereotype.Repository;

@Repository(value="customDao")
public class CustomDao {

    public void print() {
        System.out.println("CustomDao.print()");
    }
}
package com.sitech.test9;

import javax.annotation.Resource;

import org.springframework.stereotype.Service;

@Service(value="customService")
public class CustomService {

    @Resource(name="customDao")
    CustomDao customDao;

    public void print() {
        customDao.print();
    }
}
package com.sitech.test9;

import org.springframework.context.ApplicationContext;
import org.springframework.context.support.ClassPathXmlApplicationContext;

public class Test {

    public static void main(String[] args) {
        ApplicationContext applicationContext = new ClassPathXmlApplicationContext("applicationContextAOP.xml");
        CustomService customService = (CustomService) applicationContext.getBean("customService");
        customService.print();
    }
}
三、配置文件与注解混合使用
- 配置文件注入对象,注解注入属性
<beans xmlns="http://www.springframework.org/schema/beans"
    xmlns:xsi="http://www.w3.org/2001/XMLSchema-instance"
    xmlns:context="http://www.springframework.org/schema/context" xsi:schemaLocation="
        http://www.springframework.org/schema/beans http://www.springframework.org/schema/beans/spring-beans.xsd
        http://www.springframework.org/schema/context http://www.springframework.org/schema/context/spring-context.xsd">


    <context:component-scan base-package="com.sitech.test10">context:component-scan>

    <bean id="customService" class="com.sitech.test10.CustomService">bean>
    <bean id="bookDao" class="com.sitech.test10.BookDao">bean>
    <bean id="sportDao" class="com.sitech.test10.SportDao">bean>
beans>
package com.sitech.test10;
public class BookDao {
public void read() {
System.out.println(this.getClass().getName() + ".read()");
}
}
package com.sitech.test10;

public class SportDao {

    public void run() {
        System.out.println(this.getClass().getName() + ".run()");
    }
}
package com.sitech.test10;

import javax.annotation.Resource;

import org.springframework.stereotype.Service;

@Service(value="customService")
public class CustomService {

    @Resource(name="bookDao")
    BookDao bookDao;

    @Resource(name="sportDao")
    SportDao sportDao;

    public void print() {
        bookDao.read();
        sportDao.run();
    }
}
package com.sitech.test10;

import org.springframework.context.ApplicationContext;
import org.springframework.context.support.ClassPathXmlApplicationContext;

public class Test {

    public static void main(String[] args) {
        ApplicationContext applicationContext = new ClassPathXmlApplicationContext("applicationContextAnno.xml");
        CustomService customService = (CustomService) applicationContext.getBean("customService");
        customService.print();
    }
}
