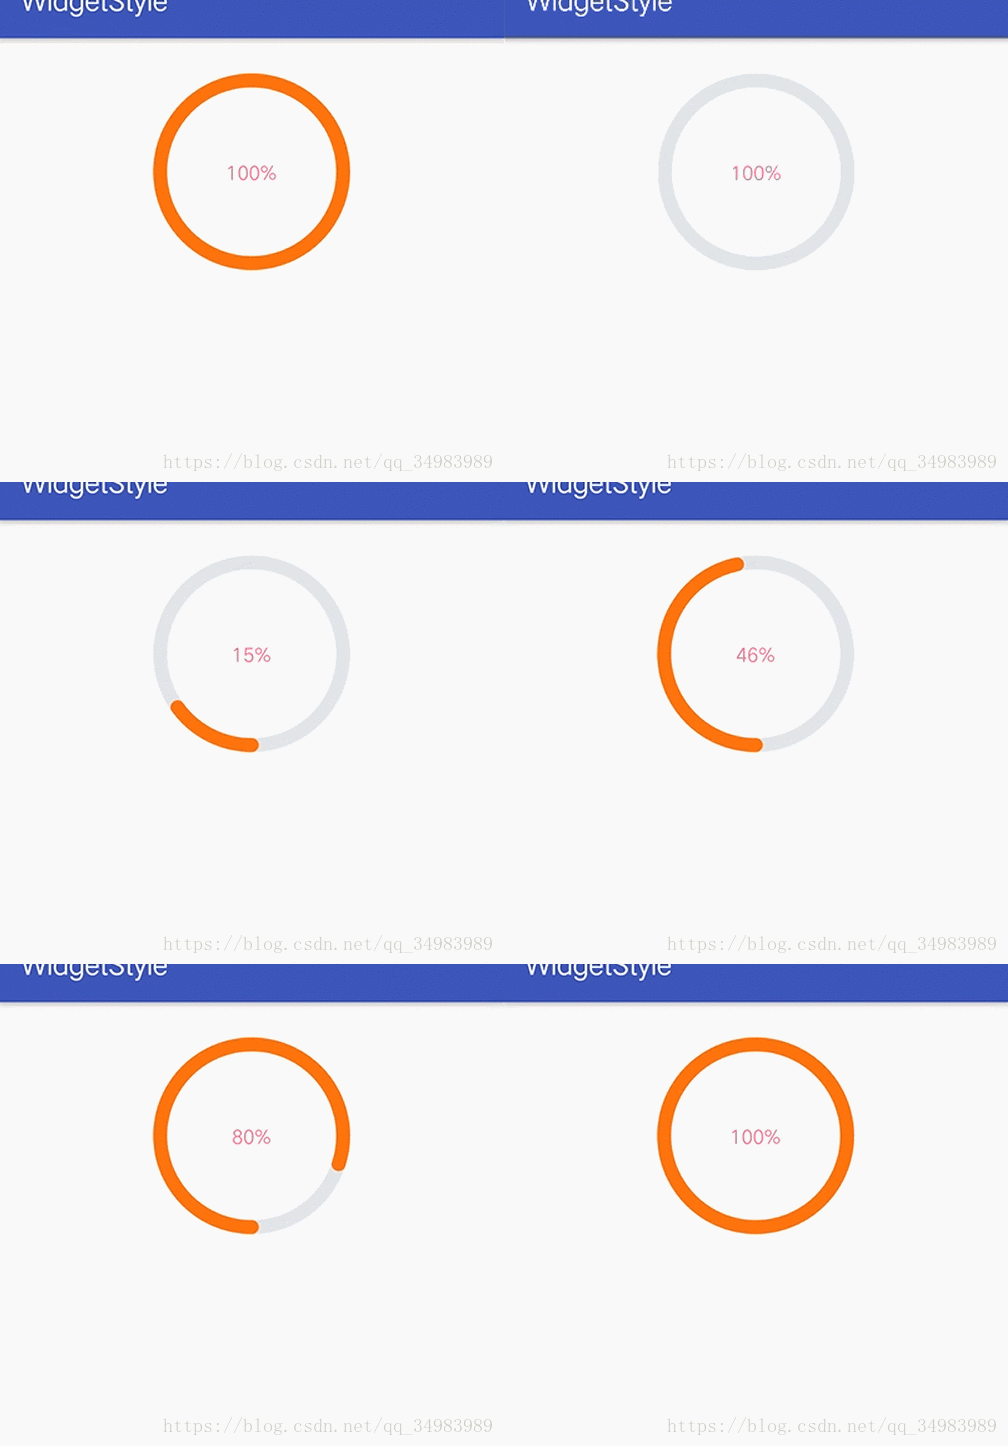
Android 自定义 View 之 圆形进度条
基础
等待更新
CycleProgress
1. 创建 CycleProgress
创建一个CycleView类,使其继承子View, 重写它的三个构造方法
public class CycleProgress extends View {
    public CycleProgress(Context context) {
        super(context);
        init(context, null);
    }

    public CycleProgress(Context context, @Nullable AttributeSet attrs) {
        super(context, attrs);
        init(context, attrs);
    }

    public CycleProgress(Context context, @Nullable AttributeSet attrs, int defStyleAttr) {
        super(context, attrs, defStyleAttr);
        init(context, attrs); // 初始化 view
    }
}
在构造方法的init中,我们完成View的初始化,
2.创建布局
新建一个activity_cycleprogress,简单点如下:
<RelativeLayout
    xmlns:android="http://schemas.android.com/apk/res/android"
    xmlns:cyclepb="http://schemas.android.com/apk/res-auto"
    android:layout_width="match_parent"
    android:layout_height="match_parent">

    <com.hong.widgetstyle.ui.widget.CycleProgress
        android:layout_centerInParent="true"
        android:id="@+id/cycle_progress"
        android:layout_width="match_parent"
        android:layout_height="150dp"
        android:layout_marginTop="20dp"
        cyclepb:centerProgressTextColor="@color/colorAccent"
        cyclepb:circleBgStrokeWidth="10dp"
        cyclepb:progressStrokeWidth="10dp"
        cyclepb:centerProgressTextSize="14sp"
        cyclepb:isDrawCenterProgressText="true"/>
RelativeLayout>
其中:xmlns:cyclepb=”http://schemas.android.com/apk/res-auto” 被称作命名空间,
它的理解和xmlns:android=”http://schemas.android.com/apk/res/android” 是一样的,之所以我们能用下面的layout_width等属性,是因为android 内部定义了一个名为 android 的各种属性, 所以我们也可以仿照它自定义一系列属性,叫做cyclepb。
3. 创建自定义属性
在res/values文件夹下,创建atter.xml文件
<resources>
    <declare-styleable name="CycleProgress">
        <attr name="circleBgStrokeWidth" format="dimension" />
        <attr name="progressStrokeWidth" format="dimension" />

        <attr name="circleBgColor" format="color" />
        <attr name="progressColor" format="color" />

        <attr name="circleAnimationDuration" format="integer" />

        <attr name="isDrawCenterProgressText" format="boolean" />

        <attr name="centerProgressTextColor" format="color"/>
        <attr name="centerProgressTextSize" format="dimension"/>
    declare-styleable>
resources>
name为 你的自定义控件的类名
其中的这些attr 可以在布局文件中进行引用,设置具体数值
4. 初始化CycleProgress
前面我们说的在init中 进行view的初始化 ,
private void init(Context context, AttributeSet attrs) {
        this.mContext = context;
        getAttr(attrs);  // 获取控件属性,
        initPaint(); // 初始化圆圈画笔
        initTextPaint(); // 初始化文字画笔
    }
首先我们需要获取到我们设置的属性,动态的进行设置值, 然后就是初始化画笔, 也就是Paint, 最后在onDraw中canvas上画出来就可以了。简单点就是用画笔(Paint) 在画布(Canvas)上把我们需要的形状画出来。
4.1 获取控件属性
   /**
     * 获取控件属性(命名空间)
     */
    private void getAttr(AttributeSet attrs) {
        TypedArray typedArray = mContext.obtainStyledAttributes(attrs, R.styleable.CycleProgress);
        cycleBgStrokeWidth = typedArray.getDimensionPixelOffset(R.styleable.CycleProgress_circleBgStrokeWidth, 10);
        progressStrokeWidth = typedArray.getDimensionPixelOffset(R.styleable.CycleProgress_progressStrokeWidth, 10);
        isProgressText = typedArray.getBoolean(R.styleable.CycleProgress_isDrawCenterProgressText, false);
        centerTextColor = typedArray.getColor(R.styleable.CycleProgress_centerProgressTextColor, mContext.getResources().getColor(R.color.colorAccent));
        centerTextSize = typedArray.getDimensionPixelOffset(R.styleable.CycleProgress_centerProgressTextSize, 16);
        cycleBgColor = typedArray.getColor(R.styleable.CycleProgress_circleBgColor, mContext.getResources().getColor(R.color.colorPrimary));
        progressColor = typedArray.getColor(R.styleable.CycleProgress_progressColor, mContext.getResources().getColor(R.color.colorAccent));

        typedArray.recycle();
    }
private int cycleBgStrokeWidth;
private int progressStrokeWidth;
private boolean isProgressText;
private int centerTextColor;
private int centerTextSize;
private int cycleBgColor;
private int progressColor;4.2 初始化圆圈的画笔(圈分为没进度条的圈和进度条的圈)
    /**
     * 初始化圆圈画笔
     */
    private void initPaint() {
        progressPaint = getPaint(progressStrokeWidth, progressColor); // 进度条画笔
        cycleBgPaint = getPaint(cycleBgStrokeWidth, cycleBgColor);  // 无进度条圈的画笔
    }

    private Paint getPaint(int width, int color) {
        Paint paint = new Paint(Paint.ANTI_ALIAS_FLAG);
        paint.setStrokeWidth(width);
        // Paint.Style.FILL:填充内部  Paint.Style.FILL_AND_STROKE:填充内部和描边Paint.Style.STROKE :描边
        paint.setStyle(Paint.Style.STROKE);
        paint.setColor(color);
        paint.setAntiAlias(true); // 扛锯齿
        paint.setStrokeCap(Paint.Cap.ROUND); // 两端是圆角
        return paint;
    }
4.3 初始化圈内文字的画笔
    /**
     * 初始化文字画笔
     */

    private void initTextPaint() {
        centerTextPaint = new Paint(Paint.ANTI_ALIAS_FLAG);
        centerTextPaint.setColor(centerTextColor);
        centerTextPaint.setTextAlign(Paint.Align.CENTER);
        centerTextPaint.setTextSize(centerTextSize);
        centerTextPaint.setAntiAlias(true);
    }
4.4 重写onSizeChanged() 方法
 /**
     * view发生改变的时候调用
     * @param w
     * @param h
     * @param oldw
     * @param oldh
     */
    @Override
    protected void onSizeChanged(int w, int h, int oldw, int oldh) {
        super.onSizeChanged(w, h, oldw, oldh);

        centerX = w / 2;
        centerY = h / 2;
        radius = Math.min(w, h) / 2 - Math.max(cycleBgStrokeWidth, progressStrokeWidth); // 两数中的最小值 / 2 - 两数中的最大值

        rectF.set(centerX - radius, centerY - radius, centerX + radius, centerY + radius);
    }
/**
* 圆心x坐标
*/
private float centerX;
/**
* 圆心y坐标
*/
private float centerY;
/**
* 圆的半径
*/
private float radius;
/**
* 进度
*/
private float mProgress;
/**
* 当前进度
*/
private float currentProgress;4.5 重写onDraw() 进行绘制
 /**
     * 画
     * @param canvas
     */
    @Override
    protected void onDraw(Canvas canvas) {
        super.onDraw(canvas);
        canvas.drawCircle(centerX, centerY, radius, cycleBgPaint);
        canvas.drawArc(rectF, 90, currentProgress, false, progressPaint);
        if (isProgressText) {
            Paint.FontMetrics fontMetrics = centerTextPaint.getFontMetrics();
            int baseline = (int) ((rectF.bottom + rectF.top - fontMetrics.bottom - fontMetrics.top) / 2);
            canvas.drawText((int) mProgress + "%", rectF.centerX(), baseline, centerTextPaint);
        }
    }
4.6 添加动画
我们已将将这个进度条的圈画出来了,为了让它动起来, 这里我们添加属性动画ValueAnimator
 /**
     * 初始化动画
     */

    private void initAanimator() {
        valueAnimator = ValueAnimator.ofFloat(0, mProgress);
        valueAnimator.setDuration(duration);
        valueAnimator.setStartDelay(500);
        //  ——AccelerateInterpolator:动画从开始到结束,变化率是一个加速的过程。
        //——DecelerateInterpolator:动画从开始到结束,变化率是一个减速的过程。
        //——CycleInterpolator:动画从开始到结束,变化率是循环给定次数的正弦曲线。
        // ——AccelerateDecelerateInterpolator:动画从开始到结束,变化率是先加速后减速的过程。
        //——LinearInterpolator:动画从开始到结束,变化率是线性变化。
        valueAnimator.setInterpolator(new LinearInterpolator());
        valueAnimator.addUpdateListener(new ValueAnimator.AnimatorUpdateListener() { //
            @Override
            public void onAnimationUpdate(ValueAnimator valueAnimator) {
                float value = (float)valueAnimator.getAnimatedValue();
                mProgress = value;
                currentProgress = value * 360 / 100;
                invalidate(); // 别忘记刷新
            }
        });
    }
4.7 在对应Activity中设置动画
/**
     * 设置动画
     * @param progress
     */
    public void setAnimator(float progress) {
        this.mProgress = progress;
        initAanimator();
    }

    /**
     * 开始动画
     */
    public void startAnimator() {
        valueAnimator.start();
    }

    public void stopAnimator() { // 在onDestory中停止
        valueAnimator.end();
    }
cycleProgress = (CycleProgress) findViewById(R.id.cycle_progress);
cycleProgress.setAnimator(100);
cycleProgress.startAnimator();