centos7.5离线安装mysql5.5.61
1、卸载旧mysql
[root@instance-q7vjqvds soft]# find / -name mysql
[root@instance-q7vjqvds soft]# find / -name mysql|xargs rm -rf
2、卸载系统自带的Mariadb
[root@instance-q7vjqvds soft]# rpm -qa|grep mariadb
mariadb-libs-5.5.56-2.el7.x86_64
[root@instance-q7vjqvds soft]# rpm -e --nodeps mariadb-libs-5.5.56-2.el7.x86_64
3、删除etc目录下的my.cnf(若有则删,没有则忽略)
[root@instance-q7vjqvds soft]# rm /etc/my.cnf4、官网下载mysql压缩包,MySQL Community Server 5.5.62
5、上传到服务器并解压,修改名称
[root@instance-q7vjqvds soft]# tar -zxvf mysql-5.5.61-linux-glibc2.12-x86_64.tar.gz
[root@instance-q7vjqvds soft]# mv mysql-5.5.61-linux-glibc2.12-x86_64 mysql
6、执行以下命令来创建mysql用户、用户组
[root@instance-q7vjqvds soft]# groupadd mysql
[root@instance-q7vjqvds soft]# useradd -g mysql mysql
7、在 etc 下新建配置文件my.cnf
[root@instance-q7vjqvds soft]# cd mysql
[root@instance-q7vjqvds soft]# cp support-files/my-medium.cnf /etc/my.cnf
[root@instance-q7vjqvds soft]# vim /etc/my.cnf
并在该文件中添加一下代码,:wq保存退出
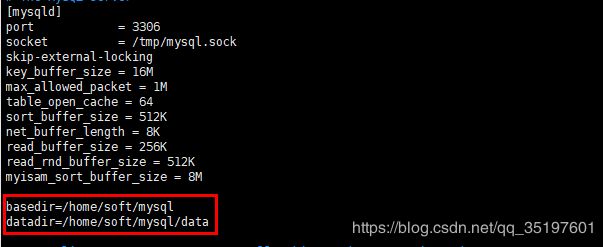
8、添加可执行权限
[root@instance-q7vjqvds mysql]# chown -R mysql:mysql ./9、安装、初始化数据库
[root@instance-q7vjqvds mysql]# ./scripts/mysql_install_db --user=mysql --basedir=/home/soft/mysql/ --datadir=/home/soft/mysql/data/会显示出mysql的登录方法

10、修改当前data目录的拥有者为mysql用户
[root@instance-q7vjqvds mysql]# chown -R mysql:mysql data11、授予my.cnf最大权限
[root@instance-q7vjqvds mysql]# chown 777 /etc/my.cnf12、复制启动脚本到资源目录
[root@instance-q7vjqvds mysql]# cp ./support-files/mysql.server /etc/rc.d/init.d/mysqld13、增加mysqld服务控制脚本执行权限
[root@instance-q7vjqvds mysql]# chmod +x /etc/rc.d/init.d/mysqld14、将mysqld服务加入到系统服务,检查mysqld服务是否已经生效
[root@instance-q7vjqvds mysql]# chkconfig --add mysqld
[root@instance-q7vjqvds mysql]# chkconfig --list mysqld

Note: This output shows SysV services only and does not include native
      systemd services. SysV configuration data might be overridden by native
      systemd configuration.

      If you want to list systemd services use 'systemctl list-unit-files'.
      To see services enabled on particular target use
      'systemctl list-dependencies [target]'.

mysqld         	0:off	1:off	2:on	3:on	4:on	5:on	6:off
15、将mysql的bin目录加入PATH环境变量,编辑 ~/.bash_profile文件,添加内容:export PATH=$PATH:/home/soft/mysql/bin
[root@instance-q7vjqvds mysql]# vim ~/.bash_profile
执行下面的命令是修改的内容立即生效:
[root@instance-q7vjqvds mysql]# source ~/.bash_profile16、启动服务
[root@instance-q7vjqvds mysql]# service mysqld start
Starting MySQL.Logging to '/home/soft/mysql/data/instance-q7vjqvds.err'.
..                                                         [  OK  ]
[root@instance-q7vjqvds mysql]#
17、登录mysql,密码为空,直接回车跳过,进入mysql,修改密码,设置生效
[root@instance-q7vjqvds mysql]# mysql -uroot -p
Enter password:
Welcome to the MySQL monitor.  Commands end with ; or \g.
Your MySQL connection id is 2
Server version: 5.5.61-log MySQL Community Server (GPL)

Copyright (c) 2000, 2018, Oracle and/or its affiliates. All rights reserved.

Oracle is a registered trademark of Oracle Corporation and/or its
affiliates. Other names may be trademarks of their respective
owners.

Type 'help;' or '\h' for help. Type '\c' to clear the current input statement.

mysql> use mysql;
Database changed
mysql> update user set password=password('123456') where user='root' and host='localhost';
Query OK, 1 row affected (0.00 sec)
Rows matched: 1  Changed: 1  Warnings: 0

mysql> flush privileges;
Query OK, 0 rows affected (0.00 sec)

mysql>
到目前为止mysql安装成功,reboot测试,mysql服务是否正常启动
[root@instance-q7vjqvds mysql]# service mysqld restart
Shutting down MySQL.                                       [  OK  ]
Starting MySQL..                                           [  OK  ]
[root@instance-q7vjqvds mysql]#