mongodb分片集群搭建与测试
1.分片架构
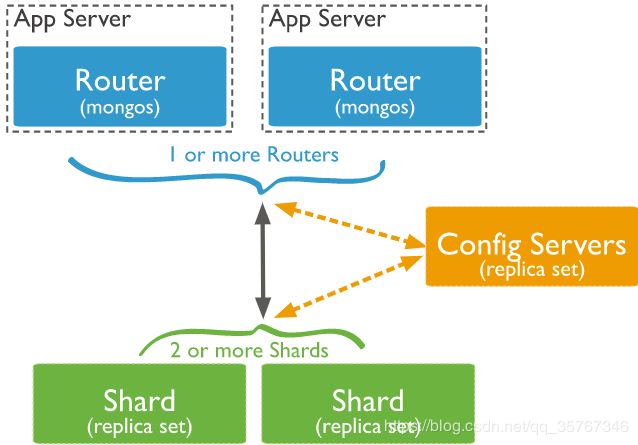
MongoDB分片群集由以下组件组成:
- shard:每个shard包含shard数据的子集。从MongoDB 3.6开始,必须将shard部署为副本集。
- mongos:mongos充当查询路由器,在客户端应用程序和分片群集之间提供接口。
- config-server:配置服务器存储集群的元数据和配置设置。从MongoDB 3.4开始,必须将配置服务器部署为副本集。
2.集群部署
2.1集群架构
2.1.1生产环境配置
生产环境下,以三台主机配置mongodb的分片集群;mongos每台都存在但不是集群,在分片集群完成部署后,每台mongos可以在每次启动时连接config节点,从而操作分片节点集群;config-server为三节点副本集,每一台都是备份;shard为三节点的副本集集群,只配置主节点与副本集节点,没有配置仲裁节点,防止万一挂掉一台主机,保证其他节点可以重新选举新的primary;可以分别配置不同分片节点的集群中节点优先级,可以使读写均匀分布在每台机器上,提高使用效率。
三台主机分片配置表:
| 主机1 | 主机2 | 主机3 |
|---|---|---|
| Mongos | Mongos | Mongos |
| config-server | config-server | config-server |
| Shard1–p | Shard1–s | Shard1–s |
| Shard2–s | Shard2–p | Shard2–s |
| Shard3–s | Shard3–s | Shard3–p |
2.1.2测试部署
在测试环境下,创建了一台虚拟机,搭建了10节点的分片集群;将端口区分开,创建一个mongs节点,3节点的config-server副本集,2个3节点的shard副本集。使用版本:3.6.3
测试部署配置表:
| 主机 | 端口 | 角色 | 副本集/分片类型 |
|---|---|---|---|
| 10.125 | 27125 | mongos | — |
| 10.125 | 27017,27018,27019 | config server | rcnf/configsvr |
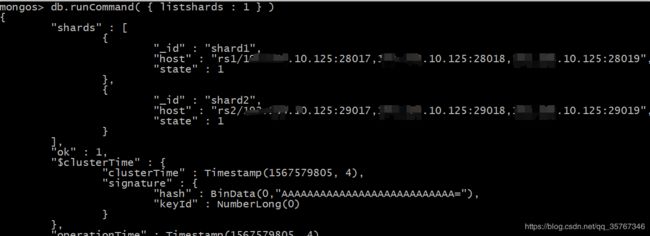
| 10.125 | 28017,28018,28019 | shard 1 | rs1/shardsvr |
| 10.125 | 29017,29018,29019 | shard 2 | rs2/shardsvr |
2.2部署实施
2.2.1部署流程
2.2.1.1搭建config与shard副本集
- 官网下载mongodb并解压
- 为每个节点编辑配置文件(见2.2.2)
- 配置集群认证文件(每个副本集使用相同key文件)
# echo -n "`openssl rand -base64 756`" > /xx/xx/xx/mongod.key
# chmod 400 /xx/xx/xx/mongod.key
- 根据实际环境配置环境变量
export MONGODB_HOME=/xxx/mongodb
export PATH=$PATH:$MONGODB_HOME/bin
- 启动mongodb
# mongod -f /file/mongodb/${MONGODB_CONF} 2>&1 >/dev/null &
- 初始化集群(分别初始化config-server副本集与shard副本集)
初始化副本集:
# mongo --port  27017 --eval 'rs.initiate( { _id : "rcnf", members: [ {_id: 0, priority: 2, host: "xx.xx.10.125:27017"},{_id: 1, host: "xx.xx.10.125:27018"},{_id: 2, host: "xx.xx.10.125:27019"}] })'

# mongo --port  28017 --eval 'rs.initiate( { _id : "rs1", members: [ {_id: 0, priority: 2, host: "xx.xx.10.125:28017"},{_id: 1, host: "xx.xx.10.125:28018"},{_id: 2, host: "xx.xx.10.125:28019"}] })'

# mongo --port  29017 --eval 'rs.initiate( { _id : "rs2", members: [ {_id: 0, priority: 2, host: "xx.xx.10.125:29017"},{_id: 1, host: "xx.xx.10.125:29018"},{_id: 2, host: "xx.xx.10.125:29019"}] })'
2.2.1.2搭建mongos节点
- 和集群配置类似,但不用配置认证文件,不用初始化集群,启动命令修改了
# mongos -f /file/mongodb/${MONGODB_CONF} 2>&1 >/dev/null &
2.2.1.3添加分片集群
- 将shard信息加入分片集群
进入mongos:
# mongo --port 27125
# mongo xx.xx.10.125:27125/admin

添加分片:
> db.runCommand({ addshard : "rs1/xx.xx.10.125:28017,xx.xx.10.125:28018,xx.xx.10.125:28019",name:"shard1"})
> db.runCommand({ addshard : "rs2/xx.xx.10.125:29017,xx.xx.10.125:29018,xx.xx.10.125:29019",name:"shard2"})

列出分片:
> db.runCommand( { listshards : 1 } )

整体状态查看:
> sh.status()

查看开启分片的数据库:
> use config
> db.databases.find() //所有数据库分片情况
2.2.2部署配置
shard配置文件(里面路径根据实际配置):
processManagement:
   fork: true
   pidFilePath: /file/logs/mongo28017/mongod.pid
net:
   bindIp: 127.0.0.1,xx.xx.10.125
   port: 28017
storage:
   dbPath: /file/public/mongo28017
systemLog:
   destination: file
   path: "/file/logs/mongo28017/mongod.log"
   logAppend: true
storage:
   journal:
      enabled: true
replication:
   replSetName: rs1
sharding:
   clusterRole: shardsvr
config-server配置文件(里面路径根据实际配置):
processManagement:
   fork: true
   pidFilePath: /file/logs/mongo27017/mongod.pid
net:
   bindIp: 127.0.0.1,xx.xx.10.125
   port: 27017
storage:
   dbPath: /file/public/mongo27017
systemLog:
   destination: file
   path: "/file/logs/mongo27017/mongod.log"
   logAppend: true
storage:
   journal:
      enabled: true
replication:
   replSetName: rcnf
sharding:
   clusterRole: configsvr
mongos配置文件(里面路径根据实际配置):
processManagement:
   fork: true
   pidFilePath: /file/logs/mongo27125/mongod.pid
net:
   bindIp: 127.0.0.1,xx.xx.10.125
   port: 27125
systemLog:
   destination: file
   path: "/file/logs/mongo27125/mongod.log"
   logAppend: true
sharding:
   configDB: rcnf/xx.xx.10.125:27017,xx.xx.10.125:27018,xx.xx.10.125:27019
3.分片测试
3.1RANGE分片
进入mongos:
# mongo --port 27125

激活数据库分片
> db.runCommand( { enablesharding : "test" } )  //库名

开启分片
> db.runCommand( { shardcollection : "test.hu1",key : {id: 1} } )  //库中集合

模拟文档数据
> for(i=10;i<1000000;i++){ db.hu1.insert({"id":i,"book":"chukiuxiang","money":320 Date()}); }

查看数据:
> db.hu1.stats()
"count" : 1500990
"shard1" :   "count" : 500001
"shard2" :   "count" : 1000989
3.2Hash分片
对于hu开启分片功能
mongo --port 27125
use admin
> db.runCommand( { enablesharding : "hu" } )

对于hu库下的hutab表建立hash索引
use hu
> db.hutab.ensureIndex( { id: "hashed" } )

开启分片
use admin
> sh.shardCollection( "db.hutab", { id: "hashed" } )

录入10w行数据测试
use hu
for(i=1;i<100000;i++){ db.hutab.insert({"id":i,"book":"chukiuxiang","money":320 Date()}); }

查询数据
rs1:PRIMARY> db.hutab.count()
50393
rs2:PRIMARY> db.hutab.count()
49606
**参照官方文档与mongodb运维实战书籍等部署测试**


