android开发案例3--学生通讯录
1.需求分析
1.1 问题定义
(1)使用Android Studio建立通讯录。用SQLite操作API完成对学生通讯录的添加(insert)、删除(delete)、更新(update)、查询(query),并使用SimpleAdapter配置ListView显示学生信息展示出来。
(2)用ListView做应用商城app。由于通信录的信息显示和应用商城都是对ListView的使用,在此对应用商城的实现不再赘述,在最后附上结果截图。
1.2 功能描述
对学生通讯录进行添加、删除、修改、查询的操作,并将数据库可视化。

Figure 1 用例图
1.3 技术要点
(1)帮助类SQLiteOpenHelper及数据库的创建
添加预定义构造函数,重写onCreate()方法和onUpdate()方法。创建和打开数据库,需要new一个帮助类的实现类。
(2)SQLite操作API
insert、delete、update、query
(3)数据库的可视化
适配器和ListView的使用
2.概要设计
2.1 系统体系结构
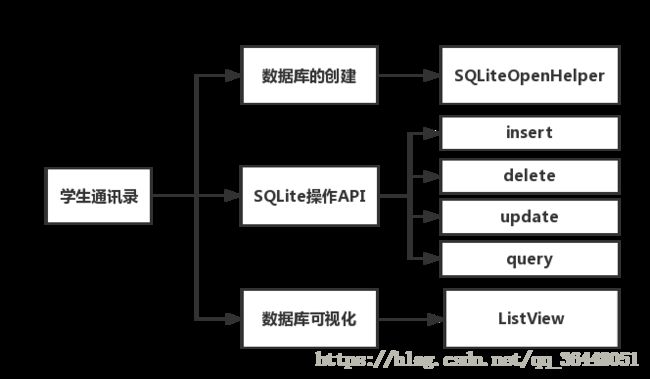
Figure 2 体系结构图
2.2 界面设计

Figure 3 界面预览
1.将图片背景资源导入项目中res\drawable文件夹下;
2.编写项目中res\layout\activity_main.xml文件,主体采用相对布局,
3.添加、删除、修改、查询四个按钮用LinearLayout(horizontal);EditText控件用来输入学生姓名和电话;TextView控件标注姓名和电话;ListView显示学生信息。
4.编写list_item.xml文件来设计表的显示界面。
3.详细设计

3.1数据库的创建StudentDBOpenHelper
package com.example.a15676.addressbook;

import android.content.Context;
import android.database.sqlite.SQLiteDatabase;

import android.database.sqlite.SQLiteOpenHelper;
import android.content.Context;
import android.os.Build;
import android.database.sqlite.SQLiteDatabase.CursorFactory;

//创建存储学生信息的数据库
public class StudentDBOpenHelper extends SQLiteOpenHelper {

    public static final String DATABASE_NAME= "mydb";//库名
    public static final String TABLE_NAME= "friends";  //表名
    public static final int DATABASE_VERSION=1;
    public static final int FRIENDS= 1;
    public static final int FRIENDS_ID=2;
    // 加下划线表示该字段不由用户输入
    //对应于表friends的三个字段,public static final StringID=" id";
    //其他字段
    public static final String ID="_id";
    public static final String NAME= "name";
    public static final String PHONE="phone";

    public StudentDBOpenHelper(Context context, String name, SQLiteDatabase.CursorFactory factory, int version) {
        super(context, name, factory, version);
    }

    @Override//数据表结构的初始化
    public void onCreate(SQLiteDatabase db) {
          System.out.print("onCreate()被调用");
          db.execSQL("CREATE TABLE "+TABLE_NAME+"(_id integer primary key autoincrement,"+"name varchar(20),phone varchar(20)"+")");
    }

    @Override
    public void onUpgrade(SQLiteDatabase db, int oldVersion, int newVersion) {
        System.out.println("onUpgrade()数据库被升级了");
        db.execSQL("DROP TABLE "+ TABLE_NAME); //先删除
         onCreate(db);  //后创建
    }
}
3.2 MainActivity
package com.example.a15676.addressbook;

import android.annotation.SuppressLint;
import android.content.ContentValues;

import android.database.Cursor;
import android.database.sqlite.SQLiteDatabase;
import android.support.v7.app.AppCompatActivity;
import android.os.Bundle;
import android.util.Log;
import android.view.View;
import android.widget.Button;
import android.widget.EditText;
import android.widget.ListView;
import android.widget.Toast;
import java.util.ArrayList;
import java.util.Map;
import java.util.HashMap;
import android.widget.AdapterView;
import android.widget.SimpleAdapter;
import android.widget.AdapterView.OnItemClickListener;

public class MainActivity extends AppCompatActivity {

    private EditText et_name;
    private EditText et_phone;
    private ArrayList> data;
    private SQLiteDatabase db;
    private ListView listview;
    private String selId;


    @Override
    protected void onCreate(Bundle savedInstanceState) {
        super.onCreate(savedInstanceState);
        setContentView(R.layout.activity_main);
        et_name = findViewById(R.id.et_name);
        et_phone = findViewById(R.id.et_phone);
        listview = findViewById(R.id.listView);
        Button addBtn = findViewById(R.id.bt_add);
        Button updBtn = findViewById(R.id.bt_modify);
        Button delBtn = findViewById(R.id.bt_del);
        Button selBtn=findViewById(R.id.bt_sel);
        addBtn.setOnClickListener(new Button.OnClickListener() {
            @Override
            public void onClick(View v) {
                dbAdd();
                dbFindAll();
            }
            //StudentDBOpenHelper helper=new StudentDBOpenHelper(this,"Student.db",null,1);
        });
        updBtn.setOnClickListener(new Button.OnClickListener() {
            @Override
            public void onClick(View v) {
                dbUpdate();
                dbFindAll();
            }
        });
        delBtn.setOnClickListener(new Button.OnClickListener() {
            @Override
            public void onClick(View v) {
                dbDel();
                dbFindAll();
            }
        });
        selBtn.setOnClickListener(new Button.OnClickListener() {
            @Override
            public void onClick(View v) {
                //dbDel();
                dbFindAll();
               // showList();
               // select();
            }
        });
        ///
        StudentDBOpenHelper dbHelper = new StudentDBOpenHelper(this, StudentDBOpenHelper.DATABASE_NAME, null, 1);
        db = dbHelper.getWritableDatabase();
        data = new ArrayList<>();
        dbFindAll();
        //listview的点击事件监听返回点击的是哪行数据
        listview.setOnItemClickListener(new OnItemClickListener() {
            @SuppressWarnings("unchecked")
            @Override
            public void onItemClick(AdapterView parent, View view, int position, long id) {
                MaplistItem=(Map)listview.getItemAtPosition(position);
                et_name.setText((String)listItem.get("name"));
                et_phone.setText((String)listItem.get("phone"));
                selId=(String)listItem.get("_id");
                Toast.makeText(getApplicationContext(),"选择的id是:"+selId,Toast.LENGTH_SHORT).show();
            }
        });
    }

    protected  void dbDel(){
        //String where="name="+et_name.getText().toString().trim();
        int i=db.delete("friends","name=?",new String[]{et_name.getText().toString()});
        if(i>0) Toast.makeText(getApplicationContext(),"数据删除成功!",Toast.LENGTH_SHORT).show();
        else  Toast.makeText(getApplicationContext(),"数据删除失败!",Toast.LENGTH_SHORT).show();
    }
    //设置simpleAdapter来在list_view中显示表数据
    private void showList(){
        SimpleAdapter listAdapter = new SimpleAdapter(this, data, R.layout.list_item, new String[]{"_id", "name", "phone"}, new int[]{R.id.tv_id, R.id.tv_name, R.id.tv_phone});
        listview.setAdapter(listAdapter);
    }

    protected void dbUpdate(){
        ContentValues values=new ContentValues();
        values.put("phone",et_phone.getText().toString().trim());
        int i=db.update("friends",values,"name=?",new String[]{et_name.getText().toString()});
        Log.e("jjj","修改了好了数据");
        if(i>0) Toast.makeText(getApplicationContext(),"数据更新成功!",Toast.LENGTH_SHORT).show();
        else  Toast.makeText(getApplicationContext(),"数据更新失败!",Toast.LENGTH_SHORT).show();
    }
    protected void dbAdd(){
        ContentValues values=new ContentValues();
        values.put("name",et_name.getText().toString().trim());
        values.put("phone",et_phone.getText().toString().trim());
        long ll=db.insert(StudentDBOpenHelper.TABLE_NAME,null,values);
        if(ll==-1) Toast.makeText(getApplicationContext(),"数据插入失败!",Toast.LENGTH_SHORT).show();
        else  Toast.makeText(getApplicationContext(),"数据插入成功!",Toast.LENGTH_SHORT).show();
    }
    protected void dbFindAll(){
        data.clear();
        @SuppressLint("Recycle") Cursor cursor = db.rawQuery("select * from friends ", null);
        Map item = new HashMap<>();
        item.put("_id","序号"); item.put("name","姓名");  item.put("phone","电话");
        data.add(item);
        cursor.moveToFirst();
        while(!cursor.isAfterLast()){
            String id= cursor.getString(0);
            String  name= cursor.getString(1);
            String  phone= cursor.getString(2);
            item =new HashMap<>();
            item.put("_id",id);
            item.put("name",name);
            item.put("phone",phone);
            data.add(item);
            cursor.moveToNext();
        }
        showList();

    }
}


   /* public void add(View v){
        SQLiteDatabase db=helper.getWritableDatabase();

        ContentValues values=new ContentValues();
        values.put("name",et_name.getText().toString());
        values.put("phone",et_phone.getText().toString());
        Long row=db.insert("Studentinfo",null,values);
        Toast.makeText(this,"数据添加成功",Toast.LENGTH_SHORT).show();
        db.close();
    }
    public void update(View v){
        SQLiteDatabase db=helper.getWritableDatabase();

        ContentValues values=new ContentValues();
        //values.put("name",et_name.getText().toString());
        values.put("phone",et_phone.getText().toString());
        int number=db.update("Studentinfo",values,"name=?",new String[]{et_name.getText().toString()});
        System.out.print("修改了"+number+"条数据");
        Log.e("jjj","修改了"+number+"条数据");
        Toast.makeText(this,"数据修改成功",Toast.LENGTH_SHORT).show();
        db.close();
    }
    public void delete(View v){
        SQLiteDatabase db=helper.getWritableDatabase();
      //  Long row=db.insert("Studentinfo",null,values);

        long number=db.delete("Studentinfo","name=?",new String[]{et_name.getText().toString()});
        System.out.print("删除了"+number+"条数据");
        Toast.makeText(this,"数据删除成功",Toast.LENGTH_SHORT).show();
        db.close();
    }
    private ListView lv;
    public void select(View v){
       // SQLiteDatabase db=helper.getReadableDatabase();
        //  Long row=db.insert("Studentinfo",null,values);
       Cursor cursor=db.query("Studentinfo",null,null,null,null,null,null);
       cursor.close();
        Log.e("jjj","chadaole了条数据");
        // lv.findViewById(R.id.lv);
       // lv.setAdapter(array_adapter);
 }
   //读取通讯录的全部的联系人
//需要先在raw_contact表中遍历id,并根据id到data表中获取数据
 /*  public void select(){
       //uri = content://com.android.contacts/contacts
       SQLiteDatabase db=helper.getReadableDatabase();
       Cursor cursor = db.rawQuery("select * from Studentinfo", null);
       List studentinfos=new ArrayList();
       int num=0;
       while(cursor.moveToNext()){
          Student student=new Student();
          student.setId(cursor.getInt(cursor.getColumnIndex("_id")));
           student.setName(cursor.getString(cursor.getColumnIndex("name")));
           student.setPhone(cursor.getString(cursor.getColumnIndex("phone")));
           num++;
           studentinfos.add(student);
           //student=null;
           }
           cursor.close();
       db.close();
       Log.e("dsdiuihfisduhfuic查出来", num+"条");
       for(Student p:studentinfos){ System.out.println(p.toString()); }

           Log.i("Contacts", "wan");
       }*/
3.3 Manifest
<manifest xmlns:android="http://schemas.android.com/apk/res/android"
    package="com.example.a15676.addressbook">

    <application
        android:allowBackup="true"
        android:icon="@mipmap/ic_launcher"
        android:label="@string/app_name"
        android:roundIcon="@mipmap/ic_launcher_round"
        android:supportsRtl="true"
        android:theme="@style/AppTheme">
        <activity android:name=".MainActivity">
            <intent-filter>
                <action android:name="android.intent.action.MAIN" />

                <category android:name="android.intent.category.LAUNCHER" />
            intent-filter>
        activity>
    application>

manifest>
3.4activity_main
<RelativeLayout xmlns:android="http://schemas.android.com/apk/res/android"
    xmlns:app="http://schemas.android.com/apk/res-auto"
    xmlns:tools="http://schemas.android.com/tools"
    android:layout_width="match_parent"
    android:layout_height="match_parent"
    android:background="@drawable/h"
    tools:context=".MainActivity">

    <LinearLayout
        android:id="@+id/A"
        android:layout_width="match_parent"
        android:layout_height="wrap_content"
        android:layout_alignParentStart="true"
        android:layout_alignParentTop="true"
        android:layout_marginTop="50dp"
        android:orientation="vertical"
        android:layout_alignParentLeft="true">

        <LinearLayout
            android:layout_width="match_parent"
            android:layout_height="match_parent"
            android:layout_marginLeft="20dp"
            android:layout_marginRight="30dp"
            android:orientation="horizontal">

            <TextView
                android:id="@+id/textView2"
                android:layout_width="170dp"
                android:layout_height="50dp"
                android:layout_weight="1"
                android:textSize="20sp"
                android:paddingLeft="20dp"
                android:gravity="center_horizontal"
                android:textColor="#ff000000"
                android:text="姓名:" />

            <EditText
                android:id="@+id/et_name"
                android:layout_width="match_parent"
                android:layout_height="50dp"
                android:layout_weight="1"

                android:ems="20"
                android:textColor="#ff000000"
                android:textSize="20sp" />
        LinearLayout>

        <View
            android:layout_width="match_parent"
            android:layout_height="5dp"
             />

        <LinearLayout
            android:layout_width="match_parent"
            android:layout_height="match_parent"
            android:layout_marginLeft="20dp"
            android:layout_marginRight="30dp"
            android:orientation="horizontal">

            <TextView
                android:id="@+id/textView3"
                android:layout_width="170dp"
                android:layout_height="50dp"
                android:gravity="center_horizontal"
                android:ems="20"
                android:paddingLeft="20dp"
                android:textSize="20sp"
                android:layout_weight="1"
                android:textColor="#ff000000"
                android:text="电话:" />

            <EditText
                android:id="@+id/et_phone"
                android:layout_width="match_parent"
                android:layout_height="50dp"
                android:layout_weight="1"

                android:ems="20"
                android:inputType="phone"
                android:textColor="#ff000000"
                android:textSize="20sp" />
        LinearLayout>

    LinearLayout>
    <View
        android:layout_width="match_parent"
        android:layout_height="5dp"

        android:background="#11000000" />
    <LinearLayout
        android:layout_width="match_parent"
        android:layout_height="wrap_content"
        android:id="@+id/B"
        android:layout_below="@+id/A"
        android:layout_marginLeft="10dp"
        android:layout_marginRight="10dp"
        android:orientation="horizontal">

        <Button
            android:id="@+id/bt_add"
            android:layout_width="wrap_content"
            android:layout_height="wrap_content"
            android:layout_weight="1"

            android:text="添加" />

        <Button
            android:id="@+id/bt_modify"
            android:layout_width="wrap_content"
            android:layout_height="wrap_content"
            android:layout_weight="1"

            android:text="修改" />

        <Button
            android:id="@+id/bt_del"
            android:layout_width="wrap_content"
            android:layout_height="wrap_content"
            android:layout_weight="1"
            android:text="删除" />

        <Button
            android:id="@+id/bt_sel"
            android:layout_width="wrap_content"
            android:layout_height="wrap_content"
            android:layout_weight="1"

            android:text="查询" />

    LinearLayout>


    <ListView
        android:id="@+id/listView"
        android:layout_below="@+id/B"
        android:layout_width="match_parent"
        android:layout_height="wrap_content" />

RelativeLayout>
3.5list_item
<LinearLayout xmlns:android="http://schemas.android.com/apk/res/android"
    android:layout_width="match_parent"
    android:orientation="horizontal"
    android:layout_height="match_parent">

    <TextView
        android:id="@+id/tv_id"
        android:layout_width="100dp"
        android:textSize="20sp"
        android:textColor="#ff000000"
        android:layout_height="wrap_content"
        android:gravity="center_horizontal"
        />
    <TextView
        android:id="@+id/tv_name"
        android:layout_width="120dp"
        android:textSize="20sp"
        android:textColor="#ff000000"
        android:layout_height="wrap_content"
        android:gravity="center_horizontal"
     />

    <TextView
        android:id="@+id/tv_phone"
        android:textSize="20sp"
        android:textColor="#ff000000"
        android:layout_width="match_parent"
        android:layout_height="wrap_content"
        android:gravity="center_horizontal"
         />

LinearLayout>
4.系统运行结果
4.1 APP初始界面
运行app,可在虚拟机上看到如下界面:

Figure 4 初始界面
4.2 添加功能
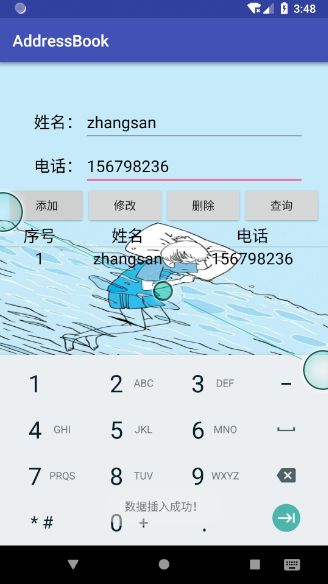
输入:“zhangsan”“156798236”点击“添加”按钮,会弹出消息框“数据插入成功”,并在ListView中显示该条信息。如图6所示,
4.3 修改功能
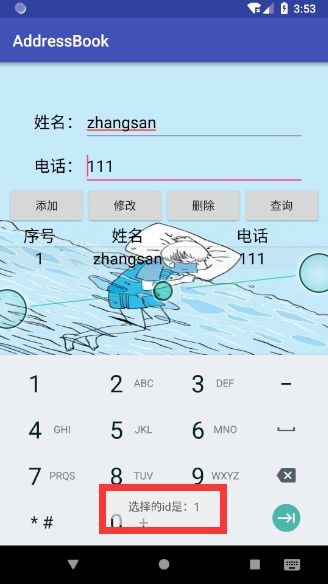
把电话改为111,并点击“修改”按钮,则会弹出消息框“数据更新成功”,在listview中显示更新后的信息。如图7所示

4.3 删除功能
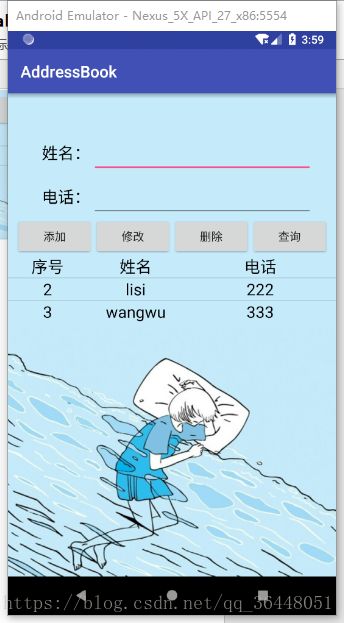
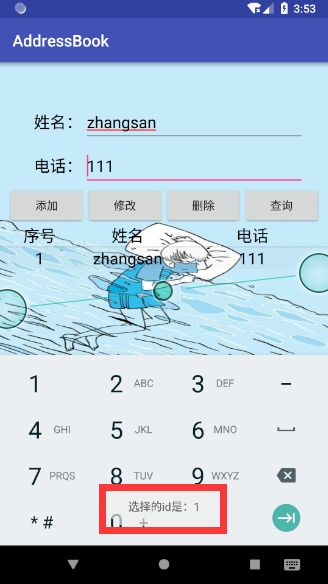
先选中一行信息,会弹出消息框“选择的id是:1”,这时点击删除按钮,就会把id=1的这一行信息删除。如图9所示,zhangsan这条信息已经没有了。
