Ansible安装部署
ansible是基于pytho开发的自动化运维工具
环境:
| vm1 | Master |
|---|---|
| server2,3 | slave |
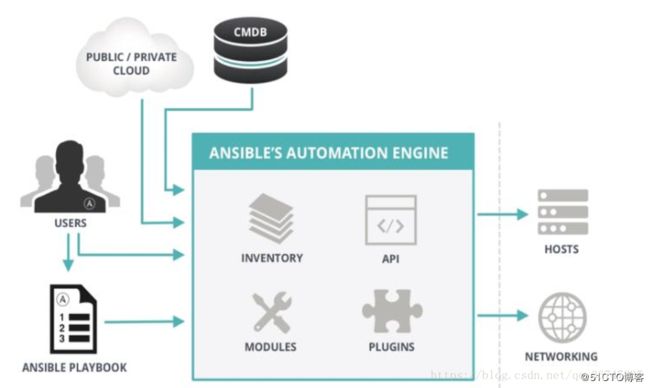
ansible架构
ansible工作原理
安装ansible
##添加yum源
[root@vm1 mnt]# vim /etc/yum.repos.d/ansible.repo
[epel]
name = all source for ansible
baseurl = https://mirrors.aliyun.com/epel/7/x86_64/
enabled = 1
gpgcheck = 0
[root@vm1 mnt]# yum install ansible -y
ssh免密
master与slaves之间是基于密钥的SSH链接。
[root@vm1 mnt]#  ssh-keygen -t rsa -P ''
Generating public/private rsa key pair.
Enter file in which to save the key (/root/.ssh/id_rsa):
Created directory '/root/.ssh'.
Your identification has been saved in /root/.ssh/id_rsa.
Your public key has been saved in /root/.ssh/id_rsa.pub.
The key fingerprint is:
1b:04:ec:b9:f9:de:6b:75:6e:79:54:84:24:6d:37:a3 root@vm1
The key's randomart image is:
+--[ RSA 2048]----+
|     ..     .o.. |
|      ..     .+oo|
|     . ..    ..oo|
|      o.     E  .|
|       oS       .|
|      o  o  . . .|
|       ..  . o o |
|        ...   + .|
|       ...o. . . |
+-----------------+
[root@vm1 mnt]# scp /root/.ssh/authorized_keys server2:/root/.ssh/
[root@vm1 mnt]# scp /root/.ssh/authorized_keys server3:/root/.ssh/
配置ansible
##添加ansible管理主机
[root@vm1 mnt]# vim /etc/ansible/hosts

[webservers]
172.25.79.2
172.25.79.3
##日志路径
[root@vm1 mnt]# vim /etc/ansible/ansible.cfg
log_path = /var/log/ansible.log
Ansible命令执行过程
##以ls /etc/passwd 为例:
[root@vm1 mnt]#  ansible group -m command -a 'ls /etc/passwd' -vvv
- 加载自己的配置文件,默认/etc/ansible/ansible.cfg
- 匹配主机清单
Parsed /etc/ansible/hosts inventory source with ini plugin - 加载指令对应的模块文件,如command,生成.py的文件到本机的临时目录,这个目录就是在/etc/ansible/ansible.cfg定义的
Using module file /usr/lib/python2.7/site-packages/ansible/modules/commands/command.py
PUT /tmp/tmp4JvsLH TO /root/.ansible/tmp/ansible-tmp-1517301292.6-155771303493861/command.py 通过ansible将模块或命令生成对应的临时py文件,并将该文件传输至远程服务器的对应执行用户$HOME/.ansible/tmp/ansible-tmp-数字/XXX.PY文件,
这个目录就是在/etc/ansible/ansible.cfg定义的( umask 77 && mkdir -p “echo /root/.ansible/tmp/ansible-tmp-1517301292.6-155771303493861” ….) sftp> put /tmp/tmp4JvsLH /root/.ansible/tmp/ansible-tmp-1517301292.6-155771303493861/command.py\n’给文件+x 权限
‘chmod u+x /root/.ansible/tmp/ansible-tmp-1517301292.6-155771303493861/ /root/.ansible/tmp/ansible-tmp-1517301292.6-155771303493861/command.py && sleep 0’- 执行并返回结果
‘/usr/bin/python /root/.ansible/tmp/ansible-tmp-1517301292.6-155771303493861/command.py; - 删除临时py文件,sleep 0退出
rm -rf “/root/.ansible/tmp/ansible-tmp-1517301292.6-155771303493861/” > /dev/null 2>&1 && sleep 0 - 断开远程主机连接
‘Shared connection to 7-db-3.hunk.tech closed.\r\n’)
测试
测试是否可以连接
[root@vm1 mnt]# ansible group -m ping
172.25.79.2 | SUCCESS => {
    "changed": false,
    "ping": "pong"
}
172.25.79.3 | SUCCESS => {
    "changed": false,
    "ping": "pong"
}
-m:指定所用的模块,我们使用 Ansible 内置的 ping 模块来检查能否正常管理远端机器
复制文件
[root@vm1 mnt]# ansible group -m copy -a "src=/mnt/test dest=/mnt/"
172.25.79.2 | SUCCESS => {
    "changed": true,
    "checksum": "1c68ea370b40c06fcaf7f26c8b1dba9d9caf5dea",
    "dest": "/mnt/test",
    "gid": 0,
    "group": "root",
    "md5sum": "2205e48de5f93c784733ffcca841d2b5",
    "mode": "0644",
    "owner": "root",
    "size": 5,
    "src": "/root/.ansible/tmp/ansible-tmp-1534425117.79-76222347089526/source",
    "state": "file",
    "uid": 0
}
172.25.79.3 | SUCCESS => {
    "changed": true,
    "checksum": "1c68ea370b40c06fcaf7f26c8b1dba9d9caf5dea",
    "dest": "/mnt/test",
    "gid": 0,
    "group": "root",
    "md5sum": "2205e48de5f93c784733ffcca841d2b5",
    "mode": "0644",
    "owner": "root",
    "size": 5,
    "src": "/root/.ansible/tmp/ansible-tmp-1534425117.8-58721625384889/source",
    "state": "file",
    "uid": 0
}再server2,3上可以查看到文件
[root@server2 .ssh]# cat /mnt/test
Test
[root@server3 .ssh]# cat /mnt/test
Test时间显示
[root@vm1 mnt]#  ansible all -m command -a "date"
172.25.79.2 | SUCCESS | rc=0 >>
2018年 08月 16日 星期四 22:31:25 CST

172.25.79.3 | SUCCESS | rc=0 >>
2018年 08月 16日 星期四 22:31:25 CST

