《构建在Spring Web Flow框架上的简单订单流程系统》
Spring Web Flow
Spring Web Flow是一个WEB框架,它使用于元素按规定流程运行的程序,它是Spring Mvc的扩展,它支持基于流程的应用程序,它将流程的行为的类和视图分离开来。
关于Spring Web Flow,官网上的介绍是这样的:
Spring Web Flow builds on Spring MVC and allows implementing the “flows” of a web application. A flow encapsulates a sequence of steps that guide a user through the execution of some business task. It spans multiple HTTP requests, has state, deals with transactional data, is reusable, and may be dynamic and long-running in nature..
简单的翻译下:Spring Web Flow是建立在Spring MVC上面的,并允许实现web应用程序的“流”。这个流封装了一系列用于指导用户执行业务任务的步骤。它跨越多个HTTP请求,具有状态,可以处理事务数据,而且是可重用的,并且可能是动态的和长期运行的。
下面我们来带大家来使用Spring Web Flow框架来模拟简单的订单系统。
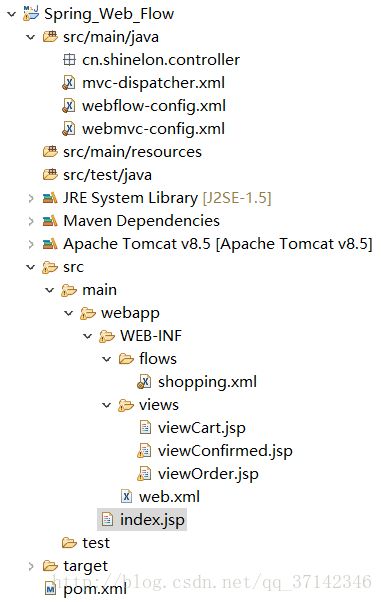
1.首先来创建一个maven项目,导入的依赖如下:
<dependencies>
        <dependency>
            <groupId>junitgroupId>
            <artifactId>junitartifactId>
            <version>3.8.1version>
            <scope>testscope>
        dependency>
        <dependency>
            <groupId>org.springframework.webflowgroupId>
            <artifactId>spring-webflowartifactId>
            <version>2.4.5.RELEASEversion>
        dependency>

        <dependency>
            <groupId>org.springframeworkgroupId>
            <artifactId>spring-webmvcartifactId>
            <version>4.3.8.RELEASEversion>
        dependency>

        <dependency>
            <groupId>org.springframeworkgroupId>
            <artifactId>spring-webartifactId>
            <version>4.3.8.RELEASEversion>
        dependency>

        <dependency>
            <groupId>javax.servletgroupId>
            <artifactId>jstlartifactId>
            <version>1.2version>
        dependency>
    dependencies>
然后我们来搭建Spring Mvc框架,web.xml:
    <web-app xmlns="http://xmlns.jcp.org/xml/ns/javaee"
             xmlns:xsi="http://www.w3.org/2001/XMLSchema-instance"
             xsi:schemaLocation="http://xmlns.jcp.org/xml/ns/javaee http://xmlns.jcp.org/xml/ns/javaee/web-app_3_1.xsd"
             version="3.1">

      <display-name>winner-test Web Applicationdisplay-name>
      <servlet>
        <servlet-name>mvc-dispatcherservlet-name>
        <servlet-class>org.springframework.web.servlet.DispatcherServletservlet-class>

        <init-param>
          <param-name>contextConfigLocationparam-name>
          <param-value>classpath:mvc-dispatcher.xmlparam-value>
        init-param>
        <load-on-startup>1load-on-startup>
      servlet>
      <servlet-mapping>
        <servlet-name>mvc-dispatcherservlet-name>
        <url-pattern>*.dourl-pattern>
      servlet-mapping>
      <welcome-file-list>
        <welcome-file>index.jspwelcome-file>
      welcome-file-list>
    web-app>
mvc-dispatcher.xml:
    <beans xmlns="http://www.springframework.org/schema/beans"
           xmlns:xsi="http://www.w3.org/2001/XMLSchema-instance"
           xmlns:p="http://www.springframework.org/schema/p"
           xmlns:context="http://www.springframework.org/schema/context"
           xmlns:mvc="http://www.springframework.org/schema/mvc"
           xsi:schemaLocation="http://www.springframework.org/schema/beans
               http://www.springframework.org/schema/beans/spring-beans.xsd
               http://www.springframework.org/schema/mvc
               http://www.springframework.org/schema/mvc/spring-mvc-4.0.xsd
               http://www.springframework.org/schema/context
               http://www.springframework.org/schema/context/spring-context.xsd">


        <context:component-scan base-package="cn.shinelon.controller"/>

        <mvc:annotation-driven/>
        <import resource="webmvc-config.xml"/>
        <import resource="webflow-config.xml"/>

    beans>
在上面的配置文件中我们引入了webmvc-config.xml和webflow-config.xml这两个xml文件,webmvc-config.xml是Spring Mvc Bean的配置,webflow-config.xml是Spring Mvc Flow的配置。
首先来看webmvc-config.xml:
<beans xmlns="http://www.springframework.org/schema/beans"
    xmlns:xsi="http://www.w3.org/2001/XMLSchema-instance"
    xsi:schemaLocation="
        http://www.springframework.org/schema/beans
        http://www.springframework.org/schema/beans/spring-beans.xsd">
    <bean id="viewResolver"
        class="org.springframework.web.servlet.view.InternalResourceViewResolver">
        <property name="viewClass"
            value="org.springframework.web.servlet.view.JstlView" />
        <property name="prefix" value="/WEB-INF/views/" />
        <property name="suffix" value=".jsp" />
    bean>

    <bean id="flowHandlerMapping"
        class="org.springframework.webflow.mvc.servlet.FlowHandlerMapping">
        <property name="flowRegistry" ref="flowRegistry" />
        <property name="defaultHandler">

            <bean class="org.springframework.web.servlet.mvc.UrlFilenameViewController" />
        property>

    bean>
    <bean id="flowHandlerAdapter"
        class="org.springframework.webflow.mvc.servlet.FlowHandlerAdapter">
        <property name="flowExecutor" ref="flowExecutor" />
    bean>

beans>
webflow-config.xml:
<beans xmlns="http://www.springframework.org/schema/beans"
    xmlns:xsi="http://www.w3.org/2001/XMLSchema-instance" xmlns:webflow="http://www.springframework.org/schema/webflow-config"
    xsi:schemaLocation=" http://www.springframework.org/schema/beans
        http://www.springframework.org/schema/beans/spring-beans-2.5.xsd
        http://www.springframework.org/schema/webflow-config
        http://www.springframework.org/schema/webflow-config/spring-webflow-config-2.0.xsd">

    <webflow:flow-executor id="flowExecutor" />


    <webflow:flow-registry id="flowRegistry"
        flow-builder-services="flowBuilderServices">
        <webflow:flow-location path="/WEB-INF/flows/shopping.xml"
            id="shopping" />

    webflow:flow-registry>

    <webflow:flow-builder-services id="flowBuilderServices"
        view-factory-creator="mvcViewFactoryCreator" />

    <bean id="mvcViewFactoryCreator"
        class="org.springframework.webflow.mvc.builder.MvcViewFactoryCreator">
        <property name="viewResolvers" ref="viewResolver" />
    bean>
beans>
接着我们创建了一个shopping.xml文件来定义执行流程:
<flow xmlns="http://www.springframework.org/schema/webflow"
    xmlns:xsi="http://www.w3.org/2001/XMLSchema-instance"
    xsi:schemaLocation="http://www.springframework.org/schema/webflow
     http://www.springframework.org/schema/webflow/spring-webflow-2.0.xsd">


    <view-state id="viewCart" view="viewCart">
        <transition on="submit" to="viewOrder">
        transition>
    view-state>
    <view-state id="viewOrder" view="viewOrder">
        <transition on="confirm" to="viewConfirmed">
        transition>
    view-state>
    <view-state id="viewConfirmed" view="viewConfirmed">
        <transition on="returnToIndex" to="returnToIndex">
        transition>
    view-state>
    <end-state id="returnToIndex" view="externalRedirect:/index.jsp">
    end-state>
flow>
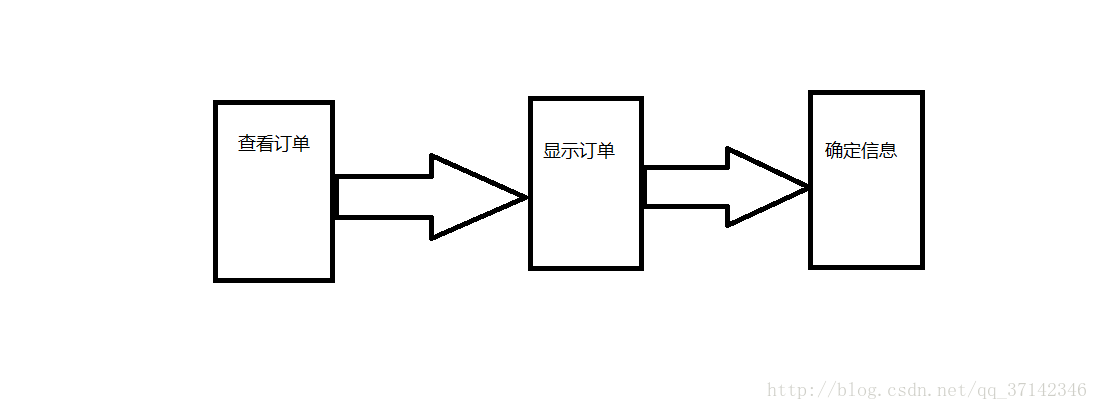
其中on属性表示触发的事件,to属性是当触发该事件后转向的状态。首先转向viewCart状态,当点击submit后转向viewOrder状态,在该状态下点击confirm则会转移到viewConfirmed状态,依次同理。这里转向的页面是jsp页面,view-state的属性id与jsp文件的名字相对应。(注:其中流程的三个主要元素是:状态,转移和流程数据,具体可参考相关资料)。
viewCart.jsp:
<html xmlns="http://www.w3.org/1999/xhtml">
<head>
<meta http-equiv="Content-Type" content="text/html; charset=utf-8" />
<title>Cart Applicationtitle>
head>
<body>
    <h1>View Carth1>
    <a href="${flowExecutionUrl}&_eventId=submit">Submita>
body>
html>
viewOrder.jsp:
<html xmlns="http://www.w3.org/1999/xhtml">
<head>
<meta http-equiv="Content-Type" content="text/html; charset=utf-8" />
<title>Cart Applicationtitle>
head>
<body>
    <h1>Order Confirmedh1>
    <a href="${flowExecutionUrl}&_eventId=confirm">Confirma>
body>
html>
html>
viewConfirmed.jsp:
<html xmlns="http://www.w3.org/1999/xhtml">
<head>
<meta http-equiv="Content-Type" content="text/html; charset=utf-8" />
<title>Cart Applicationtitle>
head>
<body>
    <h1>Order Confirmedh1>
    <a href="${flowExecutionUrl}&_eventId=confirm">Confirma>
body>
html>
html>
上面需要说明的是Spring Web Flow为视图的用户提供了一个flowExecutionUrl变量,它包含了流程的URL,结束链接将一个”_eventId”参数关联到URL上,以便回到Web流程时触发该参数值的事件,直到流程结束。
index.jsp:
<html>
<body>
<h1>Hello!h1>
    <br />
    <a href="shopping.do">View Carta>
body>
html>
至此我们完成了一个简单的订单支付流程系统,当我们在浏览器上输入localhost:8080/Spring_Web_Flow/shopping.do 时即可进行index.jsp页面,点击事件即可执行流程。


