Linux7安装mysql-8.0.13操作步骤
原文:https://blog.csdn.net/ShewMi/article/details/80754752
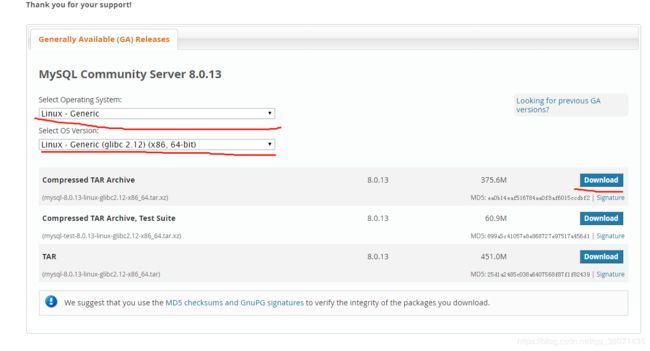
一、在官网:https://dev.mysql.com/downloads/mysql/下载安装包通用版的
mysql-8.0.13-linux-glibc2.12-x86_64.tar
二、前期安装环境准备
1、清理mysql历史文件
确保如下几个目录没有mysql有关的文件和目录:
/etc/my.cnf
/etc/my.cnf~
/usr/local/mysql
/var/lib/mysql
my.cnf是mysql的配置文件,部分linux系统可能自带该文件,先删除掉。因为5.7版本中,如果你使用mysql默认设置,无须此文件。
检查其余的几个目录和文件,通常是不存在的,那么可以全新安装mysql了。
2、上传解压压缩包
把下载的:mysql-8.0.13-linux-glibc2.12-x86_64.tar 上传到 /usr/local 目录下。
[root@VM_141_168_centos local]# tar -xzvf mysql-8.0.13-linux-glibc2.12-x86_64.tar解压后重命令解压出来的文件。
[root@VM_141_168_centos local]# mv mysql-8.0.13-linux-glibc2.12-x86_64 mysql创建mysql-files目录,其作用是为secure_file_priv系统变量的值的导入和导出到限定目录提供方便。
[root@VM_141_168_centos local]# mkdir mysql-files安装依赖
[root@VM_141_168_centos local]# yum search libaio三、安装
创建用户和用户组并授权
[root@VM_141_168_centos mysql]# groupadd mysql
[root@VM_141_168_centos mysql]# useradd -r -g mysql -s /bin/false mysql
[root@VM_141_168_centos mysql]# chown mysql:mysql mysql-files
[root@VM_141_168_centos mysql]# chmod 750 mysql-files
初始化mysql其中 A temporary password is generated for root@localhost: =8J*BAoEpa1:
root@localhost: 后面的是密码需要记住很重要
[root@VM_141_168_centos mysql]# /bin/mysql --initialize --user=mysql
2018-12-17T08:29:55.324437Z 0 [System] [MY-013169] [Server] /usr/local/mysql/bin/mysqld (mysqld 8.0.13) initializing of server in progress as process 27108
2018-12-17T08:30:00.249167Z 5 [Note] [MY-010454] [Server] A temporary password is generated for root@localhost: =8J*BAoEpa1:
2018-12-17T08:30:03.733389Z 0 [System] [MY-013170] [Server] /usr/local/mysql/bin/mysqld (mysqld 8.0.13) initializing of server has completed
安装ssl
[root@VM_141_168_centos mysql]# bin/mysql_ssl_rsa_setup将mysql守护线程设置成系统服务,在support-files目录下提供了默认启动脚本,通常我们使用默认脚本:mysql.server
[root@VM_141_168_centos mysql]# ls support-files
magic  mysqld_multi.server  mysql-log-rotate  mysql.server
[root@VM_141_168_centos mysql]# cp -a support-files/mysql.server /etc/init.d/mysql.server
配置mysql的环境变量
[root@VM_141_168_centos mysql]# vi /etc/profile
# 打开文件后,在最后一行按 i 即可进入编辑模式
#添加:
export PATH=$PATH:/usr/local/mysql/bin
#添加后按 Esc 键输入 :wq  按 Enter 键即可退出。
[root@VM_141_168_centos mysql]# source /etc/profile
#上面这个是使配置文件生效
启动mysql
[root@VM_141_168_centos mysql]# service mysql.server start进入sql设置,这个密码是上面自己初始化的时候的密码
[root@VM_141_168_centos mysql]# mysql -u root -p
Enter password:
Welcome to the MySQL monitor.  Commands end with ; or \g.
Your MySQL connection id is 43
Server version: 8.0.13 MySQL Community Server - GPL

Copyright (c) 2000, 2018, Oracle and/or its affiliates. All rights reserved.

Oracle is a registered trademark of Oracle Corporation and/or its
affiliates. Other names may be trademarks of their respective
owners.

Type 'help;' or '\h' for help. Type '\c' to clear the current input statement.

mysql> ALTER USER 'root'@'localhost' IDENTIFIED BY '新密码';
初始密码使用一次就过期了需要修改:ALTER USER 'root'@'localhost' IDENTIFIED BY '新密码';
退出后再次进入就可以使用新密码了。
四、远程用户建立,nvacat连接建立。
create user 用户名@'%' identified by '密码';
ALTER USER 用户名@'%' IDENTIFIED BY '密码' PASSWORD EXPIRE NEVER;
ALTER USER 用户名@'%' IDENTIFIED WITH mysql_native_password BY '密码';
FLUSH PRIVILEGES;
grant all privileges on *.* to '用户名'@'%';
FLUSH PRIVILEGES;
简历远程连接后还要配置防火墙,开通外网访问端口
#放通端口:
firewall-cmd --permanent --add-port=3306/tcp
#重新启动就可以了:
systemctl reatart firewalld
五、防火墙相关知识
启动/查看状态/停止/禁用/重启:
systemctl start/status/disable/stop/restart firewalld
查看所有打开的端口: firewall-cmd --zone=public --list-ports
开启端口:firewall-cmd --zone=public --add-port=80/tcp --permanent (--permanent永久生效,没有此参数重启后失效)
重新载入:firewall-cmd --reload
查看:firewall-cmd --zone= public --query-port=80/tcp
删除:firewall-cmd --zone= public --remove-port=80/tcp --permanent
显示状态: firewall-cmd --state
