spring security入门
目录
- spring security 框架简介
- 功能
- 缺点
- 认证过程
- 搭建
- 整合ssm
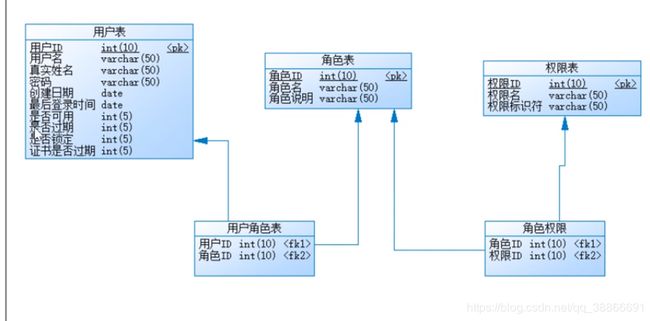
- RBAC数据库表
- 加入图形验证码
- remember me
- spring security 标签库
- 随时随地的获取用户信息
- 整合spring boot
spring security 框架简介
功能
- Authentication: 认证,就是用户登录
- Authorization: 授权,判断用户有什么权限
- 安全防护:防止跨站请求,session攻击
- 容易结合spring mvc
- 缓存支持、会话管理、加密功能、rememberMe功能
缺点
- 相对于shiro的配置和使用,比较复杂
- 必须依赖spring 容器,才可运行。shiro依赖性低,不需要依赖任何第三方框架,即可运行
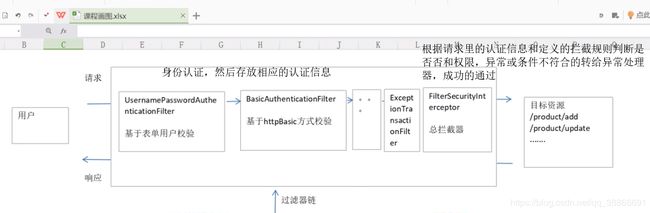
认证过程
搭建
1、导入pom
spring-core
spring-web
spring-webmvc
spring-security-web
spring-security-config

jstl>jstl
javax.servlet>servlet-api

json工具:com.fasterxml.jackson.core>jackson-databind

可以不使用本地的tomcat,直接在当前pom.xml的目录下命令mvn tomcat:run运行项目
<build>
		<plugins>
			<plugin>
				<groupId>org.apache.tomcat.mavengroupId>
				<artifactId>tomcat7-maven-pluginartifactId>
				<version>2.1version>
				<configuration>
					<path>/sslpath>
					<port>8080port>
					<server>tomcat9server>
				configuration>
			plugin>
		plugins>
	build>
2、配置web.xml
	<context-param>
		<param-name>contextConfigLocationparam-name>
		<param-value>
		classpath:application.xml

		classpath:spring-security.xml
		param-value>
	context-param>
	<listener>
		<listener-class>org.springframework.web.context.ContextLoaderListenerlistener-class>
	listener>

	<servlet>
		<servlet-name>springDispatcherServletservlet-name>
		<servlet-class>org.springframework.web.servlet.DispatcherServletservlet-class>
		<init-param>
			<param-name>contextConfigLocationparam-name>
			<param-value>classpath:springmvc.xmlparam-value>
		init-param>

		<load-on-startup>1load-on-startup>
	servlet>
	<servlet-mapping>
		<servlet-name>springDispatcherServletservlet-name>
		<url-pattern>/url-pattern>
	servlet-mapping>


    <filter>
        <filter-name>springSecurityFilterChainfilter-name>
        <filter-class>org.springframework.web.filter.DelegatingFilterProxyfilter-class>
    filter>
    <filter-mapping>
        <filter-name>springSecurityFilterChainfilter-name>
        <url-pattern>/*url-pattern>
    filter-mapping>


    <filter>
        <filter-name>EncodingFilterfilter-name>
        <filter-class>org.springframework.web.filter.CharacterEncodingFilterfilter-class>
        <init-param>
            <param-name>encodingparam-name>
            <param-value>UTF-8param-value>
        init-param>
        <init-param>
            <param-name>forceEncodingparam-name>
            <param-value>trueparam-value>
        init-param>
    filter>
    <filter-mapping>
        <filter-name>EncodingFilterfilter-name>
        <url-pattern>/*url-pattern>
    filter-mapping>
spring和springmvc xml模板
<beans
    xmlns="http://www.springframework.org/schema/beans"
    xmlns:xsi="http://www.w3.org/2001/XMLSchema-instance"
               xmlns:context="http://www.springframework.org/schema/context"
               xmlns:aop="http://www.springframework.org/schema/aop"
               xmlns:tx="http://www.springframework.org/schema/tx"
               xmlns:mvc="http://www.springframework.org/schema/mvc"
    xsi:schemaLocation="http://www.springframework.org/schema/beans
                        http://www.springframework.org/schema/beans/spring-beans-3.0.xsd
                        http://www.springframework.org/schema/context
                        http://www.springframework.org/schema/context/spring-context-3.0.xsd
                        http://www.springframework.org/schema/aop
                        http://www.springframework.org/schema/aop/spring-aop-3.0.xsd
                        http://www.springframework.org/schema/tx
                        http://www.springframework.org/schema/tx/spring-tx-3.0.xsd
                        http://www.springframework.org/schema/mvc
                        http://www.springframework.org/schema/mvc/spring-mvc-3.0.xsd"
                        default-autowire="byName">
beans>
注意!!!
spring-security.xml一定要有基本的配置,否则会报异常
org.springframework.beans.factory.NoSuchBeanDefinitionException: No bean named ‘springSecurityFilterChain’ available
配置spring mvc.xml
	<context:component-scan base-package="com.lida" />


	<mvc:annotation-driven />


	<bean class="org.springframework.web.servlet.view.InternalResourceViewResolver">

		<property name="prefix" value="/WEB-INF/JSP/">property>

		<property name="suffix" value=".jsp">property>
	 bean>


	 <mvc:default-servlet-handler/>
配置spring-security.xml
	<security:http>


		<security:intercept-url pattern="/index"
			access="permitAll()" />
		<security:intercept-url pattern="/userLoginPage"
			access="permitAll()" />

		<security:intercept-url pattern="/add"
			access="hasRole('ROLE_USER')" />


		<security:intercept-url pattern="/**"
			access="isFullyAuthenticated()" />


		<security:form-login login-page="/userLoginPage"
			login-processing-url="/userLogin" default-target-url="/successIndex"
			authentication-success-handler-ref="myAuthenticationSuccessHandler"
			authentication-failure-handler-ref="myAuthenticationFailureHandler" />


		<security:access-denied-handler
			error-page="/errorPage" />

		<security:csrf disabled="true" />
	security:http>


	<security:authentication-manager>
		<security:authentication-provider>

			<security:user-service>
				<security:user name="user" password="password"
					authorities="ROLE_USER" />
				<security:user name="root" password="password"
					authorities="ROLE_root" />
			security:user-service>
		security:authentication-provider>


		<security:authentication-provider
			ref="MyUserDetailsService">
		security:authentication-provider>
	security:authentication-manager>

	<bean name="myUserDetailsService" class="com.lida.MyUserDetailsService">bean>
	<bean name="myAuthenticationSuccessHandler" class="com.lida.MyAuthenticationSuccessHandler">bean>
	<bean name="myAuthenticationFailureHandler" class="com.lida.MyAuthenticationFailureHandler">bean>
配置自定义认证提供者:UserDetailsService 和UserDetails
public class MyUserDetailsService implements UserDetailsService {
	// 根据用户名获取用户信息 这里连接数据库
	public UserDetails loadUserByUsername(String username) throws UsernameNotFoundException {
		// 使用提供的默认的UserDetails实现类User 设置该用户所拥有的权限
		User user = new User("user", "password",
				AuthorityUtils.commaSeparatedStringToAuthorityList("ROLE_USER,ROLE_ROOT"));
		return user;
	}
}
public class MyUserDetails implements UserDetails {
	// 获取该账户的权限
	public Collection<? extends GrantedAuthority> getAuthorities() {
		return null;
	}
	public String getPassword() {
		return null;
	}
	public String getUsername() {
		return null;
	}
	// 该账户是不是不过期
	public boolean isAccountNonExpired() {
		return false;
	}
	// 该账户是不是被锁定
	public boolean isAccountNonLocked() {
		return false;
	}
	// 密码是不是不过期
	public boolean isCredentialsNonExpired() {
		return false;
	}
	// 该账户是不是可用
	public boolean isEnabled() {
		return false;
	}
}
配置验证成功和失败后的处理逻辑
public class MyAuthenticationSuccessHandler implements AuthenticationSuccessHandler {
	// 验证成功后的处理逻辑
	public void onAuthenticationSuccess(HttpServletRequest request, HttpServletResponse response,
			Authentication authentication) throws IOException, ServletException {
		// 返回json字符串给前端
		Map<String, Boolean> map = new HashMap<String, Boolean>();
		map.put("success", true);
		// 将对象转为json字符串
		String string = new ObjectMapper().writeValueAsString(map);
		response.setContentType("text/json;charset=utf-8");
		response.getWriter().write(string);
	}
}
public class MyAuthenticationFailureHandler implements AuthenticationFailureHandler {
	// 认证失败后的处理逻辑
	public void onAuthenticationFailure(HttpServletRequest request, HttpServletResponse response, AuthenticationException authenticationException)
			throws IOException, ServletException {
		// 返回json字符串给前端
		Map<String, Boolean> map = new HashMap<String, Boolean>();
		map.put("success", false);
		// 将对象转为json字符串
		String string = new ObjectMapper().writeValueAsString(map);
		response.setContentType("text/json;charset=utf-8");
		response.getWriter().write(string);
	}
}
整合ssm
RBAC数据库表

1、引入pom
org.mybatis>mybatis
org.mybatis>mybatis-spring	整合包
com.alibaba>druid	数据源
mysql>mysql-connector-java		驱动
org.springframework>spring-jdbc		使用spring的事务管理
2、整合mybatis
<context:component-scan base-package="com.lida.service">context:component-scan>
	<context:property-placeholder location="classpath:jdbc.properties" />

	<bean id="datasource" class="com.alibaba.druid.pool.DruidDataSource">
		<property name="url" value="${jdbc.url}">property>
		<property name="driverClassName" value="${jdbc.driverClass}">property>
		<property name="username" value="${jdbc.username}">property>
		<property name="password" value="${jdbc.password}">property>

		<property name="maxActive" value="10">property>

		<property name="maxWait" value="3000">property>
	bean>


	<bean id="sqlSessionFactory" class="org.mybatis.spring.SqlSessionFactoryBean">
		<property name="dataSource" ref="datasource">property>

		<property name="typeAliasesPackage" value="com.lida.entity">property>
	bean>

	<bean class="org.mybatis.spring.mapper.MapperScannerConfigurer">
		<property name="basePackage" value="com.lida.mapper">property>
	bean>


	<bean
		class="org.springframework.jdbc.datasource.DataSourceTransactionManager">
		<property name="dataSource" ref="dataSource">property>
	bean>

	<tx:annotation-driven />
3、编写MyUserDetails ,Permission Role
注意!!MyUserDetails 是要求实现UserDetails接口的,所有数据库的字段名应该与它所要求的一致
public class MyUserDetails implements UserDetails {
	private String username;
	private String password;
	private boolean enabled;
	private boolean accountNonExpired;
	private boolean accountNonLocked;
	private boolean credentialsNonExpired;
}
public class Role {
	private Integer id;
	private String roleName;
	private String roleDesc;
}
public class Permission {
	private Integer id;
	private String permName;
	private String permTag;	//这是权限的标识,
}
4、编写spring-security.xml
<security:http>

		<security:intercept-url pattern="/prodect/index"
			access="permitAll()" />
		<security:intercept-url pattern="/userLoginPage"
			access="permitAll()" />
		<security:intercept-url pattern="/**"
			access="isFullyAuthenticated()" />

		<security:form-login login-page="/userLoginPage" />
	security:http>

	<security:authentication-manager>
		<security:authentication-provider
			ref="myUserDetailsService">

			<security:password-encoder ref="passwordEncoder">security:password-encoder>
		security:authentication-provider>
	security:authentication-manager>


	<bean id="passwordEncoder" class="org.springframework.security.crypto.bcrypt.BCryptPasswordEncoder">bean>
	<bean id="myUserDetailsService" class="com.lida.MyUserDetailsService">bean>
5、编写MyUserDetailsService
public class MyUserDetailsService implements UserDetailsService {
	@Autowired
	UserMapper userMapper;
	public UserDetails loadUserByUsername(String username) throws UsernameNotFoundException {
		// 查询用户信息
		MyUserDetails myUserDetails = userMapper.findUserByUserName(username);

		// 查询用户权限
		List<Permission> permissions = userMapper.findPermissionByUserName(username);
		// 存放所有的权限
		List<GrantedAuthority> authorities = new ArrayList<GrantedAuthority>();
		// 构造满足条件的权限类
		for (Permission permission : permissions) {
			SimpleGrantedAuthority authority = new SimpleGrantedAuthority(permission.getPermTag());
			authorities.add(authority);
		}
		myUserDetails.setAuthorities(authorities);
		return myUserDetails;
	}
}
加入图形验证码
处理流程

1、定制过滤器:ImageCodeAuthenticationFilter
public class ImageCodeAuthenticationFilter extends OncePerRequestFilter{
	//异常处理器
	private AuthenticationFailureHandler authenticationFailureHandler;

	protected void doFilterInternal(HttpServletRequest request, HttpServletResponse response, FilterChain filterChain)
			throws ServletException, IOException {
		//判断当前请求是否是登陆请求
		if(request.getRequestURI().contains("/login")) {
			try {
				//校验验证码	正确的放在session里
				String key = (String) request.getSession().getAttribute("key");
				//获取用户输入的验证码
				String imageCode =request.getParameter("imageCode");
				if(StringUtils.isEmpty(imageCode.trim())) {
					//抛出自定义的异常
					throw new ImageCodeException("验证码必须输入");
				}
				if(!imageCode.trim().equals(key.trim())) {
					throw new ImageCodeException("验证码错误");
				}
			} catch (AuthenticationException e) {
				//将异常交给自定义的AuthenticationFailureHandler处理
				authenticationFailureHandler.onAuthenticationFailure(request,response,e);
				return ;
			}
		}
	}
	public void setAuthenticationFailureHandler(AuthenticationFailureHandler authenticationFailureHandler) {
		this.authenticationFailureHandler = authenticationFailureHandler;
	}
}
2、自定义异常类:ImageCodeException
public class ImageCodeException extends AuthenticationException {
	public ImageCodeException(String msg,Throwable T) {
		super(msg ,T);
	}
	public ImageCodeException(String msg) {
		super(msg);
	}
}
3、自定义失败处理类:MyAuthenticationFailureHandler
public class MyAuthenticationFailureHandler implements AuthenticationFailureHandler {
	// 认证失败后的处理逻辑
	public void onAuthenticationFailure(HttpServletRequest request, HttpServletResponse response, AuthenticationException authenticationException)
			throws IOException, ServletException {
		// 返回json字符串给前端
		Map map = new HashMap<String, Boolean>();
		map.put("success", false);
		//将错误信息传回浏览器
		map.put("message", authenticationException.getMessage());

		// 将对象转为json字符串
		String string = new ObjectMapper().writeValueAsString(map);
		response.setContentType("text/json;charset=utf-8");
		response.getWriter().write(string);
	}
}
4、spring-security.xml整合:
	<bean id="imageCodeAuthenticationFilter" class="com.lida.ImageCodeAuthenticationFilter">
		<property name="authenticationFailureHandler" ref="myAuthenticationFailureHandler">property>
	bean>
	<bean id="myAuthenticationFailureHandler" class="com.lida.MyAuthenticationFailureHandler">bean>


<security:http>

		<security:custom-filter ref="myAuthenticationFailureHandler" before="FORM_LOGIN_FILTER"/>
security:http>
remember me
处理流程

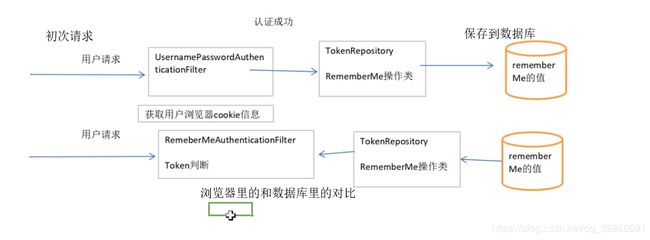
1、前端登陆页面的“记住我” 的表单的名字是:remember-me 这是固定的
2、spring-security.xml添加
<bean id="jdbcTokenRepositoryImpl"
		class="org.springframework.security.web.authentication.rememberme.JdbcTokenRepositoryImpl">

		<property name="dataSource" ref="datasource" />

		<property name="createTableOnStartup" value="true" />
bean>


		<security:remember-me token-repository-ref="jdbcTokenRepositoryImpl" token-validity-seconds="3600"/>
spring security 标签库
1、引入pom
org.springframework.security>spring-security-taglibs
2、jsp中引入
<%@ taglib uri="http://www.springframework.org/security/tags" prefix="security"%>


	当用户有权限ROLE_ADD_PRODECT时候才渲染我呀
随时随地的获取用户信息
//获取登陆的用户名
		UserDetails userDetails =(UserDetails) SecurityContextHolder.getContext().getAuthentication().getPrincipal();
整合spring boot
1、
@Configuration
@EnableWebSecurity //启动过滤连
public class SecurityConfig extends WebSecurityConfigurerAdapter{
//代替了2、
@Configuration
public class ErrorPageConfig {
	@Bean
	public EmbeddedServletContainerCustomizer embeddedServletContainerCustomizer() {
		return new EmbeddedServletContainerCustomizer() {
			//定义错误页面:指定当匹配到那个错误时,做什么请求处理
			public void customize(ConfigurableEmbeddedServlectContainer container) {
				container.addErrorPages(new ErrorPage(HttpStatus.FORBIDDEN,"/403"));
			}
		}
	}
}