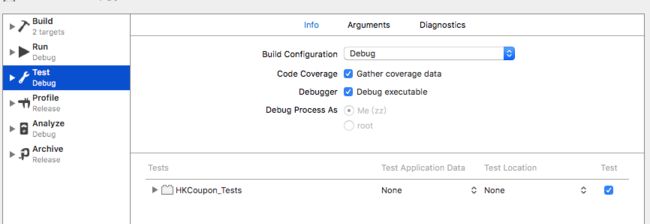
1.在Podfile文件里面添加第三方库,如下:
pod'XcodeCoverage','~>1.0'
github地址:https://github.com/daihongchao/XcodeCoverage
2.Edit Scheme将Code Coverage勾选,确保"Gather coverage data"是被选中的,然后点击关闭按钮;
3.pod安装后需要配置工程:设置 Build Settings中
“Instrument Program Flow”两个选项,分别设置Debug下为YES
3.选择pods下的 HKCoinModule需要设置两个地方,找到 “Generate Test Coverage Files”和“Instrument Program Flow”两个选项,分别设置Debug下为YES
4.设置 Build Phases,点击New Run Script Phase,编辑使其运行Pods/XcodeCoverage/exportenv.sh脚本
5.工程配置完后,开始跑单元测试例
6.cd到XcodeCoverage里面,打开env.sh文件,修改路径export OBJECT_FILE_DIR_normal="/Users/zz/Library/Developer/Xcode/DerivedData/HKCoinModule-gtxwijyxislqzcdcistkzyamyvra/Build/Intermediates/CodeCoverage/Intermediates/Pods.build/Debug-iphonesimulator/HKCoinModule.build/Objects-normal"(原来路径在HKCoinModule.build下面,现在改为Pods.build,业务代码在pods里面)
export SRCROOT="/Users/zz/Desktop/HKr_IOS_HKCoinModule/HKCoinModule"
7.在项目中找到APPDelegate.m文件,修改如下部分:
- (void)applicationDidEnterBackground:(UIApplication *)application
{
#if NT_COVERAGE
#if !TARGET_IPHONE_SIMULATOR
NSArray *paths = NSSearchPathForDirectoriesInDomains(NSDocumentDirectory, NSUserDomainMask, YES);
NSString *documentsDirectory = [paths objectAtIndex:0];
setenv("GCOV_PREFIX", [documentsDirectory cStringUsingEncoding:NSUTF8StringEncoding], 1);
setenv("GCOV_PREFIX_STRIP", "13", 1);
#endif
extern void __gcov_flush(void);
__gcov_flush();
#endif
}
第一个setenv的意思是将数据的根目录设置为app的Documents; 第二个setenv的意思是strip掉一些目录层次,因为覆盖率数据默认会写入一个很深的目录层次
8.运行单元测试,cd进入到XcodeCoverage目录,运行如下脚本:
./getcov --show
便可看到结果:
参考文章:
http://www.cnblogs.com/longhuihu/p/4032611.html
http://www.jianshu.com/p/efe2d3ec481a
http://blog.csdn.net/conghuaxiansheng/article/details/72179483


