本文将基于Android 6.0代码,分析systemUI的启动加载流程,对systemUI几处关键的视图的布局及功能进行介绍。
一. SystemUI主体框架启动流程
android设备上电,引导程序引导进入boot(通常是uboot),加载initramfs、kernel镜像,启动kernel后,进入用户态程序。第一个用户空间程序是init, PID固定是1.
init的基本功能有:
- 管理设备
- 解析并处理Android启动脚本init.rc
- 实时维护这个init.rc中的服务,包括加载 Zygote
而在Zygote中将启动SystemServer组件。
本文将从SystemServer开始分析。
SystemServer 名为系统服务进程,负责启动 Android 系统的关键服务。
其入口是SystemServer.main():
/**
     * The main entry point from zygote.
     */
    public static void main(String[] args) {
        new SystemServer().run();
    }
可以看到main()中生成了SystemServer对象并执行了run方法。
SystemServer.run():
private void run() {
    ......

     // Start services.
        try {
            startBootstrapServices();
            startCoreServices();
            startOtherServices();
            ......
       } catch (Throwable ex) {
           ...
            throw ex;
        }
        ...
        // Loop forever.
        Looper.loop();
        throw new RuntimeException("Main thread loop unexpectedly exited");
}
先看一眼startBootstrapServices();
 private void startBootstrapServices() {
        ......
        Installer installer = mSystemServiceManager.startService(Installer.class);

        // Activity manager runs the show.
        mActivityManagerService = mSystemServiceManager.startService(
                ActivityManagerService.Lifecycle.class).getService();
        mActivityManagerService.setSystemServiceManager(mSystemServiceManager);
        ......
 }
在startBootstrapServices()中启动了mActivityManagerService。
随后,我们再回头去看startOtherServices():
private void startOtherServices() {
        final Context context = mSystemContext;
        AccountManagerService accountManager = null;
        ContentService contentService = null;
        .......

         mActivityManagerService.systemReady(new Runnable() {
            @Override
            public void run() {
              ......

                try {
                    startSystemUi(context);
                } catch (Throwable e) {
                    reportWtf("starting System UI", e);
                }
         .......
mActivityManagerService.systemReady创建线程去执行startSystemUi(context),从方法名称可以看出,这里将启动systemUI。
static final void startSystemUi(Context context) {
        Intent intent = new Intent();
        intent.setComponent(new ComponentName("com.android.systemui",
                    "com.android.systemui.SystemUIService"));
        //Slog.d(TAG, "Starting service: " + intent);
        context.startServiceAsUser(intent, UserHandle.OWNER);
    }
通过intent.setComponent(new ComponentName("com.android.systemui",
"com.android.systemui.SystemUIService"));
设置启动systemui程序的SystemUIService
进入SystemUIService:
public class SystemUIService extends Service {

    @Override
    public void onCreate() {
        super.onCreate();
        ((SystemUIApplication) getApplication()).startServicesIfNeeded();
    }
......
onCreate方法中获得SystemUIApplication对象并调用其startServicesIfNeeded方法:
 public void startServicesIfNeeded() {
        final int N = SERVICES.length;
        for (int i=0; i cl = SERVICES[i];
            try {
                mServices[i] = (SystemUI)cl.newInstance();//加载实例
            } catch (IllegalAccessException ex) {
                throw new RuntimeException(ex);
            } catch (InstantiationException ex) {
                throw new RuntimeException(ex);
            }
            mServices[i].mContext = this;
            mServices[i].mComponents = mComponents;
            mServices[i].start();//start服务
            if (mBootCompleted) {
                mServices[i].onBootCompleted();
            }
        }
        mServicesStarted = true;
    }
可以看到startServicesIfNeeded()循环start了很多Services。
数组SERVICES的定义如下:
private final Class[] SERVICES = new Class[] {
            com.android.systemui.tuner.TunerService.class, //定制状态栏服务
            com.android.systemui.keyguard.KeyguardViewMediator.class,//锁屏模块
            com.android.systemui.recents.Recents.class,//最近应用
            com.android.systemui.volume.VolumeUI.class,//全局音量控制
            com.android.systemui.statusbar.SystemBars.class,//系统状态栏
            com.android.systemui.usb.StorageNotification.class,//Storage存储通知
            com.android.systemui.power.PowerUI.class,//电量管理相关
            com.android.systemui.media.RingtonePlayer.class,//铃声播放
            com.android.systemui.keyboard.KeyboardUI.class,//键盘相关
};
可以看到子服务包括:TunerService,KeyguardViewMediator,Recents,VolumeUI,SystemBars,StorageNotification,PowerUI
RingtonePlayer,KeyboardUI。
不过这里的service与我们平时所讲的四大组件的service并不一样。这里的service只是继承了SystemUI类的普通对象而已。
例如SystemBars:
public class SystemBars extends SystemUI implements ServiceMonitor.Callbacks {
           ......
}
小结:
查看到这里,可以总结一下systemUI主体框架的启动流程:
SystemServer启动Android核心服务包括了ActivityManagerService
--->ActivityManagerService一旦启动完成就会在systemReady的回调里启动SystemUIService
--->SystemUIService.onCreate—--->SystemUIApplication.startServicesIfNeeded
--->循环中调用mServices[i].start()启动SystemUI的各种核心service。
二. SystemUI关键视图呈现
手机中的下拉状态栏,锁屏,通知以及最近打开任务列表等功能都是SystemUI实现的。
主要功能点对应的界面如下图所示:
在上文中我们看到了SystemUI各项服务的启动流程,那么服务有了,界面视图又是如何呈现的呢?
接下来将以SystemBars为例,它是SystemUI的主要视图。
上文中mServices[i].start()将调用SystemBars.start():
    @Override
    public void start() {
        if (DEBUG) Log.d(TAG, "start");
        mServiceMonitor = new ServiceMonitor(TAG, DEBUG,
                mContext, Settings.Secure.BAR_SERVICE_COMPONENT, this);
        mServiceMonitor.start();  // will call onNoService if no remote service is found
    }
start中创建ServiceMonitor实例并start();
注释中说明,/服务没启动时,ServiceMonitor会回调SystemBars的onNoService/
所以去看SystemBars的onNoService:
    @Override
    public void onNoService() {
        if (DEBUG) Log.d(TAG, "onNoService");
        createStatusBarFromConfig();  // fallback to using an in-process implementation
    }

    private void createStatusBarFromConfig() {
        final String clsName = mContext.getString(R.string.config_statusBarComponent);
        if (clsName == null || clsName.length() == 0) {
            throw andLog("No status bar component configured", null);
        }
        Class cls = null;
        try {
            cls = mContext.getClassLoader().loadClass(clsName);
        } catch (Throwable t) {
            throw andLog("Error loading status bar component: " + clsName, t);
        }
        try {
            mStatusBar = (BaseStatusBar) cls.newInstance();
        } catch (Throwable t) {
            throw andLog("Error creating status bar component: " + clsName, t);
        }
        mStatusBar.mContext = mContext;
        mStatusBar.mComponents = mComponents;
        mStatusBar.start();
    }
需要注意的是,clsName得到的string为com.android.systemui.statusbar.phone.PhoneStatusBar
执行SystemBars.start()后,通过反射机制,最终得到BaseStatusBar对象。
这里需要说明的是BaseStatusBar是PhoneStatusBar的父类。
上文mStatusBar.start()即为PhoneStatusBar.start():
    public void start() {
            ......
            super.start(); // calls createAndAddWindows()
            ......
    }
再去BaseStatusBar.start():
public void start() {
        mWindowManager = (WindowManager)mContext.getSystemService(Context.WINDOW_SERVICE);
        mWindowManagerService = WindowManagerGlobal.getWindowManagerService();
        mDisplay = mWindowManager.getDefaultDisplay();
        mDevicePolicyManager = (DevicePolicyManager)mContext.getSystemService(
                Context.DEVICE_POLICY_SERVICE);

        mNotificationColorUtil = NotificationColorUtil.getInstance(mContext);

        mNotificationData = new NotificationData(this);

        mAccessibilityManager = (AccessibilityManager)
                mContext.getSystemService(Context.ACCESSIBILITY_SERVICE);

        mDreamManager = IDreamManager.Stub.asInterface(
                ServiceManager.checkService(DreamService.DREAM_SERVICE));
        mPowerManager = (PowerManager) mContext.getSystemService(Context.POWER_SERVICE);

        .......
        //在这里实例化了许多systemui常用的对象,服务,Manager,Observer等等
        .......

        createAndAddWindows(); //创建并添加视图
查看createAndAddWindows():
protected abstract void createAndAddWindows();
是个抽象方法,很显然调用去了BaseStatusBar的子类,
即PhoneStatusBar的createAndAddWindows():
 @Override
 public void createAndAddWindows() {
        addStatusBarWindow();
 }

 private void addStatusBarWindow() {
        makeStatusBarView();//关键方法,创建StatusBarView
        mStatusBarWindowManager = new StatusBarWindowManager(mContext);
        mStatusBarWindowManager.add(mStatusBarWindow, getStatusBarHeight());
 }
重点来了,makeStatusBarView,创建StatusBarView,
随后,mStatusBarWindowManager将其添加,呈现给用户
makeStatusBarView()的代码很长,但主要代码是这一句:
protected PhoneStatusBarView makeStatusBarView()
{
    ......
    mStatusBarWindow = (StatusBarWindowView) View.inflate(context,
                R.layout.super_status_bar, null);
    ......
}
通过认识super_status_bar.xml就能认识SystemBars的大体构成。
下面是部分省略的super_status_bar文件
通过上述view布局及makeStatusBarView相关代码,可以发现mStatusBarWindow(StatusBarWindowView)中包含以下4个部分:
- ScrimView
- PhoneStatusBarView layout-> status_bar
- PanelHolder id->PanelHolder
- ScrimView
其实这里还漏掉了一个重要的view—-keyguard_bouncer,它不是直接在layout布局里加入的,只有用户设置锁屏保护后才可见。
这里主要查看一下PhoneStatusBarView,PanelHolder及KeyguardBouncer。
PhoneStatusBarView
PhoneStatusBarView即为手机最上方的状态栏,主要用于显示系统状态,通知等,主要包括 notification icons 和 status bar icons
PanelHolder
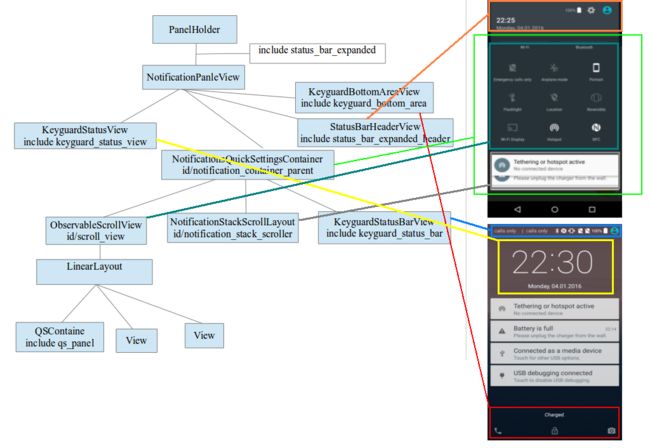
PanelHolder是用户下拉 status bar 后得到的 view。它主要包含 QuickSettings 和 Notification panel 两个部分。
PanelHolder是一个继承自FrameLayout的自定义view,它的内容是通过include status_bar_expanded.xml进行填充的。
PanelHolder的布局比较复杂,为了提高view的重用性大量的使用了include标签。
在平时修改QuickSettings以及Notification panel界面布局及功能相关的文件分别QSPanel及NotificationPanelView。
KeyguardBouncer
KeyguardBouncer是锁屏解锁界面,根据用户设置的解锁方式不同,展示不同的解锁模式。
先看看KeyguardBouncer长什么样子:
锁屏界面:
上滑锁屏后:
需要注意的是KeyguardBouncer有多种形式,上图中展示的是图案解锁,若为密码解锁KeyguardBouncer将会以数字键盘的形式展示。但无论哪种形式,都是在KeyguardBouncer中加载进来的。
public class KeyguardBouncer {
private ViewGroup mRoot;
private ViewGroup mContainer;
private KeyguardHostView mKeyguardView;
private void inflateView() {
       mRoot = (ViewGroup) LayoutInflater.from(mContext).inflate(R.layout.keyguard_bouncer, null);
       mKeyguardView =(KeyguardHostView)mRoot.findViewById(R.id.keyguard_host_view);
       mKeyguardView.setLockPatternUtils(mLockPatternUtils);
       mKeyguardView.setViewMediatorCallback(mCallback);
       mContainer.addView(mRoot,mContainer.getChildCount());
}
KeyguardBouncer的View树如下:
小结:
通过分析SystemBars的呈现流程介绍了PhoneStatusBarView,PanelHolder,keyguardbouncer三个常见SystemUI的界面布局及相关功能。当然,SystemUI的布局还是很复杂的,上述只对主要的视图从大的方向上做了分析。SystemUI也不只以上几个布局,包括最近应用视图,底部导航栏(Navigation Bar),全局音量管理Dialog等,本文暂时未介绍到。
总结:
本文分为两部分,分别介绍了SystemUI主体框架启动流程及SystemUI关键视图的界面布局呈现过程。通过以上介绍,在以后遇到SystemUI相关问题时,可以先定位出问题View属于哪个大的分类,然后结合图例给出的id缩小定位范围。


