知识清单
- lm函数
- lm对象的属性及回归直线各值的调用
- 改变坐标轴和坐标轴加箭头
- 限制abline和其他作图函数的作图范围
1. lm函数
lm(formula, data, subset, weights, na.action,
   method = "qr", model = TRUE, x = FALSE, y = FALSE, qr = TRUE,
   singular.ok = TRUE, contrasts = NULL, offset, ...)
formula代表拟合的公式,如Y~X,则对因变量Y和自变量X作线性拟合拟合模型为 y=a+bx,如Y0+X或YX+0则除对因变量Y和自变量X作线性拟合外,还规定改直线必过原点及拟合模型为y=x。
2. lm及回归直线各值的调用
lm对象即lm函数返回的值,其属性包括
> x <- 1:10
> y <- rnorm(10)
> line.model <- lm(y~x)
> names(line.model)
[1] "coefficients"  "residuals"     "effects"       "rank"          "fitted.values"
 [6] "assign"        "qr"            "df.residual"   "xlevels"       "call"
[11] "terms"         "model"
常用的有coefficients,residuals和fitted.values,分别表示拟合的得到的各系数的值、残差和预测值。
> line.model$coefficients
(Intercept)           x
 0.52805925 -0.02797779
> line.model$residuals
         1          2          3          4          5          6          7          8
-1.5765711  0.7410797  0.2115830  0.2855004 -0.7603608  0.6079035  1.5795988  1.3858017
         9         10
-1.0737913 -1.4007440
> line.model$fitted.values
        1         2         3         4         5         6         7         8         9
0.5000815 0.4721037 0.4441259 0.4161481 0.3881703 0.3601925 0.3322147 0.3042369 0.2762591
       10
0.2482813
可以看出该拟合曲线为y=0.52805925 -0.02797779x
其他值的调用,包括p值,给定x预测的y值,拟合系数R方等需要通过summary函数调用
- p值
f <- summary(line.model)$fstatistic
pf(f[1], f[2], f[3], lower.tail=F)
   value
0.8384057
- 给定x预测相应的y值
predict(line.model, data.frame(x=c(0, 1, 2)))
        1         2         3
0.5280593 0.5000815 0.4721037
- 拟合系数R方
summary(line.model)$r.squared
summary(line.model)$adj.r.squared
[1] 0.005517545
[1] -0.1187928
也可以直接通过summary(line.model)打印出大部分与回归直线相关的一些结果
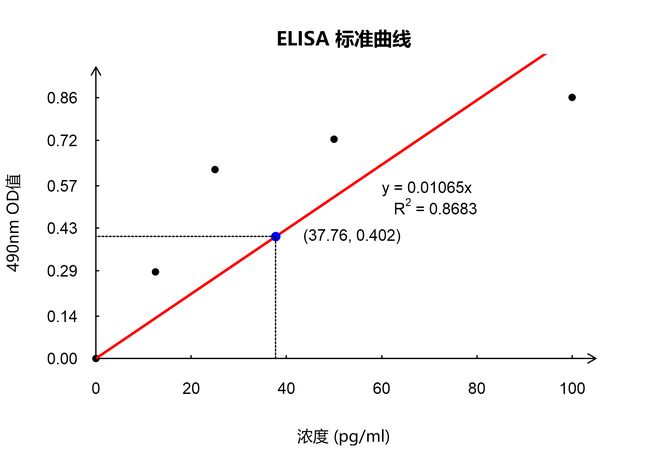
3. 改变坐标轴、坐标轴加箭头、限制abline和其他作图函数的作图范围见下述代码
# Cairo::CairoPDF("ELISA.pdf", width=7, height=5)
# Cairo::CairoPNG("ELISA.png", width=1400, height=1000, res=200)

# raw data each data has been replicated measured twice
# the last row is the measure of sample
raw_data1 <- c(0.053, 0.057,
               0.366, 0.315,
               0.677, 0.679,
               0.764, 0.792,
               1.008, 0.824,
               0.588, 0.326)

# clean data
data_norm1 <- raw_data1[seq(1, 11, 2)]
data_norm2 <- raw_data1[seq(2, 12, 2)]
data_norm <- (data_norm1+data_norm2)/2
data_norm <- data_norm -data_norm[1]
data1 <- data.frame(conc=c(0, 12.5, 25, 50, 100), od=data_norm[-length(data_norm)])

# line model fit (the model is y=b*x)
line.model <- lm(od~0+conc, data=data1)

# rsquared
summary(line.model)$r.squared

# f statistic
f <- summary(line.model)$fstatistic

# pvalue
pf(f[1], f[2], f[3], lower.tail=F)

# the data to be fitted renamed to x and y
x = data1$conc
y = data1$od

# par(family='Sans SimHei')
# 做散点图,并把坐标轴隐藏,
plot(x, y, pch=16, xlab="浓度 (pg/ml)", ylab="490nm OD值", bty="n",
     xlim=c(min(x), max(x))+c(0, 0.2)*(max(x)-min(x))/5,
     ylim=c(min(y), max(y))+c(0, 0.2)*(max(y)-min(y))/5,
     main="ELISA 标准曲线", axes=FALSE, family = "Microsoft Yahei")

# 自定义坐标轴,at为坐标点位置,labels默认为坐标点的数值
# tck表示坐标刻度长度,pos表示坐标轴的位置
axis(2, at=round(seq(0, max(y), length=7), 2), las=2, tck=0.01, pos=0)
axis(1, at=round(seq(0, max(x), length=6), 2), las=1, tck=0.01, pos=0)

# clip限制当前作图区域的界限
clip(-2, 120, -1, 1)
# 坐标轴加箭头
arrows(100, 0, 105, 0, length=0.1)
arrows(0, max(y), 0, max(y)+0.1, length=0.1)

# 作拟合直线
clip(min(x), max(x), min(y), max(y)+(max(y)-min(y))/6)
abline(line.model, lwd=2, col="red")

# 标注直线方程和拟合系数
text1 <- paste("y = ", round(line.model$coefficients, 5),"x",sep="")
text(x=quantile(x, 0.80), y=quantile(y, .39),
     labels= substitute(paste(text1, r.squared, sep=''), list(
       text1=paste(text1, "\n"), r.squared="")),
     adj=c(0,0))
text(x=quantile(x, 0.80), y=quantile(y, .39),
     labels= substitute(paste(text1, R^2, " = ", r.squared, sep=''), list(
       text1="\n", r.squared=round(summary(line.model)$r.squared, 4))),
     adj=c(0,0))

# 标注样本点
absorb_target = data_norm[length(data_norm)]
conc_target <- absorb_target/line.model$coefficients
points(conc_target, absorb_target, pch=16, col="blue", cex=1.3)
clip(0, conc_target, 0, absorb_target*2)
abline(h=absorb_target, lty=2)
clip(0, conc_target+1, 0, absorb_target)
abline(v=conc_target, lty=2)

# 标注样本点坐标值
clip(min(x), max(x), min(y), max(y)+(max(y)-min(y))/6)
text(conc_target+16, absorb_target,
     paste("(", round(conc_target, 3), ", ",  round(absorb_target, 3), ")", sep=""))

# dev.off()
