
Gradle
Hi~我是Gradle
项目地址
https://github.com/iamludaxu/gradle
gradle项目结构
 Gradle
   ├── build.gradle
   ├── settings.gradle
   └── app
       ├── build.gradle
       ├── build
       ├── libs
       └── src
           └── main
               ├── java
               │   └── gift.witch.gradle
               └── res
                   ├── drawable
                   ├── layout
                   └── etc.
settings.gradle
include ':app', ':library', ':wear'
设置整个项目的结构,包括一个三个模块app、library、wear。
build.gradle
apply plugin: 'com.android.application'

android {

    /**
     * 编译的sdk版本
     */
    compileSdkVersion 23

    /**
     * 编译的build-tools版本
     */
    buildToolsVersion '25.0.1'

    ......

    /**
     * 资源映射
     */
    sourceSets {
      ......
    }

    /**
     * 默认配置
     */
    defaultConfig {
        applicationId "gift.witch.gradle"
        ......
    }
    /**
     * 签名信息
     */
    signingConfigs {
        ......
    }

    /**
     * 版本类型
     */
    buildTypes {
        debug {
            ......
        }
        release {
            ......
        }
    }

    /**
     * 发布的不同版本
     */
    productFlavors {
       ......
    }

    /**
     * 依赖
     */
    dependencies {
        ......
    }

}
一、每个模块都会有一个build.gradle,根据模块类型不同会使用不同的插件
app模块
apply plugin: 'com.android.application'
library模块
apply plugin: 'com.android.library'
java模块
apply plugin: 'java'
二、defaultConfig默认配置
包含了该app的核心属性,该属性会重写在AndroidManifest.xml中的对应属性。
 defaultConfig {
        /**
         * 应用ID
         */
        applicationId "gift.witch.gradle"
        /**
         * 应用ID后缀
         */
        applicationIdSuffix ".dev"

        /**
         * 最小sdk版本号
         */
        minSdkVersion 14
        /**
         * 最大sdk版本号
         */
        maxSdkVersion 23
        /**
         * 目标sdk版本号
         */
        targetSdkVersion 23
        /**
         * 应用版本号
         */
        versionCode 1
        /**
         * 应用版本名称
         */
        versionName "1.0"

    }
三、signingConfigs签名信息
定义签名信息,可以在defaultConfig,buildTypes和productFlavors中使用。
signingConfigs {
        staging.initWith(signingConfigs.debug)
        release {
            storeFile file("keystore.jks")
            storePassword"123456"
            keyAlias "aliastest"
            keyPassword "123456"
        }
    }
四、buildTypes版本类型
定义不同的版本,可以改变app中BuildConfig和resources的信息。
比如下面例子
- 通过buildConfigField方法增加BuildConfig中变量API_URL的值。
- 通过resValue方法增加string.xml中的appname的值。
- 通过minifyEnabled方法是否混淆
- 通过applicationIdSuffix方法增加appId的后缀
- 通过versionNameSuffix方法增加版本名称的后缀
- 通过signingConfig方法设置签名
- 在增加string的时候不能同时在string.xml中有相同的定义,否则会报错
buildTypes {
        debug {
            buildConfigField("String","API_URL","\"debug_API_URL\"")
            resValue "string","appname","debug AppName"
            minifyEnabled false
            proguardFiles getDefaultProguardFile('proguard-android.txt'), 'proguard-rules.pro'
        }
        release {
            buildConfigField("String","API_URL","\"release_API_URL\"")
            resValue "string","appname","release AppName"
            minifyEnabled false
            proguardFiles getDefaultProguardFile('proguard-android.txt'), 'proguard-rules.pro'
        }
        staging {
            buildConfigField("String","API_URL","\"staging_API_URL\"")
            resValue "string","appname","staging AppName"
            applicationIdSuffix ".staging"
            versionNameSuffix "-staging"
            debuggable true
            signingConfig signingConfigs.staging
        }
    }
五、productFlavors发布的不同版本
- 通过resValue方法增加string和color
- 其拥有的方法和defaultConfig中相同可以修改app的核心属性
- 在增加string和color属性的时候,color.xml和string.xml不能出现相同的定义否则会报错
/**
 * 发布的不同版本
 */
productFlavors {
    red {
        resValue "string", "flavor_string", "我是红色版本"
        resValue "color", "flavor_color", "#ff0000"
    }
    blue {
        resValue "string", "flavor_string", "我是蓝色版本"
        resValue "color", "flavor_color", "#0000ff"
    }
}
六、dependencies依赖管理
 /**
 * 依赖
 */
dependencies {
    /**
     * 本地依赖形式
     */
    compile fileTree(include: ['*.jar'], dir: 'libs')
    testCompile 'junit:junit:4.12'
    /**
     * 远程依赖简洁形式
     */
    compile 'com.android.support:appcompat-v7:25.3.1'
    /**
     * 远程依赖完全形式
     */
    compile group:"com.google.code.gson", name:"gson", version:"2.3"

    testCompile "org.robolectric:robolectric:3.3.2"
    /**
     * 依赖项目
     */
    compile project(':library')
    stagingCompile 'junit:junit:4.12'
}
配置project.gradle
buildscript {
    /**
     * gradle使用的中央库
     */
    repositories {
        jcenter()
    }
    dependencies {
        classpath 'com.android.tools.build:gradle:2.3.2'

        // NOTE: Do not place your application dependencies here; they belong
        // in the individual module build.gradle files
    }
}

allprojects {
    repositories {
        jcenter()
    }
}
预定义仓库
repositories {
       mavenCentral()
       jcenter()
       mavenLocal()
   }
增加远程仓库
maven { url "https://jitpack.io" }
增加私有仓库,需要用户名和密码
maven {
           url "http://repo.acmecorp.com/maven2"
           credentials {
               username 'user'
               password 'secretpassword'
           }
        }
本地依赖单个jar文件
dependencies {
       compile files('libs/picasso-2.4.0.jar')
}
本地依赖多个jar文件
dependencies {
       compile fileTree(dir: 'libs', include: ['*.jar'])
}
远程依赖两种形式
dependencies {
        /**
         * 远程依赖简洁形式
         */
        compile 'com.android.support:appcompat-v7:25.3.1'
        /**
         * 远程依赖完全形式
         */
        compile group:"com.google.code.gson", name:"gson", version:"2.3"
}
依赖library项目
dependencies {
        /**
         * 依赖项目
         */
        compile project(':library')
}
构建变体
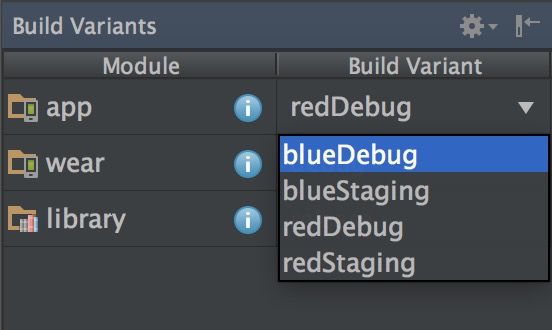
image.png
一、构建遵循如下规则
- Build types
- Product flavors
- Build variants
- Signing configurations
二、新增Source sets
创建了新的source set。默认情况下,该文件夹不会自动为你创建,所有你需要手工创建。比如增加了staging的文件夹。
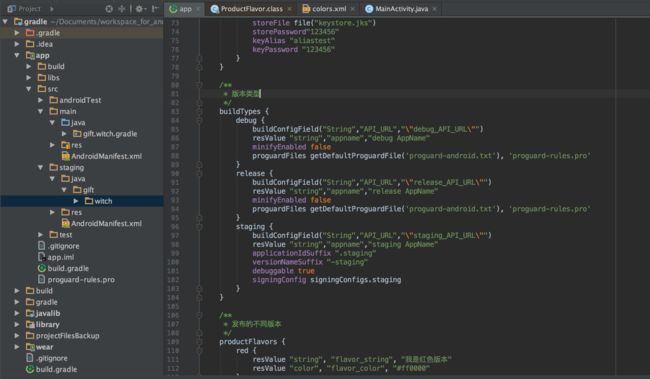
image.png
三、新增依赖包
- 对于每一个BuildType,都可以在dependencies容器中添加名为BuildTypeNameCompile的依赖配置
- 对于每一个ProductFlavor,都可以在dependencies容器中添加名为ProductFlavorNameCompile的依赖配置
    dependencies {
        stagingCompile 'junit:junit:4.12'
        redCompile 'junit:junit:4.12'
    }
四、资源文件和manifest的合并
在打包app之前,Android插件会合并main中的代码和构建的代码。当然,依赖项目也可以提供额外的资源,它们也会被合并。你可能需要额外的Android权限针对debug变体。举个例子,你不想在main中申明这个权限,因为这可能导致一些问题,所以你可以添加一个额外的mainfest文件在debug的文件夹中,申明额外的权限。
资源和mainfests的优先级是这样的:

gradle42
如果一个资源在main中和在flavor中定义了,那么那个在flavor中的资源有更高的优先级。这样那个在flavor文件夹中的资源将会被打包到apk。而在依赖项目申明的资源总是拥有最低优先级。
其他知识点
一、默认执行task
defaultTasks 'clean'
使用运行时./gradlew 就直接调用task clean
二、对apk进行重命名
    /**
     * 对输出的apk进行重命名
     */
    android.applicationVariants.all { variant ->
        variant.outputs.each { output ->
            def file = output.outputFile
            output.outputFile = new File(file.parent,file.name.replace(".apk","-${variant.versionName}.apk"))

        }
    }
三、过滤
    /**
     * 过滤
     */
    android.variantFilter { variant ->
        if(variant.buildType.name.equals('release')) {
            variant.setIgnore(true);
            variant.getFlavors().each() { flavor ->
                if (flavor.name.equals('blue')) {
                }
            }
        }
    }
参考资料
Gradle for Android 系列
Gradle之构建变体(BuildVariant)
Android Plugin DSL Reference