通知中心传值
网络基础相关
网络数据请求
通知中心传值
通知中心:(NSNotificationCenter):
使用了操作系统的功能,通过NSNotificationCenter可以让对象之间进行通讯,这些对象相互间可以不认识。当你用一个并行的流来推送通知,或者刷新数据库,并希望在界面中能够看到时,这非常有用。通知中心和协议代理等传值有什么区别?
如果我们现在好几个界面又要传递同一个值,也就是说我们当前这个界面都要得到另一个界面给它传值,用代理的话那么我们是不是要把那些界面都要实现本界面的协议?才能获取到值?这是效率非常低下的一种做法,要实现数据一对多的情况下,通知中心是一个好的解决方案。

图中黄色的线代表addObserver也就是添加观察者,当数据发生改变的时候通过紫色的线也就是postNotification发送通知,当我们的通知中心发送了通知的时候,所有的addObserver都能接收到通知。
- 步骤:
- 注册通知
 [[NSNotificationCenter defaultCenter] addObserver:self selector:@selector(myText:) name:@"myTest" object:nil];```
2. 发送通知
[[NSNotificationCenter defaultCenter] postNotificationName:@"myText" object:array];```
- 回到具体项目中
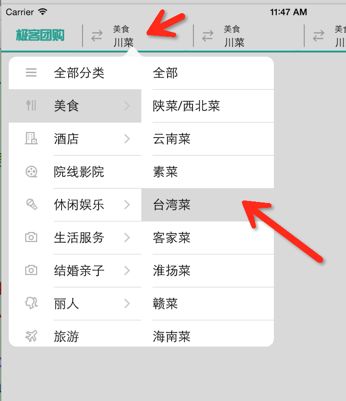
如图,我们在下拉菜单中选择了台湾菜,那么上方的item中就要显示台湾菜,同时我们的下拉菜单也要收起,然后呢我们的主界面还要显示数据。UI变化:
- 收起下拉菜单
- 改变item中值
- 刷新首页数据
- 实现思路:
1:点击商品分类发出通知
2:主界面接收到通知
3:主界面根据接收到的通知发出网络请求
1:点击商品分类发出通知:
之前我们封装了一套下拉菜单,封装的时候我们只写了数据源的方法,现在我们想要发出通知肯定是在TableView的DidSelected方法中来写,那么我们就需要再写一个tableView的代理方法,用来处理点击事件,但是我们封装的下拉二级菜单有两个TableView,我们就需要两个代理方法分别是左侧TableView的点击代理方法,右侧的TableView的点击代理方法
- popView代理方法
@protocol MyPopViewDelegate

// 点击左侧TableView的代理方法
- (void)tableView:(popView *)popView didSelectRowAtLeftTable:(NSInteger)row;
// 点击右侧TableView的代理方法
- (void)tableView:(popView *)popView didSelectRowAtRightTable:(NSInteger)row;

@end```

- 声明代理指针
@property (nonatomic, assign) id
- 实现代理方法
/**
 *  TableView DidSelected Delegate
 *
 *  @param tableView 当前TableView
 *  @param indexPath 当前行
 */
- (void)tableView:(UITableView *)tableView didSelectRowAtIndexPath:(NSIndexPath *)indexPath
{
    if (tableView == _leftTVC) {
        self.selectRow = indexPath.row; // 记录选中的行号
        [_rightTVC reloadData];

        // 左侧TableView的代理方法
        if ([self.delegate respondsToSelector:@selector(tableView:didSelectRowAtLeftTable:)]) {
            [self.delegate tableView:self didSelectRowAtLeftTable:indexPath.row];
        }
    }else
    {
        // 右侧TableView的代理方法
        if ([self.delegate respondsToSelector:@selector(tableView:didSelectRowAtRightTable:)]) {
            [self.delegate tableView:self didSelectRowAtRightTable:indexPath.row];
        }
    }
}```

- 遵守代理
@interface PopViewController ()
- 设置代理
popView *pop = [popView makePopView];
    pop.dataSource = self;
    pop.delegate = self;
    [self.view addSubview:pop];```

- 实现代理方法并发送通知信息
pragma mark - popView Delegate
(void)tableView:(popView *)popView didSelectRowAtLeftTable:(NSInteger)row
{
self.selectModel = _categotyArray[row];
if (!_selectModel.subcategories.count) {
// 发送通知
[[NSNotificationCenter defaultCenter] postNotificationName:@"categoryDidChanged" object:nil userInfo:@{@"categoryModel":_selectModel}];
}
}(void)tableView:(popView *)popView didSelectRowAtRightTable:(NSInteger)row
{
// 发送右侧通知
[[NSNotificationCenter defaultCenter] postNotificationName:@"subCategoriesName" object:nil userInfo:@{@"subCategoryName":_selectModel.subcategories[row]}];
}```首页接收通知并绑定方法
// 注册左边TableView通知
    [[NSNotificationCenter defaultCenter] addObserver:self selector:@selector(categoryDidChanged:) name:@"categoryDidChanged" object:nil];
    // 注册右边TableView通知
    [[NSNotificationCenter defaultCenter] addObserver:self selector:@selector(subcategotiesNameDidChanged:) name:@"subCategoriesName" object:nil];```

- 实现接收通知调用的方法
pragma mark - 类目发生改变的方法
- (void)categoryDidChanged:(NSNotification *)info{
CategoriyModel *md = info.userInfo[@"categoryModel"];
NSLog(@"%@", md.name);
}
pragma mark - 子类目发生变化的方法
(void)subcategotiesNameDidChanged:(NSNotification *)info{
NSString *subCategoriesName = info.userInfo[@"subCategoryName"];
NSLog(@"%@", subCategoriesName);
}```类目的两个通知写好了之后我们还要设置城市,城市的通知等同于类目的写法
/**
 *  用户选择城市
 *
 *  @param tableView tableView
 *  @param indexPath 当前行
 */
- (void)tableView:(UITableView *)tableView didSelectRowAtIndexPath:(NSIndexPath *)indexPath
{
    CityModel *model = _dataArray[indexPath.section];
    // 发送选择城市的通知
    [[NSNotificationCenter defaultCenter] postNotificationName:@"cityDidChanged" object:nil userInfo:@{@"cityName":model.cities[indexPath.row]}];
    // 让选择城市的控制器消失
    [self dismissViewControllerAnimated:YES completion:nil];
}```

- 主页面注册并接收城市改变的通知
// 选择城市的通知接收
[[NSNotificationCenter defaultCenter] addObserver:self selector:@selector(cityDidChanged:) name:@"cityDidChanged" object:nil];
pragma mark - 城市发生改变的方法
-
(void)cityDidChanged:(NSNotification *)info{
_selectedCityName = info.userInfo[@"cityName"];
NSLog(@"选择的城市%@", _selectedCityName);[self createRequest];
}``` 移除通知
#pragma mark - 移除通知
- (void)dealloc
{
[[NSNotificationCenter defaultCenter] removeObserver:self];
}```
- 至此,我们已经实现了点击下拉菜单向首页发送通知消息的功能,接下来我们来处理首页收到通知后进行网络数据请求的功能
- 网络基础相关
iOS开发网络请求我们可以理解为调用后台给我们的接口,通过接口我们可以进行数据的请求和发送
1:同步POST/GET请求
2:异步POST/GET请求
- 同步请求和异步请求的区别:
异步请求需要开辟新的线程,而同步请求都是在主线程中进行的
- iOS网络请求的类
1:NSURLConnection
2:ASIHTTPRequest
3:AFNetWorking
- 请求步骤
1:设置请求路径
2:创建请求对象
3:设置请求体(POST)
4:发送请求
- 我们这里使用大众点评的官网API来请求数据
步骤:
1:导入API

2: 遵循API代理
@interface FirstViewCollectionViewController ()
3:创建网络请求并设置其参数,参数为我们左右下拉菜单通知传递过来的值
#pragma mark - 网络请求
- (void)createRequest
{
    DPAPI *api = [[DPAPI alloc] init];
    NSMutableDictionary *params = [[NSMutableDictionary alloc] init];
    [params setValue:_selectedCityName forKey:@"city"]; // 城市
    [params setValue:_selectedCategory forKey:@"category"]; // 选择的类目
    [api requestWithURL:@"v1/deal/find_deals" params:params delegate:self];
}```

4:实现网络请求完毕之后的代理方法,即接收值,同时实现请求错误的方法
- (void)request:(DPRequest *)request didFinishLoadingWithResult:(id)result
{
NSLog(@"请求成功返回的数据%@", result);
} - (void)request:(DPRequest *)request didFailWithError:(NSError *)error
{
NSLog(@"%@", error);
}
- 运行结果:我们发现数据已经请求成功!

- 总结
1:通知中心的使用
2:网络数据请求