环境搭建
1.根据自己使用的操作系统,去ActiveMQ官网下载ActiveMQ。本文使用的是Windows,下载zip压缩包即可。
2.解压。解压下载后的压缩包,解压后的目录结构如图1所示。
图1中,各目录功能说明如下。
bin:存放ActiveMQ运行相关脚本。
conf:存放ActiveMQ配置文件。
data:存放ActiveMQ运行时数据,比如日志。
docs:存放ActiveMQ入门指导文档。
examples:存放基于各消息传递协议,使用ActiveMQ实现消息传递的demos。
lib:存放ActiveMQ相关jar包。
其余目录及文件见名知意,此处不赘述。
3.启动ActiveMQ Broker。运行bin下的activemq脚本即可。
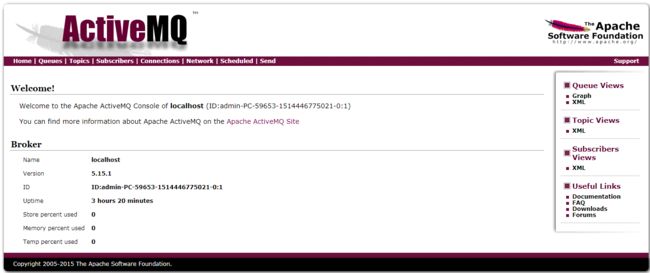
4.访问ActiveMQ Web UI界面。本文是 http://localhost:8161,默认username和password都是admin。登录后,UI界面如图2所示。
写代码
ActiveMQ客户端支持多种语言,本文基于Java实现。其实网上有一大堆代码可参考,然而其中有太多的样板式代码(boilerplate code),这是我最讨厌的。
1.新建maven project,pom中加入以下依赖。
            org.apache.activemq
            activemq-client
            5.15.1


            org.slf4j
            slf4j-log4j12
            1.7.25
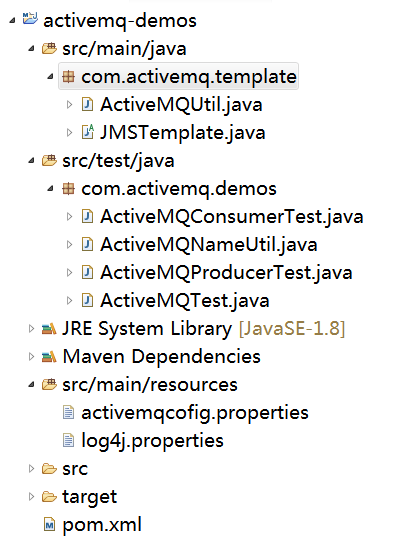
本文最终的项目结构如图3所示。
2.写模板代码,将JMS操作的样板式代码抽象到JMSTemplate中。
package com.activemq.template;

import javax.jms.Connection;
import javax.jms.ConnectionFactory;
import javax.jms.JMSException;
import javax.jms.Session;

public abstract class JMSTemplate {
    private ConnectionFactory connectionFactory;

    public JMSTemplate(ConnectionFactory connectionFactory) {
        this.connectionFactory = connectionFactory;
    }

    public ConnectionFactory getConnectionFactory() {
        return this.connectionFactory;
    }

    /**
     * To personalize your task based on JMS, Such as producing a message to the
     * broker or cunsuming a message from the broker.
     *
     * @param session
     *            javax.jms.Session object
     * @return
     */
    public abstract void doTask(Session session) throws JMSException;

    /**
     * Idicates whether the client is a message consumer.
     *
     * @return ture if the client is a message consumer, false oherwise.
     */
    public abstract boolean isConsumer();

    /**
     * Starts the task based on JMS.
     */
    public final void startTask() throws JMSException {
        Connection connection = null;
        Session session = null;
        try {
            connection = connectionFactory.createConnection();
            connection.start();
            session = connection.createSession(false, Session.AUTO_ACKNOWLEDGE);
            doTask(session);
        } finally {
            if (!isConsumer()) {
                releaseConnection(connection, session);
            }
        }
    }

    public void releaseConnection(Connection connection, Session session) throws JMSException {
        if (null != session) {
            session.close();
        }
        if (null != connection) {
            connection.close();
        }
    }
}
3.再把获取ActiveMQConnectionFactory的代码抽象到ActiveMQUtil中。
package com.activemq.template;

import java.io.IOException;
import java.io.InputStream;
import java.util.Properties;

import org.apache.activemq.ActiveMQConnectionFactory;
import org.slf4j.Logger;
import org.slf4j.LoggerFactory;

public class ActiveMQUtil {
    private static final Logger logger = LoggerFactory.getLogger(ActiveMQUtil.class);

    public static ActiveMQConnectionFactory getActiveMQConnectionFactory() throws IOException {
        // load the ActiveMQ configerations
        Properties props = new Properties();
        try (InputStream inStream = ActiveMQUtil.class.getClassLoader()
                .getResourceAsStream("activemqcofig.properties");) {
            logger.debug("load the ActiveMQ config file:activemqcofig.properties");
            props.load(inStream);

            String brokerURL = props.getProperty("activemq.url");
            if (null == brokerURL || 0 == brokerURL.length()) {
                brokerURL = ActiveMQConnectionFactory.DEFAULT_BROKER_URL;
            }
            String username = props.getProperty("activemq.username");
            if (null == username || 0 == username.length()) {
                username = ActiveMQConnectionFactory.DEFAULT_USER;
            }
            String password = props.getProperty("activemq.password");
            if (null == password || 0 == password.length()) {
                password = ActiveMQConnectionFactory.DEFAULT_PASSWORD;
            }
            return new ActiveMQConnectionFactory(username, password, brokerURL);
        }
    }
}
在ActiveMQUtil中,会去加载src/main/resources下的activemqcofig.properties配置信息来获取ActiveMQ连接工厂,该文件目前就三行,含义名副其实。
activemq.url=
activemq.username=
activemq.password=
3.demo实现。
(1)消息生产者
package com.activemq.demos;

import javax.jms.ConnectionFactory;
import javax.jms.DeliveryMode;
import javax.jms.Destination;
import javax.jms.JMSException;
import javax.jms.MessageProducer;
import javax.jms.Session;
import javax.jms.TextMessage;

import com.activemq.template.JMSTemplate;

public class ActiveMQProducerTest extends JMSTemplate {

    public ActiveMQProducerTest(ConnectionFactory connectionFactory) {
        super(connectionFactory);
    }

    @Override
    public void doTask(Session session) throws JMSException {
        Destination destination = session.createQueue(ActiveMQNameUtil.TEST_QUEUE);
        MessageProducer producer = session.createProducer(destination);
        producer.setDeliveryMode(DeliveryMode.NON_PERSISTENT);
        TextMessage message = session.createTextMessage("Hello,JMS and ActiveMQ");
        producer.send(message);
    }

    @Override
    public boolean isConsumer() {
        return false;
    }
}
(2)消息消费者
package com.activemq.demos;

import javax.jms.ConnectionFactory;
import javax.jms.Destination;
import javax.jms.JMSException;
import javax.jms.Message;
import javax.jms.MessageConsumer;
import javax.jms.MessageListener;
import javax.jms.Session;
import javax.jms.TextMessage;

import org.slf4j.Logger;
import org.slf4j.LoggerFactory;

import com.activemq.template.JMSTemplate;

public class ActiveMQConsumerTest extends JMSTemplate implements MessageListener {
    private Logger logger = LoggerFactory.getLogger(ActiveMQConsumerTest.class);

    public ActiveMQConsumerTest(ConnectionFactory connectionFactory) {
        super(connectionFactory);
    }

    @Override
    public void doTask(Session session) throws JMSException {
        Destination destination = session.createQueue(ActiveMQNameUtil.TEST_QUEUE);
        MessageConsumer consumer = session.createConsumer(destination);
        consumer.setMessageListener(this);
    }

    @Override
    public void onMessage(Message message) {
        TextMessage textMessage = (TextMessage) message;
        try {
            System.out.println("received msg:" + textMessage.getText());
        } catch (JMSException e) {
            logger.error(e.getMessage(), e);
        }
    }

    @Override
    public boolean isConsumer() {
        return true;
    }
}
消息生产者和消费者中使用的消息队列信息放在这里。
package com.activemq.demos;

public class ActiveMQNameUtil {
    public static final String TEST_QUEUE = "testQueue";

    public static final String TEST_TOPIC = "testTopic";
}
(3)运行demo
package com.activemq.demos;

import java.io.IOException;

import javax.jms.JMSException;

import org.apache.activemq.ActiveMQConnectionFactory;
import org.slf4j.Logger;
import org.slf4j.LoggerFactory;

import com.activemq.template.ActiveMQUtil;
import com.activemq.template.JMSTemplate;

public class ActiveMQTest {
    private static final Logger logger = LoggerFactory.getLogger(ActiveMQTest.class);

    public static void main(String[] args) {
        try {
            ActiveMQConnectionFactory activeMQConnectionFactory = ActiveMQUtil.getActiveMQConnectionFactory();

            JMSTemplate consumer = new ActiveMQConsumerTest(activeMQConnectionFactory);
            consumer.startTask();

            JMSTemplate producer = new ActiveMQProducerTest(activeMQConnectionFactory);
            producer.startTask();
        } catch (IOException e) {
            logger.error(e.getMessage(), e);
        } catch (JMSException e) {
            logger.error(e.getMessage(), e);
        }
    }
}
顺利的话,到此应该可以正常发送和接收消息了。
需要注意的是,本文的ActiveMQ消费者会一直监听消息队列,自己不会主动释放连接(面向生产环境),所以需要释放consumer连接时手动kill掉进程即可。
最后,懒得copy代码的请微信我!


