程序目标
程序最后会生成如下的界面
程序整体结构图
模型层
模型层需要:一个单条信息定义的类;由于最终显示的是一个列表,所以需要一个ArrayList对象;另外需要一个生成固定列表数据的类。
Crime对象
根据最终显示的内容,Crime需要一个title数据、一个列表每个条目的data数据、一个表示复选框是否选中的标志数据。再加上一个后台可能唯一确定id数据。具体代码如下:
public class Crime {
      private UUID mId;
      private String mTitle;
      private Date mDate;
      private boolean mSolved;

      public Date getDate() {
            return mDate;
      }

      public void setDate(Date date) {
            mDate = date;
      }

      public boolean isSolved() {
            return mSolved;
      }

      public void setSolved(boolean solved) {
            mSolved = solved;
      }

      public Crime() {
            mId = UUID.randomUUID();
            mDate = new Date();
      }

      public UUID getId() {
            return mId;
      }

      public String getTitle() {
            return mTitle;
      }

      public void setTitle(String title) {
            mTitle = title;
      }

      @Override
      public String toString() {
            return mTitle;
      }
}
生成Crime列表数据的CrimeLab类
- 首先,需要保证存放数据的列表在内存的生命周期和应用在内存的生命周期一致。这样需要将数据存储在特殊的java类中,叫单例,也就是一个类只能有一个实例。
- 单例需要使用一个私有的get方法。如果有实例存在,则返回此实例;如果没有则新生成一个实例。
- get方法需要带一个android.content.Context类型的参数。使用此参数,单例可以完成启动activity、获取项目资源,查找应用的私有存储空间等任务。
- Context对象可能是任何对象,为了保证CrimeLab要用到Context时,Context一定存在,则调用getApplicationContext()。这个Context是应用全局的Context,只要应用存在此Context就存在。
- 使用一个ArrayList
对象保存Crime列表,并提供返回Crime列表的方法;还提供一个根据ID返回单个Crime对象的方法。 - 在构造函数中,增加构造初始Cime列表数据的内容
public class CrimeLab {
      private ArrayList mCrimes;
      private static CrimeLab sCrimeLab;
      private Context mAppContext;

      public CrimeLab(Context appContext) {
            mAppContext = appContext;
            mCrimes = new ArrayList();

            for (int i = 0; i < 100; i++) {
                  Crime c = new Crime();
                  c.setTitle("Crime #" + i);
                  c.setSolved(i % 2 == 0);
                  mCrimes.add(c);
            }
      }

      public static CrimeLab get(Context c) {
            if (sCrimeLab == null) {
                  sCrimeLab = new CrimeLab(c.getApplicationContext());
            }
            return sCrimeLab;
      }

      public ArrayList getCrimes() {
            return mCrimes;
      }

      public Crime getCrime(UUID id) {
            for (Crime c : mCrimes) {
                  if (c.getId().equals(id)) {
                        return c;
                  }
            }
            return null;
      }
}
视图层+控制层
概述
- 视图层和控制层一起介绍,主要是因为这两者之间需要配合在一起,所以根据功能来垂直介绍更加合适
- 此次界面实现是由一个虚的Activity包含具体实现的Fragment,来实现最终的界面呈现
抽象的Activity基类
- Layout布局文件就是一个空文件,关键点是:
- 使用FrameLayout标签
- 包含一个id以供activity使用
Layout文件内容如下:
- 新建一个虚的Activity基类,继承自Activity。主要作用是将Fragment对象装载进Activity界面。关键代码如下:
- 生成一个FragmentManager对象,并通过Activity Layout中定义的id,将Fragment管理器和具体的Activity联系上。
FragmentManager fm = getFragmentManager();
Fragment fragment = fm.findFragmentById(R.id.fragmentContainer);
- 调用FragmentManager的beginTransaction()函数,返回一个FragmentTransaction实例。并通过其add方法,将Activity Layout中定义的id 和 具体的fragment对象关联起来。
fragment = createFragment();
fm.beginTransaction().add(R.id.fragmentContainer, fragment).commit();
- 定义一个abstract的方法,通过继承复写,使得可以创建具体要使用的fragment对象。
protected abstract Fragment createFragment();
SingleFragmentActivity类的全部代码如下:
public abstract class SingleFragmentActivity extends Activity {
      protected abstract Fragment createFragment();

      @Override
      public void onCreate(Bundle savedInstanceState) {
            super.onCreate(savedInstanceState);
            setContentView(R.layout.activity_fragment);

            FragmentManager fm = getFragmentManager();
            Fragment fragment = fm.findFragmentById(R.id.fragmentContainer);

            if (fragment == null) {
                  fragment = createFragment();
                  fm.beginTransaction().add(R.id.fragmentContainer, fragment).commit();
            }
      }
}
CrimeList显示界面的实现
- 创建一个继承自抽象的SingleFragmentActivity类的Activity类。目的是复写createFragment函数,创建一个实现CrimeList的fragment对象。
public class CrimeListActivity extends SingleFragmentActivity {
      protected Fragment createFragment() {
            return new CrimeListFragment();
      }
}
- 创建fragment的layout文件
-
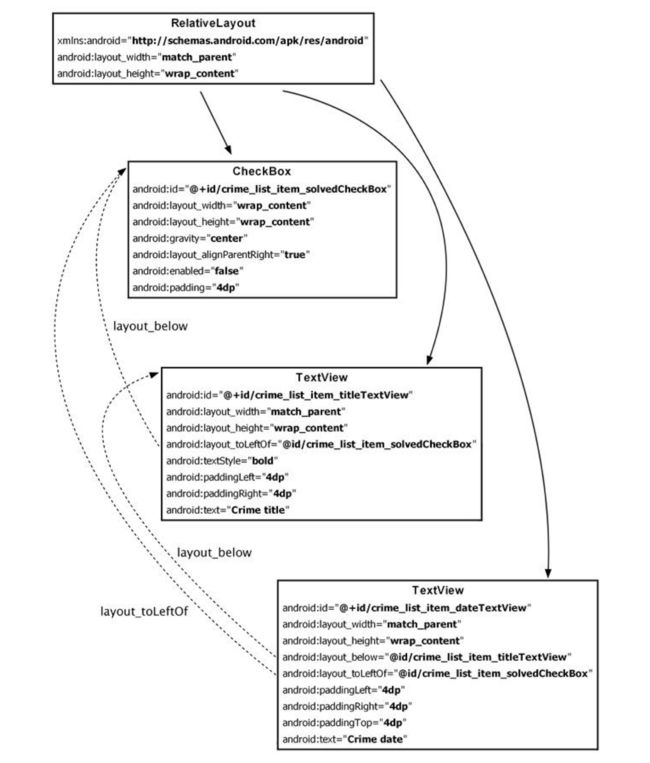
结构如下图
- 回顾文章最初的我们想要实现的界面原型,会发现每一行条目由:1个在上面的title文字、1个在下面的时间文字、以及平行于两个文字的checkbox组成。所以,可以看到使用了两个TextView和一个CheckBox。
- 所有的组件位于RelativeLayout标签中。
- 定义位置关系的关键属性是:android:layout_toLeftOf、android:layout_below。这些属性的值是对应组件的id。
- 由于每一行都有一个CheckBox,所以默认情况下,点击屏幕中的那一行,实际上点击的是CheckBox。当然要实现勾选和去勾选,需要相关代码。
但是如果想要将焦点不聚焦在CheckBox,而是选中一行,则需要在CheckBox标签内,将*android:focusable设置为false。
layout文件内容如下:
-
- 创建Fragment的控制类(CrimeListFragment),实现CrimeList界面最终显示
- CrimeListFragment类继承自ListFragment
- 在onCreate函数中使用到了getActivity()方法。此方法返回托管此fragment对象的Activity对象。
getActivity().setTitle(R.string.crimes_title);
mCrimes = CrimeLab.get(getActivity()).getCrimes();
- ArrayAdapter
类 。我们生成的Crime数据有100条,但是手机屏幕只能显示其中很小一部分。这时需要通过通过一个控制器来获取数据,以提供给界面List使用,这个就是ArrayAdapter。 - adpter负责:
- 创建必要的视图对象
- 用模型层数据填充视图对象
- 将准备好的视图对象返回给ListView
- 新建一个CrimeAdapter的内部类,继承自ArrayAdapter
。构造函数传入两个关键参数:界面Activity对象、需要填充进界面的数据对象
public class CrimeAdapter extends ArrayAdapter {
      public CrimeAdapter(ArrayList crimes) {
            super(getActivity(), 0, crimes);
      }
}
- 需要通过覆写getView方法来实现具体的内容。
通过getActivity().getLayoutInflater().inflate()关联到具体的layout文件,并得到一个Context对象。使用此对象,可以获得具体的界面对象(例如:TextView),以最终操作界面对象。
通过getItem(position)来获取单个Crime对象,以获取实际数据用于设置界面对象对应的数据。
@Overridepublic View getView(int position, View convertView, ViewGroup parent) {
      // If we weren't given a view, inflate one
      if (convertView == null) {
            convertView = getActivity().getLayoutInflater().inflate(R.layout.list_item_crime, null);
      }

      // configure the view of this Crime
      Crime c = getItem(position);

      TextView titleTextView = (TextView)convertView.findViewById(R.id.crime_list_item_titleTextView);
      titleTextView.setText(c.getTitle());

      TextView dateTextView = (TextView)convertView.findViewById(R.id.crime_list_item_dateTextView);
      dateTextView.setText(c.getDate().toString());

      CheckBox solvedCheckBox = (CheckBox) convertView.findViewById(R.id.crime_list_item_solvedCheckBox);
      solvedCheckBox.setChecked(c.isSolved());

      return convertView;
}
- 在onCreate函数中初始化CrimeAdapter对象,并通过setListAdapter方法来指定使用的ArrayAdapter
类。
CrimeAdapter adapter = new CrimeAdapter(mCrimes);
setListAdapter(adapter);
- 案例代码中,覆写了onListItemClick函数。内容是点击界面某行,则获取其对应的单个Crime对象,并在日志打印点击的哪个对象。如果仅仅是显示文章开始时的界面,且支持滑动查看所有内容,此函数不是必须的。
CrimeListFragment类所有代码如下:
public class CrimeListFragment extends ListFragment {
      private ArrayList mCrimes;
      private static final String TAG = "CrimeListFragment";

      @Override
      public void onCreate(Bundle savedInstanceState) {
            super.onCreate(savedInstanceState);
            getActivity().setTitle(R.string.crimes_title);
            mCrimes = CrimeLab.get(getActivity()).getCrimes();

            CrimeAdapter adapter = new CrimeAdapter(mCrimes);
            setListAdapter(adapter);
      }

      @Override
      public void onListItemClick(ListView a, View v, int position, long id) {
            Crime c = ((CrimeAdapter)getListAdapter()).getItem(position);
            Log.d(TAG, c.getTitle() + " was clicked");
      }

      public class CrimeAdapter extends ArrayAdapter {
            public CrimeAdapter(ArrayList crimes) {
                  super(getActivity(), 0, crimes);
            }

            @Override
            public View getView(int position, View convertView, ViewGroup parent) {
                  // If we weren't given a view, inflate one
                  if (convertView == null) {
                        convertView = getActivity().getLayoutInflater().inflate(R.layout.list_item_crime, null);
                  }

                  // configure the view of this Crime
                  Crime c = getItem(position);

                  TextView titleTextView = (TextView)convertView.findViewById(R.id.crime_list_item_titleTextView);
                  titleTextView.setText(c.getTitle());

                  TextView dateTextView = (TextView)convertView.findViewById(R.id.crime_list_item_dateTextView);
                  dateTextView.setText(c.getDate().toString());

                  CheckBox solvedCheckBox = (CheckBox) convertView.findViewById(R.id.crime_list_item_solvedCheckBox);
                  solvedCheckBox.setChecked(c.isSolved());

                  return convertView;
            }
      }
}
启动代码就可以看到文章开头时显示的内容了


