一、TouchAction类
1. 介绍
TouchAction类主要用于模拟手势操作,如点击、短按、长按、移动操作。
导入模块:from appium.webdriver.common.touch_action import TouchAction
- TouchAction(driver):获取的是TouchAction对象
2. TouchAction对象的操作方法
2.1. 动作的结束和执行
release()和perform()方法一般跟添加的动作后面。
- release()
通过将指针离开屏幕(释放指针)来结束动作 - perform()
通过向服务器发送命令来执行动作
2.2. 执行的动作
2.2.1. 模拟手势触摸元素或坐标点
- tap(element=None, x=None, y=None, count=1)
element:触摸的元素,默认为空;
x/y:触摸的屏幕坐标点,默认为空;
若触摸的是元素,则仅需传参数给element即可;若触摸的是坐标点,则需传参数给x和y。
# 点击元素
pictureEle = driver.find_element_by_xpath("//*[@content-desc='相册']")
TouchAction(driver).tap(pictureEle).perform().release()
# 点击坐标点
TouchAction(driver).tap(x=139, y=576).perform().release()
2.2.2. 模拟手势短按元素或坐标点
- press(el=None, x=None, y=None)
el:操作的元素,默认为空;
x/y:短按的屏幕坐标点,默认为空;
若短按的是元素,则仅需传参数给el即可;若短按的是坐标点,则需传参数给x和y。
# 模拟短按元素
pictureEle = driver.find_element_by_xpath("//*[@content-desc='相册']")
TouchAction(driver).press(pictureEle).release().perform()
# 模拟短按坐标点
TouchAction(driver).press(x=200, y=1000).release().perform()
2.2.3. 模拟手势长按元素或坐标点,持续duration时间
- long_press(el=None, x=None, y=None, duration=1000)
el:操作的元素,默认为空;
x/y:操作的屏幕坐标点,默认为空;
duration:长按动作持续的时间,单位为ms,默认为1000ms。
若长按的是元素,则仅需传参数给el即可;若长按的是坐标点,则需传参数给x和y。
# 长按元素
pictureEle = driver.find_element_by_xpath("//*[@content-desc='相册']")
TouchAction(driver).long_press(pictureEle).perform().release()
# 长按坐标点
TouchAction(driver).long_press(x=139, y=576).perform().release()
2.2.4. 模拟动作后的等待的时间
- wait(ms=0)
ms:等待的时间,单位ms,默认为0
通常是与模拟的动作配合使用,但也可单独作为等待动作。
TouchAction(driver).wait(1000)
2.2.5. 模拟从一个点移动到指定元素或指定点
- move_to(el=None, x=None, y=None)
el:移动到的元素,默认为空;
x/y:移动到的屏幕坐标点,默认为空;
若移动到的目标为元素,则仅需传参数给el即可;若移动到的目标为坐标点,则需传参数给x和y。
# 长按“相册”元素移动到“音乐”元素位置后释放
pictureEle = driver.find_element_by_xpath("//*[@content-desc='相册']")
musicEle = driver.find_element_by_xpath("//*[@content-desc='音乐']")
TouchAction(driver).long_press(pictureEle).move_to(musicEle).release().perform()
3. 实例:解锁九宫格
# coding: utf-8
from appium.webdriver.common.touch_action import TouchAction
from appium import webdriver

class UnlockPassword:
    """解锁屏幕密码"""

    def __init__(self, driver, lock_pattern_ele):
        """
        :param driver: 设备
        :param lock_pattern_ele: 锁屏区域元素(即九宫格元素)
        """
        self.driver = driver
        self.lock_pattern = lock_pattern_ele

    def get_nine_palace(self):
        """获取九宫格中每个点的坐标,以列表的形式返回"""
        # 获取九宫格的位置
        nine_place_areas = self.lock_pattern.rect
        areas_start_x = nine_place_areas['x']
        areas_start_y = nine_place_areas['y']
        areas_height = nine_place_areas['height']
        areas_width = nine_place_areas['width']
        # 获取九宫格中每个坐标点的位置:从左到右从上到下的顺序
        points = {
            "point1": (None, areas_start_x + areas_width / 6, areas_start_y + areas_height / 6),
            "point2": (None, areas_start_x + areas_width / 6 * 3, areas_start_y + areas_height / 6),
            "point3": (None, areas_start_x + areas_width / 6 * 5, areas_start_y + areas_height / 6),
            "point4": (None, areas_start_x + areas_width / 6, areas_start_y + areas_height / 6 * 3),
            "point5": (None, areas_start_x + areas_width / 6 * 3, areas_start_y + areas_height / 6 * 3),
            "point6": (None, areas_start_x + areas_width / 6 * 5, areas_start_y + areas_height / 6 * 3),
            "point7": (None, areas_start_x + areas_width / 6, areas_start_y + areas_height / 6 * 5),
            "point8": (None, areas_start_x + areas_width / 6 * 3, areas_start_y + areas_height / 6 * 5),
            "point9": (None, areas_start_x + areas_width / 6 * 5, areas_start_y + areas_height / 6 * 5)
        }
        return points

    def start(self):
        """从坐标点1移动到坐标点2,再到坐标点5,再到坐标点8,再到坐标点9执行解锁操作"""
        points = self.get_nine_palace()
        TouchAction(self.driver).press(*points['point1']).wait(300)\
            .move_to(*points['point2']).wait(300)\
            .move_to(*points['point5']).wait(300)\
            .move_to(*points['point8']).wait(300)\
            .move_to(*points['point9']).wait(300)\
            .release().perform()
三、MultiTouch类
1. 介绍
MultiTouch类主要用于多点触控操作
导入模块:from appium.webdriver.common.multi_action import MultiAction
- MultiAction(driver, element=None):获取的是MultiAction对象
driver:操作的设备
element:操作的元素,默认为None
2. MultiAction对象的操作方法
2.1. 添加TouchAction对象到MultiAction对象
- add(*touch_actions)
*touch_actions:1个或多个TouchAction对象(描述一个手指要执行的一系列动作)
2.2. 执行储存在对象中的所有动作
- perform()
# 初始化MultiAction对象
MultiActionObject = MultiAction(driver)
# MultiAction对象中添加动作
touchAction1 = TouchAction(driver).press(x=100, y=200)
touchAction2 = TouchAction(driver).tap(x=100, y=300)
MultiActionObject.add(touchAction1, touchAction2)
# 执行操作
MultiActionObject.perform()
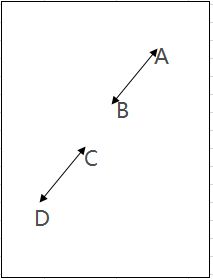
3. 实例:对界面执行放大缩小操作
界面放大:表示同时将坐标点从B移动到A,从C移动到D;
界面缩小:表示同时将坐标点从A移动到B,从D移动到C;
# 具体坐标点A、B、C、D的坐标点位置可变更,根据实际需求调整位置
class ZoomNarrow:
    def __init__(self, driver):
        self.driver = driver
        window_size = driver.get_window_size()
        width = window_size['width']
        height = window_size['height']
        """界面从上到下有4个点,依次为A、B、C、D,对应的坐标如下"""
        self.pointA = {'x': width * 0.8, 'y': height * 0.2}
        self.pointB = {'x': width * 0.6, 'y': height * 0.4}
        self.pointC = {'x': width * 0.4, 'y': height * 0.6}
        self.pointD = {'x': width * 0.2, 'y': height * 0.8}

    def zoom(self):
        """放大操作:从B到A,从C到D"""
        multi_action = MultiAction(self.driver)
        action1 = TouchAction(self.driver)
        action2 = TouchAction(self.driver)
        action1.press(x=self.pointB['x'], y=self.pointB['y']).wait(500)\
            .move_to(x=self.pointA['x'], y=self.pointA['y']).wait(500).release()
        action2.press(x=self.pointC['x'], y=self.pointC['y']).wait(500)\
            .move_to(x=self.pointD['x'], y=self.pointD['y']).wait(500).release()
        multi_action.add(action1, action2)
        multi_action.perform()

    def narrow(self):
        """缩小操作:从A到B,从D到C"""
        multi_action = MultiAction(self.driver)
        action1 = TouchAction(self.driver)
        action2 = TouchAction(self.driver)
        action1.press(x=self.pointA['x'], y=self.pointA['y']).wait(500)\
            .move_to(x=self.pointB['x'],y=self.pointB['y']).wait(500).release()
        action2.press(x=self.pointD['x'], y=self.pointD['y']).wait(500)\
            .move_to(x=self.pointC['x'],y=self.pointC['y']).wait(500).release()
        multi_action.add(action1, action2)
        multi_action.perform()
