文前说明
作为码农中的一员,需要不断的学习,我工作之余将一些分析总结和学习笔记写成博客与大家一起交流,也希望采用这种方式记录自己的学习之旅。
本文仅供学习交流使用,侵权必删。
不用于商业目的,转载请注明出处。
分析整理的版本为 Ovirt 4.2.3 版本。
1. 概念
1.1 单点登录
- 单点登录(Single Sign On)简称为 SSO,定义是在多个应用系统中,用户只需要登录一次就可以访问所有相互信任的应用系统。
- SSO 需要一个独立的认证中心,只有认证中心能接受用户的用户名密码等安全信息,其他系统不提供登录入口,只接受认证中心的间接授权。
- 间接授权通过令牌实现,SSO 认证中心验证用户的用户名密码通过,创建授权令牌,在接下来的跳转过程中,授权令牌作为参数发送给各个子系统,子系统拿到令牌,即得到了授权,可以借此创建局部会话,局部会话登录方式与单系统的登录方式相同。
- Ovirt 4.2 中将 engine 的管理员门户与虚拟机门户作为了不同的应用系统。通过 enginesso 这个独立的工程为 engine 提供单点登录的功能。将一些对登录的参数封装、拦截器(解决登录信息传递问题)等,放置到名为 aaa 的 JAR 包中引入。
1.2 CORS 定义
- Cross-Origin Resource Sharing(CORS)跨来源资源共享是一份浏览器技术的规范,提供了 Web 服务从不同域传来沙盒脚本的方法,以避开浏览器的同源策略,是 JSONP 模式的现代版。与 JSONP 不同,CORS 除了 GET 要求方法以外也支持其他的 HTTP 要求。
- CORS 的基本思想是使用自定义的 HTTP 头部允许浏览器和服务器相互了解对方,从而决定请求或响应成功与否。
- Access-Control-Allow-Origin,指定授权访问的域。
- Access-Control-Allow-Methods,授权请求的方法(GET,POST,PUT, DELETE,OPTIONS 等)。
- CORS 的基本思想是使用自定义的 HTTP 头部允许浏览器和服务器相互了解对方,从而决定请求或响应成功与否。
- Ovirt engine 使用了 org.ebaysf.web 的 cors-filter 来支持多域名配置,项目地址:https://github.com/ebay/cors-filter。
- maven 项目中可以在 pom.xml 文件中配置引入。
   org.ebaysf.web
   cors-filter
   1.0.1
2. 分析与整理
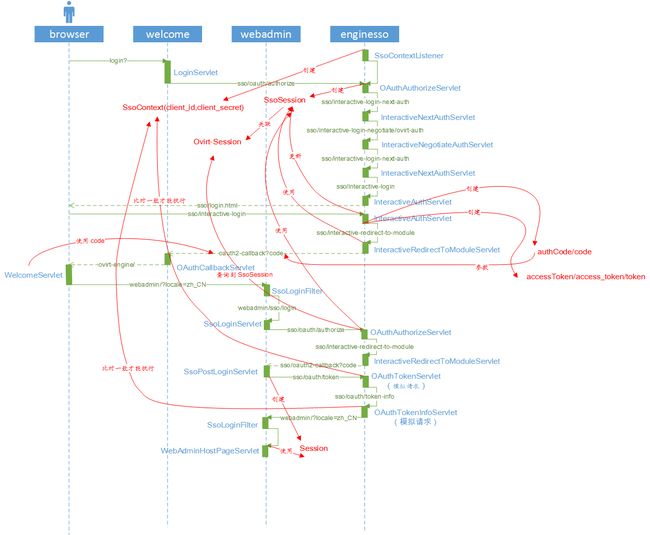
2.1 用户直接登录管理门户
| 模块 | 描述 |
|---|---|
| webadmin | 管理门户 |
| enginesso | SSO 认证中心 |
| SsoLoginFilter | 判断 SsoSession 是否存在,ovirt_aaa_engineSessionId 的值是否存在。 |
| SsoLoginServlet | 组装授权参数,client_id=ovirt-engine-core,response_type=code,app_url= |
| OAuthAuthorizeServlet | 创建 SsoSession,将上一个步骤传递的参数保存到 session 中,组装访问域栈 AuthStack。 |
| InteractiveNextAuthServlet | 访问域认证,取出栈中数据,依次认证。 |
| InteractiveNegotiateAuthServlet | 外部域认证,从数据库中查询用户是否登录等信息。 |
| InteractiveAuthServlet | 内部域认证,未登录抛出异常,转向登录 SSO 认证中心登录界。根据传递的用户名和密码,进行 SSO 认证中心登录认证,认证通过创建用户资格证书,处理资格证书,从数据库中查询用户信息,设置到 SsoSession 中,创建 Token 和 authCode,建立 Token 与 SsoSession 的映射表,将 Token 和 authCode 设置到 SsoSession 中。 |
| InteractiveRedirectToModuleServlet | 封装转向业务系统的授权请求。code= |
| SsoPostLoginServlet | 处理授权信息。通过 authCode 获取 Token。创建业务系统自身 Session。 |
| OAuthTokenServlet | SsoPostLoginServlet 中执行通过 authCode 获取 Token 的步骤。是一个模拟请求。 |
| OAuthTokenInfoServlet | SsoPostLoginServlet 中执行通过 Token 获取用户信息等(从 SsoSession 中获取)的步骤。是一个模拟请求。 |
2.1.1 用户选择管理门户
- 访问管理门户 https://rhvm.xxx-cloud.com/ovirt-engine/webadmin/?locale=zh_CN。
- engine-server-ear 项目工程中定义访问 webadmin 工程,配置文件 pom.xml 中定义。
       org.ovirt.engine.ui
       webadmin
       webadmin.war
       /ovirt-engine/webadmin
- 请求经过 SsoLoginFilter 过滤器过滤。
- webadmin 工程的 web.xml 文件中配置。
- 参数 /sso/login? 用于后续重定向 SSO 认证地址的组装。
     SsoLoginFilter
     org.ovirt.engine.core.aaa.filters.SsoLoginFilter

         login-url
         /sso/login?


......

     SsoLoginFilter
     /WebAdmin.html

......

     WebAdmin.html
- 过滤器验证到该请求的 ovirt_aaa_engineSessionId 参数无效,重定向到 SSO 认证中心。
public static final String HTTP_SESSION_ENGINE_SESSION_ID_KEY = "ovirt_aaa_engineSessionId";
......
if (!FiltersHelper.isAuthenticated(req) || !FiltersHelper.isSessionValid((HttpServletRequest) request)) {
                String url = String.format("%s%s&app_url=%s&locale=%s",
                        req.getServletContext().getContextPath(),
                        loginUrl,
                        URLEncoder.encode(requestURL.toString(), "UTF-8"),
                        request.getAttribute("locale").toString());
                log.debug("Redirecting to {}", url);
                res.sendRedirect(url);
......
public static boolean isAuthenticated(HttpServletRequest request) {
        return (request.getSession(false) != null && request.getSession(false)
                .getAttribute(SessionConstants.HTTP_SESSION_ENGINE_SESSION_ID_KEY) != null)
                || request.getAttribute(SessionConstants.HTTP_SESSION_ENGINE_SESSION_ID_KEY) != null;
}
-
最终组装的 url 是 https://rhvm.xxx-cloud.com/ovirt-engine/webadmin/sso/login?&app_url=https%3A%2F%2Frhvm.xxx-cloud.com%2Fovirt-engine%2Fwebadmin%2F%3Flocale%3Dzh_CN&locale=zh_CN
- app_url 是真正需要访问的地址。
- /sso/login? 配置文件中传递的参数。
-
重定向 SSO 认证中心,将请求交由
SsoLoginServlet处理。- 同样是在 webadmin 工程的 web.xml 中配置。
     login
     org.ovirt.engine.core.aaa.servlet.SsoLoginServlet


     login
     /sso/login
-
SsoLoginServlet主要是对认证参数进行了封装,记录了客户端 ID,IP 地址,访问范围等。
URLBuilder urlBuilder = new URLBuilder(FiltersHelper.getEngineSsoUrl(request), "/oauth/authorize")
                .addParameter("client_id", EngineLocalConfig.getInstance().getProperty("ENGINE_SSO_CLIENT_ID"))
                .addParameter("response_type", "code")
                .addParameter("app_url", request.getParameter("app_url"))
                .addParameter("engine_url", FiltersHelper.getEngineUrl(request))
                .addParameter("redirect_uri", redirectUri)
                .addParameter("scope", scope)
                .addParameter("source_addr", request.getRemoteAddr());
- 最终组装的 url 是 https://rhvm.xxx-cloud.com/ovirt-engine/sso/oauth/authorize?client_id=ovirt-engine-core&response_type=code&app_url=https%3A%2F%2Frhvm.xxx-cloud.com%2Fovirt-engine%2Fwebadmin%2F%3Flocale%3Dzh_CN&engine_url=https%3A%2F%2Frhvm.xxx-cloud.com%3A443%2Fovirt-engine&redirect_uri=https%3A%2F%2Frhvm.xxx-cloud.com%3A443%2Fovirt-engine%2Fwebadmin%2Fsso%2Foauth2-callback&scope=ovirt-app-admin+ovirt-app-portal+ovirt-ext%3Dauth%3Asequence-priority%3D%7E&source_addr=192.168.96.2
- app_url 是真正需要访问的地址。
- engine_url 为 engine 地址 https://rhvm.xxx-cloud.com/ovirt-engine/。
- redirect_uri 转向地址,web.xml 中配置。
- scope 为访问范围,ovirt-ext=auth:sequence-priority 参数从 ovirt-engine.conf 文件中读取。
- ovirt-app-admin 可以访问管理门户。
- ovirt-app-portal 可以访问虚拟机门户。
- ovirt-ext=auth:sequence-priority=~,可以访问域(外部、内部等)。
     post-action-url
     /ovirt-engine/webadmin/sso/oauth2-callback


     auth-seq-priority-property-name
     ENGINE_SSO_AUTH_SEQUENCE_webadmin
[root@rhvm ~]# cat /usr/share/ovirt-engine/services/ovirt-engine/ovirt-engine.conf | grep ENGINE_SSO_AUTH_SEQUENCE_webadmin
ENGINE_SSO_AUTH_SEQUENCE_webadmin=~
- engine-server-ear 项目工程中定义访问 enginesso 项目工程,配置文件 pom.xml 中定义。
- 上面的访问地址会将请求提交到该项目工程。
     org.ovirt.engine.core
     enginesso
     enginesso.war
     /ovirt-engine/sso
- enginesso 项目工程的 web.xml 文件中配置了
CORSSupportFilter过滤器,支持跨域请求。
    CORSSupport
    org.ovirt.engine.core.utils.servlet.CORSSupportFilter


    CORSSupport
    /sso/*
- enginesso 项目工程的 web.xml 文件中配置了
OAuthAuthorizeServlet,处理认证请求,并且创建SsoSession。- 创建访问域(内部、外部)的栈。
    OAuthAuthorizeServlet
    org.ovirt.engine.core.sso.servlets.OAuthAuthorizeServlet


    OAuthAuthorizeServlet
    /oauth/authorize
protected SsoSession buildSsoSession(HttpServletRequest request)
            throws Exception {
        String clientId = SsoUtils.getRequestParameter(request, SsoConstants.HTTP_PARAM_CLIENT_ID);
        String scope = SsoUtils.getScopeRequestParameter(request, "");
        String state = SsoUtils.getRequestParameter(request, SsoConstants.HTTP_PARAM_STATE, "");
        String appUrl = SsoUtils.getRequestParameter(request, SsoConstants.HTTP_PARAM_APP_URL, "");
        String engineUrl = SsoUtils.getRequestParameter(request, SsoConstants.HTTP_PARAM_ENGINE_URL, "");
        String redirectUri = request.getParameter(SsoConstants.HTTP_PARAM_REDIRECT_URI);
        String sourceAddr = SsoUtils.getRequestParameter(request, SsoConstants.HTTP_PARAM_SOURCE_ADDR, "UNKNOWN");
        validateClientRequest(request, clientId, scope, redirectUri);

        // Create the session
        request.getSession(true);

        SsoSession ssoSession = SsoUtils.getSsoSession(request);
        ssoSession.setAppUrl(appUrl);
        ssoSession.setClientId(clientId);
        ssoSession.setSourceAddr(sourceAddr);
        ssoSession.setRedirectUri(redirectUri);
        ssoSession.setScope(scope);
        ssoSession.setState(state);
        ssoSession.getHttpSession().setMaxInactiveInterval(-1);

        if (StringUtils.isNotEmpty(engineUrl)) {
            ssoSession.setEngineUrl(engineUrl);
        } else {
            ssoSession.setEngineUrl(SsoUtils.getSsoContext(request).getEngineUrl());
        }

        return ssoSession;
}
- 访问域的栈,默认值从配置文件中获取。
protected Stack getAuthSeq(SsoSession ssoSession) {
        String scopes = ssoSession.getScope();
        String appAuthSeq = ssoContext.getSsoLocalConfig().getProperty("SSO_AUTH_LOGIN_SEQUENCE");

        String authSeq = null;
        if (StringUtils.isEmpty(scopes) || !scopes.contains("ovirt-ext=auth:sequence-priority=")) {
            authSeq = "~";
        } else {
            for (String scope : SsoUtils.scopeAsList(scopes)) {
                if (scope.startsWith("ovirt-ext=auth:sequence-priority=")) {
                    String[] tokens = scope.trim().split("=", 3);
                    authSeq = tokens[2];
                }
            }
        }

        List authSeqList = getAuthListForSeq(authSeq);

        if (StringUtils.isNotEmpty(authSeq) && authSeq.startsWith("~")) {
            // get unique auth seq
            for (char c : appAuthSeq.toCharArray()) {
                if (!authSeqList.contains(InteractiveAuth.valueOf("" + c))) {
                    authSeqList.add(InteractiveAuth.valueOf("" + c));
                }
            }
            // intersect auth seq with sso auth seq settings
            authSeqList.retainAll(getAuthListForSeq(appAuthSeq));
        }
        Collections.reverse(authSeqList);
        Stack authSeqStack = new Stack<>();
        authSeqStack.addAll(authSeqList);
        return authSeqStack;
}

......

ssoSession.setAuthStack(getAuthSeq(ssoSession));
[root@rhvm ~]# cat /usr/share/ovirt-engine/services/ovirt-engine/ovirt-engine.conf | grep SSO_AUTH_LOGIN_SEQUENCE
SSO_AUTH_LOGIN_SEQUENCE=NI
I {
        @Override
        public String getName() {
            return "Internal";
        }

        @Override
        public String getAuthUrl(HttpServletRequest request, HttpServletResponse response) {
            log.debug("Redirecting to Internal Auth Servlet");
            return request.getContextPath() + SsoConstants.INTERACTIVE_LOGIN_URI;
        }
    },
    N {
        @Override
        public String getName() {
            return "Negotiate";
        }

        @Override
        public String getAuthUrl(HttpServletRequest request, HttpServletResponse response) {
            log.debug("Redirecting to External Auth Servlet");
            return request.getContextPath() + SsoConstants.INTERACTIVE_LOGIN_NEGOTIATE_URI;
        }
};
- 如果用户未登录过则转向一下登录地址(交互式的 interactive)。
- 最后组装的 url 地址是 https://rhvm.xxx-cloud.com/ovirt-engine/sso/interactive-login-next-auth。
public static final String INTERACTIVE_LOGIN_NEXT_AUTH_URI = "/interactive-login-next-auth";
......
ssoSession.setAuthStack(getAuthSeq(ssoSession));
            if (ssoSession.getAuthStack().isEmpty()) {
                throw new OAuthException(SsoConstants.ERR_CODE_ACCESS_DENIED,
                        ssoContext.getLocalizationUtils().localize(
                                SsoConstants.APP_ERROR_NO_VALID_AUTHENTICATION_MECHANISM_FOUND,
                                (Locale) request.getAttribute(SsoConstants.LOCALE)));
            }
            redirectUrl = request.getContextPath() + SsoConstants.INTERACTIVE_LOGIN_NEXT_AUTH_URI;
- enginesso 项目工程的 web.xml 文件中配置了
InteractiveNextAuthServlet,处理该请求。
    InteractiveNextAuthServlet
    org.ovirt.engine.core.sso.servlets.InteractiveNextAuthServlet


    InteractiveNextAuthServlet
    /interactive-login-next-auth
-
InteractiveNextAuthServlet处理访问域栈。先访问 https://rhvm.xxx-cloud.com/ovirt-engine/sso/interactive-login-negotiate/ovirt-auth。- enginesso 项目工程的 web.xml 文件中配置了
InteractiveNegotiateAuthServlet,处理该请求。
- enginesso 项目工程的 web.xml 文件中配置了
        InteractiveNegotiateAuthServlet
        org.ovirt.engine.core.sso.servlets.InteractiveNegotiateAuthServlet


        InteractiveNegotiateAuthServlet
        /interactive-login-negotiate/*
-
InteractiveNegotiateAuthServlet中进行了外部域权限的判断是否登录。- 未登录,则再次转向 https://rhvm.xxx-cloud.com/ovirt-engine/sso/interactive-login-next-auth。
protected void service(HttpServletRequest request, HttpServletResponse response)
            throws ServletException, IOException {
        switch (SsoUtils.getSsoContext(request).getNegotiateAuthUtils().doAuth(request, response).getStatus()) {
            case Authn.AuthResult.NEGOTIATION_UNAUTHORIZED:
                log.debug("External authentication failed redirecting to url: {}",
                        SsoConstants.INTERACTIVE_LOGIN_NEXT_AUTH_URI);
                response.sendRedirect(request.getContextPath() + SsoConstants.INTERACTIVE_LOGIN_NEXT_AUTH_URI);
                break;
            case Authn.AuthResult.SUCCESS:
                log.debug("External authentication succeeded redirecting to module");
                response.sendRedirect(request.getContextPath() + SsoConstants.INTERACTIVE_REDIRECT_TO_MODULE_URI);
                break;
            case Authn.AuthResult.NEGOTIATION_INCOMPLETE:
                log.debug("External authentication incomplete");
                break;
        }
}
-
InteractiveNextAuthServlet又一次处理访问域栈,将请求转向交互式的登录处理。- 最后组装的 url 地址是 https://rhvm.xxx-cloud.com/ovirt-engine/sso/interactive-login。
response.sendRedirect(authStack.pop().getAuthUrl(request, response));
public static final String INTERACTIVE_LOGIN_URI = "/interactive-login";
......
@Override
public String getAuthUrl(HttpServletRequest request, HttpServletResponse response) {
     log.debug("Redirecting to Internal Auth Servlet");
     return request.getContextPath() + SsoConstants.INTERACTIVE_LOGIN_URI;
}
- enginesso 项目工程的 web.xml 文件中配置了
InteractiveAuthServlet,处理该请求。
   InteractiveAuthServlet
   org.ovirt.engine.core.sso.servlets.InteractiveAuthServlet


   InteractiveAuthServlet
   /interactive-login
- 未登录,造成认证异常,转向登录界面。
- 最后组装的 url 地址是 https://rhvm.xxx-cloud.com/ovirt-engine/sso/login.html。
if (ssoSession == null) {
   throw new OAuthException(SsoConstants.ERR_CODE_INVALID_GRANT, ssoContext.getLocalizationUtils().localize(SsoConstants.APP_ERROR_SESSION_EXPIRED, (Locale) request.getAttribute(SsoConstants.LOCALE)));
public static final String INTERACTIVE_LOGIN_FORM_URI = "/login.html";
......
redirectUrl = request.getContextPath() + SsoConstants.INTERACTIVE_LOGIN_FORM_URI;
......
if (redirectUrl != null) {
     response.sendRedirect(redirectUrl);
}
- enginesso 项目工程的 web.xml 文件中配置了
LoginForm,处理该请求,转向单点登录界面,要求登录。
     LoginForm
     /WEB-INF/login.jsp


     LoginForm
     /login.html
2.1.2 用户登录 SSO 认证中心
- 用户输入用户名、密码进行登录。
- 登录界面 jsp 中配置了请求地址。
-
InteractiveAuthServlet对请求进行处理,请求中包含了用户名、密码等信息。- 根据填写的用户名、密码等信息,组装用户的资格证书。
private Credentials getUserCredentials(HttpServletRequest request) throws Exception {
        String username = SsoUtils.getFormParameter(request, USERNAME);
        String password = SsoUtils.getFormParameter(request, PASSWORD);
        String profile = SsoUtils.getFormParameter(request, PROFILE);
        Credentials credentials;
        // The code is invoked from the login screen as well as when the user changes password.
        // If the login form parameters are not present the code has been invoked from change password flow and
        // we extract the credentials from the credentials saved to sso session.
        if (username == null || password == null || profile == null) {
            credentials = SsoUtils.getSsoSession(request).getTempCredentials();
        } else {
            credentials = new Credentials(username, password, profile, ssoContext.getSsoProfiles().contains(profile));
        }
        return credentials;
}
- 认证用户
- 根据传递的用户名查询出用户信息,放置到
SsoSession的 authRecord 中。
- 根据传递的用户名查询出用户信息,放置到
redirectUrl = authenticateUser(request, response, userCredentials);
......
private String authenticateUser(
            HttpServletRequest request,
            HttpServletResponse response,
            Credentials userCredentials) throws ServletException, IOException, AuthenticationException {
     ......
     AuthenticationUtils.handleCredentials(ssoContext, request, userCredentials);
}
- 解析处理用户资格证书,判断用户有效性,如果通过验证,则生成
SsoSession。
SsoSession ssoSession = login(ssoContext, request, credentials, null, interactive);
- 认证用户名信息的过程,并且向上下文 SsoContext 中,注册 SsoSession。
- SsoSession 在前面的 OAuthAuthorizeServlet 中已经创建,这里直接获得。
- 生成 Token 并设置。
- 根据有无范围值 ovirt-ext=token:password-access,判断是否加密密码。
public static SsoSession persistAuthInfoInContextWithToken(
            HttpServletRequest request,
            String password,
            String profileName,
            ExtMap authRecord,
            ExtMap principalRecord) throws Exception {
        String validTo = authRecord.get(Authn.AuthRecord.VALID_TO);
        String authCode = generateAuthorizationToken();
        String accessToken = generateAuthorizationToken();

        SsoSession ssoSession = getSsoSession(request, true);
        ssoSession.setAccessToken(accessToken);
        ssoSession.setAuthorizationCode(authCode);

        request.setAttribute(SsoConstants.HTTP_REQ_ATTR_ACCESS_TOKEN, accessToken);

        ssoSession.setActive(true);
        ssoSession.setAuthRecord(authRecord);
        ssoSession.setAutheticatedCredentials(ssoSession.getTempCredentials());
        getSsoContext(request).registerSsoSession(ssoSession);

        ssoSession.setPrincipalRecord(principalRecord);
        ssoSession.setProfile(profileName);
        ssoSession.setStatus(SsoSession.Status.authenticated);
        ssoSession.setTempCredentials(null);
        ssoSession.setUserId(getUserId(principalRecord));
        try {
            ssoSession.setValidTo(validTo == null ?
                    Long.MAX_VALUE : new SimpleDateFormat("yyyyMMddHHmmssZ").parse(validTo).getTime());
        } catch (Exception ex) {
            log.error("Unable to parse Auth Record valid_to value: {}", ex.getMessage());
            log.debug("Exception", ex);
        }

        persistUserPassword(request, ssoSession, password);

        ssoSession.touch();
        return ssoSession;
}
- 用户验证通过,转向业务系统(管理门户)。
public static final String INTERACTIVE_REDIRECT_TO_MODULE_URI = "/interactive-redirect-to-module";
......
return request.getContextPath() + SsoConstants.INTERACTIVE_REDIRECT_TO_MODULE_URI;
......
if (redirectUrl != null) {
     response.sendRedirect(redirectUrl);
}
- enginesso 项目工程的 web.xml 文件中配置了
InteractiveRedirectToModuleServlet处理该请求。
    InteractiveRedirectToModuleServlet
    org.ovirt.engine.core.sso.servlets.InteractiveRedirectToModuleServlet


    InteractiveRedirectToModuleServlet
    /interactive-redirect-to-module
-
InteractiveRedirectToModuleServlet封装参数,转向 /sso/oauth2-callback。- 最后组装的 url 地址是 https://rhvm.xxx-cloud.com/ovirt-engine/webadmin/sso/oauth2-callback?code=ahUkHZLxb5HsBBKCSFX4AldLhqsJ8WvzJS8Sqbg7NnIaP7mq3ouxJtTKtpg07uEZlR5pmxAuwjrvLNwDUHWZ9g&app_url=https%3A%2F%2Frhvm.xxx-cloud.com%2Fovirt-engine%2Fwebadmin%2F%3Flocale%3Dzh_CN。
public static void redirectToModule(HttpServletRequest request,
                                        HttpServletResponse response)
            throws IOException {
        log.debug("Entered redirectToModule");
        try {
            SsoSession ssoSession = getSsoSession(request);
            URLBuilder redirectUrl = new URLBuilder(getRedirectUrl(request))
                    .addParameter("code", ssoSession.getAuthorizationCode());
            String appUrl = ssoSession.getAppUrl();
            if (StringUtils.isNotEmpty(appUrl)) {
                redirectUrl.addParameter("app_url", appUrl);
            }
            String state = ssoSession.getState();
            if (StringUtils.isNotEmpty(state)) {
                redirectUrl.addParameter("state", state);
            }
            String url = redirectUrl.build();
            response.sendRedirect(url);
            log.debug("Redirecting back to module: {}", url);
        } catch (Exception ex) {
            log.error("Error redirecting back to module: {}", ex.getMessage());
            log.debug("Exception", ex);
            throw new RuntimeException(ex);
        } finally {
            getSsoSession(request).cleanup();
        }
 }
public static String getRedirectUrl(HttpServletRequest request) throws Exception {
        String uri = getSsoSession(request, true).getRedirectUri();
        return StringUtils.isEmpty(uri) ?
                new URLBuilder(getSsoContext(request).getEngineUrl(), "/oauth2-callback").build()  : uri;
}
- 再次通过 engine-server-ear 项目工程中定义访问 webadmin 工程。
-
SsoPostLoginServlet处理请求。
-
     SsoPostLoginServlet
     org.ovirt.engine.core.aaa.servlet.SsoPostLoginServlet

        login-as-admin
        true


     SsoPostLoginServlet
     s/sso/oauth2-callback
- 这里插入一步,enginesso 项目工程的 web.xml 文件中配置了
SsoContextListener监听器。服务启动时创建。
org.ovirt.engine.core.sso.context.SsoContextListener
- 监听器中将所有的 Client 信息进行了注册,放置到
SsoContext中。转向业务系统时,用于认证。- 从数据库 sso_clients 表中读取所有数据。
ssoContext.setSsoClientRegistry(DBUtils.getAllSsoClientsInfo());
- 继续前面的步骤,
SsoPostLoginServlet执行的过程中,会进行业务系统的授权认证,通过访问 /oauth/token 生成(模拟请求)生成授权码。- 授权码通过读取配置文件获取。
- 将授权码信息拼装为模拟请求的请求头信息。
- enginesso 项目工程的 web.xml 文件中配置了
OAuthAuthorizeServlet,处理请求。- 获取的授权信息与
SsoContext中的 Client 信息能对应上,则认证通过。
- 获取的授权信息与
Map response = SsoOAuthServiceUtils.getToken("authorization_code", authCode, scope, redirectUri);
FiltersHelper.isStatusOk(response);
public static Map getToken(String grantType, String code, String scope, String redirectUri) {
        try {
            HttpPost request = createPost("/oauth/token");
            setClientIdSecretBasicAuthHeader(request);
            List form = new ArrayList<>(4);
            form.add(new BasicNameValuePair("grant_type", grantType));
            form.add(new BasicNameValuePair("code", code));
            form.add(new BasicNameValuePair("redirect_uri", redirectUri));
            form.add(new BasicNameValuePair("scope", scope));
            request.setEntity(new UrlEncodedFormEntity(form, StandardCharsets.UTF_8));
            return getResponse(request);
        } catch (Exception ex) {
            return buildMapWithError("server_error", ex.getMessage());
        }
}
private static void setClientIdSecretBasicAuthHeader(HttpUriRequest request) {
        EngineLocalConfig config = EngineLocalConfig.getInstance();
        byte[] encodedBytes = Base64.encodeBase64(String.format("%s:%s",
                config.getProperty("ENGINE_SSO_CLIENT_ID"),
                config.getProperty("ENGINE_SSO_CLIENT_SECRET")).getBytes());
        request.setHeader(FiltersHelper.Constants.HEADER_AUTHORIZATION, String.format("Basic %s", new String(encodedBytes)));
}
        OAuthTokenServlet
        org.ovirt.engine.core.sso.servlets.OAuthTokenServlet


        OAuthTokenServlet
        /oauth/token
-
OAuthTokenServlet生成授权码
case "authorization_code":
                issueTokenForAuthCode(request, response, scope);
                break;
......
protected void issueTokenForAuthCode(
            HttpServletRequest request,
            HttpServletResponse response,
            String scope) throws Exception {
        String[] clientIdAndSecret = SsoUtils.getClientIdClientSecret(request);
        SsoUtils.validateClientRequest(request,
                clientIdAndSecret[0],
                clientIdAndSecret[1],
                scope,
                null);
        SsoSession ssoSession = handleIssueTokenForAuthCode(request, clientIdAndSecret[0], scope);
        log.debug("Sending json response");
        SsoUtils.sendJsonData(response, buildResponse(ssoSession));
}

protected Map buildResponse(SsoSession ssoSession) {
        Map payload = new HashMap<>();
        payload.put(SsoConstants.JSON_ACCESS_TOKEN, ssoSession.getAccessToken());
        payload.put(SsoConstants.JSON_SCOPE, StringUtils.isEmpty(ssoSession.getScope()) ? "" : ssoSession.getScope());
        payload.put(SsoConstants.JSON_EXPIRES_IN, ssoSession.getValidTo().toString());
        payload.put(SsoConstants.JSON_TOKEN_TYPE, "bearer");
        return payload;
}
- 根据授权码获取授权信息。通过访问 /oauth/token-info 生成(模拟请求)。
- 与
OAuthTokenServlet一样,会进行业务系统的授权认证。认证通过才进行授权信息处理。 - enginesso 项目工程的 web.xml 文件中配置了
OAuthTokenInfoServlet,处理请求。
- 与
        OAuthTokenInfo
        org.ovirt.engine.core.sso.servlets.OAuthTokenInfoServlet


        OAuthTokenInfo
        /oauth/token-info
-
OAuthTokenInfoServlet生成授权信息。- 从
SsoSession中读取用户信息。
- 从
private Map buildResponse(SsoSession ssoSession, String password) {
        Map payload = new HashMap<>();
        payload.put(SsoConstants.JSON_ACTIVE, ssoSession.isActive());
        payload.put(SsoConstants.JSON_TOKEN_TYPE, "bearer");
        payload.put(SsoConstants.JSON_CLIENT_ID, ssoSession.getClientId());
        payload.put(SsoConstants.JSON_USER_ID, ssoSession.getUserIdWithProfile());
        payload.put(SsoConstants.JSON_SCOPE, StringUtils.isEmpty(ssoSession.getScope()) ? "" : ssoSession.getScope());
        payload.put(SsoConstants.JSON_EXPIRES_IN, ssoSession.getValidTo().toString());

        Map ovirt = new HashMap<>();
        ovirt.put("version", SsoConstants.OVIRT_SSO_VERSION);
        ovirt.put("principal_id", ssoSession.getPrincipalRecord().get(Authz.PrincipalRecord.ID));
        ovirt.put("email", ssoSession.getPrincipalRecord().get(Authz.PrincipalRecord.EMAIL));
        ovirt.put("namespace", ssoSession.getPrincipalRecord().get(Authz.PrincipalRecord.NAMESPACE));
        ovirt.put("first_name", ssoSession.getPrincipalRecord().get(Authz.PrincipalRecord.FIRST_NAME));
        ovirt.put("last_name", ssoSession.getPrincipalRecord().get(Authz.PrincipalRecord.LAST_NAME));
        ovirt.put("group_ids", ssoSession.getPrincipalRecord().get(Authz.PrincipalRecord.GROUPS,
            Collections.emptyList()));
        if (password != null) {
            ovirt.put("password", password);
        }
        ovirt.put("capability_credentials_change",
                ssoContext.getSsoProfilesSupportingPasswdChange().contains(ssoSession.getProfile()));
        payload.put("ovirt", ovirt);
        return payload;
}
- 创建管理门户的用户 Session。
ActionReturnValue queryRetVal = FiltersHelper.getBackend(ctx).runAction(ActionType.CreateUserSession,
                        new CreateUserSessionParameters(
                                (String) jsonResponse.get(SessionConstants.SSO_TOKEN_KEY),
                                (String) jsonResponse.get(SessionConstants.SSO_SCOPE_KEY),
                                appScope,
                                profile,
                                username,
                                (String) payload.get("principal_id"),
                                (String) payload.get("email"),
                                (String) payload.get("first_name"),
                                (String) payload.get("last_name"),
                                (String) payload.get("namespace"),
                                request.getRemoteAddr(),
                                (Collection) payload.get("group_ids"),
                                loginAsAdmin));
- 登录管理门户
- 这里的 appUrl 就是 https://rhvm.xxx-cloud.com/ovirt-engine/webadmin/?locale=zh_CN。
httpSession.setAttribute(SessionConstants.HTTP_SESSION_ENGINE_SESSION_ID_KEY,
queryRetVal.getActionReturnValue());
httpSession.setAttribute(FiltersHelper.Constants.REQUEST_LOGIN_FILTER_AUTHENTICATION_DONE, true);
log.debug("Redirecting to '{}'", appUrl);
response.sendRedirect(appUrl);
- 经过
SsoLoginFilter过滤器。SSO 验证通过,直接继续执行请求,交由WebAdminHostPageServlet处理,完成管理门户的登录操作。
     WebAdminHostPageServlet
     /WebAdmin.html
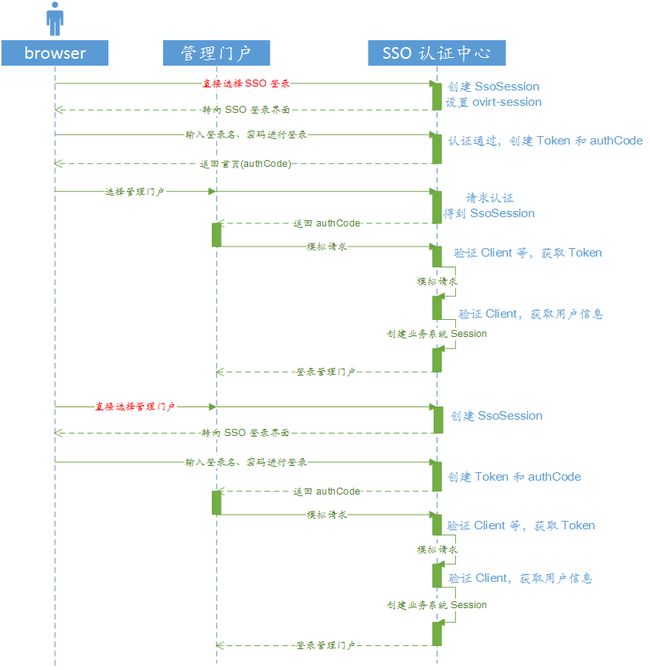
2.2 用户先登录 SSO 认证中心
2.2.1 用户首先登录 SSO 认证中心
- 登录 SSO 认证中心,访问地址 https://rhvm.xxx-cloud.com/ovirt-engine/login?scope=ovirt-app-admin+ovirt-app-portal+ovirt-ext%3Dauth%3Asequence-priority%3D%7E。
- welcome 项目工程的 web.xml 文件中配置了
LoginServlet,处理请求。 -
LoginServlet执行过程中,会验证 SSO 认证中心服务是否正常,再进行跳转。- 组装参数信息。
- welcome 项目工程的 web.xml 文件中配置了
        LoginServlet
        org.ovirt.engine.core.LoginServlet


        LoginServlet
        /login
response.sendRedirect(
                    new URLBuilder(FiltersHelper.getEngineSsoUrl(request),
                            WelcomeUtils.OAUTH_AUTHORIZE_URI)
                    .addParameter(WelcomeUtils.HTTP_PARAM_CLIENT_ID,
                            EngineLocalConfig.getInstance().getProperty(WelcomeUtils.ENGINE_SSO_CLIENT_ID))
                    .addParameter(WelcomeUtils.HTTP_PARAM_RESPONSE_TYPE, WelcomeUtils.CODE)
                    .addParameter(WelcomeUtils.HTTP_PARAM_ENGINE_URL, FiltersHelper.getEngineUrl(request))
                    .addParameter(WelcomeUtils.HTTP_PARAM_REDIRECT_URI, WelcomeUtils.getOauth2CallbackUrl(request))
                    .addParameter(WelcomeUtils.HTTP_PARAM_SCOPE, request.getParameter(WelcomeUtils.SCOPE))
                    .addParameter(WelcomeUtils.HTTP_PARAM_LOCALE, request.getAttribute(WelcomeUtils.LOCALE).toString())
                    .addParameter(WelcomeUtils.HTTP_PARAM_SOURCE_ADDR, request.getRemoteAddr())
                    .build());
LoginServlet跳转到 https://rhvm.xxx-cloud.com:443/ovirt-engine/sso/oauth/authorize?client_id=ovirt-engine-core&response_type=code&engine_url=https%3A%2F%2Frhvm.xxx-cloud.com%3A443%2Fovirt-engine&redirect_uri=https%3A%2F%2Frhvm.xxx-cloud.com%3A443%2Fovirt-engine%2Foauth2-callback&scope=ovirt-app-admin+ovirt-app-portal+ovirt-ext%3Dauth%3Asequence-priority%3D%7E&locale=zh_CN&source_addr=192.168.96.2。OAuthAuthorizeServlet,处理认证请求,过程与 2.1.1 中处理一致,执行到最后,到达 SSO 认证中心登录页。输入用户名、密码进行登录。
-
用户验证通过,转向业务系统(管理门户)。发现参数 redirect_uri 为空,因此写入默认的跳转地址。
- 组装地址为 https://rhvm.xxx-cloud.com/ovirt-engine/oauth2-callback?code=58oKlu3Ku2ry5Dvn7dS--DhFJXCIitCA0LAYDBsnWvWnkhjBwZyo1KXjNwDwZjqnGfe67EQY1VN-FfFRBZAtpA
public static String getRedirectUrl(HttpServletRequest request) throws Exception {
        String uri = getSsoSession(request, true).getRedirectUri();
        return StringUtils.isEmpty(uri) ?
                new URLBuilder(getSsoContext(request).getEngineUrl(), "/oauth2-callback").build()  : uri;
}
- 请求被 welcome 项目工程中的
OAuthCallbackServlet拦截。
        OAuthCallbackServlet
        org.ovirt.engine.core.OAuthCallbackServlet


        OAuthCallbackServlet
        /oauth2-callback
-
OAuthCallbackServlet过程中通过访问 /sso/oauth/token 生成(模拟请求)生成授权码。通过访问 /sso/oauth/token-info 生成授权信息。最后转向到首页。
String engineUri = EngineLocalConfig.getInstance().getProperty(WelcomeUtils.ENGINE_URI) + "/";
......
response.sendRedirect(engineUri);
2.2.2 再选择管理门户
- 跳转过程与 2.1.1 处理一致,直到
OAuthAuthorizeServlet执行。认证通过,直接转向InteractiveRedirectToModuleServlet处理。
if (SsoUtils.isUserAuthenticated(request)) {
            log.debug("User is authenticated redirecting to interactive-redirect-to-module");
            redirectUrl = request.getContextPath() + SsoConstants.INTERACTIVE_REDIRECT_TO_MODULE_URI;
- 后续过程与 2.1.2 处理一致,最终登录业务系统。
3. 总结整理
- 通过 Token 和 authCode 请求用户信息。
- 登录 SSO 认证中心,发放令牌(Token),建立令牌与 SsoSession 的映射(Token 和 authCode 也是一一对应)。
- 业务系统(engine)的 Session 创建之前,会先根据业务系统获取的遍历 authCode 查找到令牌,再根据令牌,查询到用户信息(这个过程采用了模拟请求方式),获取用户信息后再生成业务系统 Session。
- 通过 Client ID 和 Client Secret 确保业务系统(engine)与 SSO 认证中心的对接安全。
- SSO 能够对接的全部业务系统 Client 等信息在 SSO 服务初始化时设置到 SsoContext 上下文中。
- 业务系统想通过 authCode 查询令牌,必须提供 Client ID 和 Client Secret 与 SsoContext 中进行比对,比对成功才能通过获取 Token ,并且通过 Token 获取 SsoSession 中的用户信息。
- 在 2.2 的流程中,首先进行 SSO 认证中心登录,然后选择管理门户后能够直接找到 SSO 认证中心对应的 SsoSession。这是因为在 enginesso 的 web.xml 文件中配置了全局的
SsoSessionListener监听器。在持监听器中对会话 Session 与 SsoSession 建立了一一对应关系。
org.ovirt.engine.core.sso.context.SsoSessionListener
@Override
public void sessionCreated(HttpSessionEvent se) {
    se.getSession().setAttribute(SsoConstants.OVIRT_SSO_SESSION, new SsoSession(se.getSession()));
}

@Override
public void sessionDestroyed(HttpSessionEvent se) {
    TokenCleanupUtility.cleanupExpiredTokens(se.getSession().getServletContext());
}


