概述
本地通知就是APP发送推送通知给手机系统,不需要经过服务器,可以做到精准推送。应用场景还是比较多的,比如事务、闹钟、提醒等功能。
在不同的iOS系统中可用的本地通知框架不一样,总之是,系统越高,功能越好用,但是低版本iOS手机咱得做合理的兼容处理。先讲iOS8之后的使用方法
一、iOS8之后的系统使用本地通知
用到的几个类都是UIKit框架中的,所以不需要导入什么,一般在AppDelegate里面实现。
注册本地通知
本地通知注册很简单,看代码
// 权限类型:弹窗、声音、角标设置的权限
UIUserNotificationType types = UIUserNotificationTypeAlert | UIUserNotificationTypeSound | UIUserNotificationTypeBadge;
UIUserNotificationSettings *settings = [UIUserNotificationSettings settingsForTypes:types categories:nil];
// 请求获取通知权限
[[UIApplication sharedApplication] registerUserNotificationSettings:settings];
程序执行完这几行代码,就会弹出通知权限提醒窗
弹窗选择“允许”或“拒绝”都会走下面的方法,
 -(void)application:(UIApplication *)application didRegisterUserNotificationSettings:(UIUserNotificationSettings *)notificationSettings{
    if (notificationSettings.types == 0) {
        // 通知权限授权失败
    } else {
        // 通知权限授权成功
    }
}
这样就注册完事了。当然还可以在注册的时候加些戏
App在后台或者杀死时,弹出的消息,可以通过“下拉”或者“查看”操作来看到通知详情,其实这里还可以有定义的操作按钮,如下图
这些功能得写在注册通知之前,下面看代码
if ([[UIApplication sharedApplication] currentUserNotificationSettings].types > 0) {
    return;
}
UIUserNotificationType types = UIUserNotificationTypeAlert | UIUserNotificationTypeSound | UIUserNotificationTypeBadge;
// 设置通知弹窗的种类,种类可以有多种,不同的种类可以通过identifier区分
UIMutableUserNotificationCategory *category = [[UIMutableUserNotificationCategory alloc] init];
category.identifier = @"noti_category";

// 每种弹窗可以定义它的操作按钮,每个按钮通过identifier区分
UIMutableUserNotificationAction *action1 = [[UIMutableUserNotificationAction alloc] init];
action1.identifier = @"001";
action1.title = @"确认";
action1.activationMode = UIUserNotificationActivationModeForeground;// 此Action要打开App
action1.authenticationRequired = YES;// 执行此Action是否需要验证身份(就是手机的密码或者指纹)
action1.destructive = NO;//
action1.behavior = UIUserNotificationActionBehaviorTextInput;// 点击后可以先弹出文本输入框
UIMutableUserNotificationAction *action2 = [[UIMutableUserNotificationAction alloc] init];
action2.identifier = @"002";
action2.title = @"取消";
action2.activationMode = UIUserNotificationActivationModeBackground;// 此操作可App在后台时进行
action2.authenticationRequired = YES;
action2.destructive = YES;// YES - 表示带有摧毁性的操作需要,字体会被标红

[category setActions:@[action1,action2] forContext:(UIUserNotificationActionContextDefault)];
NSSet *set = [NSSet setWithObject:category];
UIUserNotificationSettings *settings = [UIUserNotificationSettings settingsForTypes:types categories:set];
// 注册通知
[[UIApplication sharedApplication] registerUserNotificationSettings:settings];
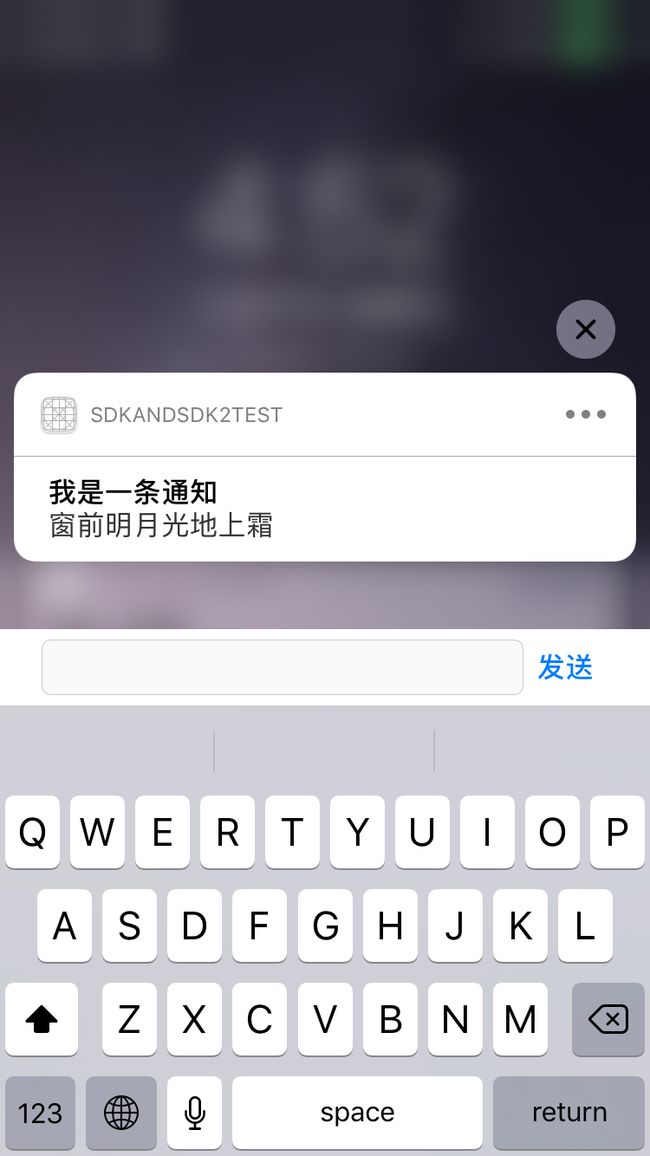
因为action1的behavior属性为UIUserNotificationActionBehaviorTextInput,所以点击确认会先弹出输入框,输入完成点击键盘上的发送后,整个操作算结束,如下图:
紧接着会走下面的这个代理方法
- (void)application:(UIApplication *)application handleActionWithIdentifier:(nullable NSString *)identifier forLocalNotification:(UILocalNotification *)notification withResponseInfo:(NSDictionary *)responseInfo completionHandler:(void (^)(void))completionHandler{
    identifier
    // 这里的identifier就是之前定义的action的identifier
}
点击取消其实也是走上面的代理方法,action是通过identifier来区分的。不同的操作需要做的处理可以在这个方法里面实现。
发送本地通知
UILocalNotification *localNoti = [[UILocalNotification alloc] init];
// 设置发送时间
localNoti.timeZone = [NSTimeZone localTimeZone];// 时区
localNoti.fireDate = [NSDate dateWithTimeIntervalSinceNow:5.0];// 时间
localNoti.repeatCalendar = [NSCalendar currentCalendar];// 日历
localNoti.repeatInterval = 3;// 重复发送次数
localNoti.alertTitle = @"我是一条通知";// 标题
localNoti.soundName = UILocalNotificationDefaultSoundName;// 声音的名字
localNoti.applicationIconBadgeNumber = 10;// 角标
localNoti.userInfo = @{
    @"chatID":@"1234567890",
    @"number":@"10"
};
localNoti.alertBody = @"窗前明月光地上霜";// 内容
localNoti.category = @"noti_category";// 种类标识
[[UIApplication sharedApplication] scheduleLocalNotification:localNoti];
如果App在前台发送本地通知,iOS10以下的系统是不会弹出弹窗的,此情况会直接走代理方法:
-(void)application:(UIApplication *)application didReceiveLocalNotification:(UILocalNotification *)notification{
    NSLog(@"点击了本地通知");
}
如果App在后台或者杀死的时候,会弹出消息弹窗。点击消息打开App,也会走上面的代理方法。
iOS8之后的系统先说到这里,下面说说iOS10之后的系统怎么发送本地通知
二、iOS10之后的系统发送本地通知
iOS10之后增加了新的通知框架,之前的被废弃了,所以要注意三点:
- 使用前引入头文件
#import - 使用的地方要做版本判断,兼容低版本
- 如果要用到通知框架的代理方法,需要遵循代理
注册本地通知
UNUserNotificationCenter *center = [UNUserNotificationCenter currentNotificationCenter];
center.delegate = self;
UNAuthorizationOptions option = UNAuthorizationOptionAlert | UNAuthorizationOptionBadge | UNAuthorizationOptionSound;
[center requestAuthorizationWithOptions:option completionHandler:^(BOOL granted, NSError * _Nullable error) {
    if (granted) {// 授权成功

    }else{//

    }
}];
注册通知授权成功会走上面的block回调。这点是与之前的框架不同的地方,显然这种方式方便些。
发送本地通知
UNUserNotificationCenter *center = [UNUserNotificationCenter currentNotificationCenter];
UNMutableNotificationContent *content = [[UNMutableNotificationContent alloc] init];
content.title = @"test";
content.subtitle = @"春晓";
content.body = @"离离原上草,一岁一枯荣,野火烧不尽,春风吹又生";
content.sound = [UNNotificationSound defaultSound];
content.badge = [NSNumber numberWithInt:10];
content.categoryIdentifier = @"ios10_category";
content.userInfo = @{
    @"key1":@"value1",
    @"key2":@"value2"
};
// 发送时机
UNTimeIntervalNotificationTrigger *timeTrigger = [UNTimeIntervalNotificationTrigger triggerWithTimeInterval:0.1 repeats:NO];
UNNotificationRequest *request = [UNNotificationRequest requestWithIdentifier:@"001" content:content trigger:timeTrigger];
[center addNotificationRequest:request withCompletionHandler:^(NSError * _Nullable error) {
    NSLog(@"发送通知");
}];
发送以后,会回调下面代理方法
-(void)userNotificationCenter:(UNUserNotificationCenter *)center willPresentNotification:(UNNotification *)notification withCompletionHandler:(void (^)(UNNotificationPresentationOptions))completionHandler{
    // 发送本地通知之后会走到这里,根据completionHandler中的参数来展示提醒类型,或弹窗、或声音、或震动
    completionHandler(UNNotificationPresentationOptionAlert);
}
代理方法中,根据completionHandler()中的参数来制定提醒类型,参数介绍如下:
typedef NS_OPTIONS(NSUInteger, UNNotificationPresentationOptions) {
    UNNotificationPresentationOptionBadge   = (1 << 0),// 角标
    UNNotificationPresentationOptionSound   = (1 << 1),// 声音
    UNNotificationPresentationOptionAlert   = (1 << 2),// 弹框
}
使用UNNotificationPresentationOptionAlert就可以实现弹窗,而且iOS10之后版本推送消息可以在App前台显示弹窗的。
处理本地通知
点击通知栏的通知,会走下面的代理方法,方法的参数"response"带了通知的相关信息
-(void)userNotificationCenter:(UNUserNotificationCenter *)center didReceiveNotificationResponse:(UNNotificationResponse *)response withCompletionHandler:(void (^)(void))completionHandler{
    NSLog(@"");
}
当然,也可以给通知弹窗添加一些操作功能,和上面比较类似,直接贴代码
UNUserNotificationCenter *center = [UNUserNotificationCenter currentNotificationCenter];
center.delegate = self;
// 添加操作选项
UNNotificationAction *action1 = [UNNotificationAction actionWithIdentifier:@"action1_sure" title:@"查看" options:(UNNotificationActionOptionAuthenticationRequired)];
UNNotificationAction *action2 = [UNNotificationAction actionWithIdentifier:@"action2_cancel" title:@"确定" options:(UNNotificationActionOptionForeground)];
UNNotificationAction *action3 = [UNNotificationAction actionWithIdentifier:@"action3_cancel" title:@"取消" options:(UNNotificationActionOptionDestructive)];
UNTextInputNotificationAction *action4 = [UNTextInputNotificationAction actionWithIdentifier:@"action4_input" title:@"编辑" options:(UNNotificationActionOptionForeground) textInputButtonTitle:@"发送" textInputPlaceholder:@"请输入消息"];
UNNotificationCategory *category = [UNNotificationCategory categoryWithIdentifier:@"ios10_category" actions:@[action1,action2,action3,action4] intentIdentifiers:@[] options:UNNotificationCategoryOptionNone];
NSSet *set = [NSSet setWithObjects:category, nil];
[center setNotificationCategories:set];
UNAuthorizationOptions option = UNAuthorizationOptionAlert | UNAuthorizationOptionBadge | UNAuthorizationOptionSound;
[center requestAuthorizationWithOptions:option completionHandler:^(BOOL granted, NSError * _Nullable error) {
    if (granted) {// 授权成功

    }else{//

    }
}];
效果是这样的:
其他的操作流程和上面一样,over~
