1. 前言
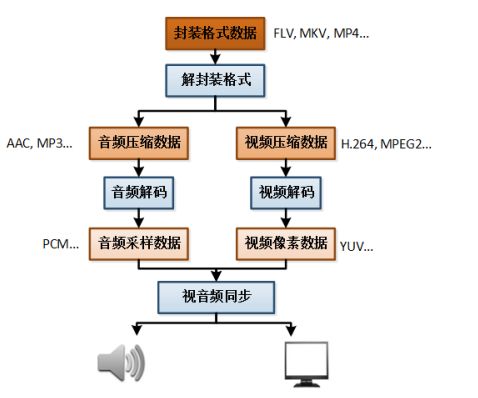
前面已经介绍了播放一个视频文件的流程图:
而视频解码是播放视频文件的一个步骤,本篇博客将介绍FFmpeg视频解码。
首先我们简单的了解一下FFmpeg八大库:
2. FFmpeg库简介
| 库的名称 | 库的作用 |
|---|---|
| avcodec | 该库是音视频编解码的核心库,用于各种类型声音、图像编解码 |
| avformat | 各种音视频封装格式的处理,为avcodec库提供独立的音频或视频码流源 |
| avfilter | 音视频滤波器的开发,滤镜特效的处理 |
| avdevice | 硬件采集、加速、显示,各种设备的输入输出 |
| avutil | 工具库,大部分库都需要这个库的支持 |
| postproc | 音视频应用后期效果处理,如图像的去块效应 |
| swresample | 音频采样数据格式转换 |
| swscale | 视频像素数据格式转换 |
而视频转码将用到其中的三个库,分别是avcodec、avformat、swscale。
3. FFmpeg解码的函数
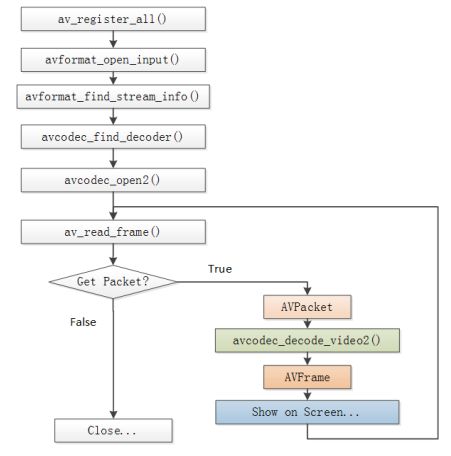
3.1 FFmpeg解码流程图
3.2 FFmpeg解码函数简介
av_register_all():注册所有组件
avformat_open_input():打开输入视频文件
avformat_find_stream_info():获取视频文件信息
avcodec_find_decoder():查找解码器
avcodec_open2():打开解码器
av_read_frame():从输入文件读取一帧压缩数据
avcodec_decode_video2():解码一帧压缩数据
avcodec_close():关闭解码器
avformat_close_input():关闭输入视频文件
开始接触这些函数时,必然很陌生,我们需要熟记这些函数,因为即将进行的视频解码,这些函数都会用到。
4. FFmpeg数据结构简介
-
AVFormatContext
封装格式上下文结构体,也是统领全局的结构体,保存了视频文件封装格式相关信息。
- iformat:输入视频的AVInputFormat
- nb_streams :输入视频的AVStream 个数
- streams :输入视频的AVStream []数组
- duration :输入视频的时长(以微秒为单位)
- bit_rate :输入视频的码率
-
AVInputFormat
每种封装格式(例如FLV、MKV、MP4、AVI)对应一个该结构体。
- name:封装格式名称
- long_name:封装格式的长名称
- extensions:封装格式的扩展名
- id:封装格式ID
- 一些封装格式处理的接口函数
-
AVStream
视频文件中每个视频(音频)流对应一个该结构体。
- id:序号
- codec:该流对应的AVCodecContext
- time_base:该流的时基
- r_frame_rate: 该流的帧率
-
AVCodeContext
编码器上下文结构体,保存了视频(音频)编解码相关信息。
- codec:编解码器的AVCodec
- width, height:图像的宽高(只针对视频)
- pix_fmt:像素格式(只针对视频)
- sample_rate:采样率(只针对音频)
- channels:声道数(只针对音频)
- sample_fmt:采样格式(只针对音频)
-
AVCodec
每种视频(音频)编解码器(例如H.264解码器)对应一个该结构体。
- name:编解码器名称
- long_name:编解码器长名称
- type:编解码器类型
- id:编解码器ID
- 一些编解码的接口函数
-
AVPacket
存储一帧压缩编码数据。
- pts:显示时间戳
- dts :解码时间戳
- data :压缩编码数据
- size :压缩编码数据大小
- stream_index :所属的AVStream
-
AVFrame
存储一帧解码后像素(采样)数据。
- data:解码后的图像像素数据(音频采样数据)
- linesize:对视频来说是图像中一行像素的大小;对音频来说是整个音频帧的大小
- width, height:图像的宽高(只针对视频)
- key_frame:是否为关键帧(只针对视频)
- pict_type:帧类型(只针对视频) ,例如I, P, B
有人要说了,这么多数据结构我怎么记啊,其实并不需要大家去记,我们只要心里有个印象,在用的时候能用起来就行,通过用也能帮助我们记忆。
4. 原理简述
本次我们要做的是把一个mp4视频文件转换成yuv视频文件,所以我们拿到mp4视频文件获取到视频流的位置,从而获取编解码上下文,然后循环读取数据包获取AVFrame像素数据,而最后想要转换成yuv视频文件,所以需要将此时的像素数据转换成YUV420P像素数据,最后写入输出文件中。
5. FFmpeg解码过程
5.1 注册所有组件
av_register_all();
5.2 打开输入视频文件
//封装格式上下文
AVFormatContext* pFormatCtx = avformat_alloc_context();
//2. 打开输入视频文件,成功返回0,第三个参数为NULL,表示自动检测文件格式
if (avformat_open_input(&pFormatCtx, input_cstr, NULL, NULL) != 0) {
        LOGE("%s", "打开输入视频文件失败");
        return;
    }
当我们不知道某个函数怎么使用的时候,我们可以点进去,查看它函数的注释,通过这些去了解函数使用和需要传入什么样的值,比如avformat_open_input函数:
/**
 * Open an input stream and read the header. The codecs are not opened.
 * The stream must be closed with avformat_close_input().
 *
 * @param ps Pointer to user-supplied AVFormatContext (allocated by avformat_alloc_context).
 *           May be a pointer to NULL, in which case an AVFormatContext is allocated by this
 *           function and written into ps.
 *           Note that a user-supplied AVFormatContext will be freed on failure.
 * @param url URL of the stream to open.
 * @param fmt If non-NULL, this parameter forces a specific input format.
 *            Otherwise the format is autodetected.
 * @param options  A dictionary filled with AVFormatContext and demuxer-private options.
 *                 On return this parameter will be destroyed and replaced with a dict containing
 *                 options that were not found. May be NULL.
 *
 * @return 0 on success, a negative AVERROR on failure.
 *
 * @note If you want to use custom IO, preallocate the format context and set its pb field.
 */
从函数注释中我们得知第三个参数为NULL的时候,就表示自动检测文件格式,还有需要关流,通过调用avformat_close_input()函数去实现,......,很多信息都可以从这里得到,我们需要学会这种方式去了解函数使用。
5.3 获取视频文件信息
if (avformat_find_stream_info(pFormatCtx, NULL) < 0) {
        LOGE("%s", "获取视频文件信息失败");
        return;
    }
//查找视频流所在的位置
//遍历所有类型的流(视频流、音频流可能还有字幕流),找到视频流的位置
int video_stream_index = -1;
    int i = 0;
    for(; i < pFormatCtx -> nb_streams; i++) {
        if (pFormatCtx->streams[i]->codec-> codec_type == AVMEDIA_TYPE_VIDEO) {
            video_stream_index = i;
            break;
        }
    }
5.4 查找解码器
//编解码上下文
AVCodecContext* pCodecCtx = pFormatCtx->streams[video_stream_index]->codec;
//4. 查找解码器 不能通过pCodecCtx->codec获得解码器
AVCodec* pCodec = avcodec_find_decoder(pCodecCtx->codec_id);
if (pCodec == NULL) {
        LOGE("%s", "查找解码器失败");
        return;
    }
5.5 打开解码器
if (avcodec_open2(pCodecCtx, pCodec, NULL) < 0) {
        LOGE("%s", "打开解码器失败");
        return;
    }
5.6 读取压缩的视频数据AVPacket
av_read_frame(pFormatCtx, pPacket)
5.7 解码一帧压缩数据AVPacket ---> AVFrame
avcodec_decode_video2(pCodecCtx, pFrame, &got_frame, pPacket);
6. 完整JNI代码zp_decode.c
//
// Created by zp on 2017/12/5.
//
#include
#include

//解码
#include "libavcodec/avcodec.h"
//封装格式
#include "libavformat/avformat.h"
//缩放
#include "libswscale/swscale.h"

#define LOGI(FORMAT, ...) __android_log_print(ANDROID_LOG_INFO, "zp", FORMAT, ##__VA_ARGS__);
#define LOGE(FORMAT, ...) __android_log_print(ANDROID_LOG_ERROR, "zp", FORMAT, ##__VA_ARGS__);

JNIEXPORT void JNICALL
Java_com_zhangpan_zpplayer_util_VideoUtils_decode(JNIEnv *env, jclass type, jstring input_jstr,
jstring output_jstr) {
    const char* input_cstr = (*env) -> GetStringUTFChars(env, input_jstr, NULL);
    const char* output_cstr = (*env) -> GetStringUTFChars(env, output_jstr, NULL);

    //1. 注册所有组件
    av_register_all();

    //封装格式上下文
    AVFormatContext* pFormatCtx = avformat_alloc_context();
    //2. 打开输入视频文件,成功返回0,第三个参数为NULL,表示自动检测文件格式
    if (avformat_open_input(&pFormatCtx, input_cstr, NULL, NULL) != 0) {
        LOGE("%s", "打开输入视频文件失败");
        return;
    }

    //3. 获取视频文件信息
    if (avformat_find_stream_info(pFormatCtx, NULL) < 0) {
        LOGE("%s", "获取视频文件信息失败");
        return;
    }

    //查找视频流所在的位置
    //遍历所有类型的流(视频流、音频流可能还有字幕流),找到视频流的位置
    int video_stream_index = -1;
    int i = 0;
    for(; i < pFormatCtx -> nb_streams; i++) {
        if (pFormatCtx->streams[i]->codec-> codec_type == AVMEDIA_TYPE_VIDEO) {
            video_stream_index = i;
            break;
        }
    }

    //编解码上下文
    AVCodecContext* pCodecCtx = pFormatCtx->streams[video_stream_index]->codec;
    //4. 查找解码器 不能通过pCodecCtx->codec获得解码器
    AVCodec* pCodec = avcodec_find_decoder(pCodecCtx->codec_id);
    if (pCodec == NULL) {
        LOGE("%s", "查找解码器失败");
        return;
    }

    //5. 打开解码器
    if (avcodec_open2(pCodecCtx, pCodec, NULL) < 0) {
        LOGE("%s", "打开解码器失败");
        return;
    }

    //编码数据
    AVPacket* pPacket = (AVPacket*)av_malloc(sizeof(AVPacket));

    //像素数据(解码数据)
    AVFrame* pFrame = av_frame_alloc();
    AVFrame* pYuvFrame = av_frame_alloc();

    FILE* fp_yuv = fopen(output_cstr, "wb");

    //只有指定了AVFrame的像素格式、画面大小才能真正分配内存
    //缓冲区分配内存
    uint8_t* out_buffer = (uint8_t*)av_malloc(avpicture_get_size(AV_PIX_FMT_YUV420P, pCodecCtx->width, pCodecCtx->height));
    //初始化缓冲区
    avpicture_fill((AVPicture*)pYuvFrame, out_buffer, AV_PIX_FMT_YUV420P, pCodecCtx->width, pCodecCtx->height);

    //srcW:源图像的宽
    //srcH:源图像的高
    //srcFormat:源图像的像素格式
    //dstW:目标图像的宽
    //dstH:目标图像的高
    //dstFormat:目标图像的像素格式
    //flags:设定图像拉伸使用的算法
    struct SwsContext* pSwsCtx = sws_getContext(
            pCodecCtx->width, pCodecCtx->height, pCodecCtx->pix_fmt,
            pCodecCtx->width, pCodecCtx->height, AV_PIX_FMT_YUV420P,
            SWS_BILINEAR, NULL, NULL, NULL);

    int got_frame, len, frameCount = 0;
    //6. 从输入文件一帧一帧读取压缩的视频数据AVPacket
    while(av_read_frame(pFormatCtx, pPacket) >= 0) {
        if (pPacket->stream_index == video_stream_index) {
            //7. 解码一帧压缩数据AVPacket ---> AVFrame,第3个参数为0时表示解码完成
            len = avcodec_decode_video2(pCodecCtx, pFrame, &got_frame, pPacket);

            if (len < 0) {
                LOGE("%s", "解码失败");
                return;
            }
            //AVFrame ---> YUV420P
            //srcSlice[]、dst[]        输入、输出数据
            //srcStride[]、dstStride[] 输入、输出画面一行的数据的大小 AVFrame 转换是一行一行转换的
            //srcSliceY                输入数据第一列要转码的位置 从0开始
            //srcSliceH                输入画面的高度
            sws_scale(pSwsCtx,
                      pFrame->data, pFrame->linesize, 0, pFrame->height,
                      pYuvFrame->data, pYuvFrame->linesize);

            //非0表示正在解码
            if (got_frame) {
                //图像宽高的乘积就是视频的总像素,而一个像素包含一个y,u对应1/4个y,v对应1/4个y
                int yuv_size = pCodecCtx->width * pCodecCtx->height;
                //写入y的数据
                fwrite(pYuvFrame->data[0], 1, yuv_size, fp_yuv);
                //写入u的数据
                fwrite(pYuvFrame->data[1], 1, yuv_size/4, fp_yuv);
                //写入v的数据
                fwrite(pYuvFrame->data[2], 1, yuv_size/4, fp_yuv);

                LOGI("解码第%d帧", frameCount++);
            }
            av_free_packet(pPacket);
        }
    }

    fclose(fp_yuv);
    av_frame_free(&pFrame);
    av_frame_free(&pYuvFrame);
    avcodec_free_context(&pCodecCtx);
    avformat_free_context(pFormatCtx);

    (*env) -> ReleaseStringUTFChars(env, input_jstr, input_cstr);
    (*env) -> ReleaseStringUTFChars(env, output_jstr, output_cstr);
}
解码主要是在C中做的,Java中只是简单的调用了,具体的配置,请看我的上一篇博客:Android Studio NDK开发(十二):FFmpeg编译与配置,直接看测试FFmpeg模块。
编译运行完之后,将输出文件复制到电脑中,用YUV专属播放器播放,能完整且流畅播放,表示解码成功。
项目源码:
展望
喜欢本篇博客的简友们,就请来一波点赞,您的每一次关注,将成为我前进的动力,谢谢!


