git的学习与使用
1、git简介
1.1 git历史
Git是一个免费开源的分布式版本控制系统(DVCS)。
Git诞生于一个极富纷争大举创新的年代。Linux内核开源项目有着为数众广的参与者。绝大多数的Linux内核维护工作都花在了提交补丁和保存归档的繁琐事务上(1991-2002年间)。到2002年,整个项目组开始启用分布式版本控制系统BitKeeper来管理和维护代码。
到了2005年,开发BitKeeper的商业公司同Linux内核开源社区的合作关系结束,他们收回了免费使用BitKeeper的权力。这就迫使Linux开源社区(特别是Linux的缔造者Linus Torvalds)不得不吸取教训,只有开发一套属于自己的版本控制系统才不至于重蹈覆辙。
自诞生于2005年以来,Git日臻成熟完善,在高度易用的同时,仍然保留着初期设定的目标。它的速度飞快,极其适合管理大项目,它还有着令人难以置信的非线性分支管理系统,可以应付各种复杂的项目开发需求。
1.2 git与svn比较
1.2.1 分布式与集中式版本控制
Git是Linus用C实现的一个分布式版本控制工具,注意这里对分布式的强调。不同于Git,像Perforce、SVN和CVS这类版本控制工具都是集中式的。
1、集中式版本控制
所谓集中式的版本控制,就是在一个系统中只有一个机器是服务端,其他机器全是客户端。
以SVN版本控制为例,在一个系统中会有一个SVN服务器,所有的代码以及版本信息都保存在这个服务器上。每个客户端可以从服务器获取一份代码,然后在本地修改,最后submit修改的代码。
这里可以看出集中式的控制版本存在一些问题:
- 网络依赖性强,工作环境保持网络连接,如果网络断掉了,所有的客户端就无法工作了。
- 安全性较弱,所有的代码以及版本信息保存在服务器中,一旦服务器挂掉了,代码和版本控制信息就丢失了。
2、分布式版本控制
在分布式版本控制系统中,没有服务端/客户端的概念,每台机器都是一个服务器。也就是说,在分布式本版控制系统中,每台机器都有一份代码,并且有代码的版本信息。
对比SVN可以看出其相应的一些优势:
- 每台机器都是一台服务器,无需依赖网络就可以帮自己的更新提交到本地服务器,支持离线工作。当有网络环境的时候,就可以把更新推送给其他服务器。
- 安全性高,每台机器都有代码以及版本信息的维护,所有即使某些机器挂掉了,代码依然是安全的。
在git中,同步的方式有很多种,可以把自己的更新推送给别人,也可以生成一个diff的patch,通过邮件方式把这个patch发送给别人。这些可以在之后的章节介绍。
虽然分布式控制版本没有服务器的概念,但是在一般的一个git系统中,为了方便大家交换和更新,会找一台机器作为中心服务器,这台机器的目的只是为了大家方便交换和更新代码。即使这台中心服务器挂了,大家依旧可以继续工作,只是相互之间交换比较麻烦。
1.2.2 版本控制的原理
git和其他版本控制系统的主要差别在于:git只关心文件数据的整体是否发生变化,而大多数其他系统则只关心文件内容的具体差异。这类系统(CVS,Subversion,Perforce,Bazaar 等等)每次记录有哪些文件作了更新,以及都更新了哪些行的什么内容
1、svn
SVN是一个增量式的版本控制,它不会讲各个版本的副本都完整的保存下来,而只会记录下版本之间的差异,然后按照顺序更新或者恢复特定版本的数据。这使得服务端的存储量会非常低。
2、git
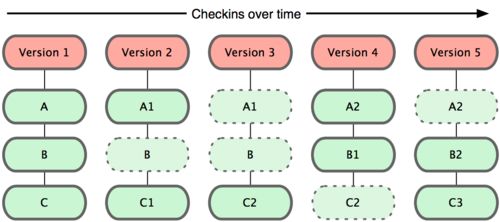
git早版本控制时只关心文件数据的整体是否发生变化,并不保存这些前后变化的差异数据。实际上,git更像是把变化的文件做快照后,记录在一个微型的文件系统中。每次提交更新时,它会纵览一遍所有文件的指纹信息并对文件作一快照,然后保存一个指向这次快照的索引。为提高性能,若文件没有变化,git不会再次保存,而只是对上次保存的快照做一链接。简单来说,如下图:
这是git同其它系统的重要区别,他完全颠覆了传统版本控制的思路,并对各个环节的实现做了新的设计。git更像是一个小型的文件系统,但它同时还提供了许多以此为基础的超强工具,而不只是一个简单的VCS。
1.3 git主要特点前述
1、如上:分布式快照记录,与其它版本集中式差异比较的版本控制有本质差异。
2、近乎所有操作都是本地进行,不需要联网。
在git中的绝大数操作都只需要访问本地文件和资源,不用连网。但用SVN的话,差不多所有的操作都需要连接网络。因为git在本地磁盘上就保存着多有当前项目的历史更新,所以处理起来飞快。
3、时刻保持数据的完整性。
在保存到git之前,所有的数据都要进行内容的较检和(checksum)计算,并将此结果作为数据的唯一标识和索引。换句话说,不可能在修改了文件或目录之后,git一无所知。这项特性作为git的设计哲学,建立在整体架构的最底层。所以文件在传输时不完整或磁盘损坏导致文件缺失,git都能第一时间察觉。
git使用SHA-1算法计算数据的较检和,通过对文件的内容或目录的结构计算出一个SHA-1的hash值。作为指纹字符串,该字符串由40个十六进制的字符组成,看起来如下,这个在之后会有说明。
24b9da6552252987aa493b52f8696cd6d3b00373
实际上,保存在git数据库的东西都是靠此hash值来索引的,而不是靠文件名。
4、多数操作仅添加数据
常用的git操作仅仅是把数据添加到数据库中。因为任何一种不可逆的操作,比如删除数据,都会使回退或重现历史版本变得困难重重。在别的VCS中,若还未提交更新,就有可能丢失或混淆一些修改的内容,但在git里,一旦提交之后就完全不用担心数据丢失,特别是养成定期推送到其它仓库的习惯时。
5、文件的三种状态
对于任何一个文件,都有三种状态:已提交(committed)、已修改(modified)、已暂存(staged)。
- 已提交:该文件已被安全存储到本地数据库中。
- 已修改:已经修改此文件,但还没有提交保存。
- 已暂存:已修改的文件放在了下次要提交保存的列表中。
由此我们可以看到git管理项目时,文件流转的三个工作区域:git的工作目录、暂存区域即本地仓库。
git控制的版本系统,每个项目都会有一个git目录(如果git clone 出来,其中.git目录;如果git clone --bare的话,新建目录本身就是git目录),它是git用来保存元数据和对象数据库的地方。该目录非常重要,每次克隆镜像仓库的时候,实际上就是拷贝其中的数据。
从项目上取出某个版本的所有文件和目录,用以开始后续的工作叫做工作目录。这些文件实际上都是从git目录中的压缩对象数据库中提取出来的,以后就可以在工作目录中对这些文件进行编辑。
所谓的暂存区域只不过是个简单的文件,一般都放在git目录中,有时候人们会把这个文件叫做索引文件,不过标准的说法还是叫暂存区域。
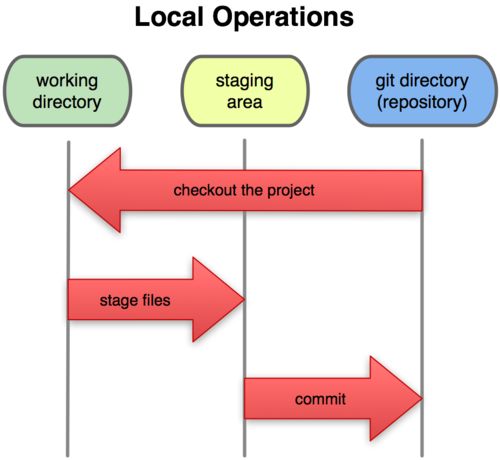
git基本的工作流程如下:
a、新建或检出一份项目代码到工作目录。
b、在工作目录中对某些文件做修改。
c、对修改的文件做快照,然后保存到暂存区域。
d、提交更新,将保存在暂存区域的文件快照永久转存到git目录中。
从上面我们可以看出从文件所处的位置来判断文件的状态:
- 已提交:git目录中保存着特定版本的文件。
- 已暂存:文件做了修改且已放在暂存区域。
- 已修改:文件自上次取出后,做了修改但还没放到暂存区域里。
2、git安装与配置
2.1 git的安装
git主要有两种安装方式:一种是通过源代码来安装;另一种是使用为特定平台预编译好的安装包。
2.1.1 源代码安装
源代码安装有许多好处,至少可以安装使用最新版本的git。git的每个版本都在尝试不断改进用户的体验,所以通过源代码编译安装最新版本最好。
git源码下载地址。
下载完成后编译并安装。
[root@localhost ~] wget https://www.kernel.org/pub/software/scm/git/git-2.9.5.tar.gz
[root@localhost ~]# tar -zxvf git-manpages-2.9.5.tar.gz
[root@localhost ~]# cd git-2.9.5/
[root@localhost ~]# ./configure --prefix=/usr/local/git
[root@localhost ~]# make && make install
然后就可以使用git命令了,不能使用再配置下软连接。
[root@localhost ~]# cd /usr/bin
[root@localhost bin]# ln -s /usr/local/git/bin/git ./git
2.1.2 各平台安装
1、linux安装
直接使用系统提供的包管理工具。
[root@localhost ~]# yum install git
2、mac上面安装(借鉴)
a、图形化git的安装工具
http://sourceforge.net/projects/git-osx-installer/
b、MacPorts(http://www.macports.org)安装。如果已经装好了MacPorts,用下面的命令安装Git:
[root@localhost ~]# sudo port install git-core +svn +doc +bash_completion +gitweb
3、windows上面安装
有项目名为msysGit提供了安装包(https://git-for-windows.github.io)下载,然后按默认选项安装即可。
2.2 git的配置(可略)
一般在新的系统上,我们都需要先配置下自己的git安装环境。配置工作只需要一次,以后升级还会沿用现在的配置。当然,如果需要,可以随时用相同的命令修改已有的配置。
1、用户信息
[root@localhost test]# git config --global user.name "yourname"
[root@localhost test]# git config --global user.email "youremail"
如果使用了--global选项,那么更改的配置文件是位于用户主目录下的那个,以后所有的额项目都会使用这里配置的用户信息。如果想要在某个特定的项目中使用其它名字或电邮,只要去掉--global选项重新配置即可,新的设定保存在当前项目的.git/config文件里。
2、配置级别
git共三个配置级别:
- --local、高优先级,只影响本仓库,文件尾.git/config
- --global、中优先级,影响到素有当前用户的git仓库,文件为~/.gitconfig
- --system、低优先级,影响全系统的git仓库,文件为/etc/gitconfig
3、查看配置信息
[root@localhost test]# git config --list
core.repositoryformatversion=0
core.filemode=true
core.bare=false
core.logallrefupdates=true
3、git通用概念
在介绍下面的部分,有必要说下git的通用概念,这些将会对下面的操作有理解帮助。
在git中,每个版本库都叫做一个仓库(repository),每个仓库可以简单的理解为一个目录,这个目录里面的所有文件都通过git来实现版本管理,git都能跟踪记录在该目录中发生的所有更新。
假设我们新建一个仓库test(repository),那么在这个test目录中就会有.git的文件夹,这个文件夹非常重要,所有的版本信息、更新纪录及git进行仓库管理的相关信息全部都保存在这个文件夹里面。所以,不修改或删除其中的文件,以免造成数据的丢失。
[root@localhost test]# ls -al
总用量 0
drwxr-xr-x  2 root root  6 10月 24 14:04 .
drwxr-xr-x. 6 root root 59 10月 23 19:02 ..
[root@localhost test]# git init
初始化空的 Git 仓库于 /home/test/.git/
[root@localhost test]# ls -al
总用量 0
drwxr-xr-x  3 root root  17 10月 24 14:04 .
drwxr-xr-x. 6 root root  59 10月 23 19:02 ..
drwxr-xr-x  7 root root 111 10月 24 14:04 .git
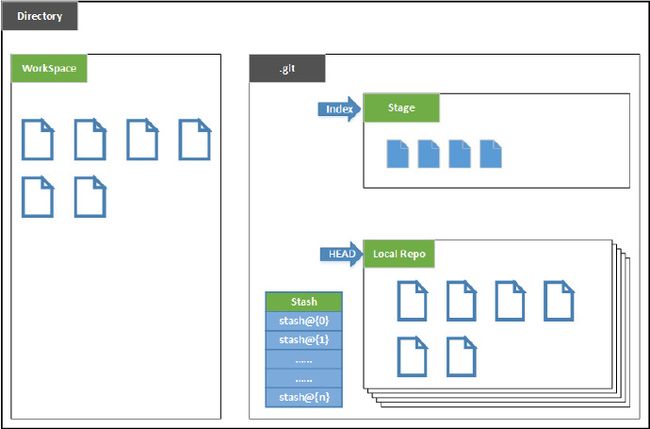
进一步参考下面的图,大概展示了需要了解的基本知识。
根据上图,再给出简要说明:
- Directory:使用git管理的一个目录,也就是一个
仓库,包含我们的工作空间和git的管理空间。 - Workspace:从仓库中chenkout出来的,需要通过git进行版本控制的目录和文件,这些目录和文件组成了
工作空间。 - .git:存放git管理信息的目录,初始化仓库时自动创建。
- Index/Stage:暂存区或叫做待提交更新区;在提交至repo之前,我们可以把所有的更新放在暂存区。
- Local Repo:本地仓库,一个存放在本地的版本库;HEAD会指示当前的开发分支(branch)。
- Stash:工作状态保存栈,用于保存/恢复WorkSpace的临时状态。
4、本地仓库操作(单机)
新建test目录,然后通过git init就可以初始化一个新的仓库,此时会产生一个.git文件夹,这个就是前面提到的git管理信息的目录。下面会大概介绍git一般的工作流程。
4.1 添加
现在在仓库中新建文件content1.txt,内容为f1 content1。
[root@localhost test]# git status
位于分支 master

初始提交

未跟踪的文件:
  (使用 "git add <文件>..." 以包含要提交的内容)

    content1.txt

提交为空,但是存在尚未跟踪的文件(使用 "git add" 建立跟踪)
command 1、git status
git status:可以查看workspace的状态,可以看到输出显示content1.txt未被git跟踪,然后提示可以使用git add把文件添加到暂存区以建立跟踪。
这里文件的第一个状态:处于工作区(workspace)中,暂存区(stage)没有,仓库(repo)没有。
command 2、git add
git add file[/path]:可以将文件从工作区更新到暂存区。使用git add content1.txt,然后继续查看worksace的状态,这时发现文件已经被存放在了暂存区。
[root@localhost test]# git add content1.txt
[root@localhost test]# git status
位于分支 master

初始提交

要提交的变更:
  (使用 "git rm --cached <文件>..." 以取消暂存)

    新文件:   content1.txt
这里文件的第二个状态:工作区(workspace)、暂存区(stage)有,仓库(repo)没有。
command 3、git commit
git commit:将暂存区文件提交到仓库中。最后我们可以使用git commit -m content1.txt,然后继续查看worksace的状态,这时发现文件已经被存放在了仓库中。
[root@localhost test]# git commit -m 'comtent1'
[master(根提交) 36f5265] comtent1

 1 file changed, 1 insertion(+)
 create mode 100644 content1.txt

[root@localhost test]# git status
位于分支 master
nothing to commit, working tree clean
这里文件的第三个状态:工作区(workspace)、暂存区(stage)、仓库(repo)都有。
通过上面的操作,文件content1.txt成功被添加到了仓库中。
4.1.1 git查看
下面作为触探,供后面讲述git存储原理使用。
[root@localhost test]# fing .git/objects/
bash: fing: 未找到命令...
[root@localhost test]# find .git/objects/
.git/objects/
.git/objects/pack
.git/objects/info
.git/objects/de
.git/objects/de/35f338a9d7d8d4faeea0b693f0494932748de5
.git/objects/2e
.git/objects/2e/688748738147fbf159038d82224e9ef728d3cc
.git/objects/36
.git/objects/36/f526581e2d29e5e6eaec7bcfaa51315d5de8b4
[root@localhost test]# git cat-file -t de35f338a9d7d8d4faeea0b693f0494932748de5
blob
[root@localhost test]# git cat-file -t 2e688748738147fbf159038d82224e9ef728d3cc
tree
[root@localhost test]# git cat-file -t 36f526581e2d29e5e6eaec7bcfaa51315d5de8b4
commit
[root@localhost test]# git cat-file -p 36f526581e2d29e5e6eaec7bcfaa51315d5de8b4
tree 2e688748738147fbf159038d82224e9ef728d3cc
author root  1508831813 +0800
committer root  1508831813 +0800

comtent1
[root@localhost test]# git cat-file -p 36f526581e2d29e5e6eaec7bcfaa51315d5de8b4
tree 2e688748738147fbf159038d82224e9ef728d3cc
author root  1508831813 +0800
committer root  1508831813 +0800

comtent1
[root@localhost test]# git cat-file -p de35f338a9d7d8d4faeea0b693f0494932748de5
f1 content1
4.2 更新
下面对content1.txt文件进行修改,内容为f1 content1 now the file has been modified.。修改完后,查看workspace的状态,提示文件已经修改但未提交。
[root@localhost test]# git status
位于分支 master
尚未暂存以备提交的变更:
  (使用 "git add <文件>..." 更新要提交的内容)
  (使用 "git checkout -- <文件>..." 丢弃工作区的改动)

    修改:     content1.txt

修改尚未加入提交(使用 "git add" 和/或 "git commit -a")
同样,通过git add、commit的操作,我们可以把工作区(workspace)文件的更新先存放到暂存区,然后从暂存区(stage)提交到仓库(repo)中。
[root@localhost test]# git add content1.txt
[root@localhost test]# git commit -m 'modified content1.txt' content1.txt
[master 2c4ee67] modified content1.txt

    git commit --amend --reset-author

 1 file changed, 2 insertions(+), 1 deletion(-)
4.2.1 git查看
[root@localhost test]# find .git/objects/
.git/objects/
.git/objects/pack
.git/objects/info
.git/objects/de
.git/objects/de/35f338a9d7d8d4faeea0b693f0494932748de5
.git/objects/2e
.git/objects/2e/688748738147fbf159038d82224e9ef728d3cc
.git/objects/36
.git/objects/36/f526581e2d29e5e6eaec7bcfaa51315d5de8b4
.git/objects/0b
.git/objects/0b/0a0c1d103a155ace75fc2e4738dfe64e3ee4a0
.git/objects/2f
.git/objects/2f/327c9eae9421634ff69b51a3edc4725e8c5703
.git/objects/2c
.git/objects/2c/4ee671dbbf37360e6b6b724d2c4f11d9d111ad
[root@localhost test]# git cat-file -t 0b0a0c1d103a155ace75fc2e4738dfe64e3ee4a0
blob
[root@localhost test]# git cat-file -t 2f327c9eae9421634ff69b51a3edc4725e8c5703
tree
[root@localhost test]# git cat-file -t 2c4ee671dbbf37360e6b6b724d2c4f11d9d111ad
commit
[root@localhost test]# git cat-file -p 2c4ee671dbbf37360e6b6b724d2c4f11d9d111ad
tree 2f327c9eae9421634ff69b51a3edc4725e8c5703
parent 36f526581e2d29e5e6eaec7bcfaa51315d5de8b4
author root  1508832742 +0800
committer root  1508832742 +0800

modified content1.txt
[root@localhost test]# git cat-file -p 2f327c9eae9421634ff69b51a3edc4725e8c5703
100644 blob 0b0a0c1d103a155ace75fc2e4738dfe64e3ee4a0    content1.txt
[root@localhost test]# git cat-file -p 0b0a0c1d103a155ace75fc2e4738dfe64e3ee4a0
f1 content1
now the file has been modified.
4.2.2 文件版本对比
1、工作区和暂存区
command 4、git diff
git diff :查看工作区和暂存区的文件的差异情况,当我们把更新add到Stage中,diff就不会有任何输出了。
[root@localhost test]# git diff
现修改文件内容为f1 content1 now the file has been modified. git giff。
[root@localhost test]# git diff
diff --git a/content1.txt b/content1.txt
index 0b0a0c1..cbbe1be 100644
--- a/content1.txt
+++ b/content1.txt
@@ -1,2 +1,3 @@
 f1 content1
 now the file has been modified.
+git diff
2、工作区与仓库
当然我们也可以把工作区的文件跟仓库中的文件做差异对比。
[root@localhost test]# git diff HEAD~1
diff --git a/content1.txt b/content1.txt
index de35f33..0b0a0c1 100644
--- a/content1.txt
+++ b/content1.txt
@@ -1 +1,2 @@
-f1 content1
+f1 content1
+now the file has been modified.
4.3 撤销更新
根据前面对git操作的了解,我们可以智道更新可能存在于三个地方,工作区(workspace)、暂存区(stage)和仓库(repo)。下面就分别界山怎么撤销这些更新。
确认我们现在工作区(workspace)、暂存区(stage)和仓库(repo)的文件内容一致为:f1 content1 now the file has been modified.。
4.3.1 撤销工作区中的更新
先修改文件content1.txt内容为new content1,查看状态。
[root@localhost test]# git status
位于分支 master
尚未暂存以备提交的变更:
  (使用 "git add <文件>..." 更新要提交的内容)
  (使用 "git checkout -- <文件>..." 丢弃工作区的改动)

    修改:     content1.txt

修改尚未加入提交(使用 "git add" 和/或 "git commit -a")
command 5、git checkout --
可以看到上面工作区状态有提示:(使用 "git checkout -- <文件>..." 丢弃工作区的改动),这里注意它的格式,'--'左右空格要保留。
[root@localhost test]# git checkout  -- content1.txt
[root@localhost test]# vim content1.txt
[root@localhost test]# git status
位于分支 master
nothing to commit, working tree clean
注意:使用这种方法的时候要慎重,因为通过这种方法撤销后,工作区之前所作的修改将无法挽回。
4.3.2 撤销暂存区中的更新
先修改文件content1.txt内容为new content1 stage,之后再git add提交,再查看状态。
[root@localhost test]# git add content1.txt
[root@localhost test]# git status
位于分支 master
要提交的变更:
  (使用 "git reset HEAD <文件>..." 以取消暂存)

    修改:     content1.txt
从输出中提示我们可以通过git reset HEAD 把暂存区的更新移出到工作区中。
command 5、git reset HEAD
[root@localhost test]# git reset HEAD content1.txt
重置后取消暂存的变更:
M   content1.txt
[root@localhost test]# git status
位于分支 master
尚未暂存以备提交的变更:
  (使用 "git add <文件>..." 更新要提交的内容)
  (使用 "git checkout -- <文件>..." 丢弃工作区的改动)

    修改:     content1.txt
注意:若撤销前,文件又被修改,此操作只是将相应文件从暂存区移除,不会影响到工作区最新的已被修改文件。
4.3.3 撤销仓库中的更新
介绍repo的更新之前,我们可以先看下git log这个命令。
command 6、git log
git log:可以查看commit的历史记录。
[root@localhost test]# git log
commit 2c4ee671dbbf37360e6b6b724d2c4f11d9d111ad
Author: root
Date:   Tue Oct 24 16:12:22 2017 +0800

    modified content1.txt

commit 36f526581e2d29e5e6eaec7bcfaa51315d5de8b4
Author: root
Date:   Tue Oct 24 15:56:53 2017 +0800

    comtent1
假设我们要撤销修改文件的那次提交,即仓库中要只留有一次提交版本,内容为f1 content1。
有两种方式:使用HEAD指针和使用commit id。
command 7、git reset --hard
1、HEAD指针
当前版本,我们使用HEAD^,那么再前一个版本可以使用HEAD^^,如果想回退到更早的提交,可以使用HEAD~n。(也就是,HEAD=HEAD~1,HEAD^=HEAD~2)
2、commit id
即根据文件内容或目录结构计算得出的40位16进制hash值。
即
git reset --hard HEAD^ # 前一个版本
等价:
git reset --hard 36f526581e2d29e5e6eaec7bcfaa51315d5de8b4 # 前一个版本
[root@localhost test]# git reset --hard 2c4ee671dbbf37360e6b6b724d2c4f11d9d111ad
HEAD 现在位于 2c4ee67 modified content1.txt
[root@localhost test]# git log
commit 2c4ee671dbbf37360e6b6b724d2c4f11d9d111ad
Author: root
Date:   Tue Oct 24 16:12:22 2017 +0800

    modified content1.txt

commit 36f526581e2d29e5e6eaec7bcfaa51315d5de8b4
Author: root
Date:   Tue Oct 24 15:56:53 2017 +0800

    comtent1
[root@localhost test]# git reset --hard HEAD^
HEAD 现在位于 36f5265 comtent1
[root@localhost test]# git log
commit 36f526581e2d29e5e6eaec7bcfaa51315d5de8b4
Author: root
Date:   Tue Oct 24 15:56:53 2017 +0800

    comtent1
此时查看工作区文件,内容已经变成最初的状态,内容为:f1 content。
4.3.4 仓库版本的恢复
假设现在你又想要恢复内容为f1 content1 now the file has been modified.这个提交了,当然git是支持这样的操作。
command 8、git reflog
git reflog:git log只是包括了当前分支中的commit记录,而git reflog中会记录这个仓库所有分支的所有更新记录,包括已经撤销的更新。
[root@localhost test]# git reflog
36f5265 HEAD@{0}: reset: moving to HEAD^
2c4ee67 HEAD@{1}: commit: modified content1.txt
36f5265 HEAD@{2}: commit (initial): comtent1
我们可以使用下面的命令:
git reset --hard HEAD@{1}
等价于:
git reset --hard 2c4ee67

[root@localhost test]# git reset --hard HEAD@{1}
HEAD 现在位于 2c4ee67 modified content1.txt

[root@localhost test]# git log
commit 2c4ee671dbbf37360e6b6b724d2c4f11d9d111ad
Author: root
Date:   Tue Oct 24 16:12:22 2017 +0800

    modified content1.txt

commit 36f526581e2d29e5e6eaec7bcfaa51315d5de8b4
Author: root
Date:   Tue Oct 24 15:56:53 2017 +0800

    comtent1
恩、最后content1.txt的内容还是内容为f1 content1 now the file has been modified.。
–hard和–soft
前面在使用reset来撤销更新的时候,我们都是使用的“–hard”选项,其实与之对应的还有一个“–soft”选项,区别如下:
- –hard:撤销并删除相应的更新。
- –soft:撤销相应的更新,把这些更新的内容放的Stage中。
4.4 删除文件
在Git中,如果我们要删除一个文件,可以使用下面的命令,“git rm”相比“rm”只是多了一步,把这次删除的更新发到Stage中。
rm                    # 这个在linux下直接变成要删除文件。

git rm
command 9、rm
[root@localhost test]# git rm content1.txt
rm 'content1.txt'
[root@localhost test]# git status
位于分支 master
要提交的变更:
  (使用 "git reset HEAD <文件>..." 以取消暂存)

    删除:     content1.txt

[root@localhost test]# git commit -m 'delete content1.txt'
[master 86c41ea] delete content1.txt
 Committer: root
您的姓名和邮件地址基于登录名和主机名进行了自动设置。请检查它们正确
与否。您可以对其进行设置以免再出现本提示信息。运行如下命令在编辑器
中编辑您的配置文件:

    git config --global --edit

设置完毕后,您可以用下面的命令来修正本次提交所使用的用户身份:

    git commit --amend --reset-author

 1 file changed, 2 deletions(-)
 delete mode 100644 content1.txt
[root@localhost test]# git log
commit 86c41eade0390d2a9c15ba3385ccdce9bca73cbf
Author: root
Date:   Tue Oct 24 17:17:33 2017 +0800

    delete content1.txt

commit 2c4ee671dbbf37360e6b6b724d2c4f11d9d111ad
Author: root
Date:   Tue Oct 24 16:12:22 2017 +0800

    modified content1.txt

commit 36f526581e2d29e5e6eaec7bcfaa51315d5de8b4
Author: root
Date:   Tue Oct 24 15:56:53 2017 +0800

    comtent1
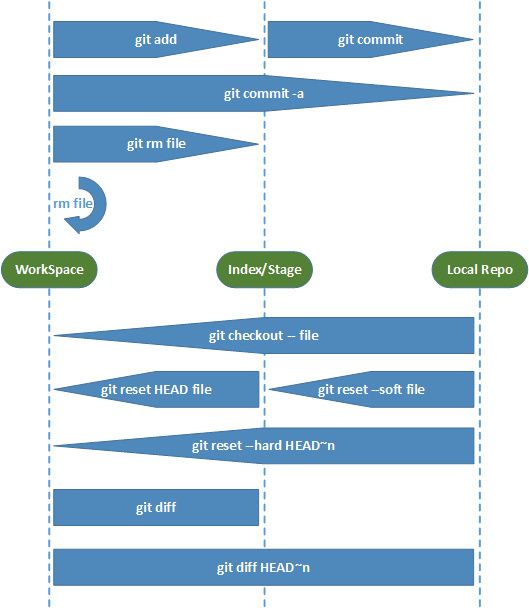
4.5 操作总结图
5、git对象模型
5.1 git对象
在git系统中有4种类型的对象,所有的git操作都是基于这四种类型的对象。
- blob:用来保存文件内容的对象。
- tree:可以理解为一个关系对象树,它管理一些tree和blob对象。
- commit:只指向一个tree,他用来标记项目某一个特定时间点的状态。它包括一些关于时间点的元数据,如时间戳、最近一次提交的作者、指向上次提交(初始commit没有这一项)。
- tag:给某个提交(commit)增添一个标记。
5.2 SHA1哈希值
前面介绍了git对象实例,在git系统中,每个git对象都有一个特殊的ID来代表这个对象。这个特殊的ID就是我们所说的哈希值。
SHA1哈希值就通过SHA1算法计算出来的哈希值,对于内容不同的对象,会有不同的哈希值,它是40位长的16进制字符表示的字符串。
5.3 git对象模型实例
重温下1.2.2 版本控制的原理章节,git的版本控制原理可能会对你理解下面的内容有所帮助。
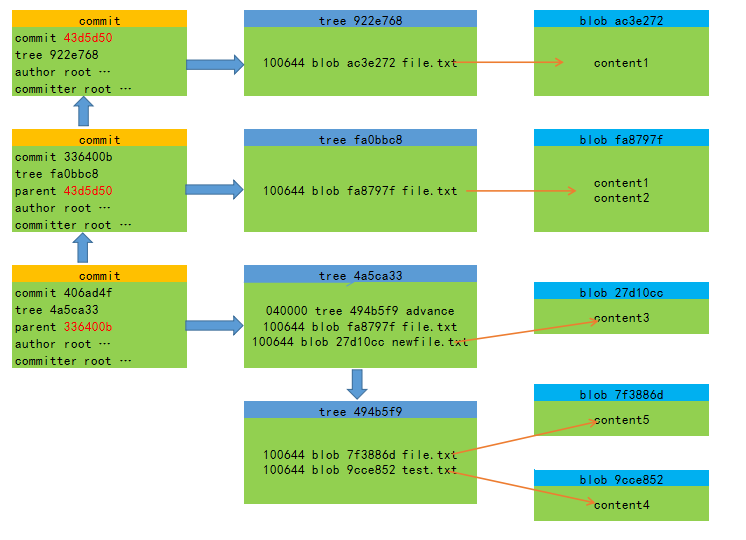
1、初始化新建gitob仓库,新建file.txt文件,内容为content1。由工作区将file.txt提交到暂存区,再提交到仓库。生成了三个对象:blob(ac3e272)、tree(922e768)、commit(43d5d50)。
[root@localhost home]# mkdir gitob
[root@localhost home]# cd gitob/
[root@localhost gitob]# git init
初始化空的 Git 仓库于 /home/gitob/.git/
[root@localhost gitob]# find .git/objects/
.git/objects/
.git/objects/pack
.git/objects/info
[root@localhost gitob]# echo "content1" >> file.txt
[root@localhost gitob]# git add file.txt
[root@localhost gitob]# git commit -m 'file content1'
[master(根提交) 43d5d50] file content1
 Committer: root
 1 file changed, 1 insertion(+)
 create mode 100644 file.txt
[root@localhost gitob]# find .git/objects/
.git/objects/
.git/objects/pack
.git/objects/info
.git/objects/ac
.git/objects/ac/3e272b72bbf89def8657766b855d0656630ed4
.git/objects/92
.git/objects/92/2e7684388b51938e7442eb310513d8a965971d
.git/objects/43
.git/objects/43/d5d5076eaa085fef9f26fbd807d5babc58eb5a
[root@localhost gitob]# git log --pretty=raw
commit 43d5d5076eaa085fef9f26fbd807d5babc58eb5a
tree 922e7684388b51938e7442eb310513d8a965971d
author root  1508845030 +0800
committer root  1508845030 +0800

    file content1

[root@localhost gitob]# git cat-file -p 922e7684388b51938e7442eb310513d8a965971d
100644 blob ac3e272b72bbf89def8657766b855d0656630ed4    file.txt
[root@localhost gitob]# git cat-file -p ac3e272b72bbf89def8657766b855d0656630ed4
content1
2、这一步对file.txt做出追加修改,内容为content2。由工作区将file.txt提交到暂存区,再提交到仓库。生成了三个对象:blob(fa8797f)、tree(fa0bbc8)、commit(336400b),这里注意查看commit历史时,它又又有一个属性parent 43d5d50指向上面那个commit对象。
[root@localhost gitob]# echo 'content2' >> file.txt
[root@localhost gitob]# ll
总用量 4
-rw-r--r-- 1 root root 18 10月 24 20:02 file.txt
[root@localhost gitob]# git add file.txt
[root@localhost gitob]# git commit -m 'comment2'
[master 336400b] comment2
 Committer: root

 1 file changed, 1 insertion(+)

[root@localhost gitob]# git log --pretty=raw
commit 336400b0b36e8f6cfe683fa5127bad6fb235060c
tree fa0bbc8e85135d5ed51a4f13ec9227917d8f4b57
parent 43d5d5076eaa085fef9f26fbd807d5babc58eb5a
author root  1508846561 +0800
committer root  1508846561 +0800

    comment2

commit 43d5d5076eaa085fef9f26fbd807d5babc58eb5a
tree 922e7684388b51938e7442eb310513d8a965971d
author root  1508845030 +0800
committer root  1508845030 +0800

    file content1

[root@localhost gitob]# git cat-file -p fa0bbc8e85135d5ed51a4f13ec9227917d8f4b57
100644 blob fa8797f68cd826a3ac7713bdfdb9ddb43b146752    file.txt
[root@localhost gitob]# git cat-file -p fa8797f68cd826a3ac7713bdfdb9ddb43b146752
content1
3、这一步新建newfile.txt,内容为content3;新建advance文件夹;在advance下,新建test.txt,内容为content4;新建file.txt,内容为content5;再提交到暂存区,再提交到仓库。生成了6个对象:blob(27d10cc)、tree(4a5ca33)、commit(406ad4f),这里注意查看commit历史时,它又又有一个属性parent 336400b指向上面修改文件之后的那个commit对象。tree(4a5ca33)又包含tree(494b5f9)、blob(7f3886d)、blob(9cce852)。
[root@localhost gitob]# echo 'content3' >> newfile.txt
[root@localhost gitob]# mkdir advance
[root@localhost gitob]# echo 'content4' >> ./advance/test.txt
[root@localhost gitob]# echo 'content5' >> ./advance/file.txt

[root@localhost gitob]# git add .
[root@localhost gitob]# git commit -m 'third op' .
[master 406ad4f] third op
 Committer: root

 3 files changed, 3 insertions(+)
 create mode 100644 advance/file.txt
 create mode 100644 advance/test.txt
 create mode 100644 newfile.txt

[root@localhost gitob]# git log --pretty=raw
commit 406ad4f261d9f2ced79f8b73b9b8a5a0adfdc9e1
tree 4a5ca33cc59ec2b01900e65ec75266090ccc8a7a
parent 336400b0b36e8f6cfe683fa5127bad6fb235060c
author root  1508847505 +0800
committer root  1508847505 +0800

    third op

commit 336400b0b36e8f6cfe683fa5127bad6fb235060c
tree fa0bbc8e85135d5ed51a4f13ec9227917d8f4b57
parent 43d5d5076eaa085fef9f26fbd807d5babc58eb5a
author root  1508846561 +0800
committer root  1508846561 +0800

    comment2

commit 43d5d5076eaa085fef9f26fbd807d5babc58eb5a
tree 922e7684388b51938e7442eb310513d8a965971d
author root  1508845030 +0800
committer root  1508845030 +0800

    file content1

[root@localhost gitob]# git cat-file -p 4a5ca33cc59ec2b01900e65ec75266090ccc8a7a
040000 tree 494b5f973f06cc02664b393e4fc0b174dde85218    advance
100644 blob fa8797f68cd826a3ac7713bdfdb9ddb43b146752    file.txt
100644 blob 27d10cc8d0f10540c1fce1aa6de5e8f3e6b655ba    newfile.txt
[root@localhost gitob]# git cat-file -p 494b5f973f06cc02664b393e4fc0b174dde85218
100644 blob 7f3886d9cc49b5817001f0fc16c637290e4200b0    file.txt
100644 blob 9cce8524a4871530843e41906f1c3e07af4849de    test.txt
[root@localhost gitob]# git cat-file -p 27d10cc8d0f10540c1fce1aa6de5e8f3e6b655ba
content3
[root@localhost gitob]# git cat-file -p 7f3886d9cc49b5817001f0fc16c637290e4200b0
content5
[root@localhost gitob]# git cat-file -p 9cce8524a4871530843e41906f1c3e07af4849de
content4
4、关系示意图
git对象模型就像是git系统特有的文件系统,以特定的方式存储更新的内容、元数据以及版本历史信息。
6、探索仓库.git目录
6.1 git目录基本介绍
下面探索git目录,这里接着5、git对象结构模型里面的文件进行。
[root@localhost gitob]# ls -al
总用量 8
drwxr-xr-x  4 root root  64 10月 24 20:16 .
drwxr-xr-x. 7 root root  71 10月 24 19:30 ..
drwxr-xr-x  2 root root  36 10月 24 20:17 advance
-rw-r--r--  1 root root  18 10月 24 20:02 file.txt
drwxr-xr-x  8 root root 155 10月 24 20:18 .git
-rw-r--r--  1 root root   9 10月 24 20:16 newfile.txt
[root@localhost .git]# ls -al
总用量 24
drwxr-xr-x  8 root root  155 10月 24 20:18 .
drwxr-xr-x  4 root root   64 10月 24 20:16 ..
drwxr-xr-x  2 root root    6 10月 24 19:32 branches
-rw-r--r--  1 root root    9 10月 24 20:18 COMMIT_EDITMSG
-rw-r--r--  1 root root   92 10月 24 19:32 config
-rw-r--r--  1 root root   73 10月 24 19:32 description
-rw-r--r--  1 root root   23 10月 24 19:32 HEAD
drwxr-xr-x  2 root root 4096 10月 24 19:32 hooks
-rw-r--r--  1 root root  409 10月 24 20:18 index
drwxr-xr-x  2 root root   20 10月 24 19:32 info
drwxr-xr-x  3 root root   28 10月 24 19:37 logs
drwxr-xr-x 15 root root  127 10月 24 20:18 objects
drwxr-xr-x  4 root root   29 10月 24 19:32 refs
对于这些文件和目录,先进行一些基本的描述,在之后有更详细的介绍。
(d)hooks:这个目录存放一些shell脚本,可以设置特定的git命令发出后响应的脚本,在搭建gitweb或其它git托管系统经常用到,即钩子。
(d)info:包含一些仓库的信息。
(d)logs:保存所有更新的引用记录。
(d)objects:所有的git对象都会放在这个目录中,对象的hash值的前两位是文件夹的名称,后38位作为对象的文件名。这里注意完整的hash值仍是40位整的。
(d)refs:这个目录一般包含三个子目录:heads、remotes和tags,heads中的文件标识了项目中各个分支指向的当前commit。
(d)branches:存放一个仓库的各个分支。
(f)COMMIT_EDITMSG:保存最新的commit messsage,git系统不会用到这个文件夹,只是给用户的一个参考。
(f)config:仓库的配置文件。
(f)description:仓库的描述信息,主要给gitweb等git托管系统使用。
(f)HEAD:这个文件包含了一个当前分支(branch)的作用,通过这个文件git可以找到下一次commmit的parent。
(f)index:这个文件就是我们前面提到的暂存区(stage),是一个二进制文件。
6.2 git引用
git引用是非常重要的概念,对于理解分支、HEAD指针以及reflog非常有帮助。
git系统中的分支名、远程分支名、tag等都是指向某个commit的引用,比如master分支,origin/master,命名为v1.0的tag等都是引用,它们通过保存某个commit的SHA1哈希值指向某个commit。
6.2.1 重新认识HEAD
HEAD也是一个一用,一般情况下间接指向你当前所在的分支的最新的commit上。HEAD跟git中一般的引用不同,它并不包含某个commit的SHA1哈希值,而是包含当前所在的分支,所以HEAD直接指向当前所在的分支,然后简介指向当前分支的最新提交。
下面实例解释上面的内容,首先查看‘.git/HEAD’的内容。
[root@localhost gitob]# cat .git/HEAD
ref: refs/heads/master
这里表示HEAD指向一个master分支的引用,然后我们可以根据引用路径打开‘.git/refs/heads/master’文件,内容如下:
[root@localhost gitob]# cat .git/refs/heads/master
406ad4f261d9f2ced79f8b73b9b8a5a0adfdc9e1
我们利用git log查看各个commit的哈希值,可以看出上面的commit正是指向master分支上最新的提交406ad4f261d9f2ced79f8b73b9b8a5a0adfdc9e1。
[root@localhost gitob]# git log
commit 406ad4f261d9f2ced79f8b73b9b8a5a0adfdc9e1
Author: root
Date:   Tue Oct 24 20:18:25 2017 +0800

    third op

commit 336400b0b36e8f6cfe683fa5127bad6fb235060c
Author: root
Date:   Tue Oct 24 20:02:41 2017 +0800

    comment2

commit 43d5d5076eaa085fef9f26fbd807d5babc58eb5a
Author: root
Date:   Tue Oct 24 19:37:10 2017 +0800

    file content1
所以所有的内容环环相扣,我们通过HEAD找到当前分支,然后通过当前分支的引用找到最新的commit,然后通过commit找到整个对象关系模型,对应下图。
6.2.2 引用与分支
分支在下节会描述,这节直接先使用,下面会大概介绍下引用与分支的关系。
[root@localhost gitob]# git branch bugfix           # 新建分支
[root@localhost gitob]# git checkout bugfix         # 切换到bugfix分支
切换到分支 'bugfix'
在上面我们新建了一个bugfix的分支,然后切换到了这个分支中,那我们再次查看refs/heads/目录可以看到除了master分支外,又多出一个bugfix的分支文件,其文件的内容也是一个哈希值。
[root@localhost gitob]# cd .git/refs/heads/         # 查看ref/heads目录中的分支
[root@localhost heads]# ll
总用量 8
-rw-r--r-- 1 root root 41 10月 26 13:36 bugfix
-rw-r--r-- 1 root root 41 10月 24 20:18 master
[root@localhost heads]# cd -
/home/gitob
通过git show-ref --heads命令就可以看到所有的头。
[root@localhost gitob]# git show-ref --heads        # 查看所有的分支头
406ad4f261d9f2ced79f8b73b9b8a5a0adfdc9e1 refs/heads/bugfix
406ad4f261d9f2ced79f8b73b9b8a5a0adfdc9e1 refs/heads/master
根据前面的概念,HEAD指向当前分支的最新提交,即现在我们查看HEAD值的话就是下面这样。
[root@localhost gitob]# cat .git/HEAD               # 当前头指向分支
ref: refs/heads/bugfix
6.2.3 再看reflog
在第4节中,已经说过如何根据reflog去得到一个commit的哈希值,然后把repo退回到指定的版本状态。
下面我们切到.git/logs文件夹,可以看到这个文件夹也有一个HEAD文件和refs目录,这些就是记录reflog的地方。
查看HEAD文件的内容,会发现这个文件将会包含所有分支的reflog记录。
[root@localhost gitob]# cd .git/logs/
[root@localhost logs]# vim HEAD

0000000000000000000000000000000000000000 43d5d5076eaa085fef9f26fbd807d5babc58eb5a root  1508845030 +0800    commit (initial): file content1
43d5d5076eaa085fef9f26fbd807d5babc58eb5a 336400b0b36e8f6cfe683fa5127bad6fb235060c root  1508846561 +0800    commit: comment2
336400b0b36e8f6cfe683fa5127bad6fb235060c 406ad4f261d9f2ced79f8b73b9b8a5a0adfdc9e1 root  1508847505 +0800    commit: third op
406ad4f261d9f2ced79f8b73b9b8a5a0adfdc9e1 406ad4f261d9f2ced79f8b73b9b8a5a0adfdc9e1 root  1508996182 +0800    checkout: moving from master to bugfix
进入.git/logs/refs/heads目录,同样会有master和bugfix两个文件,两个文件将会保存各自分支的reflog记录。内容记录分别如下:
[root@localhost heads]# cat master
0000000000000000000000000000000000000000 43d5d5076eaa085fef9f26fbd807d5babc58eb5a root  1508845030 +0800    commit (initial): file content1
43d5d5076eaa085fef9f26fbd807d5babc58eb5a 336400b0b36e8f6cfe683fa5127bad6fb235060c root  1508846561 +0800    commit: comment2
336400b0b36e8f6cfe683fa5127bad6fb235060c 406ad4f261d9f2ced79f8b73b9b8a5a0adfdc9e1 root  1508847505 +0800    commit: third op
[root@localhost heads]# cat bugfix
0000000000000000000000000000000000000000 406ad4f261d9f2ced79f8b73b9b8a5a0adfdc9e1 root  1508996177 +0800    branch: Created from master
6.2.4 索引(index)
前面说过index/stage,就是更新的暂存区,下面就来看下index文件。这里已经将当前分支恢复到了master。
index(索引)是一个存放了以排序路径的二进制文件,并且每个路径都对应一个SHA1哈希值,在git系统中,可以通过git ls-files --stage来查看index文件的内容。
[root@localhost .git]# git ls-files --stage
100644 7f3886d9cc49b5817001f0fc16c637290e4200b0 0   advance/file.txt
100644 9cce8524a4871530843e41906f1c3e07af4849de 0   advance/test.txt
100644 fa8797f68cd826a3ac7713bdfdb9ddb43b146752 0   file.txt
100644 27d10cc8d0f10540c1fce1aa6de5e8f3e6b655ba 0   newfile.txt
从上面的结果可以看出,所有的记录都对应仓库的文件(包括全路径)。通过git cat-file命令可以查看某个文件对应的哈希值,这个哈希值就是代表这个文件所在的blob对象。
[root@localhost .git]# git cat-file -t fa8797f68cd826a3ac7713bdfdb9ddb43b146752
blob
[root@localhost .git]# git cat-file -p fa8797f68cd826a3ac7713bdfdb9ddb43b146752
content1
content2
下面修改file.txt文件,添加提交,其哈希值已经发生变化。
[root@localhost gitob]# cat file.txt
content1
content2

stage
[root@localhost gitob]# git add file.txt
[root@localhost gitob]# git commit -m 'stage update'
[master d540063] stage update
 Committer: root

 1 file changed, 2 insertions(+)
再查看暂存区index中其对应的文件。
[root@localhost gitob]# git ls-files --stage
100644 7f3886d9cc49b5817001f0fc16c637290e4200b0 0   advance/file.txt
100644 9cce8524a4871530843e41906f1c3e07af4849de 0   advance/test.txt
100644 a458c3d38d26fcac12c94af976c8cc580c5be30a 0   file.txt
100644 27d10cc8d0f10540c1fce1aa6de5e8f3e6b655ba 0   newfile.txt
[root@localhost gitob]# git cat-file -t a458c3d38d26fcac12c94af976c8cc580c5be30a
blob
[root@localhost gitob]# git cat-file -p a458c3d38d26fcac12c94af976c8cc580c5be30a
content1
content2

stage
这个例子我们可以理解之前diff操作会有怎样的变化。
- git diff:比较workspace和stage,add之前有diff输出;add之后没有diff输出。
- git diff HEAD:比较workspace和repo,add之前之后都有diff输出。
- git diff --cached:比较stage和repo,add之前没有diff输出;add之后有diff输出。
6.3 git对象存储
之前提到git所有的对象都会放在.git/objects的目录中,对象SHA1的哈希值是文件夹名称,后38位作为对象文件名。上述所有的对象都可以这么找到。
在git系统中有两种存储对象的方式,松散对象和打包对象存储。
6.3.1 松散对象(loose object)
松散随想存储就是前面提到的每个对象都被写入一个单独文件中,对象SHA1哈希值的前两位是文件夹的名称,后38位作为对象文件名。
6.3.2 打包对象(packed object)
对于松散对象,把每个文件的每个版本都作为一个单独的对象,它的效率比较低,而且浪费空间,所有就有了打包文件的存储方式。
git使用打包文件(packfile)去节省空间,在这个格式中,git只会保存第二个文件中改变了的部分,然后用一个指针指向相似的那个文件。
一般的git系统中会自动完成打包的工作,在已经发生打包的git仓库中,.git/objects/pack目录下会成对出现跟对‘pack-?.idx’和‘pack-?.pack’文件,再具体这里不做介绍。
