全网 HTTPS 时代就要到来,Let’s Encrypt 三个月有效期的免费 HTTPS 证书现在支持泛域名了,我们可以通过 Certbot 非常方便的申请和更新证书。网上很多关于 Certbot 的文章,但是关于泛域名证书的自动更新很少提及,或者很多误区,这里简单的讲解一下。
Certbot 安装
安装非常简单,只要进入 Certbot 官网选择对应的系统和 Web 服务软件就会提示如何安装,按照提示操作就可以了。
我的服务器是 Ubuntu 16.04 + Nginx,以下内容以这个为模板。
$ sudo apt-get update
$ sudo apt-get install software-properties-common
$ sudo add-apt-repository universe
$ sudo add-apt-repository ppa:certbot/certbot
$ sudo apt-get update
$ sudo apt-get install python-certbot-nginx
申请证书有两种模式:自动模式和手动模式
自动模式
$ sudo certbot --nginx
一行命令解决所有问题:
- 申请证书
- 配置 Nginx 站点
- 设置证书自动更新
既然自动模式全部搞定了,为什么还要手动模式呢。自动模式只能自动申请和更新普通域名证书,即仅包含类似 dada.fun、www.dada.fun 这种域名的证书,将来每增加一个二级域名如 admin.dada.fun 都要重新扩展证书。而泛域名证书是直接认证给 *.dada.fun,所有二级域名都覆盖了,一劳永逸。如果你仅仅需要普通域名证书,那到此就结束了。
对于喜欢折「zhuang」腾「bi」的人来说,当然还是来个泛域名证书吧!
手动模式
申请泛域名证书
申请泛域名证书的时候要对域名进行认证。认证方式有很多,比如在域名绑定空间下放个文件什么的,都很麻烦,最方便的是 DNS 认证。DNS 认证只需要在域名 DNS 下增加一条指定的记录就可以了。一般来说可以自己登录域名管理后台添加指定记录来配合申请,但是以后更新怎么办?每次都登录服务器运行更新命令,再登录域名管理后台添加记录?好在 Certbot 程序可以在更新证书的时候通过接口来替我们添加 DNS 记录。现在很多 DNS 服务商都提供了 API 接口来管理 DNS 记录,这样就使自动更新成为可能。Certbot 默认支持很多 DNS 服务商,但是国内几家大的服务商都不支持,这样就要用到第三方的插件了。
我用的是网友 虞大胆 开源的一个工具:certbot-letencrypt-wildcardcertificates-alydns-au。工具就不介绍了,点开链接作者写的很详细了,看看怎么用吧:
$ git clone https://github.com/ywdblog/certbot-letencrypt-wildcardcertificates-alydns-au certbot-wildcard
$ cd certbot-wildcard
$ chmod 0777 au.sh autxy.sh augodaddy.sh python-version/au.sh
「这工具名字太长,我改成 certbot-wildcard 了」
下载安装完成修改一下配置文件 alydns.php「我是阿里云注册的域名」:
阿里云的 accessKeyId 和 accessSecrec 填进去就可以了,注意一下域名数组里可有你的根域名在里面,没有就加进去。
现在来执行 Certbot 命令申请证书:
$ sudo certbot certonly -d dada.fun -d *.dada.fun --manual --preferred-challenges dns --manual-auth-hook /root/certbot-wildcard/au.sh --pre-hook "systemctl stop nginx.service" --post-hook "systemctl start nginx.service"
命令非常长,带了很多参数:
-d 指定域名,*.dada.fun 必须的,本来就冲着它来的。有的机构会自动带上 dada.fun,但是 Let’s Encrypt 不会,所以要把 dada.fun 带上,不然访问 dada.fun 还是 HTTP 就尴尬了!
--manual 手动操作
--preferred-challenges dns 通过 DNS 来认证
--manual-auth-hook /root/certbot-wildcard/au.sh 手动操作认证时候的钩子,这里调用刚刚下载的工具进入阿里云域名管理后台添加 DNS 记录
--pre-hook "systemctl stop nginx.service" 前置钩子,安装证书之前关闭 nginx 服务
--post-hook "systemctl start nginx.service" 后置钩子,证书安装完成以后打开 nginx 服务
不出意外的话证书就申请好了。默认放在 /etc/letsencrypt/archive/dada.fun/ 文件夹里面。接下来修改一下 Nginx 的站点配置:
server {

    server_name dada.fun www.dada.fun;
    root "/var/www/dada.fun";

    index index.html index.htm index.php;

    charset utf-8;

    location / {
        try_files $uri $uri/ /index.php?$query_string;
    }

    location = /favicon.ico { access_log off; log_not_found off; }
    location = /robots.txt  { access_log off; log_not_found off; }

    access_log /var/log/nginx/dada.fun.log;
    error_log /var/log/nginx/dada.fun-error.log error;

    sendfile off;

    client_max_body_size 100m;

    location ~ \.php$ {
        fastcgi_split_path_info ^(.+\.php)(/.+)$;
        fastcgi_pass unix:/var/run/php/php7.2-fpm.sock;
        fastcgi_index index.php;
        include fastcgi_params;
        fastcgi_param SCRIPT_FILENAME $realpath_root$fastcgi_script_name;
        fastcgi_param DOCUMENT_ROOT $realpath_root;

        fastcgi_intercept_errors off;
        fastcgi_buffer_size 16k;
        fastcgi_buffers 4 16k;
        fastcgi_connect_timeout 300;
        fastcgi_send_timeout 300;
        fastcgi_read_timeout 300;
    }

    location ~ /\.ht {
        deny all;
    }

    listen 443 ssl; # 修改地方
    ssl_certificate /etc/letsencrypt/live/dada.fun/fullchain.pem; # 修改地方
    ssl_certificate_key /etc/letsencrypt/live/dada.fun/privkey.pem; # 修改地方

} server {

    if ($host = www.dada.fun) {
        return 301 https://$host$request_uri;
    } # 强制跳转 HTTPS

    if ($host = dada.fun) {
        return 301 https://$host$request_uri;
    } # 强制跳转 HTTPS

    listen 80;
    server_name dada.fun www.dada.fun;
    return 404; # 修改地方

}
改完以后重启 Nginx 服务生效,网站就能访问了。
更新泛域名证书
证书有效期只有三个月,所以更新域名非常关键。更新操作其实和初次申请差不多,只是命令不同,参数都一样。所以智能的 Certbot 在初次申请完成以后就把所有参数都保存下来,方便更新的时候使用。更新的参数保存在 /etc/letsencrypt/renewal/dada.fun.conf。我们打开看看:
# renew_before_expiry = 30 days
version = 0.28.0
archive_dir = /etc/letsencrypt/archive/dada.fun
cert = /etc/letsencrypt/live/dada.fun/cert.pem
privkey = /etc/letsencrypt/live/dada.fun/privkey.pem
chain = /etc/letsencrypt/live/dada.fun/chain.pem
fullchain = /etc/letsencrypt/live/dada.fun/fullchain.pem

# Options used in the renewal process
[renewalparams]
manual_public_ip_logging_ok = True
manual_auth_hook = /root/certbot-wildcard/au.sh
server = https://acme-v02.api.letsencrypt.org/directory
pref_challs = dns-01,
authenticator = manual
account = 6656c0feac6c44e53d8b89e9afb6712b
pre_hook = systemctl stop nginx.service
post_hook = systemctl start nginx.service
通过第一行看到 Certbot 只有在离证书过期 30 天内才会更新证书,超过 30 天的证书更新会被忽略。
既然参数都还在,那更新证书只需要一条简单的命令就可以了:
$ sudo certbot renew
定时任务自动更新
光能更新证书还不够,谁吃饱没事每三个月登录一次服务器更新证书呀。在服务器上设置定时任务自动更新才是完美的方案。Linux 的定时任务有两种方法:cron 和 systemd/timers,任何一种都能实现定时的更新任务,可爱的 Certbot 两种都设置了,我们分别看看。
Cron
$ vim /etc/cron.d/certbot
打开文件可以看到 Certbot 设定的任务记录:
0 */12 * * * root test -x /usr/bin/certbot -a \! -d /run/systemd/system && perl -e 'sleep int(rand(43200))' && certbot -q renew
每天运行两次 certbot -q renew,-q 是安静模式,只把 error 写入日志。我们选择 timers 来自动更新,所以把 cron 任务注释掉:
#0 */12 * * * root test -x /usr/bin/certbot -a \! -d /run/systemd/system && perl -e 'sleep int(rand(43200))' && certbot -q renew
Timers
Certbot 在 /lib/systemd/system/ 下生成了两个文件:certbot.service 和 certbot.timer,一个是服务,一个是定时器。
certbot.service:
[Unit]
Description=Certbot
Documentation=file:///usr/share/doc/python-certbot-doc/html/index.html
Documentation=https://letsencrypt.readthedocs.io/en/latest/
[Service]
Type=oneshot
ExecStart=/usr/bin/certbot -q renew
PrivateTmp=true
可以看到也是运行 certbot -q renew 命令。
certbot.timer:
[Unit]
Description=Run certbot twice daily

[Timer]
OnCalendar=*-*-* 00,12:00:00
RandomizedDelaySec=43200
Persistent=true

[Install]
WantedBy=timers.target
每天 0 点和 12 点激活 certbot.service。其实不需要这么频繁的更新证书,而且在更新证书的时候我们加了钩子来关闭和开启 Nginx 服务,所以最好是在凌晨没人访问网站的时候更新证书,我们稍微修改一下:
[Unit]
Description=Run certbot every 05:00

[Timer]
OnCalendar=*-*-* 05:00:00
Persistent=true

[Install]
WantedBy=timers.target
每天凌晨 5 点更新一次证书。因为只有过期前 30 天才会申请更新,所以前 60 天这个任务什么都没干。
保存修改以后需要重启定时器:
$ systemctl daemon-reload
$ systemctl restart certbot.timer
至此就算大功告成了!写起来一大篇,其实真正操作起来也就是半小时。最后祝大家都用上安全的 HTTPS!
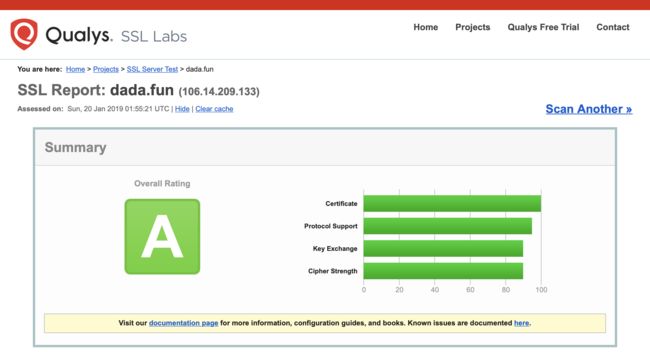
看一下安全检测:https://www.ssllabs.com/ssltest/analyze.html?d=dada.fun

