一、ElasticSearch简介
ElasticSearch是一个基于Lucene的搜索服务器。它提供了一个分布式多用户能力的全文搜索引擎,基于RESTful web接口。Elasticsearch是用Java语言开发的,并作为Apache许可条款下的开放源码发布,是一种流行的企业级搜索引擎。ElasticSearch用于云计算中,能够达到实时搜索,稳定,可靠,快速,安装使用方便。官方客户端在Java、.NET(C#)、PHP、Python、Apache Groovy、Ruby和许多其他语言中都是可用的。根据DB-Engines的排名显示,Elasticsearch是最受欢迎的企业搜索引擎,其次是Apache Solr,也是基于Lucene。
Elasticsearch是一个可用于构建搜索应用的成品软件,它最早由Shay Bannon创建并于2010年2月发布。现在已经非常流行,成为商业解决方案之外一个开源的重要选择。
Elasticsearch是一个基于Lucene的搜索服务器,提供一个分布式多用户能力的全文搜索引擎,基于RESTful web借口,使用Java开发,在Apache许可条款下开发源代码发布。做到准实时搜索、稳定、可靠、安装使用方便。
Elasticsearch具有合理的默认配置,默认就是分布式工作模式,使用对等架构(P2P)避免单点故障(SPOF),易于横向扩展新的节点。此外由于没有对索引中的数据结构强行添加限制,从而允许用户调整现有数据模型。
官网:https://www.elastic.co/cn/
Elasticsearch 2.x 版本与其他软件的兼容性:
地址: https://www.elastic.co/cn/support/matrix#matrix_compatibility
二、下载安装
前置条件:
安装JDK。
- 下载
https://www.elastic.co/cn/downloads/
如果要使用SpringBoot开发,请参考以下网址:
https://docs.spring.io/spring-data/elasticsearch/docs/3.2.0.RC3/reference/html/#preface.versions
进行安装:
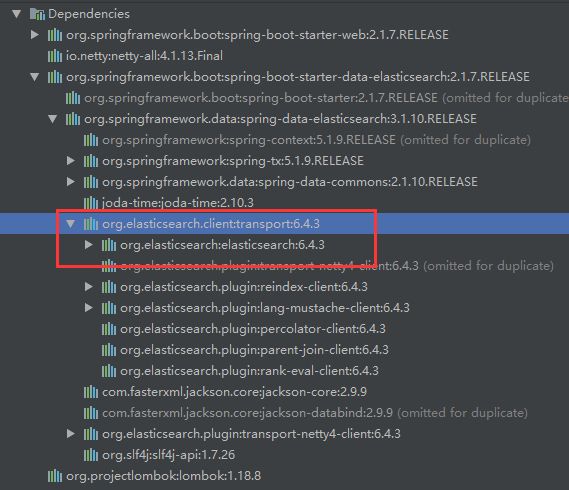
# 建议安装6.4.3版本,因为目前:SpringBoot2.1.17 支持最高6.4.3
[root@localhost ~]# wget https://artifacts.elastic.co/downloads/elasticsearch/elasticsearch-7.3.1-linux-x86_64.tar.gz
6.4.3安装:
下载地址:https://www.elastic.co/guide/en/elasticsearch/reference/6.4/zip-targz.html
# 下载
[root@localhost ~]# wget https://artifacts.elastic.co/downloads/elasticsearch/elasticsearch-6.4.3.tar.gz
# 解压文件
[root@localhost ~]# tar -xzf elasticsearch-6.4.3.tar.gz -C /usr/local/
# 切换目录
[root@localhost ~]# cd /usr/local/elasticsearch-6.4.3

# 配置自动创建索引 elasticsearch.yml
[root@localhost elasticsearch-6.4.3]# vi config/elasticsearch.yml
# 添加内容
network.host: 0.0.0.0
#action.auto_create_index: .monitoring*,.watches,.triggered_watches,.watcher-history*,.ml*
# 添加用户
[root@localhost bin]# useradd es
[root@localhost bin]# passwd es
# 设置权限
[root@localhost elasticsearch-6.4.3]#  chown -R es:es /usr/local/elasticsearch-6.4.3

# 使用es用户运行
[es@localhost elasticsearch-6.4.3]$ ./bin/elasticsearch
# 后台运行
[es@localhost elasticsearch-6.4.3]$ ./bin/elasticsearch -d
# 关闭服务
[es@localhost elasticsearch-6.4.3]$ kill -9 8988
测试访问:
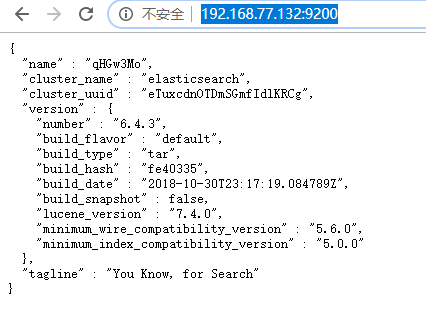
http://192.168.77.132:9200/
- 解压(7.3.1安装)
需安装JDK11
[root@localhost ~]# mkdir /usr/elasticsearch
[root@localhost ~]# tar -zxvf elasticsearch-7.3.1-linux-x86_64.tar.gz -C /usr/elasticsearch
[root@localhost ~]# cd /usr/elasticsearch/elasticsearch-7.3.1/
# 创建用户
[root@localhost bin]# useradd es
[root@localhost bin]# passwd es
# 设置权限
[root@localhost elasticsearch-7.3.1]# chown -R es:es /usr/elasticsearch/elasticsearch-7.3.1/
- yum安装(可按官网进行源配置)
# 配置更新源 /etc/yum.repos.d/elasticsearch.repo
[root@localhost ~]# vi /etc/yum.repos.d/elasticsearch.repo
# 内容
[elasticsearch-2.x]
name=Elasticsearch repository for2.x packages
baseurl=https://packages.elastic.co/elasticsearch/2.x/centos
gpgcheck=1
gpgkey=https://packages.elastic.co/GPG-KEY-elasticsearch
enabled=1
# 安装
[root@localhost ~]# yum install elasticsearch
# 添加开机自启
[root@localhost ~]# chkconfig --add elasticsearch
默认安装目录: /usr/share/elasticsearch/
三、服务启动
先使用以下命令启动:
[root@localhost elasticsearch-7.3.1]# ./bin/elasticsearch
没有错误,后台启动:
# 启动(使用es用户启动,非root)
[es@localhost elasticsearch-7.3.1]$ ./bin/elasticsearch  -d
OpenJDK 64-Bit Server VM warning: If the number of processors is expected to increase from one, then you should configure the number of parallel GC threads appropriately using -XX:ParallelGCThreads=N
[2019-08-25 08:53:34,886][INFO ][node                     ] [Peter Petruski] version[2.4.6], pid[4448], build[5376dca/2017-07-18T12:17:44Z]
[2019-08-25 08:53:34,886][INFO ][node                     ] [Peter Petruski] initializing ...
[2019-08-25 08:53:35,754][INFO ][plugins                  ] [Peter Petruski] modules [reindex, lang-expression, lang-groovy], plugins [], sites []
[2019-08-25 08:53:35,862][INFO ][env                      ] [Peter Petruski] using [1] data paths, mounts [[/ (rootfs)]], net usable_space [14gb], net total_space [16.9gb], spins? [unknown], types [rootfs]
[2019-08-25 08:53:35,863][INFO ][env                      ] [Peter Petruski] heap size [1015.6mb], compressed ordinary object pointers [true]
[2019-08-25 08:53:35,863][WARN ][env                      ] [Peter Petruski] max file descriptors [4096] for elasticsearch process likely too low, consider increasing to at least [65536]
[2019-08-25 08:53:38,389][INFO ][node                     ] [Peter Petruski] initialized
[2019-08-25 08:53:38,389][INFO ][node                     ] [Peter Petruski] starting ...
[2019-08-25 08:53:38,562][INFO ][transport                ] [Peter Petruski] publish_address {127.0.0.1:9300}, bound_addresses {[::1]:9300}, {127.0.0.1:9300}
[2019-08-25 08:53:38,567][INFO ][discovery                ] [Peter Petruski] elasticsearch/Xuv6H62NTJe2-tyvh0DzpA
[2019-08-25 08:53:41,768][INFO ][cluster.service          ] [Peter Petruski] new_master {Peter Petruski}{Xuv6H62NTJe2-tyvh0DzpA}{127.0.0.1}{127.0.0.1:9300}, reason: zen-disco-join(elected_as_master, [0] joins received)
[2019-08-25 08:53:41,857][INFO ][gateway                  ] [Peter Petruski] recovered [0] indices into cluster_state
[2019-08-25 08:53:41,861][INFO ][http                     ] [Peter Petruski] publish_address {127.0.0.1:9200}, bound_addresses {[::1]:9200}, {127.0.0.1:9200}
[2019-08-25 08:53:41,861][INFO ][node                     ] [Peter Petruski] started

# 关闭:
[es@localhost bin]$ ps -ef | grep elastic
[es@localhost bin]$ kill -9 37951

# 防火墙设置
[root@localhost elasticsearch]# firewall-cmd --permanent --add-port=9200/tcp
success
# 重启防火墙
[root@localhost elasticsearch]# firewall-cmd --reload
# 测试访问
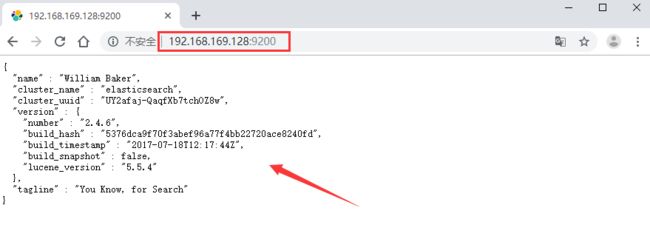
[es@localhost elasticsearch]$ curl http://localhost:9200
{
  "name" : "Evilhawk",
  "cluster_name" : "elasticsearch",
  "cluster_uuid" : "UY2afaj-QaqfXb7tchOZ8w",
  "version" : {
    "number" : "2.4.6",
    "build_hash" : "5376dca9f70f3abef96a77f4bb22720ace8240fd",
    "build_timestamp" : "2017-07-18T12:17:44Z",
    "build_snapshot" : false,
    "lucene_version" : "5.5.4"
  },
  "tagline" : "You Know, for Search"
}
四、外网访问配置
修改 config 下 elasticsearch.yml 配置
[es@localhost elasticsearch]$ vi config/elasticsearch.yml
# 内容
#远程访问IP 服务器的IP地址
 network.host: 0.0.0.0
# 设置为多个主机地址 可访问
network.bind_host: ["yourhost", "localhost"]
# 开启http访问
http.port: 9200
五、Marvel插件
Marvel插件:在簇中从每个节点汇集数据。这个插件必须每个节点都得安装。
Marvel是Elasticsearch的管理和监控工具,在开发环境下免费使用。它包含了一个叫做Sense的交互式控制台,使用户方便的通过浏览器直接与Elasticsearch进行交互。
- 安装
[es@localhost elasticsearch]$ ./bin/plugin install license
-> Installing license...
Trying https://download.elastic.co/elasticsearch/release/org/elasticsearch/plugin/license/2.4.6/license-2.4.6.zip ...
Downloading ...........................DONE
Verifying https://download.elastic.co/elasticsearch/release/org/elasticsearch/plugin/license/2.4.6/license-2.4.6.zip checksums if available ...
Downloading .DONE
Installed license into /usr/share/elasticsearch/plugins/license

[es@localhost elasticsearch]$ ./bin/plugin install marvel-agent
-> Installing marvel-agent...
Trying https://download.elastic.co/elasticsearch/release/org/elasticsearch/plugin/marvel-agent/2.4.6/marvel-agent-2.4.6.zip ...
Downloading ....................DONE
Verifying https://download.elastic.co/elasticsearch/release/org/elasticsearch/plugin/marvel-agent/2.4.6/marvel-agent-2.4.6.zip checksums if available ...
Downloading .DONE
@@@@@@@@@@@@@@@@@@@@@@@@@@@@@@@@@@@@@@@@@@@@@@@@@@@@@@@@@@@
@     WARNING: plugin requires additional permissions     @
@@@@@@@@@@@@@@@@@@@@@@@@@@@@@@@@@@@@@@@@@@@@@@@@@@@@@@@@@@@
* java.lang.RuntimePermission setFactory
* javax.net.ssl.SSLPermission setHostnameVerifier
See http://docs.oracle.com/javase/8/docs/technotes/guides/security/permissions.html
for descriptions of what these permissions allow and the associated risks.

Continue with installation? [y/N]y
Installed marvel-agent into /usr/share/elasticsearch/plugins/marvel-agent
- 配置
配置marvel.agent.exporters ( elasticsearch.yml)
[es@localhost elasticsearch]$ vi config/elasticsearch.yml

# 文件最后添加(用于集群es-mon1与es-mon2为主机名)
marvel.agent.exporters:
  id1:
    type: http
    host: ["http://es-mon1:9200", "http://es-mon2:9200"]
六、Shield插件
Shield是Elastic公司为ElasticSearch开发的一个安全插件。在安装此插件后,Shield会拦截所有对ElasticSearch的请求,并加上认证与加密,保障ElasticSearch及相关系统的安全性。
Shield是商业插件,需要ElasticSearch的商业许可。第一次安装许可的时候,会提供30天的免费试用权限。30天后,Shield将会屏蔽cluster health, cluster stats, index stats这几个API,其余功能不受影响。
https://www.elastic.co/cn/what-is/elastic-stack-security
elasticsearch 5.0以下的版本要用到权限控制的话需要使用shield。
下载地址: https://www.elastic.co/downloads/shield
5.0以上的版本则可以使用X-Pack,shield现在只是x-pack的一部分。
- shield安装
[root@localhost elasticsearch]# ./bin/plugin install shield
七、常见错误:
- Likely root cause: java.nio.file.NoSuchFileException: /usr/share/elasticsearch/config
直接在安装目录里去启动elasticsearch的话,elasticsearch是不会去/etc找配置文件的,elasticsearch只会在当前目录找config文件夹,如果安装成service的形式应该是可以找到配置文件。
cp -r /etc/elasticsearch /usr/share/elasticsearch/config
- Exception in thread "main" java.lang.RuntimeException: don't run elasticsearch as root.
原因:因为安全问题elasticsearch不让用root用户直接运行,所以要创建新用户
解决:创建一个单独的用户用来运行ElasticSearch
解决方案:
新建用户:
[root@localhost bin]# useradd es
[root@localhost bin]# passwd es
更改用户 es 的密码 。
新的 密码:
无效的密码: 密码少于 8 个字符
重新输入新的 密码:
passwd:所有的身份验证令牌已经成功更新。
创建目录:
[root@localhost bin]# mkdir -p /export/servers/data
[root@localhost bin]# mkdir -p /export/servers/logs
# 添加权限
[root@localhost ~]#  chown -R es:es /usr/elasticsearch/elasticsearch-7.3.1/
[root@localhost ~]# mkdir -p /export/servers/data
[root@localhost ~]# mkdir -p /export/servers/logs
[root@localhost bin]# chown -R es:es /export/servers/data
[root@localhost bin]# chown -R es:es /export/servers/logs
切换es用户命令:su es
启动:
[es@localhost bin]$ ./elasticsearch
- Likely root cause: java.nio.file.AccessDeniedException: /usr/share/elasticsearch/config
原因:当前用户没有执行权限
解决方法: chown linux用户名 elasticsearch安装目录 -R
[es@localhost elasticsearch]$ su root
密码:
[root@localhost elasticsearch]# chown -R es:es /usr/share/elasticsearch/
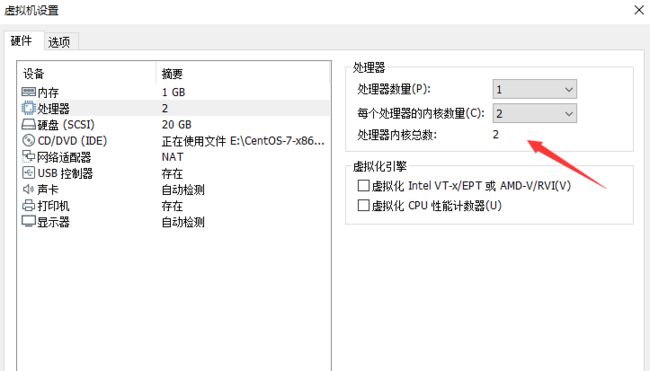
- OpenJDK 64-Bit Server VM warning: If the number of processors is expected to increase from one, then you should configure the number of parallel GC threads appropriately using -XX:ParallelGCThreads=N
在虚拟机的设置中,将处理器的处理器核心数量改成2,重新执行启动命令后,能够正常运行。若还是未能执行成功,可进一步将处理器数量也改成2。
future versions of Elasticsearch will require Java 11; your Java version from [/usr/lib/jvm/java-1.8.0-openjdk-1.8.0.181-3.b13.el7_5.x86_64/jre] does not meet this requirement
原因:必须使用java 11版本。bash: ./bin/elasticsearch: 权限不够
[root@localhost ~]# chmod 755 /usr/elasticsearch/elasticsearch-7.3.1/bin
- ERROR: [3] bootstrap checks failed
[1]: max file descriptors [4096] for elasticsearch process is too low, increase to at least [65535]
[2]: max number of threads [3802] for user [es] is too low, increase to at least [4096]
[3]: the default discovery settings are unsuitable for production use; at least one of [discovery.seed_hosts, discovery.seed_providers, cluster.initial_master_nodes] must be configured
解决:切换到root用户,编辑limits.conf 添加类似如下内容
[root@localhost bin]# vi /etc/security/limits.conf
添加如下内容:
* soft nofile 65536
* hard nofile 131072
* soft nproc 2048
* hard nproc 4096
解决:切换到root用户,进入limits.d目录下修改配置文件。
vi /etc/security/limits.d/90-nproc.conf
修改如下内容:
* soft nproc 1024
#修改为
* soft nproc 2048
解决:切换到root用户修改配置sysctl.conf
[root@localhost bin]# vi /etc/sysctl.conf
添加下面配置:
vm.max_map_count=655360
并执行命令:
[root@node2 elasticsearch-6.4.3]# sysctl -p
vm.max_map_count = 655360
说明:* 代表针对所有用户
noproc 是代表最大进程数
nofile 是代表最大文件打开数
- the default discovery settings are unsuitable for production use; at least one of [discovery.seed_hosts, discovery.seed_providers, cluster.initial_master_nodes] must be configured
修改:elasticsearch.yml
添加:
cluster.initial_master_nodes: ["node-1"]
保留一个节点。
- SpringBoot启动使用elasticsearch启动异常:java.lang.IllegalStateException: Received message from unsupported version: [6.4.3] minimal compatible version is: [6.8.0]
表示从不支持的版本接收到的消息:[6.4.3]最小兼容版本是:[6.8.0]
        org.springframework.boot
        spring-boot-starter-parent
        2.2.0.M5


    org.springframework.boot
    spring-boot-starter-data-elasticsearch
7.3.1必须使用:SpringBoot 2.2.0.M5版本
- OpenJDK 64-Bit Server VM warning: Option UseConcMarkSweepGC was deprecated in version 9.0 and will likely be removed in a future release.
解决:
更新JDK版本为11。
# 安装JDK
[root@localhost elasticsearch-7.3.1]# yum install -y java-11-openjdk java-11-openjdk-devel
# 默认安装路径
[root@localhost elasticsearch-7.3.1]# ls /usr/lib/jvm
# 使用alternatives切换Java版本
[root@localhost alternatives]# alternatives --config java

共有 2 个提供“java”的程序。

  选项    命令
-----------------------------------------------
*+ 1           java-1.8.0-openjdk.x86_64 (/usr/lib/jvm/java-1.8.0-openjdk-1.8.0.222.b10-0.el7_6.x86_64/jre/bin/java)
   2           java-11-openjdk.x86_64 (/usr/lib/jvm/java-11-openjdk-11.0.4.11-1.el7_7.x86_64/bin/java)

按 Enter 保留当前选项[+],或者键入选项编号:2
[root@localhost alternatives]# java -version
openjdk version "11.0.4" 2019-07-16 LTS
OpenJDK Runtime Environment 18.9 (build 11.0.4+11-LTS)
OpenJDK 64-Bit Server VM 18.9 (build 11.0.4+11-LTS, mixed mode, sharing)

# 卸载JDK1.8
[root@localhost elasticsearch-7.3.1]# yum remove java-1.8.0-openjdk* -y
- 不在 sudoers 文件中。此事将被报告。
使用sudo命令临时给用户test赋予root权限。
[root@localhost elasticsearch-6.4.3]# chmod u+w /etc/sudoers
[root@localhost elasticsearch-6.4.3]# vi /etc/sudoers
root    ALL=(ALL)   ALL
# 添加es
es    ALL=(ALL)       ALL
[root@localhost elasticsearch-6.4.3]# chmod u-w /etc/sudoers


