看了张宏伦的全栈学习视频,在此做个笔记。
一、创建项目环境
1.安装flask
2.工程目录
本人已安装Anaconda,所以直接创建项目easy_blog_flask。目录结构如下:
staic放css,图片等静态资源;templates放模板文件;run.py是程序入口;config.py配置参数。
3.创建数据库,建立表
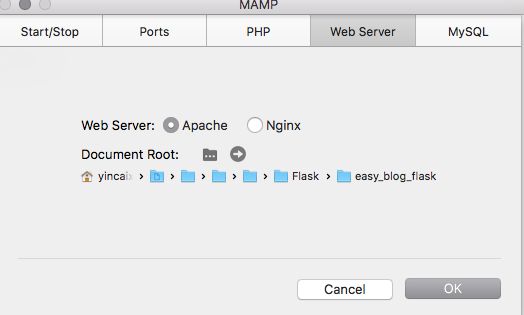
由于本人用mac进行开发,所以用mamp进行数据库的操作。安装好mamp后,启动mamp,点击start servers开启服务,在preferences进行端口以及项目路径设置。
端口:

路径:
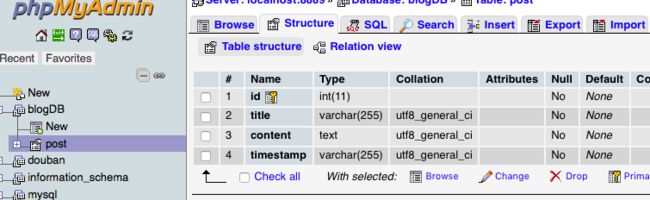
建立数据库:点击Open WebStart page,然后点击MySQL下的 phpMyAdmin。点击左边栏的New创建数据库blogDB,然后创建表post,如下:
4.开始代码
在config.py中进行一些项目的参数配置:
HOST="localhost"
PORT=8889
USER='root'
PASSWORD='root'
DATABASE='blogDB'
CHARSET='utf8'
在templates文件夹下创建界面,套用模板layout.html,首页index.html,文章列表list.html,文章详情post.html。在run.py中连接数据库:
import sys
from flask import *
import warnings
warnings.filterwarnings("ignore")
import pymysql
from config import *
import time
import numpy as np

app = Flask(__name__)
app.config.from_object(__name__)
#链接数据库
def connectdb():
    db=pymysql.connect(host=HOST,user=USER,passwd=PASSWORD,db=DATABASE,port=PORT,charset=CHARSET)
    db.autocommit(True)
    cursor=db.cursor()
    return (db,cursor)
#关闭数据库
def closedb(db,cursor):
    db.close()
    cursor.close()
#首页
@app.route('/')
def index():
    return render_template('index.html')

if __name__ =='__main__':
    app.run(debug=True)
5.测试
进入项目根目录,然后python run.py结果如下:
 * Running on http://127.0.0.1:5000/ (Press CTRL+C to quit)
 * Restarting with stat
 * Debugger is active!
 * Debugger PIN: 330-801-124
http://127.0.0.1:5000/ 就是项目根地址.
6.页面之间的跳转以及URL定义
比如首页index.html跳转到列表界面list.html,那么在index.html中:文章列表。而run.py中list函数为:
@app.route('/list')
def list():
    return render_template('list.html')
如上所见, route()装饰器把一个函数绑定到对应的 URL 上。这样index.html就可以跳转到list.html界面了。要在界面之间进行参数传递,可以在URL绑定相应的变量。比如在文字列表页面list.html跳转到文字详情界面post.html要传递文章id,那么在list.html界面要传递参数id:
    {% for item in arr %}
    第{{item[0]}}篇文章:


                    {{item[1]}}


             {{item[3]}}

    {% endfor %}
而在run.py中接收参数post_id,然后从数据看获取相应的文章,然后返回给post.html页面:
#文章详情页
@app.route('/post/')#参数
def post(post_id):
    (db,cursor) = connectdb()
    cursor.execute('select * from post where id=%s',post_id)
    item1=cursor.fetchone()
    item=np.array(item1)
    item[-1]=time.strftime('%Y-%m-%d %H:%M:%S',time.localtime(int(item[-1])))
    closedb(db,cursor)
    return render_template('post.html',item=item)
以上为什么要item=np.array(item1)因为从数据看获取的数据时tuple,不能进行更改,而时间要进行转换就要把tuple进行转换后才能更改,再传给post.html页面.
7. 模板渲染
post.html页面获取到相应的文章item过后,在此页面展示文章内容:
{% extends 'layout.html' %}
{% block body %}
文章详情
{{item[1]}}
{{item[-1]}}
{{item[2]}}
{% endblock %}
8.表单数据提交
在首页进行文章的编辑,然后提交给数据库,跳转到文字列表界面。那么在首页index.html页面:
用handel函数进行post表单提交,在run.py中接收数据:
#处理提交
@app.route('/handel',methods=['POST'])
def handel():
    data = request.form
    arr=[data['title'],data['content'],int(time.time())]
    print(arr)
    (db,cursor) = connectdb()
    cursor.execute("insert into post(title,content,timestamp) values(%s,%s,%s)",arr)
    db.commit()
    closedb(db,cursor)
    return redirect(url_for('list'))  #跳转到list.html界面
获取到文字结构然后插入数据库,跳转到list.html页面,展示文章列表,那么run.py中list函数就要从数据库获取所以数据,然后传递给list.html页面。run.py的list函数:
#文章列表页
@app.route('/list')
def list():
    (db,cursor) = connectdb()
    cursor.execute("select * from post")
    data=cursor.fetchall()
    closedb(db,cursor)
    arr=[]
    for i in range(0,len(data)):
        lists=np.array(data[i])
        lists[-1]=time.strftime('%Y-%m-%d %H:%M:%S',time.localtime(int(lists[-1])))
        arr.append(lists)
    return render_template('list.html',arr=arr)
在list.html页面渲染:
{% for item in arr %}
    第{{item[0]}}篇文章:


                    {{item[1]}}


             {{item[3]}}

    {% endfor %}