使用
Android studio自带的打包工具通过productFlavors来打多渠道包,效率太低,每次只变更了一个渠道名称,却要重头打包编译,后来看到 美团多渠道方案,确实很方便,参考别人的代码整理了份脚本,在此记录一下;
系统: mac 10.12
python: 3.x
要求:
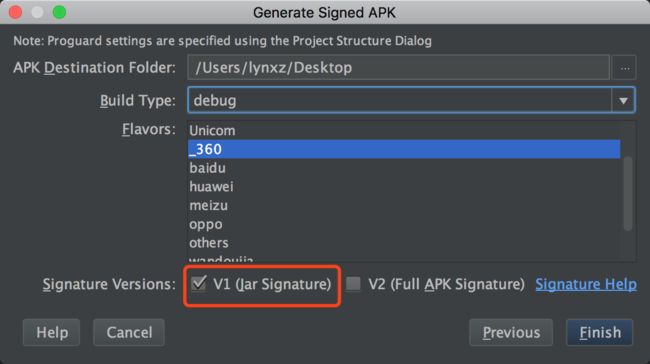
1. 只使用使用v1签名方式:
P.S. 若使用v2签名的,可以参考 这篇 ;
android{
    signingConfigs {
        release {
            keyAlias '******'
            keyPassword '******'
            storeFile file('***.jks')
            storePassword '******'
            v2SigningEnabled false // 禁用v2签名
        }
    }
    buildTypes {
        release {
            signingConfig signingConfigs.release
            ......
        }
    }
}
或者
generate_signed_apk
2. 第三方库的渠道名称可通过代码来设置
如我项目中使用的talkingdata,就可以先去查找 META_INF/ 中的渠道文件,若有则使用其定义的渠道名来初始化:
private void initTalkingData() {
    String channel = getChannel(this);
    String tdAppId = CommonUtils.getMetaValue(this, "TD_APP_ID");
    if (TextUtils.isEmpty(channel) || TextUtils.isEmpty(tdAppId)) {
        TCAgent.init(this);
    } else {
        TCAgent.init(this, tdAppId, channel);
    }
    TCAgent.setReportUncaughtExceptions(true);
}
使用
/**
    * 获取meta_data中指定的渠道号
    * 文件为: META-INF/tdchannel_{channelName}
    */
public static String getChannel(Context context) {
    ApplicationInfo appinfo = context.getApplicationInfo();
    String sourceDir = appinfo.sourceDir;
    String ret = "";
    ZipFile zipfile = null;
    try {
        zipfile = new ZipFile(sourceDir);
        Enumeration entries = zipfile.entries();
        while (entries.hasMoreElements()) {
                ZipEntry entry = ((ZipEntry) entries.nextElement());
                String entryName = entry.getName();
            // 文件名与python脚本定义的相匹配即可
            if (entryName.startsWith("META-INF/tdchannel")) {
                ret = entryName;
                break;
            }
        }
    } catch (Exception e) {
        e.printStackTrace();
    } finally {
        if (zipfile != null) {
            try {
                zipfile.close();
            } catch (IOException e) {
                e.printStackTrace();
            }
        }
    }

    String[] split = ret.split("_");
    if (split.length >= 2) {
        return ret.substring(split[0].length() + 1);
    } else {
        return "";
    }
}
python脚本
把下面的代码保存为 multi_channel.py 文件
#!/usr/bin/env python3
# -*- coding: utf-8 -*-

'''
根据美团多渠道打包方式,自动生成多渠道目录
要求apk是使用V1加密方式打包的;
python3 multi_channel -s srcApkPath -v versionCode
python3 multi_channel -srcFile=srcApkPath --version=versionCode
'''
import os
import shutil
import zipfile
import time
import sys
import getopt

startTime = time.time()

prefixInfo = "release"
srcApk = "./channelApk.apk"
version = ""  # 版本号
channelFilePath = "./channel"  # 渠道配置文件路径,每行定义一个渠道

toolInfo = '''参考美团多渠道打包方案1的打包工具;
默认使用当前目录下 "channel" 文件中定义的渠道信息,每行一个渠道名称,可通过 -c 参数来指定渠道文件路径;
要求apk使用的是v1签名方式,若使用v2则本工具无效;
python3 multi_channel -s srcApkPath -v 1.7 -p demo -c ./channel
-s --srcFile : 添加一个源apk,会依据该apk生成多渠道apk,并保存于 "./channelApk/" 中;
-v --version : 可选, 给生成的apk名称添加一个版本号,会自动添加前缀 _v{version},如 demo_v1.7.apk;
-p --prefix  : 可选, 给生成的apk名称添加一个前缀信息,默认为"release"
-c --channel : 定义要生成的渠道包信息,每行定义一个渠道名称,会依次生成对应的渠道包'''

opts, args = getopt.getopt(sys.argv[1:], "hs:v:p:c:", ["help", "srcFile=", "version=", "prefix=", "channel="])
for name, value in opts:
    if name in ("-s", "--srcFile"):  # 源文件名称
        srcApk = value
    elif name in ("-v", "--version"):  # 版本号
        version = "_v%s" % value
    elif name in ("-p", "--prefix"):  # apk名称前缀信息
        prefixInfo = value
    elif name in ("-c", "--channel"):  # 多渠道配置文件
        channelFilePath = value
    elif name in ("-h", "--help"):
        print(toolInfo)
        exit()

print("srcApk = %s , version = %s" % (srcApk, version))

isApkExist = os.path.exists(srcApk)
if not isApkExist or not os.path.isfile(srcApk):
    print("%s 源apk文件不存在,请重试" % srcApk)
    exit()

if not os.path.exists(channelFilePath) or not os.path.isfile(channelFilePath):
    print("%s channel渠道文件不存在或者不是有效的file,请检查后重试" % channelFilePath)
    exit()

pkgPath = os.path.join(os.getcwd(), "channelApk")  # 生成的多渠道apk存放的目录
print("生成的apk会被存放于 %s" % pkgPath)

isPathExist = os.path.exists(pkgPath)
isDir = os.path.isdir(pkgPath)
if not isPathExist or not isDir:
    os.makedirs(pkgPath)

f = open(channelFilePath, 'r', encoding='utf-8')
for line in f:
    channel_name = line.strip('\n')
    # print("当前正在生成渠道包: %s" % channel_name)
    channelPath = pkgPath + "/{prefix}_{channel}{version}.apk".format(prefix=prefixInfo, channel=channel_name,
                                                                      version=version)
    shutil.copy(srcApk, channelPath)
    zipped = zipfile.ZipFile(channelPath, 'a', zipfile.ZIP_DEFLATED)
    empty_channel_file = "META-INF/tdchannel_{channel}".format(channel=channel_name)
    # zipped.write("empty", empty_channel_file) # 使用这种方式需要在当前目录下存在empty文件
    zipped.writestr(empty_channel_file, data=channel_name)
diff = time.time() - startTime
print("耗时: %s" % diff)
使用时需要定义多渠道版本文件

channel.png
python3 multi_channel -s ./SrcApk.apk -v 1.0 -p demo -c ./channel
// 就会在 `./channelApk/` 中生成多渠道apk包,apk文件名类似: demo_baidu_v1.0.apk
// 若channel 文件位于当前目录下,则可省略  -c ./channel ,即:
python3 multi_channel -s ./SrcApk.apk -v 1.0 -p demo
当然,也可以给 multi_channel.py 添加执行权限,并将其所在目录添加到PATH 环境变量中,就不需要使用 python3 命令来执行了;
chmod a+x multi_channel.py //添加可执行权限

vi ~/.bash_profile
// 添加 multi_channel.py 文件所在目录到 PATH
export PATH = ****:$PATH // ****表示python脚本所在目录路径

source   ~/.bash_profile

multi_channel.py -s SrcApk.apk -c channel
shell.png