Android学习中网络是必不可少的一部分,甚至是重中之重。开发中可能我们会使用一些很成熟优秀的网络框架,如:OkHttp,Retrofit,Volley等。图片库:Fresco,Glide,Picasso,ImageLoader等。为了深入的学习一起来打造一个属于自己的网络库吧。
HttpURLConnetion
HttpURLConnetion是Java的一个类,当然Java的JDK中的也是有HttpURLConnetion类的,Android SDK中HttpURLConnection进行了很多修改,所以很多Android中和Java同名的类是不一样的。
我们可以用HttpURLConnetion来实现Android的网络请求。HttpURLConnetion类中设置了7种请求方法:OPTIONS,GET,HEAD,POST,PUT,DELETE,TRACE。
-
OPTIONS返回服务器针对特定资源所支持的HTTP请求方法。 -
HEAD向服务器索要与GET请求相一致的响应,只不过响应体(body)将不会被返回。这一方法可以在不必传输整个响应内容的情况下,就可以获取包含在响应消息头中的元信息。 -
GET向特定的资源发出请求。注意:GET方法不应当被用于产生副作用的操作中。其中一个原因是GET可能会被网络蜘蛛等随意访问。 -
POST向指定资源提交数据进行处理请求(例如提交表单或者上传文件)。数据被包含在请求体中,POST请求可能会导致新的资源的建立或已有资源的修改。 -
PUT向指定资源位置上传其最新内容。 -
DELETE请求服务器删除Request-URI所标识的资源。 -
TRACE回显服务器收到的请求,主要用于测试或诊断。
虽然有这么多的请求方式,但是常用的就只有GET和POST,图片(网络上的一个文件地址)的请求方式也正好是GET。
经过HttpURLConnetion简单的进行封装后得到
public class Net {
    static Net instance;
    private Net(){};
    public static Net getInstance(){
        if(instance==null){
            instance=new Net();
        }
        return instance;
    }

    public interface CallBack{
        void onCallBack(String result);
    }
    public interface BitmapCallBack{
        void onBitmapCallBack(Bitmap bitmap);
    }


    //get请求:这里的请求参数必须写在string url里面,通过URL realurl=new URL(url);来访问地址
    public void netGet(final String url ,final Map params,final CallBack callBack){
        final Handler handler=new Handler();
        new Thread(new Runnable() {
            @Override
            public void run() {
                try {
                    String requestData="";
                    if(params==null){
                        requestData=url;
                    }
                    if(params!=null){
                        requestData=url+"?";
                        for(Entry entry:params.entrySet()){
                            requestData+=URLEncoder.encode(entry.getKey(),"UTF-8")+
                                    "="+URLEncoder.encode(entry.getValue(),"UTF-8")+"&";
                        }

                    }
                    URL realurl=new URL(requestData);
                    HttpURLConnection connection= (HttpURLConnection) realurl.openConnection();
                    //貌似默认的是get请求
                    connection.setRequestMethod("GET");
                    //获取输入流(inputstream和outputstream是其他字节流的父类(抽象类)是不能直接new的
                    // 必须继承他,实例化它的子类)
                    InputStream in=connection.getInputStream();
                    ByteArrayOutputStream out=new ByteArrayOutputStream();
                    int a=0;
                    byte[] bytes=new byte[1024*20];
                    while ((a=in.read(bytes))!=-1){
                            out.write(bytes,0,a);
                    }
                    in.close();
                    out.flush();
                    out.close();
                    //toByteArray:返回这个流的当前内容作为一个字节数组。
                    final String result=new String(out.toByteArray());
                    handler.post(new Runnable() {
                        @Override
                        public void run() {
                            callBack.onCallBack(result);
                        }
                    });

                } catch (MalformedURLException e) {
                    e.printStackTrace();
                } catch (IOException e) {
                    e.printStackTrace();
                }

            }
        }).start();


    }

    //post请求,这里的请求参数需要方法对应的输出流里面去请求网络(httpurlconnection)对应的outputstream

    public void netPost(final String url, final Map params, final CallBack callBack){
        final Handler handler=new Handler();
        new Thread(new Runnable() {

            @Override
            public void run() {
                try{
                    InputStream in = null;
                    URL realurl = null;
                    String result = null;
                    String requestData="";
                    HttpURLConnection conn = null;
                    realurl = new URL(url);
                    conn = (HttpURLConnection)realurl.openConnection();
                    //post请求必须设置为true这下面的两个
                    conn.setDoOutput(true);
                    conn.setDoInput(true);
                    conn.setRequestMethod("POST");

                    if(params!=null){
                        for(Entry entry:params.entrySet()){
                                requestData+= "&"+
                                        URLEncoder.encode(entry.getKey(),"UTF-8")
                                        +"="
                                        + URLEncoder.encode(entry.getValue(),"UTF-8");
                        }
                    }
                    //取出网络对应的输出流,这里转化为了字符流
                    PrintWriter pw = new PrintWriter(conn.getOutputStream());
                    pw.print(requestData);
                    pw.flush();
                    pw.close();
//                    //这里也可以不转化为字符流,直接写出字节流
//                    OutputStream out=conn.getOutputStream();
//                    out.write(requestData.getBytes());
                    //获取对应的输入流,然后取到返回的数据
                    in = conn.getInputStream();
                    BufferedReader bin = new BufferedReader(
                            new InputStreamReader(in));
                    String line;
                    while ((line = bin.readLine()) != null) {
                        result += line;
                    }
                    in.close();
                    final String finalResult = result;
                    handler.post(new Runnable() {
                        @Override
                        public void run() {
                            //这里通过回调去处理返回的数据
                            callBack.onCallBack(finalResult);
                        }
                    });

                }catch(Exception eio){
                    eio.printStackTrace();
                }
            }
        }).start();

    }

    public void netBitmap(final String url, final BitmapCallBack callBack){
        final Handler handler=new Handler();
        new Thread(new Runnable() {
                @Override
                public void run() {
                    URL realurl = null;
                    try {
                        realurl = new URL(url);
                        HttpURLConnection connection = (HttpURLConnection) realurl.openConnection();
                        //貌似默认的是get请求
                        connection.setRequestMethod("GET");
                        connection.setDoInput(true);
                        connection.connect();
                        //获取输入流(inputstream和outputstream是其他字节流的父类(抽象类)是不能直接new的
                        // 必须继承他,实例化它的子类)
                        InputStream in = connection.getInputStream();
                        final Bitmap bitmap = BitmapFactory.decodeStream(in);
                        in.close();
                        handler.post(new Runnable() {
                            @Override
                            public void run() {
                                callBack.onBitmapCallBack(bitmap);
                            }
                        });
                    } catch (MalformedURLException e) {
                        e.printStackTrace();
                    } catch (ProtocolException e) {
                        e.printStackTrace();
                    } catch (IOException e) {
                        e.printStackTrace();
                    }
                }

                }).start();

        }

}
这样一个简单的GET,POST,图片加载就做好了,调用方式
Net.getInstance().netGet(url,null,new Net.CallBack() {
            @Override
            public void onCallBack(String result) {
                Gson gson=new Gson();
                Data datas=gson.fromJson(result,Data.class);
                if(datas!=null){
for(int i=0;iAndroid中网络不能在UI线程请求数据,所以在进行网络数据请求的时候必须要开启新的线程。考虑到APP可能有大量的网络数据请求,过多的数据请求,线程的不断创建都是对手机电量和流量的考验,这样的情况下我们需要考虑缓存,对于网络请求使用服务器端的缓存,对于图片则使用内存缓存和硬盘缓存,即节省了流量和电量,还提高的加载速度,能有效避免OOM的发生。
针对上面的问题我们需要有请求队列,缓存队列,线程池,内存缓存(LruCache),硬盘缓存(DiskLruCache)等。
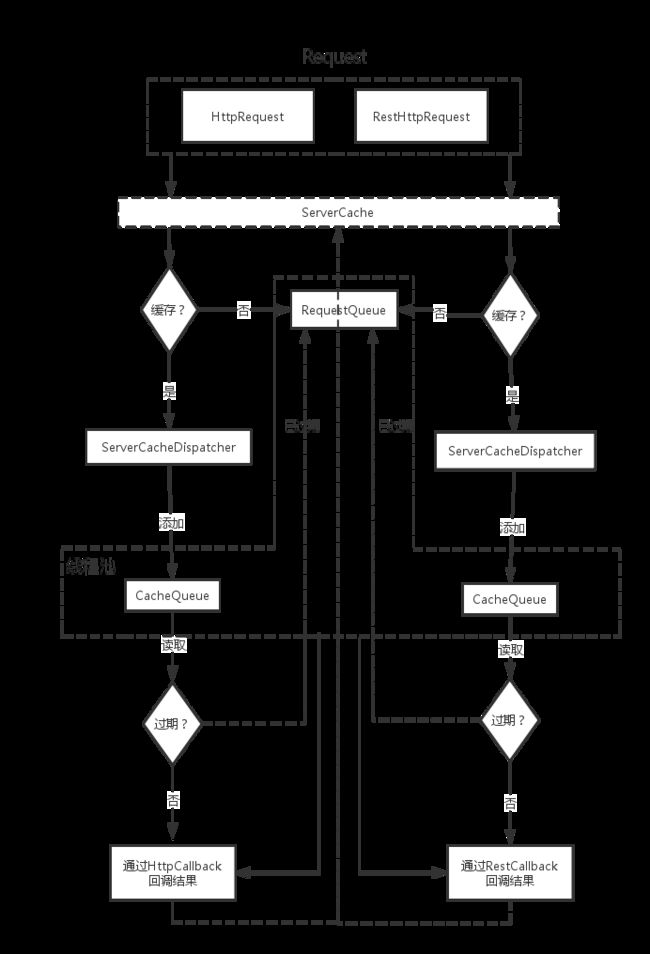
网络数据请求
流程图
重要的类
-
HttpRequest:网络请求的入口类,通过它发出请求,然后判断是否有缓存,如果有缓存加入缓存队列,如果没有缓存加入 请求队列。 -
ServerCache:数据缓存类,存储和读取网络数据。 -
ServerCacheDispatcher:缓存调度类,维持了缓存队列,负责缓存任务。 -
RequestDispatcher:内部维持了请求队列,负责网络请求任务。 -
RestHttpRequest:通过动态代理的方式模仿了Retrofit。
图片的加载
流程图
重要的类
-
HttpRequestImage:图片请求的入口类。 -
MemoryCache:内存缓存类,负责图片在内存中的读取和存储。 -
DiskCahce:硬盘缓存类,负责图片在硬盘中的读取和存储。 -
CacheDispatcher:缓存调度类,内存维持了缓存队列。
源码
由于项目代码量不少,不方便挨着贴代码出来讲解,下面是项目地址,欢迎start后clone下来看源码进行学习。
**项目地址 https://github.com/llxdaxia/RestHttp **,欢迎大家一起学习,探讨,后期架构和新需求持续更新。。。。

