本文参考了点击打开链接
1.首先新建dll项目。
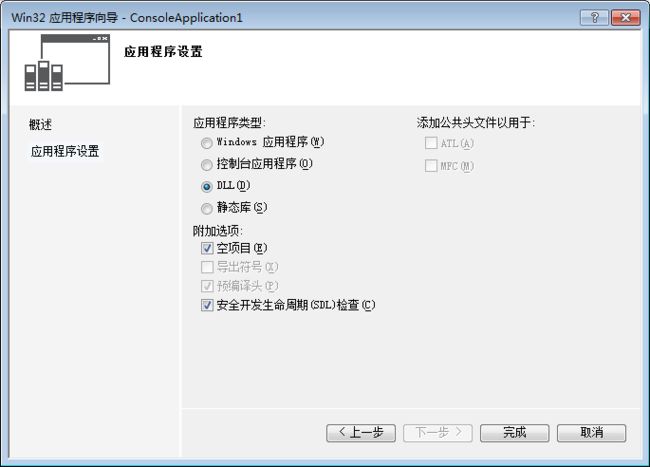
打开vs2013,新建一个Win32控制台程序(Win32项目创建dll无效),
应用程序类型:DLL
附加选项:空项目
点击完成。
2.添加头文件firstdll.h ,firstdll.cpp
内容如下:
*----------firstdll.h--------------------------------------------------------*/
#ifndef FIRSTDLL_H
#define FIRSTDLL_H
#ifdef DLLEXPORT
#define DLLOPTION _declspec(dllexport) //表明标有此宏定义的函数和类是dll文件的导出函数和类,是dll文件的对外接口
#else
#define DLLOPTION _declspec(dllimport) //表明标有此宏定义的函数和类的定义在dll文件中
#endif
class DLLOPTION CTest{
public:
virtual void sayHello(); //如果要在运行时动态链接导出类的成员函数必须声明为 virtual
};
extern "C" DLLOPTION CTest* getCTestInstance();
#endif
/*-----------firstdll.cpp-----------------------*/ //为firstdll.h中的导出函数和导出类的成员函数提供具体实现
#include
#define DLLEXPORT //定义了预处理器变量 DLLEXPORT
#include "firstdll.h"
using std::cout;
using std::endl;
void CTest::sayHello(){
cout << "Hello i come from dll"<
return;
}
CTest* getCTestInstance(){
return new CTest();
}
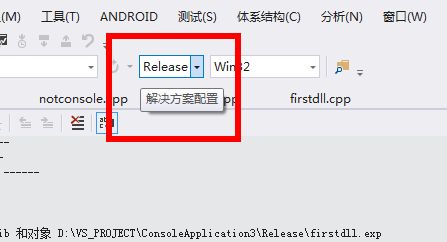
dll准备工作完成,可以在解决方案配置 中选择 Release
免去后期由Debug转为Release过程中出现的问题。
3.新建testdll工程,可以直接在本解决方案中新建项目,项目类型 Win32 控制台或者Win32应用 都可以。
代码如下:
下面我们要编写运行时动态链接的代码了。我们在项目的源文件目录中建一个test.cpp文件。代码如下:
/*----------------test.cpp----------------------------------------------------------*/
#include
#include
#include "firstdll.h" //注意在导入firstdll.h文件之前,没有在声明DLLEXPORT 预处理器变量
#pragma comment(linker, "/subsystem:console ")
//告诉连接器,程序运行的方式是 win32 console. /subsystem:console 是连接器选项
using std::cout;
using std::endl;
int main(){
LPWSTR lpws = L"firstdll.dll";
typedef CTest* (*dllProc)(); //定义一个函数指针类型,将来会用该类型的指针调用CTest* getCTestInstance()函数
HINSTANCE hdll = LoadLibrary(lpws); //winapi 参数是dll文件的变量名/全路径名+变量名 。返回dll文件的句柄
if(hdll != NULL){
//winapi 利用dll句柄和导出函数的函数名得到函数的入口地址。返回 void* 所以要强转
dllProc pdp = (dllProc)GetProcAddress(hdll,"getCTestInstance");
CTest* pCTest = (pdp)(); //执行导出函数 返回指向CTest类的指针
pCTest->sayHello(); //利用类指针执行导出类的成员函数
delete pCTest;
FreeLibrary(hdll); //望名生义 此winapi的作用是释放被动态链接到程序中的dll文件
cout << "the result of test is successful !!" <
}else{
cout << "Can not get handle of classdll.dll" << endl;
}
system("pause");
return 0;
}
4.然后需要将firstdll.h 文件拷贝到 testdll项目头文件中,注意是拷贝,不是简单添加
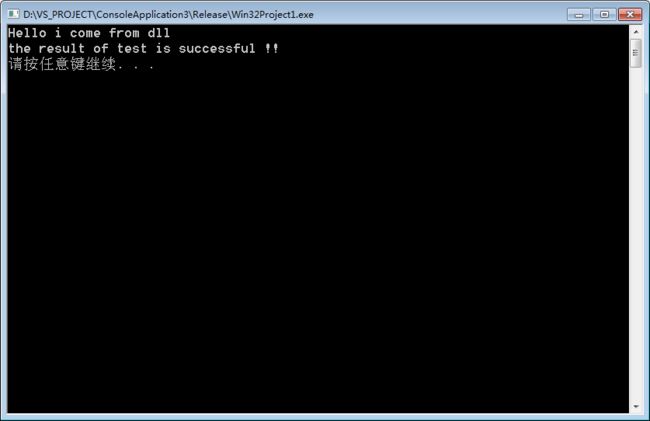
5.生成项目,进行调试,这个是成功运行的结果。
项目代码下载:http://pan.baidu.com/s/1slTIC6x
PS:
1.dll工程一定要 Win32控制台程序
2.本人新建的VS2015dll工程在树莓派exagear+wine+c++下无法调用,而使用VS2013则可以,大家如果遇到可以使用VS2013编译
(错误代码为:wine: Call from 0x5c5e488c to unimplemented function api-ms-win-crt-runtime-l1-1-0.dll._initialize_onexit_table, aborting
Can not get handle of classdll.dll.Press any key to continue...)
3.关于这段代码
#ifdef DLLEXPORT
#define DLLOPTION _declspec(dllexport) //表明标有此宏定义的函数和类是dll文件的导出函数和类,是dll文件的对外接口
#else
#define DLLOPTION _declspec(dllimport) //表明标有此宏定义的函数和类的定义在dll文件中
#endif
需要在firstdll.cpp中 定义#define DLLEXPORT 由此说明该类为导出函数,导出类。


